
Google Social Login
흐름
- Google Developer Console 설정
- 새로운 프로젝트를 생성하고,OAuth 2.0 클라이언트 ID를 받아야한다.
- 이 ID는 앱에서 Google 로그인을 요청할 때 사용된다.
- Expo 설정
- Expo는 Google 로그인을 위한 패키지를 제공한다. 해당 패키지를 설치하고 설정한다.
- 앱 내 로그인 흐름 구현
- 사용자가 ‘Google로 로그인’버튼을 클릭하면, Google 로그인 페이지로 리다이렉션된다.
- 사용자가 로그인에 성공하면 Google에서 앱으로 토큰을 반환한다. 이 토큰을 사용해 사용자의 정보를 가져올 수 있다.
- 토큰 저장 및 사용
- 로그인에 성공하면 받은 토큰을 앱 내에 저장하고, 이 토큰을 사용해 사용자의 정보나 다른 Google 서비스에 접근한다.
Expo 공식문서에서 Google로그인에 대한 자세한 정보와 구현 방법을 확인할 수 있다.
@react-native-google-signin/google-signin 라이브러리를 사용해 Google 인증을 Expo 프로젝트에 통합하는 방법 가이드를 제공한다.
시작
새로운 프로젝트에다가 해봅시다
npx create-expo-app google-login
google-login rn 프로젝트를 만들었다.
패키지 설정
npx expo install expo-auth-session expo-crypto expo-web-browser react-native-web react-dom @expo/webpack-config @react-native-async-storage/async-storage- expo-auth-session : 웹 브라우저를 사용해 사용자인증 관리하고, 토큰 반환받는데에 필요한 redirection, 상태 관리 로직처리해줌
- expo-crypto : 데이터 해싱
- expo-web-browser : 사용자에게 웹 브라우저 제공하여 외부 웹 페이지나 URL를 열 수 있게 해줌
- react-native-web : RN코드를 웹에서 실행할 수 있게 도와주는 라이브러리. 하나의 코드베이스로 iOS, Android, Web 앱을 개발할 수 있게 된다.
- react-dom : React 애플리케이션을 웹 페이지에 렌더링하는데 필요한 라이브러리
- @expo/webpack-config : Expo 프로젝트에서 Webpack구성을 사용자화하거나 확장할 때 사용되는 유틸리티
- @react-native-async-storage/async-storage : 로컬 디바이스에 데이터를 비동기적으로 저장하고 접근하는데 사용되는 라이브러리. 보통 세션 또는 간단한 데이터를 저장하는데 사용됨
Google Developer Console 설정
OAuth 웹 클라이언트 ID 만들기 - Google Workspace Migrate
console cloud google
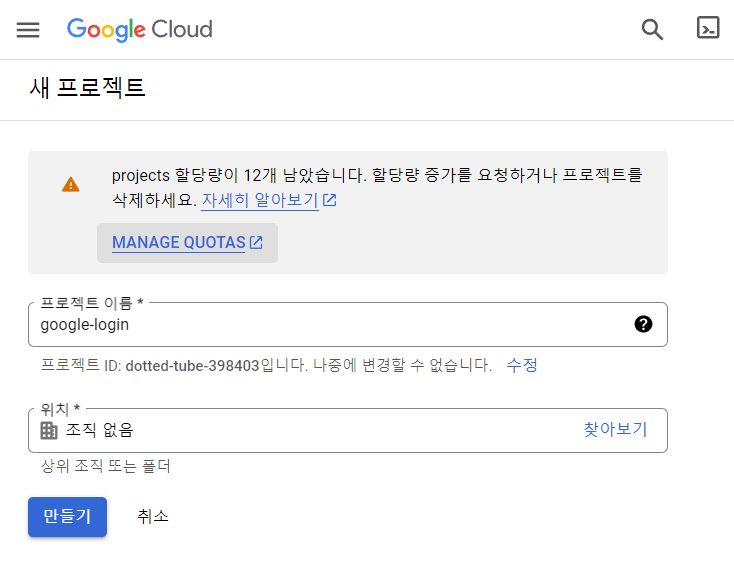
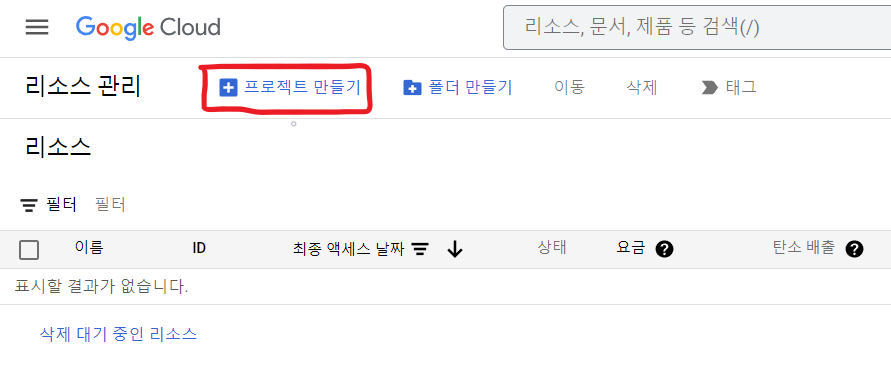 프로젝트를 만듭니다
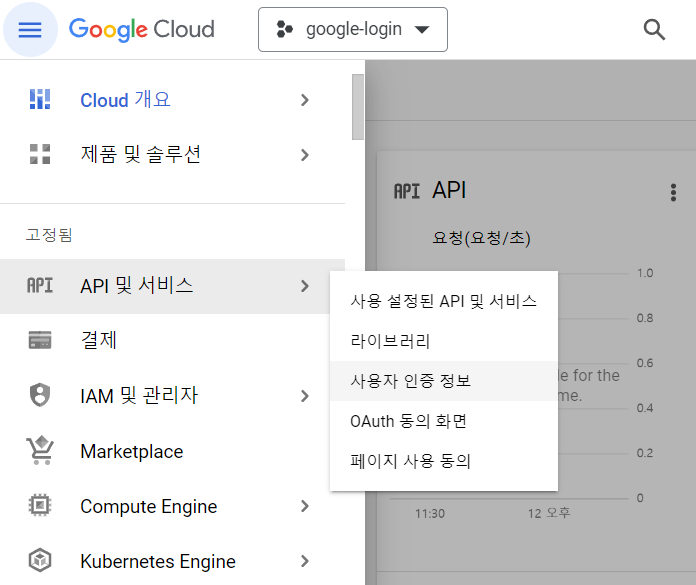
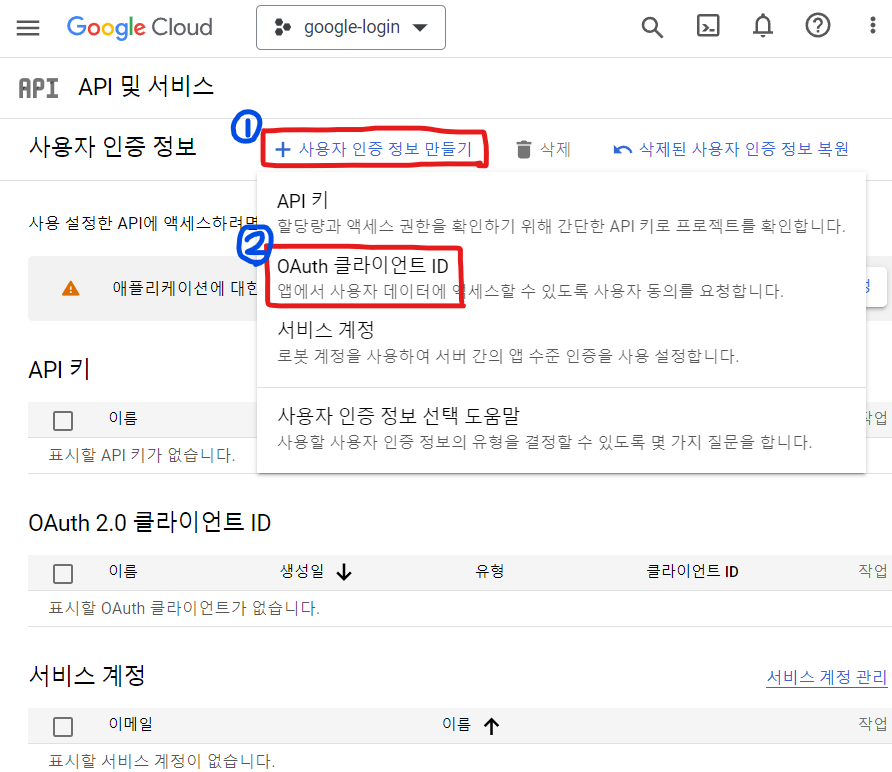
프로젝트에 들어간 뒤, 탭 → API 및 서비스 → 사용자 인증 정보로 들어간다.

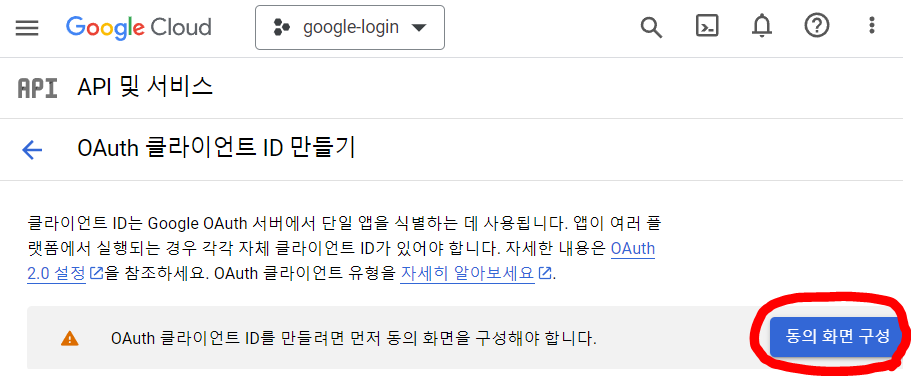
사용자 인증 정보 만들기 → OAuth 클라이언트 ID로 들어간다.
OAuth 클라이언트 ID 만들기

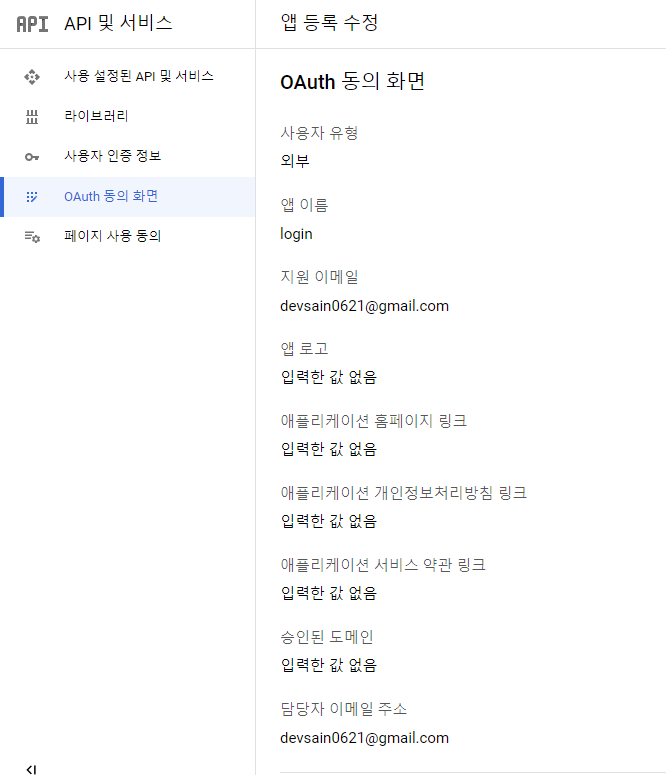
앱이름에 test, google 등 금지어가 있는것같애요 오류나면 앱이름 바꿔서 진행하시길 바랍니당
앱 로고 등 스킵하고 맨 밑에있는 개발자이메일에 본인 이메일 넣어주세요
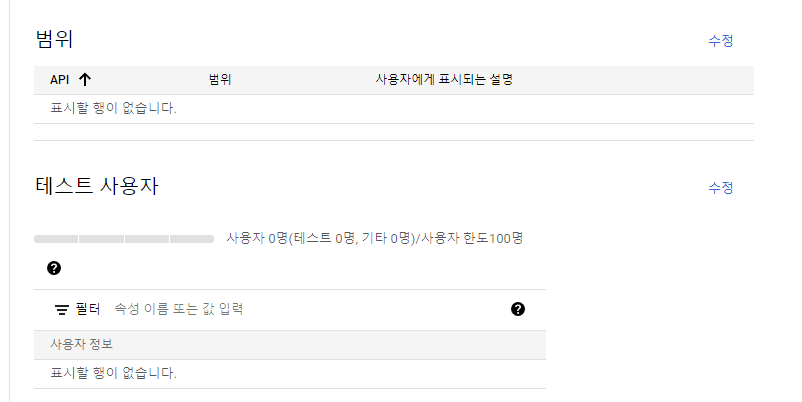
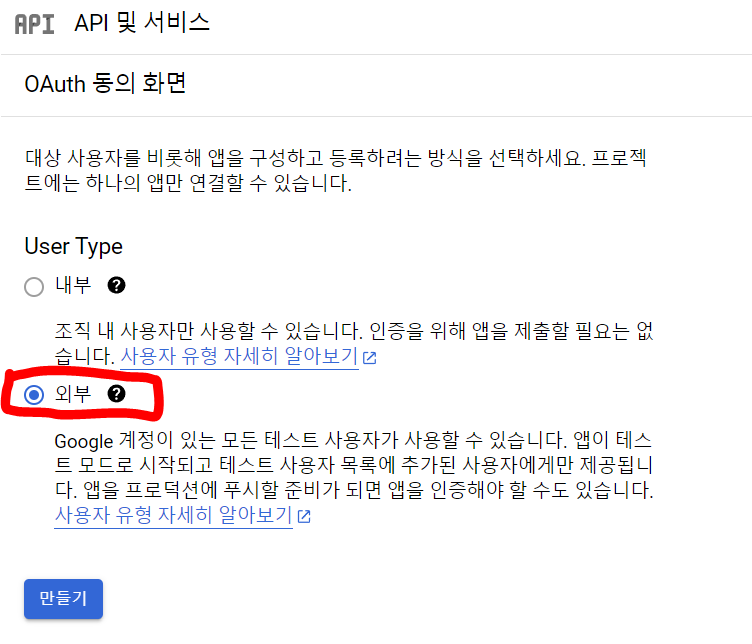
테스트라 범위, 테스트사용자 등 다 아무것도 입력안하고 진행했습니다
사용자 인증 정보 만들기
다시 사용자인증정보 → 정보만들기 → OAuth 클라이언트 ID ㄱㄱ
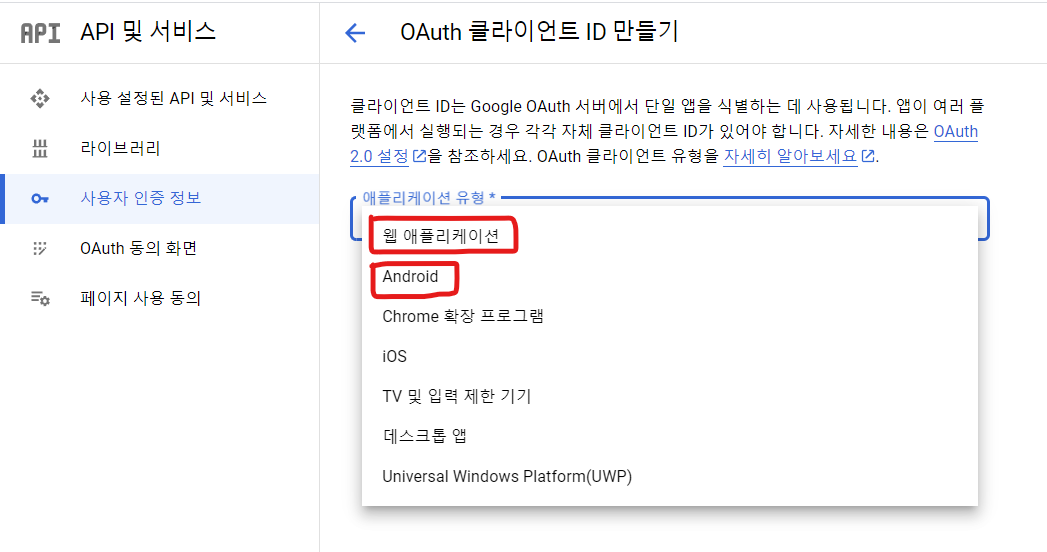
현재 제 프로젝트는 iOS를 지원안할거라 두개만 설정하겠습니다
일단 웹 애플리케이션부터 설정합시다
웹 애플리케이션

승인된 자바스크립트 원본, 리디렉션 URI가 필요하네요
vscode켜서 프로젝트에 들어와서
npx expo start 를 치면, http://localhost:19006이라고 나옴.

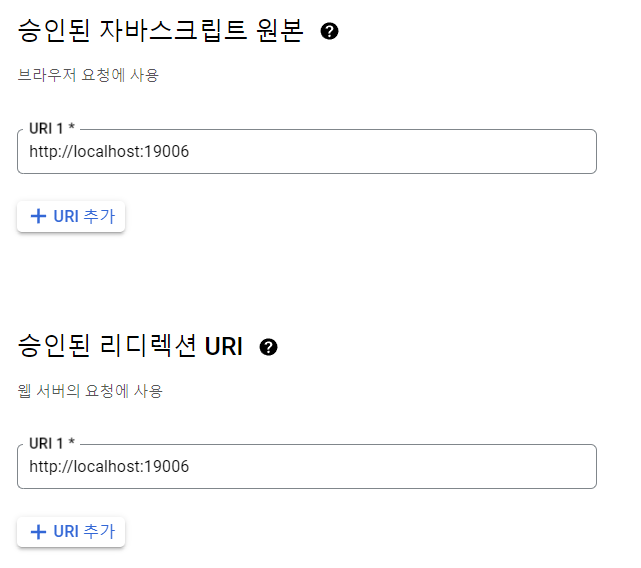
해당 URI에서의 접근은 허용시켜주고 만듭시다
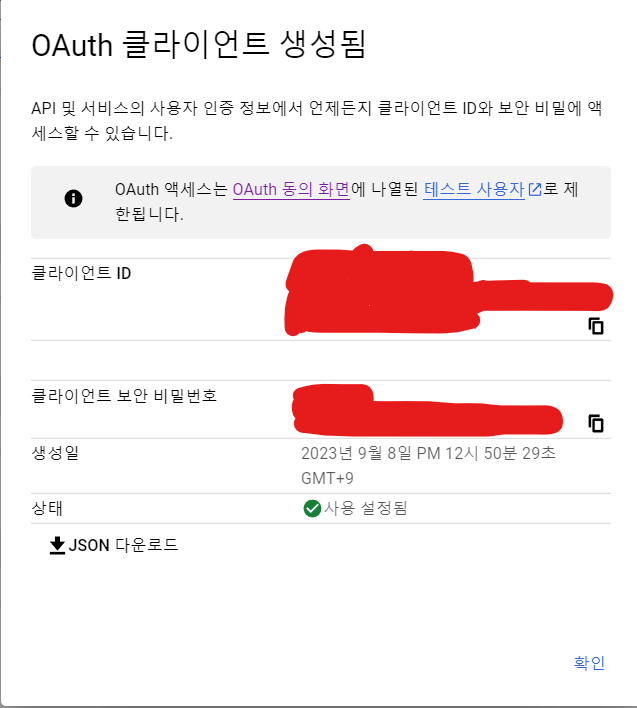
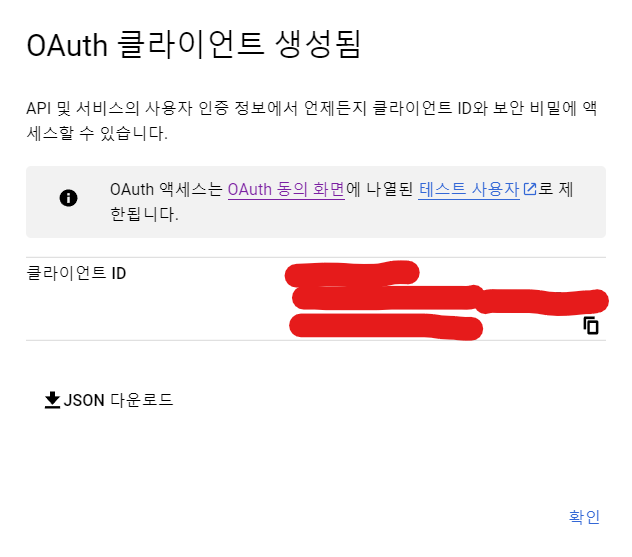
클라이언트 ID가 나오는데, 이걸 가지고있어야합니다.
json받아서 들고있으세요
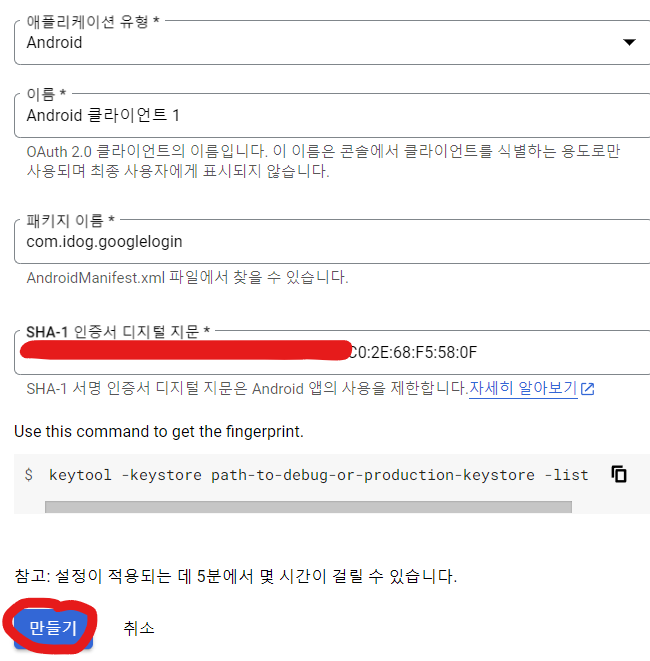
안드로이드
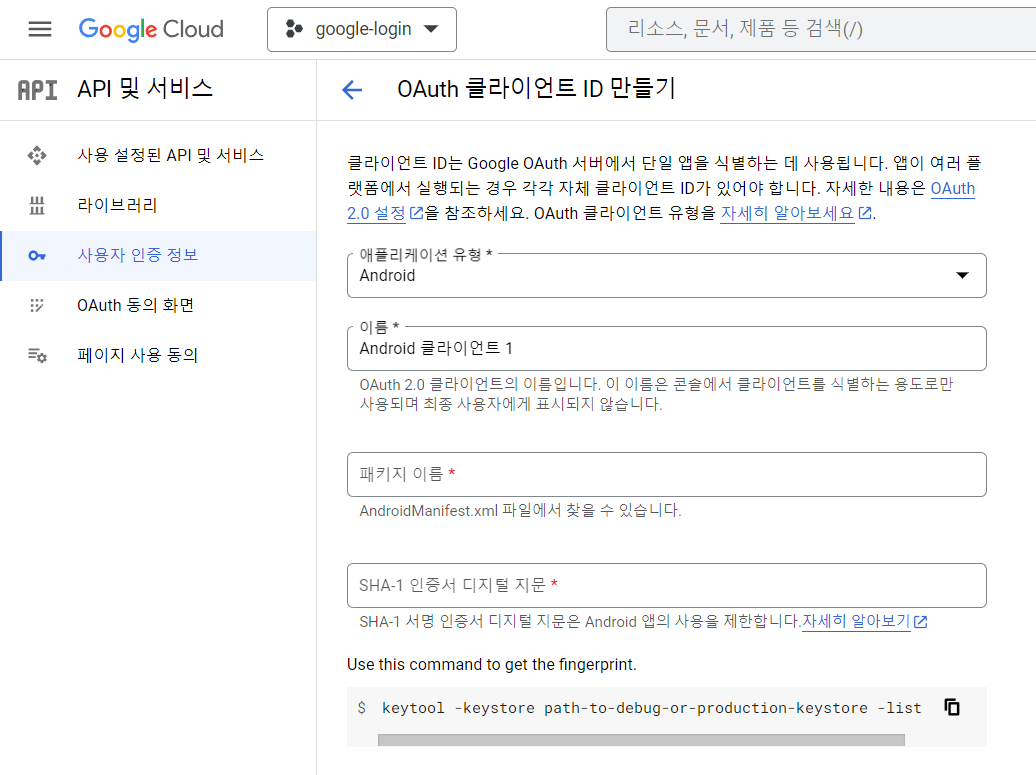
패키지이름과 sha-1 인증서 디지털 지문이 필요합니다.
패키지 이름

다시 vscode로 돌아와서 npx expo prebuild를 칩니다.
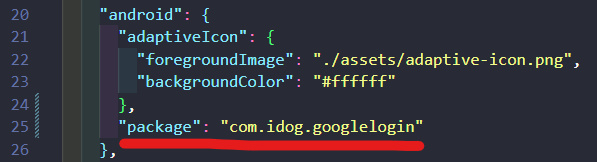
그러면 app.json에 package가 생기는데, com.idog.googlelogin 을 패키지 이름에 넣읍시다
SHA-1 인증서 디지털 지문
npx expo credentials:manager
예전엔 해당 명령어로 credentials를 매니징했던 것 같은데 버전이 업데이트되어 eas로 매니징해야함.

npm install -g eas-cli 으로 eas-cli 설치해주고

eas login 로그인합니다
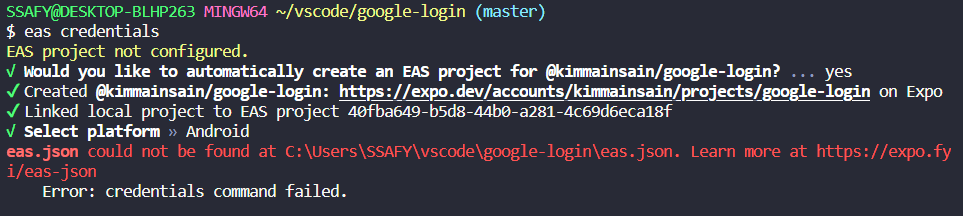
eas credentials로 매니징하려고 하는데, eas.json이 없다네요
프로젝트 root에 eas.json을 만들고,
{
  "build": {
    "release": {
      "distribution": "store"
    }
  }
}
를 넣어줍니다
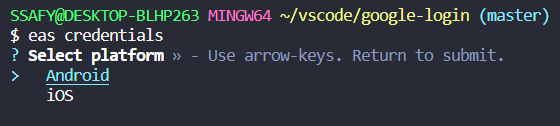
다시 명령어 실행, Android해야하니까 저것도 눌러줌

Keystore : Manage … 넹 플젝에 빌드해야지요. 선택합니다
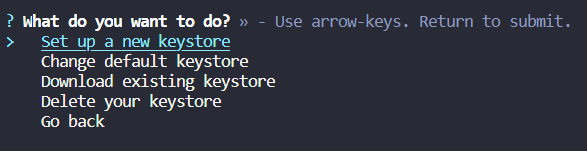
처음이니 새로운거 받읍시다 Set up a new keystore ㄱㄱ
Generate a new Android Keystore?질문이 나오는데, yes누르고

노랑이 sha1 긁어서 올립시다
얘도 저장해줍시다
코드구현
App.js에 해당 코드를 넣읍시다
import * as React from "react";
import * as WebBrowser from "expo-web-browser";
import * as Google from "expo-auth-session/providers/google";
import AsyncStorage from "@react-native-async-storage/async-storage";
import { Button, View, Text } from "react-native";
import { useEffect } from "react";

// 로그인 버튼 누르면 웹 브라우저가 열리고, 구글 로그인 페이지로 이동함.
WebBrowser.maybeCompleteAuthSession();
export default function App() {
  // 안드로이드, 웹 클라이언트 아이디를 사용하여 인증 요청 보냄.
  // Google 인증 요청을 위한 훅 초기화
  // promptAsync: 인증 요청 보냄.
  const [request, response, promptAsync] = Google.useAuthRequest({
    webClientId: "아까 웹 클라이언트 아이디",
    androidClientId: "아까 안드로이드 클라이언트 아이디",
  });

  const [userInfo, setUserInfo] = React.useState(null);

  // Google 로그인 처리하는 함수
  const handleSignInWithGoogle = async () => {
    const user = await AsyncStorage.getItem("@user");
    if (!user) {
      if (response?.type === "success") {
        // 인증 요청에 대한 응답이 성공이면, 토큰을 이용하여 유저 정보를 가져옴.
        await getUserInfo(response.authentication?.accessToken);
      }
    } else {
      // 유저 정보가 이미 있으면, 유저 정보를 가져옴.
      setUserInfo(JSON.parse(user));
    }
  };

  // 토큰을 이용하여 유저 정보를 가져오는 함수
  const getUserInfo = async (token) => {
    if (!token) return;
    try {
      const response = await fetch(
        "https://www.googleapis.com/oauth2/v3/userinfo",
        {
          headers: { Authorization: `Bearer ${token}` },
        }
      );
      const userInfoResponse = await response.json();
      // 유저 정보를 AsyncStorage에 저장, 상태업뎃
      await AsyncStorage.setItem("@user", JSON.stringify(userInfoResponse));
      setUserInfo(userInfoResponse);
    } catch (e) {
      console.log(e);
    }
  };

  const handleLogout = async () => {
    await AsyncStorage.removeItem("@user");
    setUserInfo(null);
  };

  // Google 인증 응답이 바뀔때마다 실행
  useEffect(() => {
    handleSignInWithGoogle();
  }, [response]);

  return (
    <View>
      <Text>{JSON.stringify(userInfo, null, 2)}</Text>
      <Button
        disabled={!request}
        title="Login"
        onPress={() => {
          promptAsync();
        }}
      />
      <Button title="logout" onPress={() => handleLogout()} />
    </View>
  );
}
그리고 먼저 웹부터 실행해봅시다
웹 테스트
npx expo start
w
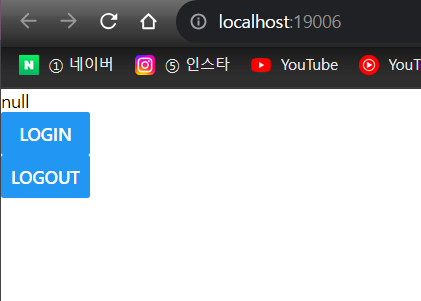
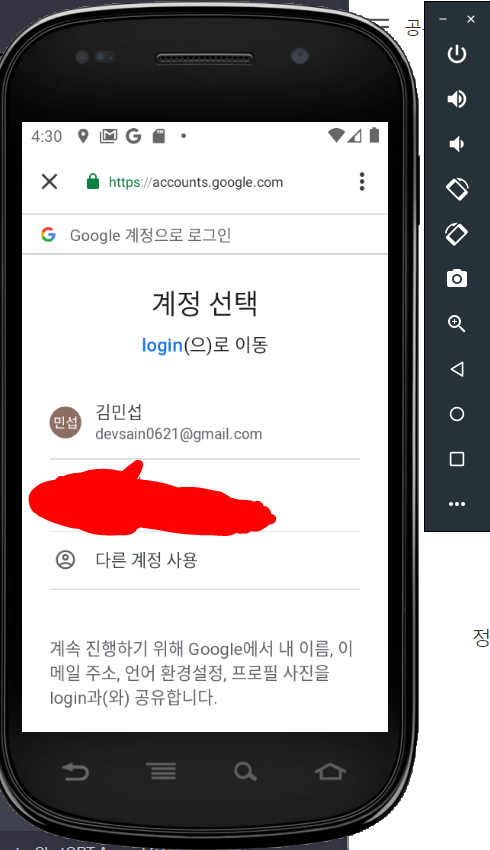
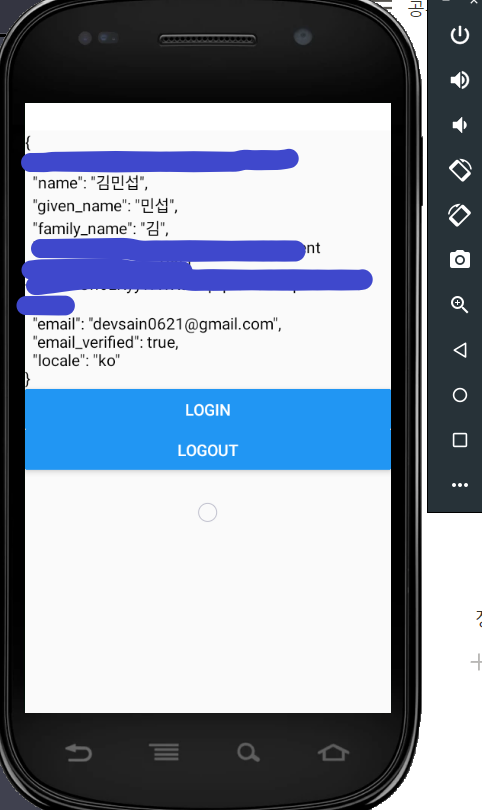
로그인버튼을 누르면?
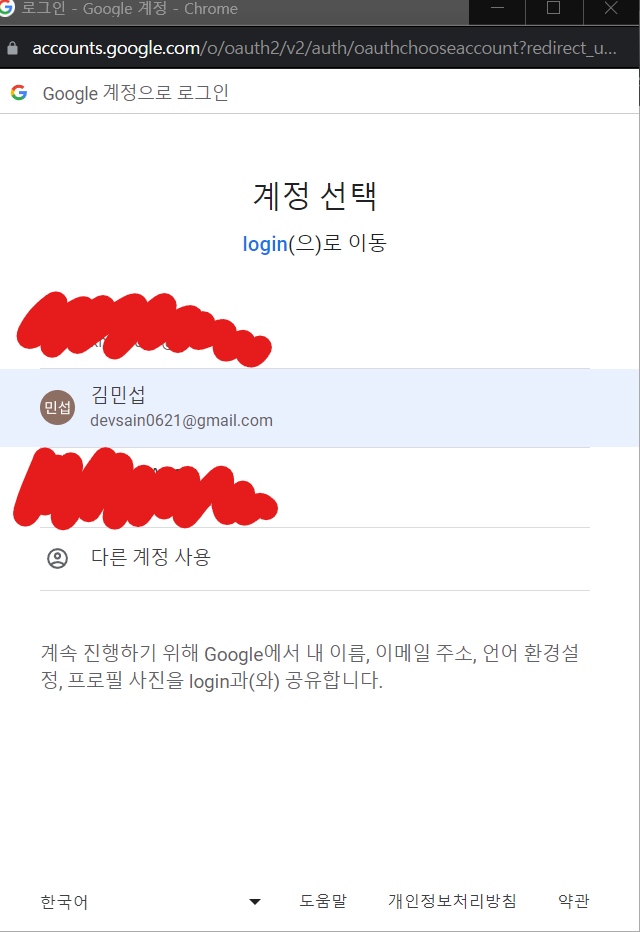
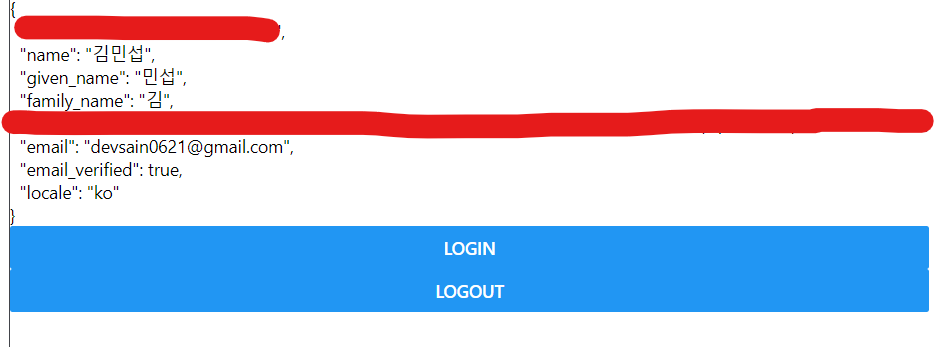
회원정보가 잘 나오고, 로그아웃누르면 null이 잘 나온다.
Android 테스트
npx expo run:android
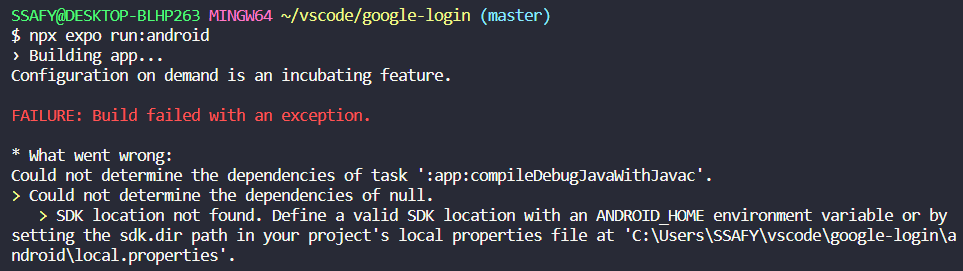
엥 에러가 났네요
sdk를 못찾고있음
해결방법 A
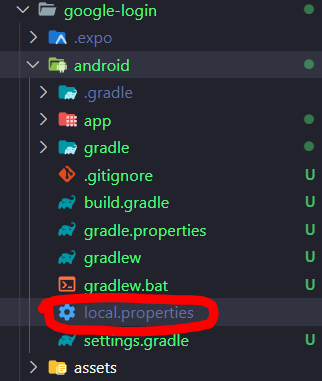
local.properties를 android에 생성해준다.
그 내부에 본인의 sdk경로를 입력해주면 됩니다

저같은경우 sdk.dir=C:\Users\SSAFY\AppData\Local\Android\Sdk 였어요
해결방법 B

환경변수 설정해줍니다. (A랑 경로가 다른건 집에서 해서그럼. 본인 sdk경로 작성해주세요)
그리고 path에 들어가 %ANDROID_HOME%\platform-tools를 새로 만들어주세요

adb — version 눌러서 잘 설치되어있는지 확인.
다시 npx expo run:android
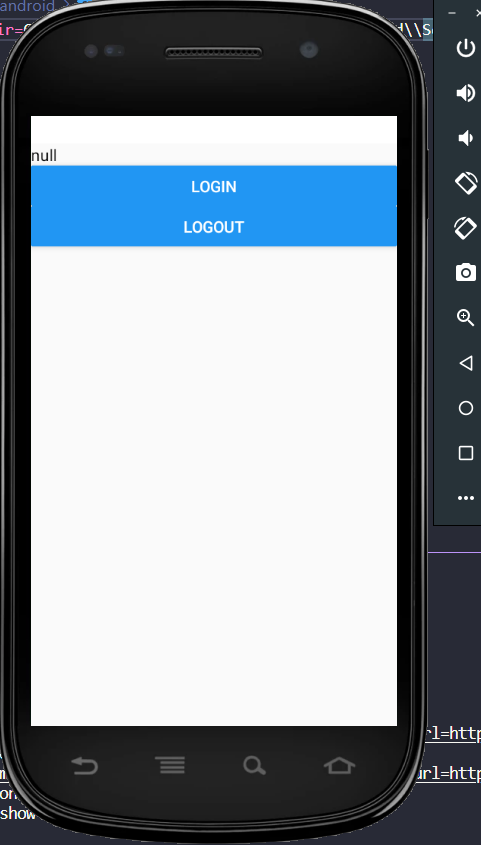
정상적으로 빌드가 되었고
잘 나오네용
끗

안녕하세요
질문. 웹으로 설정하면 구글 로그인이 잘됩니다!
반면 안드로이드로 똑같이 따라 하고 로그인 눌렀을 때 구글 화면에서 "액세스 차단됨: 승인 오류" 라고 뜨면 어떻게 해결해야하나요?