환경
Springboot 2.7.16
ckeditor5
jquery, javascript, thymeleaf
간단하게 로컬에서 ckeditor 사용해서 이미지를 업로드해보자.
ckeditor 연결
원하는 html 파일에 ckeditor 연결 (해당 포스팅에서는 cdn 사용)
//ckeditor
<script src="https://cdn.ckeditor.com/ckeditor5/12.4.0/classic/ckeditor.js"></script>
//이미지 업로드 어댑터
<script src="https://ckeditor.com/apps/ckfinder/3.5.0/ckfinder.js"></script><script>
let myEditor;
ClassicEditor
.create(document.querySelector('#editor'), {
ckfinder: {
uploadUrl : '{자기가 만든 컨트롤러 url}'
}
})
.then(editor => {
myEditor = editor;
console.log('Editor was initialized');
})
.catch(error => {
console.error(error);
});
</script>
연결하면 나오는 화면이다.
API 만들기
화면연결 해줬으면 API를 만들자.
첫번째로는 config 파일을 하나 만들어줘야 한다.
ckeditor는 retrun 값으로 uploaded와 url값을 json형식으로 받는데
controller가 modelAndView를 통해 json 형식으로 return 할 수 있도록 해줘야한다.
@Configuration
public class WebConfig implements WebMvcConfigurer {
    @Bean
    MappingJackson2JsonView jsonView() {
        //
        return new MappingJackson2JsonView();
    }
}
config 파일을 만들어줬으면 컨트롤러를 만들자
@PostMapping("/upload")
    public ModelAndView upload(MultipartHttpServletRequest request) {
        ModelAndView mav = new ModelAndView("jsonView");

        String uploadPath = photoUtil.ckUpload(request);

        mav.addObject("uploaded", true);
        mav.addObject("url", uploadPath);
        return mav;
    }
ck는 이미지 업로드 후 이미지를 표시하기 위해 uploaded와 url을 json으로 받아야 하므로
ModelAndView를 사용하여 json 형식으로 보내기 위해 modelAndView를 만들어준다.
여기서 jsonView라는 이름은 위에서 @Bean으로 등록해준 jsonView 메서드가 있기 때문이다.
@Component
public class PhotoUtil {

    public String ckUpload(MultipartHttpServletRequest request) {

        MultipartFile uploadFile = request.getFile("upload");

        String fileName = getFileName(uploadFile);

        String realPath = getPath(request);

        String savePath = realPath + fileName;

        String uploadPath = request.getContextPath() + "/upload/" + fileName;

        uploadFile(savePath, uploadFile);

        return uploadPath;
    }

    private void uploadFile(String savePath, MultipartFile uploadFile) {
        File file = new File(savePath);
        try {
            uploadFile.transferTo(file);
        } catch (IOException e) {
            throw new RuntimeException("Failed to upload the file", e);
        }
    }

    private String getFileName(MultipartFile uploadFile) {
        String originalFileName = uploadFile.getOriginalFilename();
        String ext = originalFileName.substring(originalFileName.lastIndexOf("."));
        return UUID.randomUUID() + ext;
    }

    private String getPath(MultipartHttpServletRequest request) {
        // 실제 파일 저장 경로
        String realPath = request.getServletContext().getRealPath("/upload/");
        Path directoryPath = Paths.get(realPath);
        if (!Files.exists(directoryPath)) {
            try {
                Files.createDirectories(directoryPath);
            } catch (IOException e) {
                throw new RuntimeException("Could not create upload directory", e);
            }
        }
        return realPath;
    }

}
다음은 PhotoUitl이다.
ckeditor에서 파일을 보낼 때 upload 라는 이름으로 넘어오기 때문에 request.getFile("upload")로 받아주고
파일의 이름을 뽑고, 거기서 파일의 확장자를 뽑고, 파일의 이름이 겹칠수도 있으니 UUID로 랜덤값으로 변경 후 확장자 이름을 붙여준다.
이후에는 이미지를 저장하기 위해 현재 경로를 알아내고, 이미지를 저장해줄 경로를 지정,
그다음에 이미지 파일을 불러오게 하는 uploadPath를 지정 하고
파일을 업로드 한다.
결과
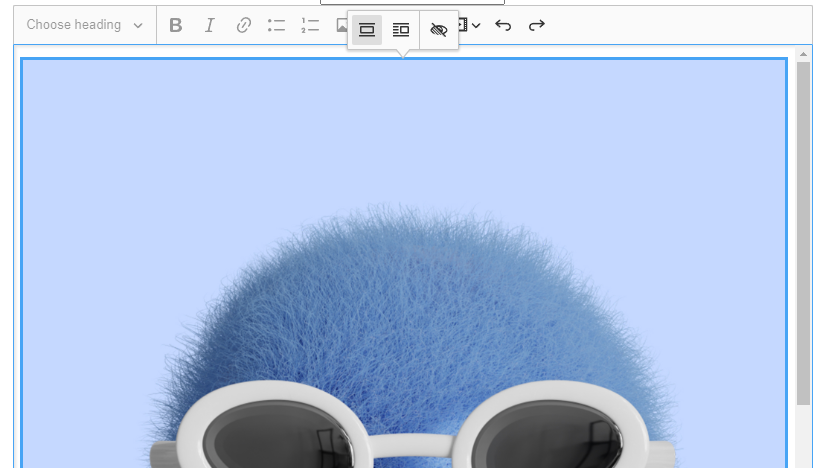
업로드가 잘 된것을 확인할 수 있다.
로컬에서만 간단하게 테스트 해보는 용도로 작성한것이라서 실제 서버로 올렸을 때는 수정해줘야 할 부분이 많을것 같다.
URL 로 접근은 loaclhost:8082/upload/{fileName} 으로 접근 가능하고
윈도우 기준 C/Users/{userName}/AppData/Local/Temp/tomcat-어쩌구저쩌구
에서 파일 확인이 가능하다
