
Intro
우여곡절 끝에 FastAPI를 배포할 수 있는 리소스가 생겼다.
이전 글에서 업로드한 Repository를 바탕으로 Oracle Cloud Instance에 FastAPI 앱을 배포해보자.
필자는 Oracle cloud를 사용하지만 다른 cloud service들도 Oracle과 큰 차이가 없으니 천천히 해보길 바란다.
Oracle cloud에 관한 내용은 여기에서 확인할 수 있다.
Verse
FastAPI를 배포할 리소스(필자의 경우 Oracle cloud instance)를 확보했다는 가정으로 글을 작성하겠다.
먼저 배포하고자 하는 Instance에 접속하자.
$ ssh ubuntu@{Public IP address} -i .\ssh-key-202x-xx-xx.key
ubuntu@mini-project-instance:~$ whoami
ubuntu
Docker 설치
Docker를 이용하기 때문에 공식 홈페이지 내용을 참고하여 Docker를 설치해주자.
필요한 명령어를 아래에 적어놨지만, 아래 내용으로 정상적으로 진행되지 않는 경우 공식 홈페이지를 참고하자.
- Set up Docker's apt repository.
# Add Docker's official GPG key:
sudo apt-get update
sudo apt-get install ca-certificates curl gnupg
sudo install -m 0755 -d /etc/apt/keyrings
curl -fsSL https://download.docker.com/linux/ubuntu/gpg | sudo gpg --dearmor -o /etc/apt/keyrings/docker.gpg
sudo chmod a+r /etc/apt/keyrings/docker.gpg

# Add the repository to Apt sources:
echo \
  "deb [arch=$(dpkg --print-architecture) signed-by=/etc/apt/keyrings/docker.gpg] https://download.docker.com/linux/ubuntu \
  $(. /etc/os-release && echo "$VERSION_CODENAME") stable" | \
  sudo tee /etc/apt/sources.list.d/docker.list > /dev/null
sudo apt-get update- Install the Docker packages.
sudo apt-get install docker-ce docker-ce-cli containerd.io docker-buildx-plugin docker-compose-plugin- Verify that the Docker Engine installation is successful by running the
hello-worldimage.
sudo docker run hello-world정상적으로 설치됐다면 아래와 같은 출력을 확인할 수 있을 것이다.
Hello from Docker!
This message shows that your installation appears to be working correctly.

To generate this message, Docker took the following steps:
 1. The Docker client contacted the Docker daemon.
 2. The Docker daemon pulled the "hello-world" image from the Docker Hub.
    (amd64)
 3. The Docker daemon created a new container from that image which runs the
    executable that produces the output you are currently reading.
 4. The Docker daemon streamed that output to the Docker client, which sent it
    to your terminal.

To try something more ambitious, you can run an Ubuntu container with:
 $ docker run -it ubuntu bash

Share images, automate workflows, and more with a free Docker ID:
 https://hub.docker.com/

For more examples and ideas, visit:
 https://docs.docker.com/get-started/
Reference - Install Docker Engine on Ubuntu
매번 docker 명령어를 입력할 때 sudo를 붙여줘도 되지만 편의상 root가 아닌 유저에서 docker를 관리할 수 있게 설정해주자.
이를 설정하지 않고 ubuntu 유저에서 docker images 명령어를 실행해보면 아래와 같은 오류를 만날 수 있을 것이다.
permission denied while trying to connect to the Docker daemon socket at unix:///var/run/docker.sock: Get "http://%2Fvar%2Frun%2Fdocker.sock/v1.24/images/json": dial unix /var/run/docker.sock: connect: permission denied설정 방법은 간단하다.
sudo usermod -aG docker $USER
newgrp docker
Reference - Linux post-installation steps for Docker Engine
FastAPI 배포
먼저 Github repository에 있는 FastAPI 코드를 가져오자.
git clone https://github.com/soohyunme/fastapi-app
cd fastapi-app
아래와 같이 코드가 잘 받아진 것을 확인할 수 있다.
$ ls
Dockerfile  main.py  requirements.txt
Docker image build
로컬에서 진행했던 것과 동일하게 Docker 이미지를 빌드해보자.
docker build -t fastapi .아래 명령어를 통해 이미지가 정상적으로 빌드됐는지 확인할 수 있다.
$ docker images
REPOSITORY   TAG       IMAGE ID       CREATED       SIZE
fastapi      latest    f08868f2d0cd   4 hours ago   1.02GB
Docker container 실행
이제 docker run 명령을 통해 fastAPI를 Oracle instance에 배포해보자.
컨테이너가 정상적으로 생성됐다면 FastAPI 서버가 잘 떠있는지 확인해보자.
$ docker run -itd --name fastapi-app -p 8000:8000 fastapi
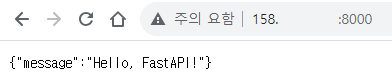
f9757944d2e5ee376eacd159c266f191ddbd713f05a58fc53d2d1b7fa8595820웹브라우저에서 예약해두었던 Public IP의 8000번 포트에 접근하면 아래와 같은 화면을 만날 수 있다. (Instance의 Public IP를 잊어버렸다면, Instance detail 페이지로 돌아가 Public IP address 옆에 있는 copy를 누르면 된다.)
컨테이너의 로그를 통해 접속을 확인할 수 있다.
$ docker logs fastapi-app
INFO:     Started server process [1]
INFO:     Waiting for application startup.
INFO:     Application startup complete.
INFO:     Uvicorn running on http://0.0.0.0:8000 (Press CTRL+C to quit)
INFO:     211.xxx.xxx.xxx:4382 - "GET / HTTP/1.1" 200 OK
혹시 로그에는 정상적으로 서버가 띄워졌는데, 웹 브라우저로 접근이 안된다면 포트가 제대로 열려있는지 확인해보자.
포트 설정에 관한 내용은 여기에서 확인할 수 있다.
Outro
이제 원하는대로 API를 개발하면 된다.
하지만 현재는 새로운 기능이 추가될 때마다 FastAPI를 수동으로 다시 배포해줘야 한다.
다음 글에서는 번거로운 배포 작업을 자동화하는 배포 프로세스를 구축해보자.