가장 기억 남는 부분은 역시나 게시글 업로드 페이지 이다.
앨범 이미지 추가 기능(feat. 삭제)
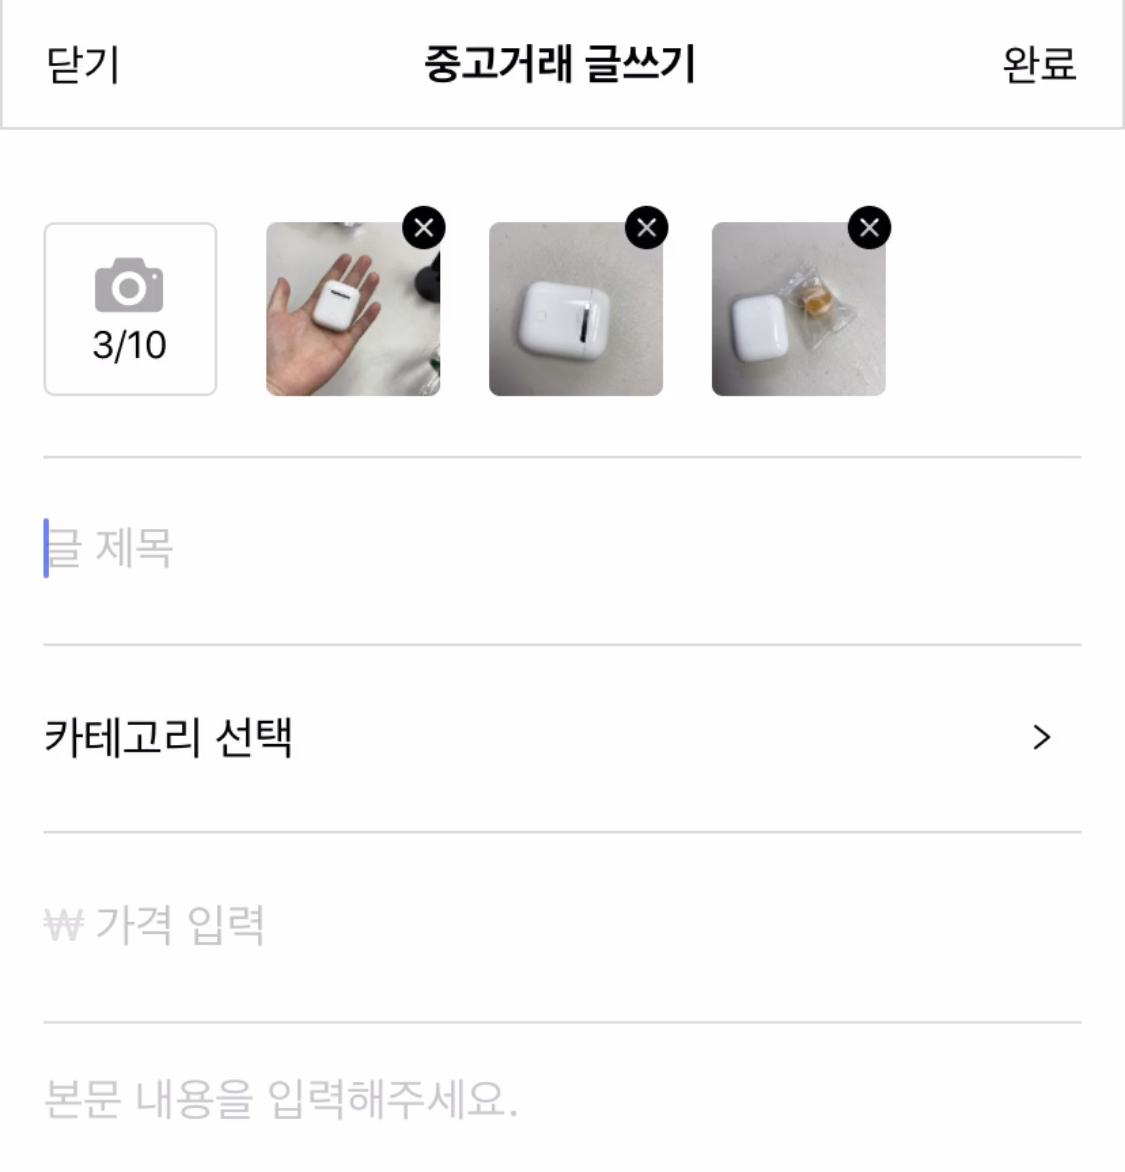
아래 코드는 글쓰기 페이지의 이미지 슬라이드 부분이다.
기본적인 기능은 카메라 버튼 클릭 시 앨범에서 이미지를 선택할 수 있고,
선택된 이미지들은 순서대로 버튼 오른쪽으로 사각형의 이미지로 사용자에게 보이게 된다.
X모양의 버튼을 클릭 시 업로드 될 이미지 목록 (state)에서 삭제 된다.
import React, { useState, useEffect } from "react";
import { Text, Platform, FlatList, Alert } from "react-native";
import * as ImagePicker from "expo-image-picker";
import { Entypo } from "react-native-vector-icons";
import DeleteButton from "./DeleteButton";
import styled from "styled-components/native";

const AddImagesView = ({ updateImage }) => {
  const [image, setImage] = useState([]);

  useEffect(() => {
    image.length > 0 && updateImage(image);
  }, [image]);

  const deleteImage = (imageUri) => {
    setImage(image.filter((item) => item.uri !== imageUri));
  };

  useEffect(() => {
    async () => {
      if (Platform.OS !== "web") {
        const {
          status,
        } = await ImagePicker.requestMediaLibraryPermissionsAsync();
        if (status !== "granted") {
          alert("Sorry, we need camera roll permissions to make this work!");
        }
      }
    };
  }, []);

  const pickImage = async () => {
    if (image.length < 10) {
      let result = await ImagePicker.launchImageLibraryAsync({
        mediaTypes: ImagePicker.MediaTypeOptions.Images,
        allowsEditing: true,
        aspect: [4, 3],
        quality: 1,
      });

      if (!result.cancelled) {
        setImage(
          image.concat({
            uri: result.uri,
            type: result.type,
          })
        );
      }
    } else {
      Alert.alert("알림", "이미지는 최대 10장 까지 첨부할 수 있어요", [
        { text: "닫기" },
      ]);
    }
  };

  return (
    <AddImagesViewContainer>
      <FlatList
        showsHorizontalScrollIndicator={false}
        data={image}
        keyExtractor={(_, index) => `${index}`}
        ListHeaderComponent={
          <AddImagesButton onPress={pickImage}>
            <Entypo name="camera" size={25} color="darkgray" />
            <Text>{image.length}/10</Text>
          </AddImagesButton>
        }
        renderItem={({ item }) => (
          <ImageContainer>
            <DeleteButton imageUri={item.uri} deleteImage={deleteImage} />
            <ImageBox source={{ uri: item.uri }} />
          </ImageContainer>
        )}
        horizontal={true}
      />
    </AddImagesViewContainer>
  );
};

export default AddImagesView;

{...}
카테고리 선택
const PostItem = ({ navigation, route }) => {
  {...}

  const goCategorySelectPage = () => {
    navigation.push("CategorySelectPage");
  };

  const updateData = (data) => {
    setBody({
      ...body,
      [data.type]: data.value,
    });
  };

  {...}
  return (
    <>
      <PostItemHeader
        type={type}
        goBack={navigation.goBack}
        handleUploadPhoto={handleUploadPhoto}
      />
      <View style={styles.container}>
        <AddImagesView updateImage={updateImage} />
        <TitleInput updateData={updateData} />
        <CategorySelectButton goCategorySelectPage={goCategorySelectPage} />
        <PriceInput updateData={updateData} />
        <MainTextInput updateData={updateData} />
      </View>
    </>
  );
}
카테고리 선택 기능 구현중 내가 마주친 문제는 부모 컴포넌트에 있는 State를 다른 스크린에서 setState를 해야하는 상황이었다.
그래서 평소처럼 카테고리 선택페이지로 navigation.push("CategorySelectPage",updateData);
navigation.push 의 두번째 인자를 이용해 props로 전달하려고 했다.
그랬더니 아래와 같은 에러 메시지가 튀어나왔다! (Warning 이긴 해서 애써 무시는 가능..ㅋㅋ)
I get the warning "Non-serializable values were found in the navigation state"
뭐 공식문서에 Troubleshooting 페이지가 따로 있어서 찾아보니, 클래스 인스턴스, 함수 등과 같은 직렬화 할수 없는 값을 전달할 경우 발생한다고 한다.
해결하는 방법도 여러가지 있는데, 우선은 저런 방식은 지양하라고 하고 React Context 를 사용하라고 해서
비슷한 기능을 하는 통합 state 관리 프로그램? 인 Redux를 사용해 보기로 했다.
8주차에 Wecode Session도 있으니 자주 쓰니까 알려줄거라고 생각했다.
우선 카테고리 선택기능의 플로우를 보자면
카테고리 선택 페이지 에서 카테고리를 선택하면 위 사진의 "카테고리 선택" 부분이 선택한 카테고리로 바뀌게 된다.
이제 Redux를 알아봐야 하기 때문에 다음 포스팅에서 다루기로 하겠다.