이전 포스팅 내용
우린 싱글톤과 스프링이 관리하면서 얻는 이점을 활용하기 위해 객체 생성하는 클래스를 config로 하여 객체들을 스프링빈으로 등록하기로 했다.
의문점
그럼 스프링 컨테이너는 어떻게 생성하고. 스프링빈들은 어떻게 꺼내 사용할까?
스프링 컨테이너 생성
ApplicationContext applicationContext =
	new AnnotationConfigApplicationContext(AppConfig.class);
스프링 컨테이너는 위와 같이 생성하며. ApplicationContext 를 스프링 컨테이너라 한다. 그러면 AnnotationConfigApplicationContext는 뭘까?
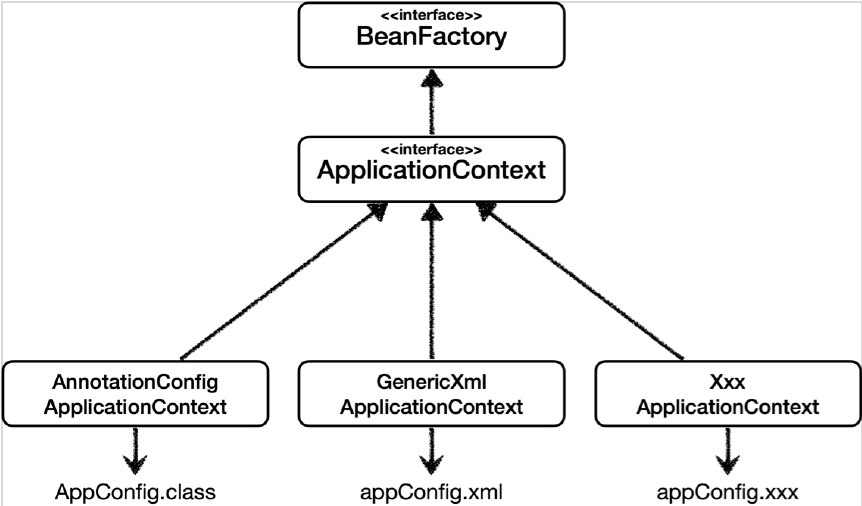
먼저 BeanFactory 인터페이스가 존재한다. BeanFactory 인터페이스는 스프링의 주요 기능인 스프링 빈 관리 기능을 제공한다.
스프링 컨테이너인 ApplicationContext 인터페이스는 BeanFactory 를 상속 받는다. 또한 스프링의 기능을 제공하는 여러 다른 인터페이스들 (MessageSource 등)을 상속받아 스프링 빈 관리 + 스프링의 여러 편리한 기능을 제공한다.
컨테이너를 만들려면 스프링 빈 정보를 갖고있는 Config 파일이 필요하다. 스프링은 Java, Xml 과 같은 여러 형태의 Config 파일의 호환성을 위해 ApplicationContext를 인터페이스로 분리하였다. 구현체는 Config 파일을 읽어 BeanDefinition 을 생성하며, 이를 바탕으로 스프링 빈이 등록된다.
| BeanFactory | ApplicationContext | AnnotationConfigApplicationContext |
|---|---|---|
| 스프링 빈 관리 기능 제공 | 스프링 빈 관리 + 여러 스프링 기능 제공 | 빈 선언된 Config 파일 받는 컨테이너 구현체 |
ApplicationContext 가 스프링 컨테이너다. 스프링은 여러 형태의 Config 파일을 받을 수 있도록 인터페이스로 다형성을 통해 구현되어있다.
스프링 빈 등록
Config 파일을 ApplicationContext 구현체의 파라미터로 넘겨 BeanDefinition 을 생성하고. 컨테이너는 이를 바탕으로 빈을 등록한다고 하였다. Config 파일은 어떻게 구성될까? 스프링 빈 등록은 크게 수동등록과 자동등록으로 나뉜다.
수동등록
//AppConfig 클래스
@Configuration
public class AppConfig {
    @Bean
    public MemberRepository memberRepository() {
        return new MemoryMemberRepository();
    }

    @Bean
    public DiscountPolicy discountPolicy() {
        return new RateDiscountPolicy();
    }

    @Bean
    public OrderService orderService() {
        return new OrderServiceImpl(memberRepository(), discountPolicy());
    }
}
수동등록은 @Configuration으로 Config 클래스임을 스프링에게 알려준다.
스프링은 아 이건 Config 클래스구나 얘는 빈 등록할 때 CGLIB 기술로 바이트 조작해서 안에 있는 놈들 싱글톤 보장하게 바꿔야겠다고 받아들인다.
@Bean은 빈 생성 부분임을 스프링에게 알려준다. 빈 이름은 메서드 이름이 된다.
| 빈 이름 | 타입 |
|---|---|
| memberRepository | MemberRepository, MemoryMemberRepository |
| discountPolicy | DiscountPolicy, RateDiscountPolicy |
| orderService | OrderService, OrderServiceImpl |
수동등록은 Config 클래스안에 @Bean을 추가한 메서드로 직접 빈을 등록하며, 의존성 주입도 여기서 진행한다. 이때 메서드 이름이 빈 이름이 된다.
자동등록
//AutoAppConfig 클래스
@Configuration
@ComponentScan(
        basePackages = "hello.core",
        excludeFilters = @ComponentScan.Filter(type = FilterType.ANNOTATION,
        	classes = Configuration.class)
)
public class AutoAppConfig {
}

//OrderServiceImpl 클래스
@Component // (name = "") 로 빈 이름 설정가능
public class OrderServiceImpl implements OrderService{

    private final MemberRepository memberRepository;
    private final DiscountPolicy discountPolicy;

    @Autowired
    public OrderServiceImpl(MemberRepository memberRepository,
    				DiscountPolicy discountPolicy) {
        this.memberRepository = memberRepository;
        this.discountPolicy = discountPolicy;
    }
}
자동등록은 Config 클래스에 @ComponentScan 를 추가한다. 그러면 스프링은 베이스 패키지(디폴트 : Config 클래스 패키지)와 모든 하위 패키지를 탐색하여 @Component 가 붙은 클래스의 객체를 빈으로 저장한다. 이 때 excludeFilters로 특정 클래스를 제외할 수 있다. @Controller 나 @Service 등도 @Component의 일종이다. 클래스 이름 첫글자를 소문자로 바꾼 것이 빈 이름이 된다.
자동등록은 Config 클래스에 @ComponentScan 을 추가한다. 스프링은 @Component가 붙은 클래스의 객체를 스프링 빈으로 추가하며, 클래스 이름 첫글자를 소문자로 바꾼 것이 빈 이름이 된다.
본 글은 김영한님의 "스프링 핵심 원리 - 기본편" 강의내용 및 이해한 내용을 정리한 것입니다.
