월렛 개요
사용자가 블록체인 네트워크와 소통할 때,
일반적으로 브라우저에서 다이렉트로 블록체인 노드에 트랜잭션 요청을 건네지는 않습니다
(콜 메서드만 사용하는 경우가 아니라면)
트랜잭션을 발동시키기 위해 서명을 생성할 때 사용자에게 직접 개인키를 입력받도록 하는 것이
보안적으로도, 사용성 측면에서도 그리 좋지 못하기 때문인데요
그래서 블록체인 네트워크에 요청을 보낼 때는
보통 서명 기능을 담당할 월렛이라는 중개자를 거치게 됩니다
(브라우저 > 월렛 > 블록체인 네트워크)
이 과정을 풀어쓰면 다음과 같습니다
- 월렛에 데이터 전달: 브라우저에서 생성한 트랜잭션 데이터를 월렛에 전달합니다
이는 일반적으로 월렛 API를 사용해서 데이터를 전달하는 방식으로 이루어집니다
// 브라우저 단에서 생성할 트렌잭션 데이터 구조 예시
const tx = {
	from: "",
   to: "",
   value: "",
   gas: "",
   gasPrice: "",
   // r, v, s (서명은 월렛에서 처리)
}- 서명 생성: 월렛은 전달받은 데이터를 기반으로 서명을 생성합니다
서명은 개인키를 사용하여 생성되며 트랜잭션의 무결성을 보장합니다
-
블록체인 노드에 전달: 월렛은 서명된 트랜잭션을 블록체인 노드에 전송합니다
-
트랜잭션 확인과 블록 생성: 블록체인 노드는 전달받은 트랜잭션을 확인하고,
무결성을 검증한 뒤 새로운 블록을 생성합니다
그러면 월렛을 통해서 직접 트렌젝션 요청을 전달하는 과정을 실습해보겠습니다
가나쉬 네트워크를 기반으로, 가장 대중적인 월렛 프로그램인 메타마스크를 사용합니다
Metamask & React
먼저 리액트 프로젝트를 생성합니다
(메타마스크 설치 과정은 생략)
npx create-react-app metamask
npm install web3console.log(window.ethereum)
// Proxy(c) {_events: {…}, _eventsCount: 0, _maxListeners: 100, _log: l, _state: {…}, …}메타마스크를 설치하면 브라우저의 window객체 안에 ethereum객체가 주입됩니다
그리고 이 이더리움 객체를 통해 브라우저와 메타마스크 간의 소통이 이루어집니다
(월렛을 설치하지 않은 브라우저에는 이더리움 객체가 존재하지 않습니다)
- 브라우저와 메타마스크 연동하기
useEffect(()=> {
  window.ethereum.request({
    method: "eth_chainId"
  }).then((data) => console.log(data))  // 0x539 = 1337
}, [])
현재 메타마스크가 바라보고 있는 네트워크의 체인ID(가나쉬/1337)가 찍히는 것을 확인
- 로그인 구현하기
function App() {
  const [account, setAccount] = useState(null)

  useEffect(()=> {
    window.ethereum.request({
      method: "eth_requestAccounts"
    }).then(([data]) => setAccount(data))

  }, [])

  return (
    <>
      {account || '로그인해주세요'}
    </>
  );
}
requestAccounts 메서드가 발동되면 브라우저의 메타마스크가 반응하는 것을 확인할 수 있습니다
메타마스크에서 사용자의 허가를 거치면 브라우저와 메타마스크가 세션을 맺게 됩니다
이것이 일반적인 탈중앙화의 로그인 방식입니다
이와 같이 디앱 설계의 포커스는 비밀키를 제외한 사용자의 개인정보는 받지 않도록 구현하는 데에 있습니다
- RPC통신을 더 간결하게 사용하기 위해
web3라이브러리를 활용할 수도 있습니다
const [web3, setWeb3] = useState(null)

...
setWeb3(new Web3(window.ethereum))

...

const handleClick = (e) => {
    console.log(web3)
    web3.eth.getBalance(account).then(console.log)
}

return <button onClick={handleClick}>balance</button>sendTransaction도 날려봅시다
  const handleSubmit = (e) => {
    e.preventDefault()

    const to = e.target.received.value
    // 입력값을 wei 단위로 변환해야 합니다 (10 => 10^18)
    const value = web3.utils.toWei(e.target.amount.value, "ether")

    const tx = {
      from: account,
      to, // 가나쉬에서 임의의 어카운트 선택
      value,
    }
    web3.eth.sendTransaction(tx).then(console.log)
  }

...
<form onSubmit={handleSubmit}>
    <input type="text" id="received" placeholder="received" />
    <input type="number" id="amount" placeholder="amount" />
    <button type="submit">transfer</button>
</form>
...
위에서 언급한대로 브라우저에서 생성한 트랜젝션 데이터를 메타마스크에 전달하면
메타마스크는 사용자의 확인을 거친 뒤, 서명을 생성하고 완성된 트랜잭션을 블록체인 네트워크에 요청합니다
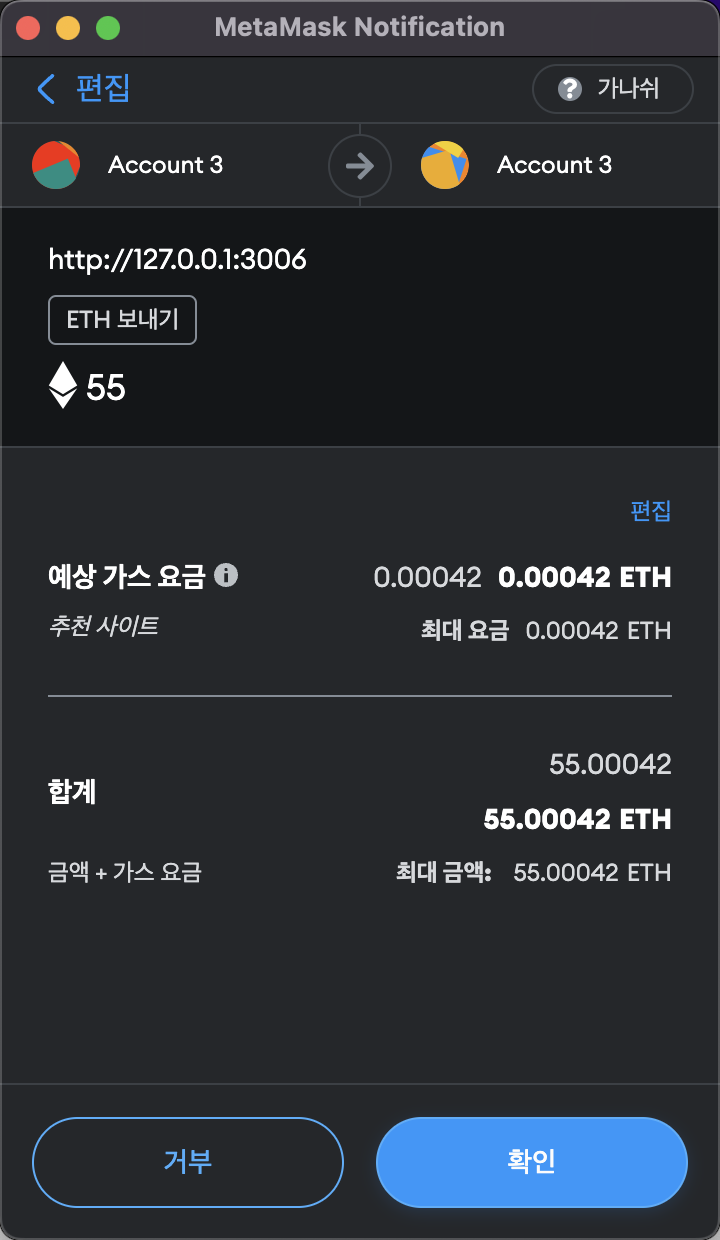
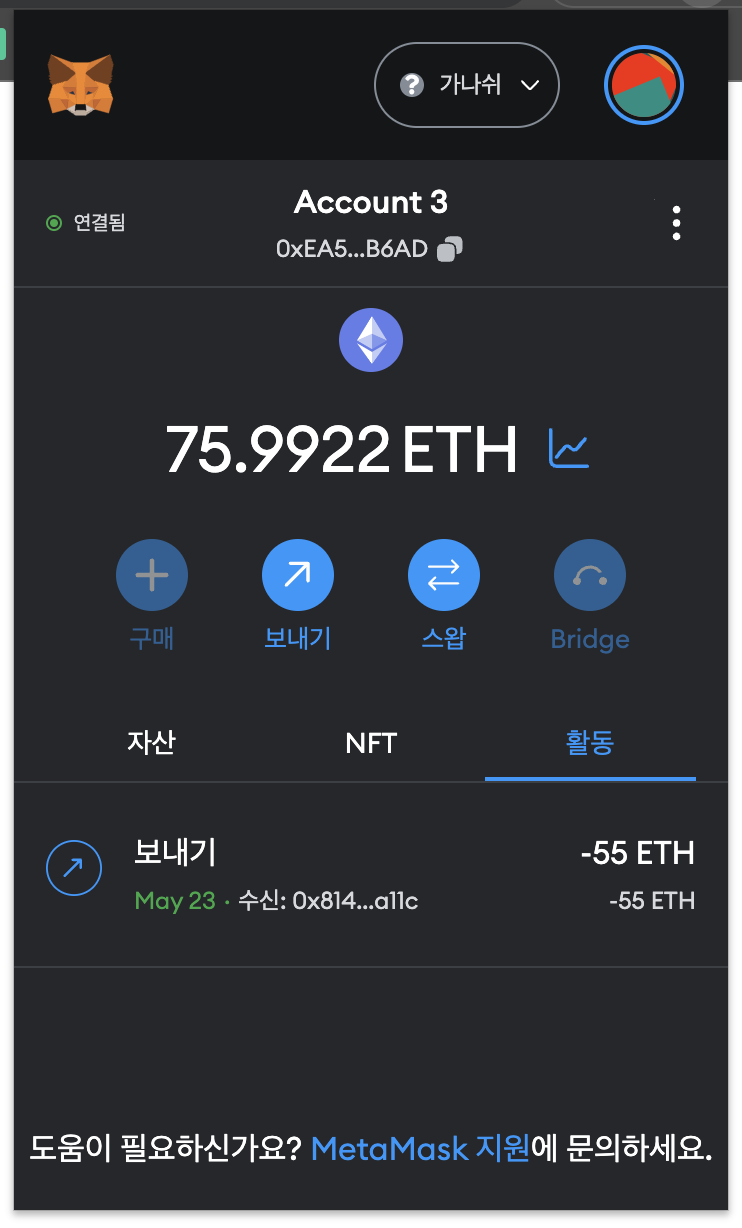
이것으로 송금도 성공
추가로 월렛 커넥션을 맺을 때는 다른 외부 라이브러리를 사용하지 않는 것을 추천합니다
(특별한 경우가 아니라면 이더리움에서 제공하는 web3만으로도 충분합니다)
- 요청 메서드를 커스텀 훅으로 만들어서 사용하기
[web3.hook.js]
import { useEffect, useState } from "react"
import Web3 from "web3"

const useWeb3 = () => {
    const [user, setUser] = useState({
        account: "",
        balance: 0,
    })
    const [web3, setWeb3] = useState(null)

    useEffect(()=> {
        if (window.ethereum) {
            window.ethereum.request({
                method: "eth_requestAccounts"
            }).then(async ([data])=>{
                const web3Provider =new Web3(window.ethereum)
                setWeb3(web3Provider)
                setUser({
                    ...user,
                    account: data,
                    balance: web3Provider.utils.toWei(await web3Provider.eth.getBalance(data), "ether"),
                })
            }).catch(console.error)
        } else {
            alert("메타마스크를 설치해주세요")
        }
    }, [])

    return {
        user,
        web3,
    }
}

export default useWeb3
[App.js]
...
function App() {
    const { user, web3 } = useWeb3();

    console.log(user) // {account: "0xABC...", value: 100}

    const handleSubmit = async (e) => {
        e.preventDefault();
        const to = e.target.received.value;
        // gWei는 10**9, ether는 10**18
        const value = web3.utils.toWei(e.target.amount.value, "ether");
        const tx = {
            from: user.account,
            to,
            value,
        };
        await web3.eth.sendTransaction(tx).then(console.log);
    };

    if (!user.account) return "로그인해주세요";
    return (
        <>
            <form onSubmit={handleSubmit}>
                <input type="text" id="received" placeholder="received" />
                <input type="number" id="amount" placeholder="amount" />
                <button type="submit">transfer</button>
            </form>
        </>
    );
}
이제 지난 포스트에서 배포한 스마트 컨트랙트를 활용해볼 차례입니다
Metamask & Solidity
- 우선 리믹스에 간단한 스마트 컨트랙트를 작성해보겠습니다
https://remix.ethereum.org/
// SPDX-License-Identifier: UNLICENSED
pragma solidity ^0.8.0;

contract Counter {
  uint256 value;
  constructor(){}

  function setValue(uint256 _value) public {
    value = _value; // 값 설정
  }

  function getValue() public view returns (uint256) {
    return value;
  }
  // increment
  function increment() public {
    value += 1;
  }
  // decrement
  function decrement() public {
    value -= 1;
  }
}- 완성된 스마트 컨트랙트를 메타마스크를 통해 승인 절차를 걸친 뒤 가나쉬 네트워크에 배포합니다


(생성된 CA-컨트랙트 어드레스-를 복사하기)
.call~ CA를 통해 브라우저에서 컨트랙트의 상태를 불러올 수 있습니다
먼저 컨트랙트의 인터페이스(abi)를 가져와야 합니다
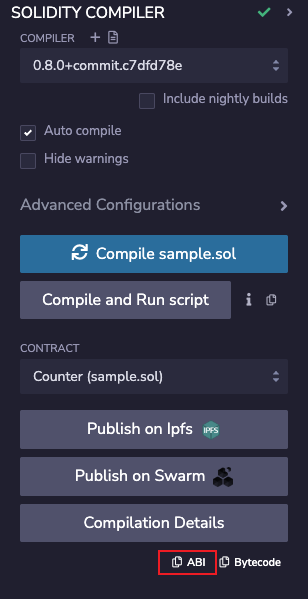
[./abi/counter.abi.json]
[
	{
		"inputs": [],
		"name": "decrement",
		"outputs": [],
		"stateMutability": "nonpayable",
		"type": "function"
	},
	{
		"inputs": [],
		"name": "increment",
		"outputs": [],
		"stateMutability": "nonpayable",
		"type": "function"
	},
  	{
		"inputs": [],
		"name": "getValue",
		"outputs": [
			{
				"internalType": "uint256",
				"name": "",
				"type": "uint256"
			}
		],
		"stateMutability": "view",
		"type": "function"
	}
	...
]-
name: 함수의 이름 -
inputs: 만약 함수에 전달될 인자들이 있다면 위 배열에 담깁니다 -
outputs: 함수가 반환하는 값들의 배열입니다 (리턴 타입이void라면 빈 배열) -
stateMutability: 함수의 상태 변경 가능성을 나타내는 속성입니다.
pure,view,nonpayable,payable등이 있습니다.
(여기서nonpayable은 외부 송금을 받지 않는 함수라는 의미인데,
코드상에 컨트랙트의 상태 변경을 유발하는 로직이 담겨 있다면 함수가 발동할 때 가스를 소비합니다)
그리고 가져온 abi파일을 활용해서 컨트랙트의 현재 상태를 가져올 수 있습니다
(.call 발동)
import abi from "./abi/counter.json"

...
    const [count, setCount] = useState(null)
...
    useEffect(()=> {
      if (!web3) return
  	  // name값(메서드명)으로 객체 찾기
      const getValueData = abi.find(data => data?.name === "getValue")
	  // 두번째 인자([])에는 매개변수가 담깁니다
      const data = web3.eth.abi.encodeFunctionCall(getValueData, [])

      web3.eth.call({
        to: "0xB02Fd6b8c7e39A83FDc9c1114024Ea1b1e8bd362", // CA
        data,
      }).then(data => {
        const result = web3.utils.toBN(data).toString(10)
        setCount(result)
      })
    }, [web3])

...
return (

        <div>
          <h2>카운터 : {count}</h2>
          <button onClick={increment}>증가</button>
          <button onClick={decrement}>감소</button>
        </div>

) .send~ 이제 컨트랙트의 상태를 바꿔봅시다
이때 가스는 메서드의 사용자가 지불하도록 해야 합니다 (from 속성)
    const increment = async () => {
      const incrementData = abi.find((data) => data.name === "increment")
      const data = web3.eth.abi.encodeFunctionCall(incrementData, [])

      const from = user.account // 사용자 계정
      const to = "0xB02Fd6b8c7e39A83FDc9c1114024Ea1b1e8bd362" // CA

      const tx = {
        from,
        to,
        data
      }
      const result = await web3.eth.sendTransaction(tx)
      setCount(web3.utils.toBN(result).toString(10))
    }
감소도 같은 방식으로 처리합니다
단, 지금의 코드에서는 상태(타입이 uint)를 음수로 내리는 것은 불가능합니다
↓ 약간의 리팩토링
import useWeb3 from "./hooks/web3.hook";
import { useEffect, useState } from "react"
import abi from "./abi/counter.json"

function App() {
    const { user, web3 } = useWeb3();
    const [count, setCount] = useState(null)
    const [isLoading, setIsLoading] = useState(true)

    const handleSubmit = async (e) => {
        e.preventDefault();
        const to = e.target.received.value;
        // gWei는 10^9, ether는 10^18
        const value = web3.utils.toWei(e.target.amount.value, "ether");
        const tx = {
            from: user.account,
            to,
            value,
        };
        await web3.eth.sendTransaction(tx).then(console.log);
    };

    const increment = async () => {
      const incrementData = abi.find((data) => data.name === "increment")
      const data = web3.eth.abi.encodeFunctionCall(incrementData, [])

      const from = user.account
      const to = "0xC56b7474E0A1Bf6ab53fdD9DeC1dE098b8b3C03C"

      const tx = {
        from,
        to,
        data,
        gas: 50000,
        gasPrice: 20000000000,
      }
      await web3.eth.sendTransaction(tx).then((data) => {
        getCount()
      }).catch(console.error)


      setIsLoading(false)
    }
    const decrement = async () => {
      const incrementData = abi.find((data) => data.name === "decrement")
      const data = web3.eth.abi.encodeFunctionCall(incrementData, [])

      const from = user.account
      const to = "0xC56b7474E0A1Bf6ab53fdD9DeC1dE098b8b3C03C"

      const tx = {
        from,
        to,
        data,
        gas: 50000,
        gasPrice: 20000000000,
      }
      await web3.eth.sendTransaction(tx).then((data) => {
        getCount()
      }).catch(console.error)
    }

    const getCount = () => {
      if (!web3) return
      const getValueData = abi.find(data => data?.name === "getValue")
      const data = web3.eth.abi.encodeFunctionCall(getValueData, [])

      web3.eth
      .call({
        to: "0xC56b7474E0A1Bf6ab53fdD9DeC1dE098b8b3C03C",
        data,
      }).then((data) => {
        const result = web3.utils.toBN(data).toString(10)
        setCount(result)
      })
    }

    useEffect(()=> {
      getCount()
      setIsLoading(false)
    }, [isLoading, web3])

    if (!user.account) return "로그인해주세요";
    if (isLoading) return 'Loading...'
    return (
        <>
            <form onSubmit={handleSubmit}>
                <input type="text" id="received" placeholder="received" />
                <input type="number" id="amount" placeholder="amount" />
                <button type="submit">transfer</button>
            </form>

            <div>
              <h2>카운터 : {count}</h2>
              <button onClick={increment}>증가</button>
              <button onClick={decrement}>감소</button>
            </div>
        </>
    );
}

export default App;
