TIL
배운 내용
오늘은 어제 실습에 대한 풀이와 시험을 보았다.
그래서 오늘의 Velog는 실습에 대한 풀이를 할려고한다. 시험에 대한 풀이는 다음주에 강사님과의 풀이를 하고 작성하도록 하겠다.
실습 문제 풀이
문제 : '외부'대역(211.183.3.0/24)에는 211.183.3.100의 주소를 갖는 mint 클라이언트가 존재하며 '내부'에는 아래와 같이 서로 다른대역에 서버들이 존재한다.
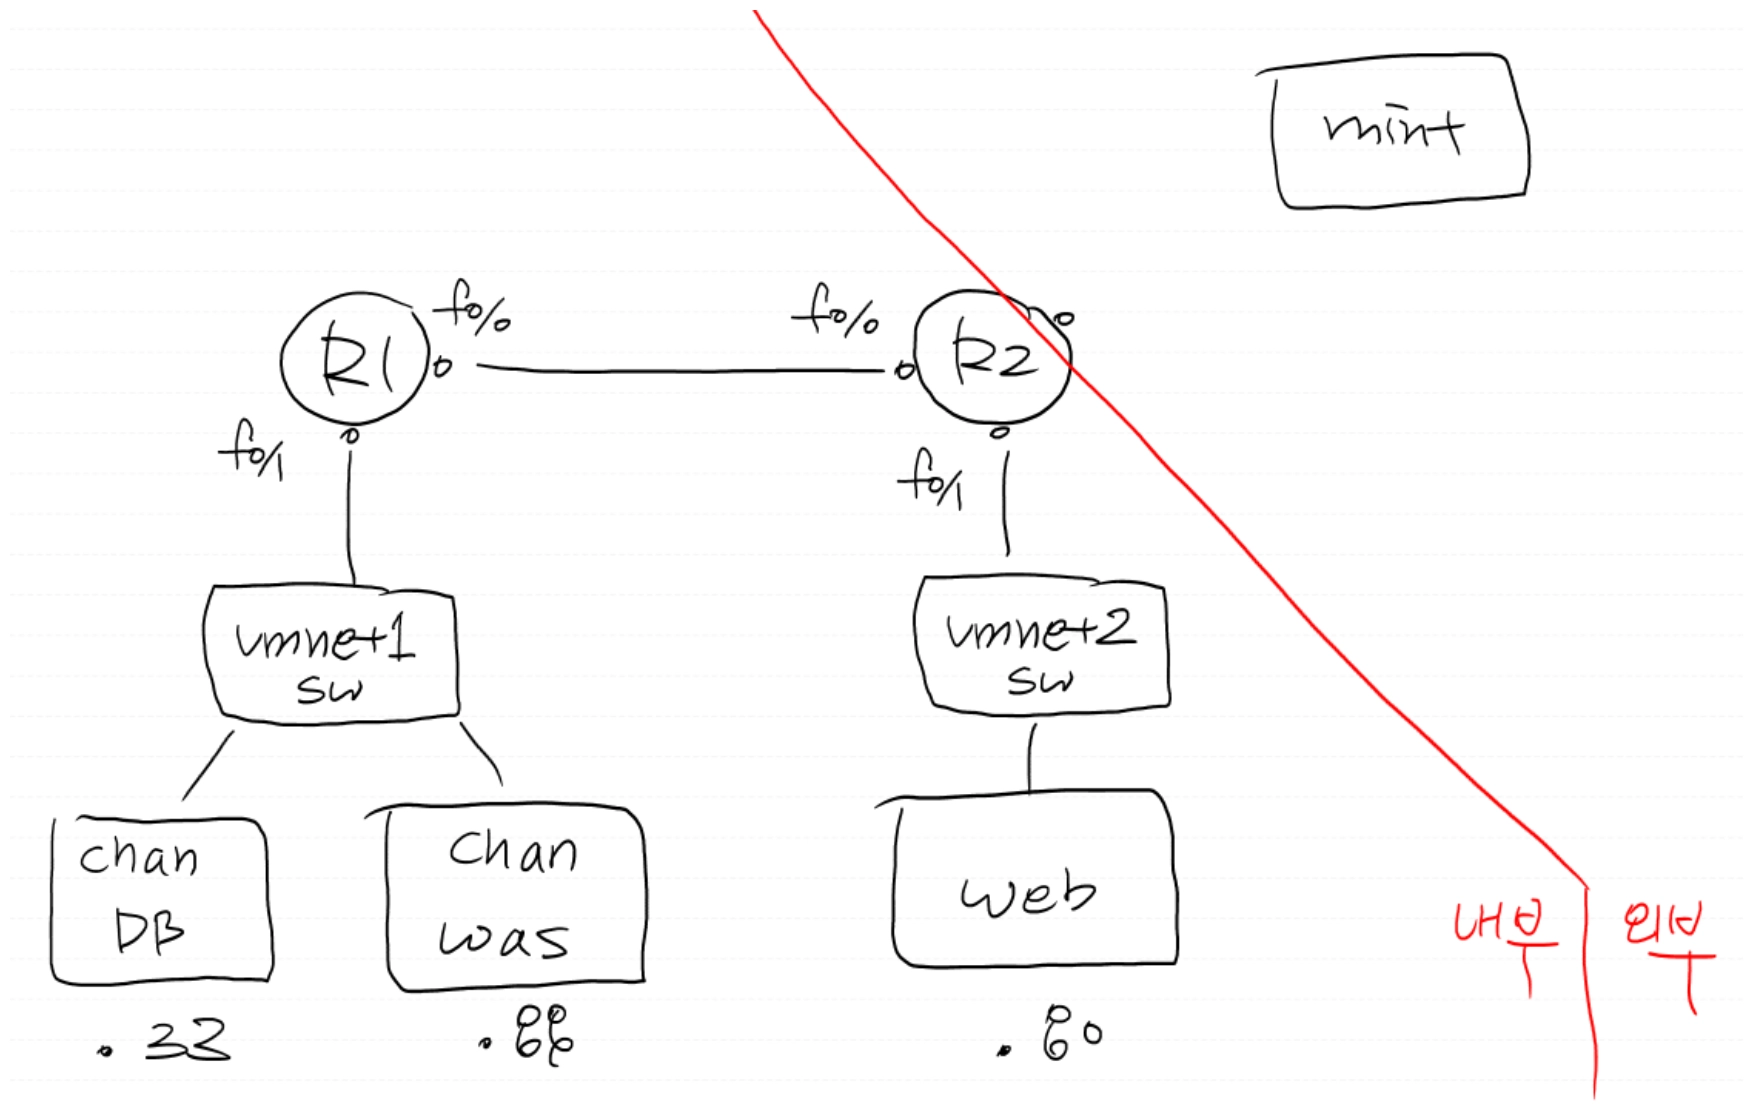
mint(외부)는
<주소>/tem에 접속시 간단한 무료템플릿을 볼 수 있고,
<주소>/wp 에 접속시 워드프레스 블로그,
<주소>/tom에 접근했을때는 tomcat 서버로 리버스프록시 되어 db와 잘 연동됐는지를 확인하는 페이지에 접속되길 바란다. 또한 이 페이지는 tomcat 서버에서 접속했을때는 localhost:8080/was 로 접속이 됐었다.
여태까지 배운 내용을 종합적으로 풀어보는 실습이었다.
먼저 GNS3를 이용해 토플로지 구성이다.

이대로 내부 네트워크를 구성해보겠다.
- R1의 기본설정
R1#conf t

R1(config)#int f0/0
R1(config-if)#ip add 10.10.3.100 255.255.255.0
R1(config-if)#no sh

R1(config-if)#int f0/1
R1(config-if)#ip add 10.10.1.250 255.255.255.0
R1(config-if)#no sh- R2의 기본설정
R2#conf t

R2(config)#int f0/1
R2(config-if)#ip add 10.10.2.250 255.255.255.0
R2(config-if)#no sh

R2(config-if)#int f0/0
R2(config-if)#ip add 10.10.3.200 255.255.255.0
R2(config-if)#no sh
여기까지는 2개의 네트워크 밖에 없기 때문에 R1에서 10.10.2.0/24로 보내기 위한 라우팅이 필요하다.
R1(config-if)#ip route 10.10.2.0 255.255.255.0 10.10.3.200
# 10.10.2.0 /24 목적지로 가기위한 넥스트홉은 10.10.3.200
라우팅을 통해 R2에서 10.10.1.250 으로 ping을 보내면 잘 도착함을 알 수 있다.
Tomweb 설정
VMware를 통해 가상환경을 실행하고 IP : 10.10.2.80/24
GW : 10.10.2.250으로 설정한다.
Tomcat 설정
IP : 10.10.1.88 /24
GW : 10.10.1.250
Tomdb 설정
IP : 10.10.1.33 /24
GW : 10.10.1.250
이렇게 하고 각 서버에서 ping을 통해 연결을 확인한다.
확인 후 내부에 있는 서버끼리 통신이 되는 것을 확인할 수 있다.
이제 외부와의 통신을 하기 위해 라우팅을 해준다.
먼저 R2에서 Default route를 한다.
R2(config)#int f1/0
R2(config-if)#ip add 211.183.3.250 255.255.255.0
R2(config-if)#no sh

R2(config)#ip route 0.0.0.0 0.0.0.0 211.183.3.2
R1도 외부와 통신을 해야하기 떄문에
R1(config)#ip route 0.0.0.0 0.0.0.0 10.10.3.200이렇게 외부와의 라우팅을 해준다.
NAT 설정
- PAT 설정
R2(config)#int f1/0
R2(config-if)#ip nat out

R2(config-if)#int f0/0
R2(config-if)#ip nat in

R2(config)#int f0/1
R2(config)#ip nat in

R2(config-if)#ip nat inside source list 1 int f1/0 over- Default Route: 외부로 나가는 통로를 뚫어주는 것.
- PAT: 외부 서버가 나에게 답장을 줄 수 있게 공인 주소로 갈아입혀 주는 것.
이후 Tomdb에서 ping을 통해 외부와의 통신이 되는지를 확인한다.
tomdb에서 mariadb 패키지를 설치해준다.
[root@tomdb ~]# yum install -y mariadb-server

[root@tomdb ~]# systemctl enable --now mariadb

[root@tomdb ~]# mysql_secure_installation
# 암호 1234, ynyy

[root@tomdb ~]# mysql -u root -p1234

MariaDB [(none)]> create database tomdb;

MariaDB [(none)]> grant all privileges on tomdb.* to tomuser@'%' identified by '1234';

[root@tomdb ~]# mysql -u tomuser -p1234
# 생성한 유저가 유효한지 확인.
Tomcat 설정
[root@tomcat ~]# yum install java-11-openjdk wget unzip

[root@tomcat ~]# wget https://dlcdn.apache.org/tomcat/tomcat-10/v10.1.52/bin/apache-tomcat-10.1.52.zip

[root@tomcat ~]# unzip apache*

[root@tomcat ~]# mv apache-tomcat-10.1.52 tomcat

[root@tomcat ~]# chmod 777 -R tomcat

[root@tomcat ~]# cd tomcat

[root@tomcat tomcat]# ./bin/startup.sh
# tomcat/bin 경로의 실행파일 실행.

[root@tomcat tomcat]# cd webapps/ROOT/
[root@tomcat tomcat]# mkdir was
[root@tomcat tomcat]# cd was

cat <<EOF > dbtest.jsp

<%@ page language="java" contentType="text/html; charset=UTF-8" pageEncoding="UTF-8"%>
<%@ page import="java.sql.*"%>
<h1>DB</h2>
<%
        Connection conn=null;
        try{
                String Url="jdbc:mysql://<DB주소>/<DB이름>";
                String Id="<DB유저>";
                String Pass="<유저암호>";

                Class.forName("com.mysql.jdbc.Driver");
                conn=DriverManager.getConnection(Url,Id,Pass);
                out.println("was-db Connection Success!");
        }catch(Exception e) {
                e.printStackTrace();
}
%>

EOF
# 내부에 이 내용을 넣어준다. <>의 내용을 db생성에 맞게 수정해준다.
웹서버설정
[root@tomweb ~]# yum install -y httpd

[root@tomweb ~]# vi /etc/httpd/conf/httpd.conf
의 내용에서 :set nu를통해 56번째줄 뒤에

LoadModule proxy_connect_module modules/mod_proxy_connect.so
LoadModule proxy_module modules/mod_proxy.so
LoadModule proxy_http_module modules/mod_proxy_http.so

<VirtualHost *:80> # 80번 포트로 들어오는 모든 ip에 대한 설정
    ProxyRequests Off
    ProxyPreserveHost On
    <Proxy *>
        Order deny,allow
        Allow from all
    </Proxy>

    ProxyPass /tom http://<was주소>:8080/<경로>/
    ProxyPassReverse /tom http://<was주소>:8080/<경로>/
</VirtualHost>

<>를 내용에 맞게 수정해준다.

[root@tomweb ~]# systemctl restart httpd
[root@tomweb ~]# systemctl enable httpd
mint에서 웹서버에 접근하게 하려면 R2에서 DNAT 설정을 해줘야한다.
R2(config)#ip nat inside source static tcp 10.10.2.80 80 211.183.3.250 80템플릿 배포
[root@tomweb ~]# yum install -y wget unzip

[root@tomweb ~]# mv templatemo_611_maison_doree templatemo_611_maison_doree.zip
[root@tomweb ~]# unzip templatemo_611_maison_doree.zip

[root@tomweb ~]# mv templatemo_611_maison_doree /var/www/html

[root@tomweb ~]# cd /var/www/html
[root@tomweb html]# mv templatemo_611_maison_doree tem
# 디렉토리 이름을 tem으로 변경
Wordpress 배포
[root@tomdb ~]# mysql -u root -p1234

MariaDB [(none)]> create database wpdb;

MariaDB [(none)]> grant all privileges on wpdb.* to wpuser@'%' identified by '1234';

#tomdb 서버에서 데이터베이스 생성

[root@tomweb html]# yum install -y wget unzip epel-release

[root@tomweb html]# yum -y install https://rpms.remirepo.net/enterprise/remi-release-7.rpm
# 레포 목록 설치

[root@tomweb html]# yum install -y yum-utils

[root@tomweb html]# yum-config-manager --enable remi-php73

[root@tomweb html]# yum install -y php php-mysql
오늘은 실습 풀이를 한번 작성해보았다. 오늘은 거의 실습을 위주로 하였다. 아직 네트워크가 익숙하지는 않지만 그래도 길은 알것같다 어떻게 설계해야 할지 어떻게 해야 외부로 넘어갈지 단지 그 생각을 실제로 적용이 어렵다. 아마 내가 많이 실습을 안해서 그렇다고 생각은 된다.
