🎯 Home.tsx
// 날짜 포맷을 위한 date-fns와 상태 관리, Swiper 모듈 import
import { format, subDays, addDays } from 'date-fns';
import { useState } from 'react';
import { Autoplay, Pagination } from 'swiper/modules';
import { Swiper, SwiperSlide } from 'swiper/react';
import useMobile from '@/hooks/useMobile';

// Swiper 스타일 import
import 'swiper/css';
import 'swiper/css/pagination';

// 카드 스타일 래퍼 컴포넌트
import CardFrame from '../../components/CardFrame';

function Home() {
  // 현재 화면이 모바일인지 여부 판단
  const isMobile = useMobile();

  // 배너 이미지 리스트
  const imgList = [
    '../src/assets/img/swiper1.png',
    '../src/assets/img/swiper2.png',
    '../src/assets/img/swiper3.png',
  ];

  // 스케줄 데이터 타입 정의
  interface Schedule {
    idolName: string;
    idolImage: string;
    title: string;
    date: string;
  }

  // 목업 스케줄 데이터 정의 (어제, 오늘, 내일 포함)
  const mockSchedule: Schedule[] = [
    {
      idolName: '보이넥스트도어',
      idolImage: '../src/assets/img/boynextdoor.jpeg',
      title: '예능 방송',
      date: format(new Date(), 'yyyy-MM-dd'),
    },
    {
      idolName: '보이넥스트도어',
      idolImage: '../src/assets/img/boynextdoor.jpeg',
      title: '공연',
      date: format(new Date(), 'yyyy-MM-dd'),
    },
    {
      idolName: '보이넥스트도어',
      idolImage: '../src/assets/img/boynextdoor.jpeg',
      title: '팬사인',
      date: format(new Date(), 'yyyy-MM-dd'),
    },
    {
      idolName: '보이넥스트도어',
      idolImage: '../src/assets/img/boynextdoor.jpeg',
      title: '머없음',
      date: format(new Date(), 'yyyy-MM-dd'),
    },
    {
      idolName: '엔시티',
      idolImage: '../src/assets/img/ncity.jpeg',
      title: '뮤직쇼 녹화',
      date: format(subDays(new Date(), 1), 'yyyy-MM-dd'), // 어제
    },
    {
      idolName: '보이넥스트도어',
      idolImage: '',
      title: '라이브 방송',
      date: format(addDays(new Date(), 1), 'yyyy-MM-dd'), // 내일
    },
  ];

  // 선택된 날짜 상태값 (초기값은 오늘)
  const [selectedDate, setSelectedDate] = useState(
    format(new Date(), 'yyyy-MM-dd')
  );

  // 날짜 선택 시 상태 업데이트
  const handleSelect = (offset: number) => {
    const newDate = format(addDays(new Date(), offset), 'yyyy-MM-dd');
    setSelectedDate(newDate);
  };

  // 선택된 날짜 기준으로 스케줄 필터링
  const filtered = mockSchedule.filter(item => item.date === selectedDate);

return (
  // 전체 페이지 여백 설정
  <div className="px-4 md:px-8">
    {/* 페이지 최대 너비 설정 (가운데 정렬) */}
    <div className="mx-auto max-w-[1080px]">

      {/* Swiper 이미지 배너 영역 */}
      <div className="pt-20">
        <Swiper
          modules={[Autoplay, Pagination]} // 자동 재생 + 페이지네이션 모듈 사용
          spaceBetween={20}                // 슬라이드 간격 20px
          slidesPerView={1}                // 한 번에 1개만 보여줌
          autoplay={{ delay: 3000 }}       // 3초마다 자동 넘김
          pagination={{ clickable: true }} // 점(dot) 누르면 슬라이드 이동
          loop                             // 무한 루프
        >
          {/* 이미지 리스트 렌더링 */}
          {imgList.map(src => (
            <SwiperSlide key={src}>
              <img
                src={src}
                alt={`swiper${src}`}
                className="h-auto w-full rounded-xl object-cover"
              />
            </SwiperSlide>
          ))}
        </Swiper>
      </div>

      {/* 스케줄 섹션 */}
      <section className="mt-20">
        {/* 섹션 타이틀 */}
        <div className="mb-8">
          <h4 className="mt-2 text-[2.5rem] leading-tight font-bold">
            Today Schedule
          </h4>
          <p className="mt-2 text-[1.2rem] text-gray-700">
            오늘 가장 핫한 케이팝 스케줄은?
          </p>
        </div>

        {/* 날짜 선택 버튼: 어제 / 오늘 / 내일 */}
        <div className="mb-10 flex justify-center gap-16 text-[1.2rem]">
          {[-1, 0, 1].map(offset => {
            const targetDate = addDays(new Date(), offset); // offset만큼 날짜 이동
            const dateString = format(targetDate, 'yyyy-MM-dd');
            const day = format(targetDate, 'd');             // 일(day)만 추출
            const isSelected = selectedDate === dateString;  // 현재 선택 여부

            // 날짜 레이블: 어제/오늘/내일
            let label = '';
            if (offset === -1) label = '어제';
            else if (offset === 0) label = '오늘';
            else label = '내일';

            return (
              <div key={offset} className="flex flex-col items-center gap-2">
                <span className="text-[1.2rem] text-gray-600">{label}</span>
                <button
                  type="button"
                  onClick={() => handleSelect(offset)} // 날짜 선택 핸들러
                  className={`h-10 w-10 rounded-md border text-[1.2rem] font-semibold transition-colors duration-200 ${
                    isSelected
                      ? 'border-red-500 text-red-500'
                      : 'border-gray-300 text-gray-800'
                  }`}
                >
                  {day}
                </button>
              </div>
            );
          })}
        </div>

        {/* 오늘 날짜에 맞는 스케줄 카드 리스트 */}
        <div className="grid gap-4 sm:grid-cols-1 sm:gap-6 md:grid-cols-4 md:gap-10">
          {filtered.map(item => (
            <CardFrame key={item.title}>
              {/* 모바일일 경우 - 가로형 카드 */}
              {isMobile ? (
                <div className="flex items-center gap-3 p-3">
                  <img
                    src={item.idolImage}
                    alt={item.title}
                    className="h-[64px] w-[64px] rounded-lg object-cover"
                  />
                  <div>
                    <p className="font-semibold">{item.idolName}</p>
                    <p className="text-sm text-gray-500">{item.title}</p>
                    <p className="text-xs text-gray-400">{item.date}</p>
                  </div>
                </div>
              ) : (
                // PC일 경우 - 세로형 카드
                <div>
                  <img
                    src={item.idolImage}
                    alt={item.title}
                    className="h-auto w-full object-cover"
                  />
                  <div className="p-3">
                    <p className="mb-1 text-[1.1rem] font-semibold">
                      {item.idolName}
                    </p>
                    <p className="text-[0.9rem] text-gray-500">
                      {item.title}
                    </p>
                    <p className="text-[0.8rem] text-gray-400">{item.date}</p>
                  </div>
                </div>
              )}
            </CardFrame>
          ))}
        </div>
      </section>
    </div>
  </div>
);
✅ addDay() / subDay() 함수 사용 이유
트리쉐이킹이
트리쉐이킹을 할수있다는건데
즉 add를 가져오면 내가 사용하지 않는 js도 가져오고
addDay를 쓰면 내가 원하는 js 메서드만 가져오는거죠
그러면 빌드크기가 줄어들고
성능도 좋아짐
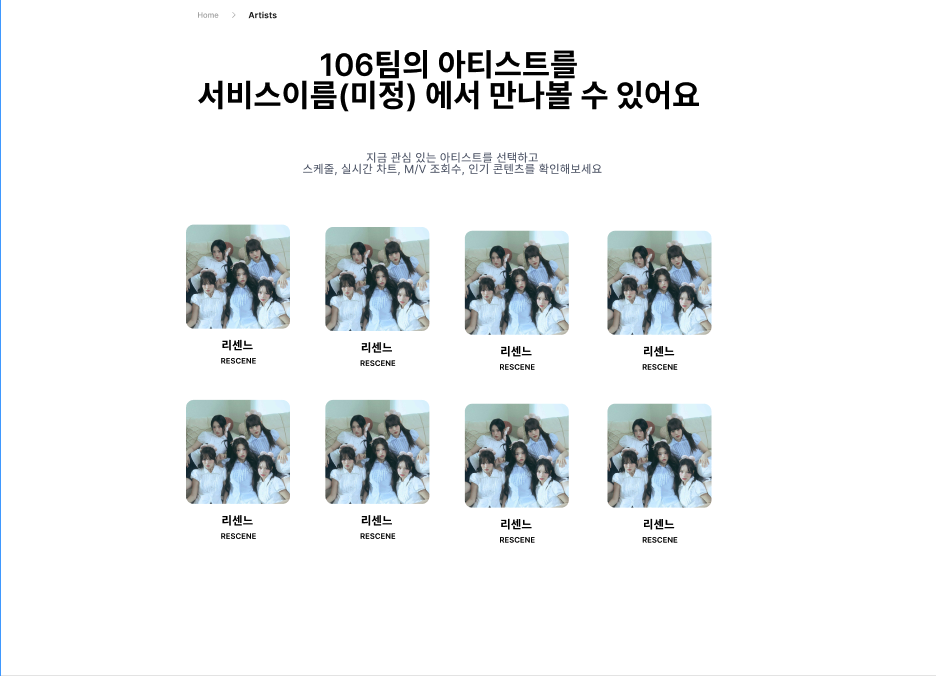
🎯 Artists 페이지 구현
✨ 구현 예시
💻 PC
📱 Mobile
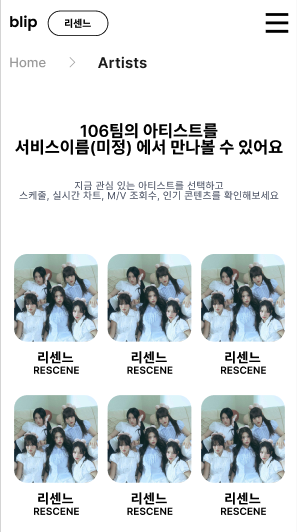
✅ 필요한 요구사항
- 전체 아티스트 목록들이 보여짐
1-1. 전체 아티스트들 allIdolList로 배열에 map메서드를 사용하여 접근 후 불러옴- 팔로우한 아티스트들은 임시로 store에서 가져옴
2-1. 이 때 artist 페이지 최 상단에는 드롭다운에 추가된 아티스트 카드 목록들이 있어야 함
2-2. store에서 드롭다운 박스에 추가 또는 삭제하는 함수를 가져옴- 아이돌마다 모달창에 OOO를 추가할건지 상태 변화를 위해 state 선언
- 추가할 아티스트 클릭하면 모달창으로 드롭다운에 추가할지 말지
- 카드 클릭 시 팔로우 되어있는 아이돌 리스트 즉, idols의 객체가 모달창에 표시된 아이돌에 값을 넣어주고 그 값을 isSelected라는 변수로 지정
5-1. isSelected 라는 변수가 true이면 즉 팔로우 한 아이돌이라면 삭제 함수를 호출 아니면 추가 함수를 호출
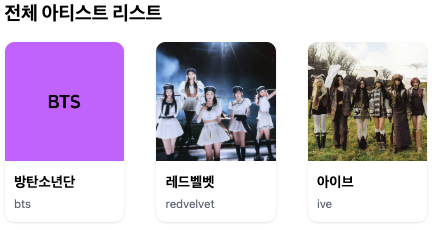
✅ 전체 아티스트 목록 화면에 보여지게 하기
1️⃣ 먼저 allIdolList 변수로 임시 배열 객체 생성
const allIdolList = [
    {
      id: 4,
      idolId: 2,
      title: '방탄소년단 팬사인회',
      type: '팬사인회',
      startDate: '2025-05-03',
      endDate: '2025-05-03',
      location: '서울 코엑스',
      description: '2025년 상반기 뉴진스 팬사인회',
      img: '../src/assets/img/bts.jpg',
      name: '방탄소년단',
      enName: 'bts',
    },
    {
      id: 5,
      idolId: 3,
      title: '레드벨벳 월드투어',
      type: '공연',
      startDate: '2025-05-10',
      endDate: '2025-05-10',
      location: '대구 스타디움',
      description: 'Red Velvet WORLD TOUR FOLLOW AGAIN',
      img: '../src/assets/img/redvelvet.jpg',
      name: '레드벨벳',
      enName: 'redvelvet',
    },
    {
      id: 6,
      idolId: 4,
      title: '아이브 음악방송 출연',
      type: '방송',
      startDate: '2025-05-18',
      endDate: '2025-05-18',
      location: 'KBS 여의도',
      description: '뮤직뱅크 생방송 출연',
      img: '../src/assets/img/ive.jpg',
      name: '아이브',
      enName: 'ive',
    },
  ];
2️⃣ 이후 map() 메서드를 활용하여 화면에 보여질 속성들만 추려냄
{allIdolList.map(item => (
        <CardFrame key={item.id}>
          <div
            role="button"
              tabIndex={0}
            onClick={() => setModalIdol(item)}
            onKeyDown={e => {
              if (e.key === 'Enter' || e.key === ' ') setModalIdol(item);
            }}
            className="cursor-pointer"
          >
            <img
              src={item.img}
              alt={item.name}
              className="h-auto w-full object-cover"
            />
            <div className="p-3">
              <p className="mb-1 text-[1.1rem] font-bold">{item.name}</p>
              <p className="text-[0.9rem] text-gray-500">{item.enName}</p>
            </div>
          </div>
        </CardFrame>
))}- 카드 형태는
CardFrane컴포넌트에서 가져온 후 안의 데이터는 따로 삽입 해줌 - 1단계 임시 완성본
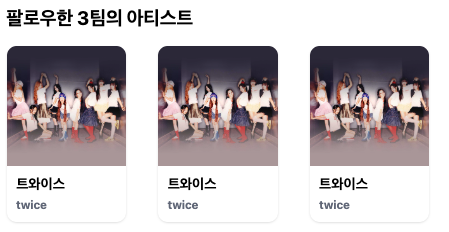
✅ follow 한 아이돌 리스트 화면에 불러오기
1️⃣ follow 한 리스트들은 zustand 파일 store 에서 idols를 받아와서 가져옴
- 이 때 팔로우 추가 혹은 삭제 하는 함수를 함께 불러와 관리할 수 있도록 해야 함
import { useIdolState } from '@/store/idolStore';

function Artist() {
	  const {
    	idols, // 팔로우 되어있는 아이돌 리스트
	    selectedIdolId, // 선택된 아이돌 Id
	    addIdol, // 아이돌을 드롭다운에 추가하는 함수
	    removeIdol, // 아이돌을 드롭다운에서 제거하는 함수
  } = useIdolState();
}
2️⃣ 이후에 몇 팀 팔로우 하였는지 최상단 화면에 표시하기 위하여 map() 메서드를 사용하여 팔로우 한 아이돌 리스트들이 보이게 표시
- 그리고 총 몇 팀 팔로우 하였는지 알기 위하여
idols배열의 길이를 사용
       {idols.map(item => (
         <CardFrame key={item.id}>
           <div
             role="button"
             tabIndex={0}
             onClick={() => setModalIdol(item)}
             onKeyDown={e => {
               if (e.key === 'Enter' || e.key === ' ') setModalIdol(item);
             }}
             className="cursor-pointer"
           >
             <img
               src={item.img}
               alt={item.name}
               className="h-auto w-full object-cover"
             />
             <div className="p-3">
               <p className="mb-1 text-[1.1rem] font-bold">{item.name}</p>
               <p className="text-[0.9rem] text-gray-500">{item.enName}</p>
             </div>
           </div>
         </CardFrame>
       ))}
✅모달 컴포넌트 생성
1️⃣ 모달 컴포넌트를 생성하여 아이돌 카드를 클릭했을 때 모달창을 통해 아이돌 추가 혹은 삭제 여부를 물어보는 기능 추가
- 이 때 모달 컴포넌트에서는 어떤 아이돌을 추가 및 삭제를 할 것인지 물어봐야 함
- 그러기 위해서는 카드마다 아이돌 이름 상태가 변경되므로
state선언
const [modalIdol, setModalIdol] = useState(null);2️⃣ 아이돌 카드 클릭했을 때 불러올 함수 handleConfirm 작성
  const handleConfirm = () => {
    if (!modalIdol) return;

    // 현재 아이돌이 드롭다운(idols)에 존재하는지 확인
    // idols에 즉 팔로우 되어있는 아이돌 리스트에 선택된 아이돌 id와 modal의 id 비교
    const isSelected = idols.some(idol => idol.id === modalIdol.id);

    // 만약 dropdown 에 있는 아이돌이라면 삭제 함수
    if (isSelected) {
      removeIdol(modalIdol.id);
    } else {
      // dropdown에 없다면 추가 후 home으로 이동
      addIdol(modalIdol);
      navigate('/');
    }

    // 모달 닫기
    setModalIdol(null);
};- 먼저
isSelected변수를 선언하여 팔로우 아이돌 배열idols에some()메서드를 사용하여idols배열에 모달에 나오는 상태modalIdol의 id가 포함되어 있는지 확인하여 존재한다면isSelected에 담아줌 - 그 다음 만약 담겨져 있다면
removeIdol함수를 불러옴 - 담겨져 있지 않다면
addIdol함수를 불러옴 - 이후 아이돌 추가를 하게 된다면
navigate를 통해home페이지로 이동 - 그리고 위 작업이 끝나면 모달 상태를
null로 주고 모달창을 닫음
3️⃣ 이후 return에서 modalIdol 상태가 true라면 모달 컴포넌트 IdolConfirmModal에 props로 데이터 전달
    {modalIdol && ( // modalIdol 값이 존재할 때만 모달 컴포넌트 렌더링
      <IdolConfirmModal
        idol={modalIdol} // 모달창에 쓰여지는 아이돌 이름을 모달컴포넌트로 props로 전달
        onConfirm={handleConfirm} // '추가' 또는 '삭제' 버튼 클릭 시 handleConfirm함수 실행
        onCancel={() => setModalIdol(null)} // 취소 버튼 클릭 시 모달 닫음
        isAlreadySelected={idols.some(
          // 현재 선택된 아이돌이 드롭다운 목록에 존재하는지 여부 확인
          i => i.id === modalIdol.id
        )}
      />
)}props로 전달한 데이터 첫번째로modalIdol즉 모달창에 표시될 아이돌 이름을 전달- 그 다음 추가 및 삭제 여부를 판단해주기 위해
handleConfirm함수를 전달 - 그리고 만일 추가 및 삭제랑 번외로 모달창을 닫기 위해
setModalIdol의 값을 null로 전달한 것까지 전달 - 마지막으로 드롭다운에 추가되어 있는지의 여부를 판단하기 위한
props도 전달
✅ props를 전달받기 위한 모달 컴포넌트 IdolConfirmModal 생성 및 구현하기
1️⃣ 먼저 전달 받은 props의 타입 작성 및 인자로 받아오기
type Idol = {
  id: number;
  name: string;
};-
해당
type에서는 모달창에 표시할 아이돌 정보를 위해 id와 이름이 필요해서 사용할 수 있도록 지정 -
아이돌의 id와 이름을 알아야 하므로
type작성
2️⃣ 다음으로 모달 컴포넌트에서 전달받을props의type지정
type Props = {
  idol: Idol; // 모달에 표시할 아이돌 정보
  onConfirm: () => void; // 추가 및 삭제 버튼 클릭 시 실행할 함수
  onCancel: () => void; // 취소 버튼 클릭 시 실행할 함수
  isAlreadySelected: boolean; // 드롭다운에 아이돌의 존재 여부 확인
};
3️⃣ 위에서 지정한 props 들의 type을 기반으로 구조분해하여 사용
export function IdolConfirmModal({
  idol,
  onConfirm,
  onCancel,
  isAlreadySelected,
}: Props)
4️⃣ 마지막으로 return 안에서 모달 컴포넌트 UI 구현
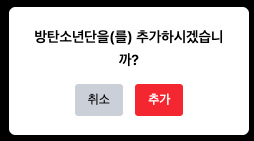
  return (
    <div className="bg-opacity-40 fixed inset-0 z-50 flex items-center justify-center bg-black">
      <div className="w-[300px] rounded-lg bg-white p-6 shadow-lg">
        <p className="mb-4 text-center text-lg font-semibold">
          {isAlreadySelected
            ? `${idol.name}을(를) 삭제하시겠습니까?`
            : `${idol.name}을(를) 추가하시겠습니까?`}
        </p>
        <div className="flex justify-center gap-4">
          <button
            type="button"
            onClick={onCancel}
            className="rounded bg-gray-300 px-4 py-2"
          >
            취소
          </button>
          <button
            type="button"
            onClick={onConfirm}
            className="rounded bg-red-500 px-4 py-2 text-white"
          >
            {isAlreadySelected ? '삭제' : '추가'}
          </button>
        </div>
      </div>
    </div>
);- 이 때 모달창에서
onClick이벤트를 주어 취소가 필요할 때는onCancel함수를 불러옴 - 그리고 상황에 따라 질문 버튼 텍스트가 달라지므로
onConfirm함수를 불러옴 - 그리고 그 상황은
isAlreadySelected의 삼항연산자를 사용하여 판단 후 텍스트 바뀜 - 드롭다운에 포함되어있는 아이돌일 시 삭제 여부 물어봄
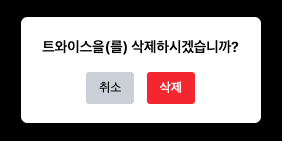
- 드롭다운에 포함되어있지 않은 아이돌 일 시 추가 여부 물어봄

개발 공부...