Spring Boot Project에서 Config File(application.yaml, application.properties 등)을 어떻게 관리할지에 대한 문서입니다.
Config File은 어디에 저장 해야 할까?
Config File은 일반적으로 아래와 같은 AWS Parameter Store, AWS S3, Git Repository, Local Machine 등등 각 저장소에 저장할 수 있습니다. 그래서 가장 많이 사용하는 저장소 4가지를 두고 각 저장소별 특징에 대해 알아보겠습니다.
AWS Parameter Store
AWS Parameter Store 같은 경우에는 암호화해야 하는 Key 값이나 구성 값들을 보통 저장하게 되는데요.
아래와 같은 장점이 있습니다.
- 안전하고 확장 가능한 호스팅 방식 암호 관리 서비스를 사용합니다(관리할 서버가 없음).
- 데이터를 코드와 격리하여 보안 태세를 개선합니다.
- 구성 데이터 및 암호화된 문자열을 계층으로 저장하고 버전을 추적합니다.
- 세분화된 수준에서 액세스를 제어하고 감사합니다.
- Parameter Store는 AWS 리전의 여러 가용 영역에서 호스팅되기 때문에 파라미터를 안정적으로 저장합니다.
암호화된 값으로 안전하게 구성 값들을 관리할 수 있고 어플리케이션이 분산 되어있어도 구성 값들이 별도의 외부 저장소 하나로 관리되기 때문에 쉽게 관리할 수 있습니다.
AWS S3
AWS S3는 Simple Storage Server의 약자로 객체(파일) 저장소 서비스를 제공합니다.
- 보안 측면에서 안전하게 객체들을 저장할 수 있고 관리할 수 있다는 장점이 있습니다.
- AWS Parameter Store와는 다르게 값이 아닌 객체(파일) 단위로 관리하기 때문에 yaml이나 properties 파일로 관리할 수 있어 개발자의 입장에서는 훨씬 더 가독성이 좋고 관리하기에 유용합니다.
Git Repository
Git Submodule를 사용하거나 Private Repository 직접 생성해 그 저장소에 Config File을 두어 관리합니다.
💡 이 방법도 외부 저장소에서 관리하는 방식이라 좋은 방법이지만 AWS의 다른 서비스에 비해서는 보안 측면에서 좋지는 않아서 AWS의 서비스를 사용할 수 있다면 AWS의 서비스를 사용하는 게 더 좋다고 생각합니다.Local Machine
Local Machine은 프로젝트를 실행하는 컴퓨터 안에 Config File을 두어 관리하는 것 입니다.
- Config File이 유실될 가능성 있음
- 다른 분산된 어플리케이션을 실행해야 할 때 번거롭게 옮겨주는 작업을 해줘야합니다.
- 옮겨주는 과정에서 보안관련한 문제가 생길 수 있고 누락되는 경우도 생기게 되고 무엇보다 손이 많이 가는 작업이기 때문에 운영 측면에서는 별로 좋지 않은 방법입니다.
S3 Config 파일 관리
위에 4가지 중에서는 AWS S3가 가장 적절하다는 생각이 들었습니다. AWS Parameter Store과 AWS S3를 둘다사용 해보면서 비교했을 때 AWS Parameter Store은 Secret Key 같은 것을 저장하는 데 특화 되어있다고 생각이 들었습니다. 왜냐하면 Key Value 방식으로 관리하기 때문에 구성 값들을 한눈에 보기가 쉽지 않았고 관리하기에도 손이 많이 간다는 생각이 들었습니다. S3는 보안 측면에서도 좋고 객체 단위로 저장하기 때문에 유관한 구성 값들을 모아 하나의 파일로 관리할 수 있기 때문에 가독성이 올라가기 때문에 유지보수하기 좀 더 적절하다는 생각이 들어 S3를 선택하게 되었습니다.
기본적으로 어플리케이션 환경에 맞게 크게 3가지의 폴더로 구분해서 관리합니다.
- dev
- develop 환경에서만 사용될 설정 파일들을 두고 관리합니다.
- stage
- stage 환경에서만 사용될 설정 파일들을 두고 관리합니다.
- prod
- product 환경에서만 사용될 설정 파일들을 두고 관리합니다.
Spring Cloud Config
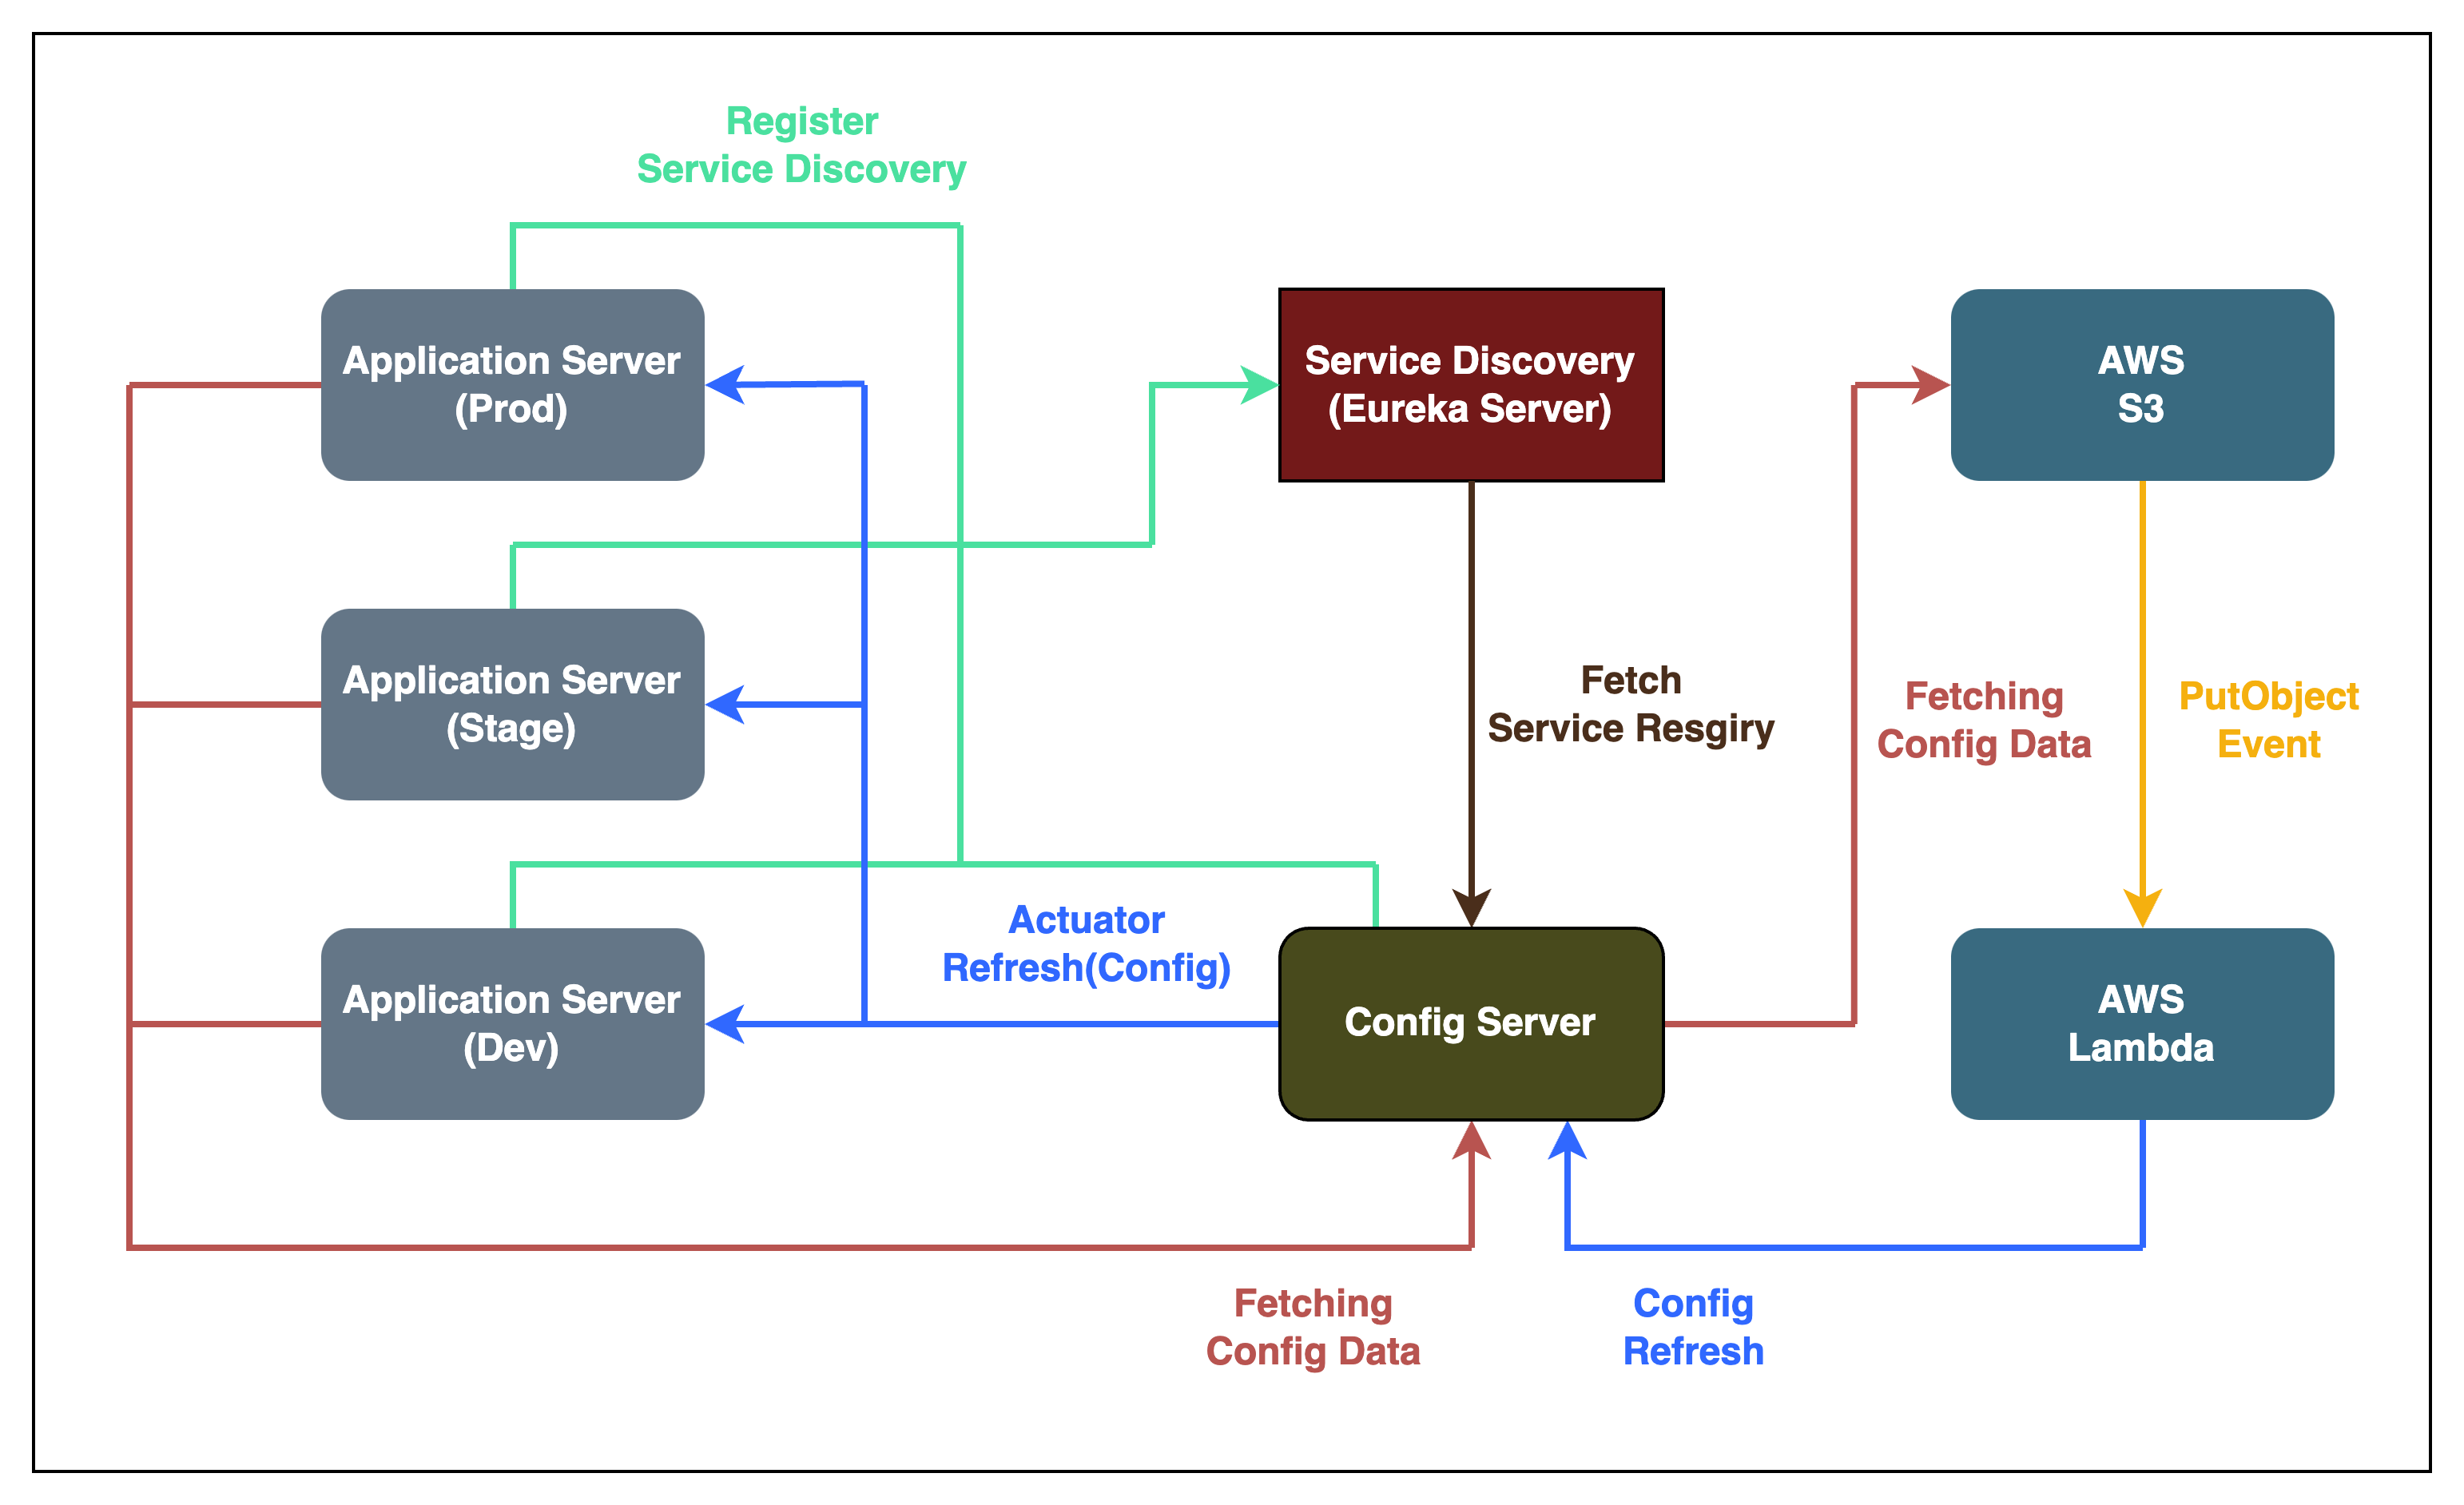
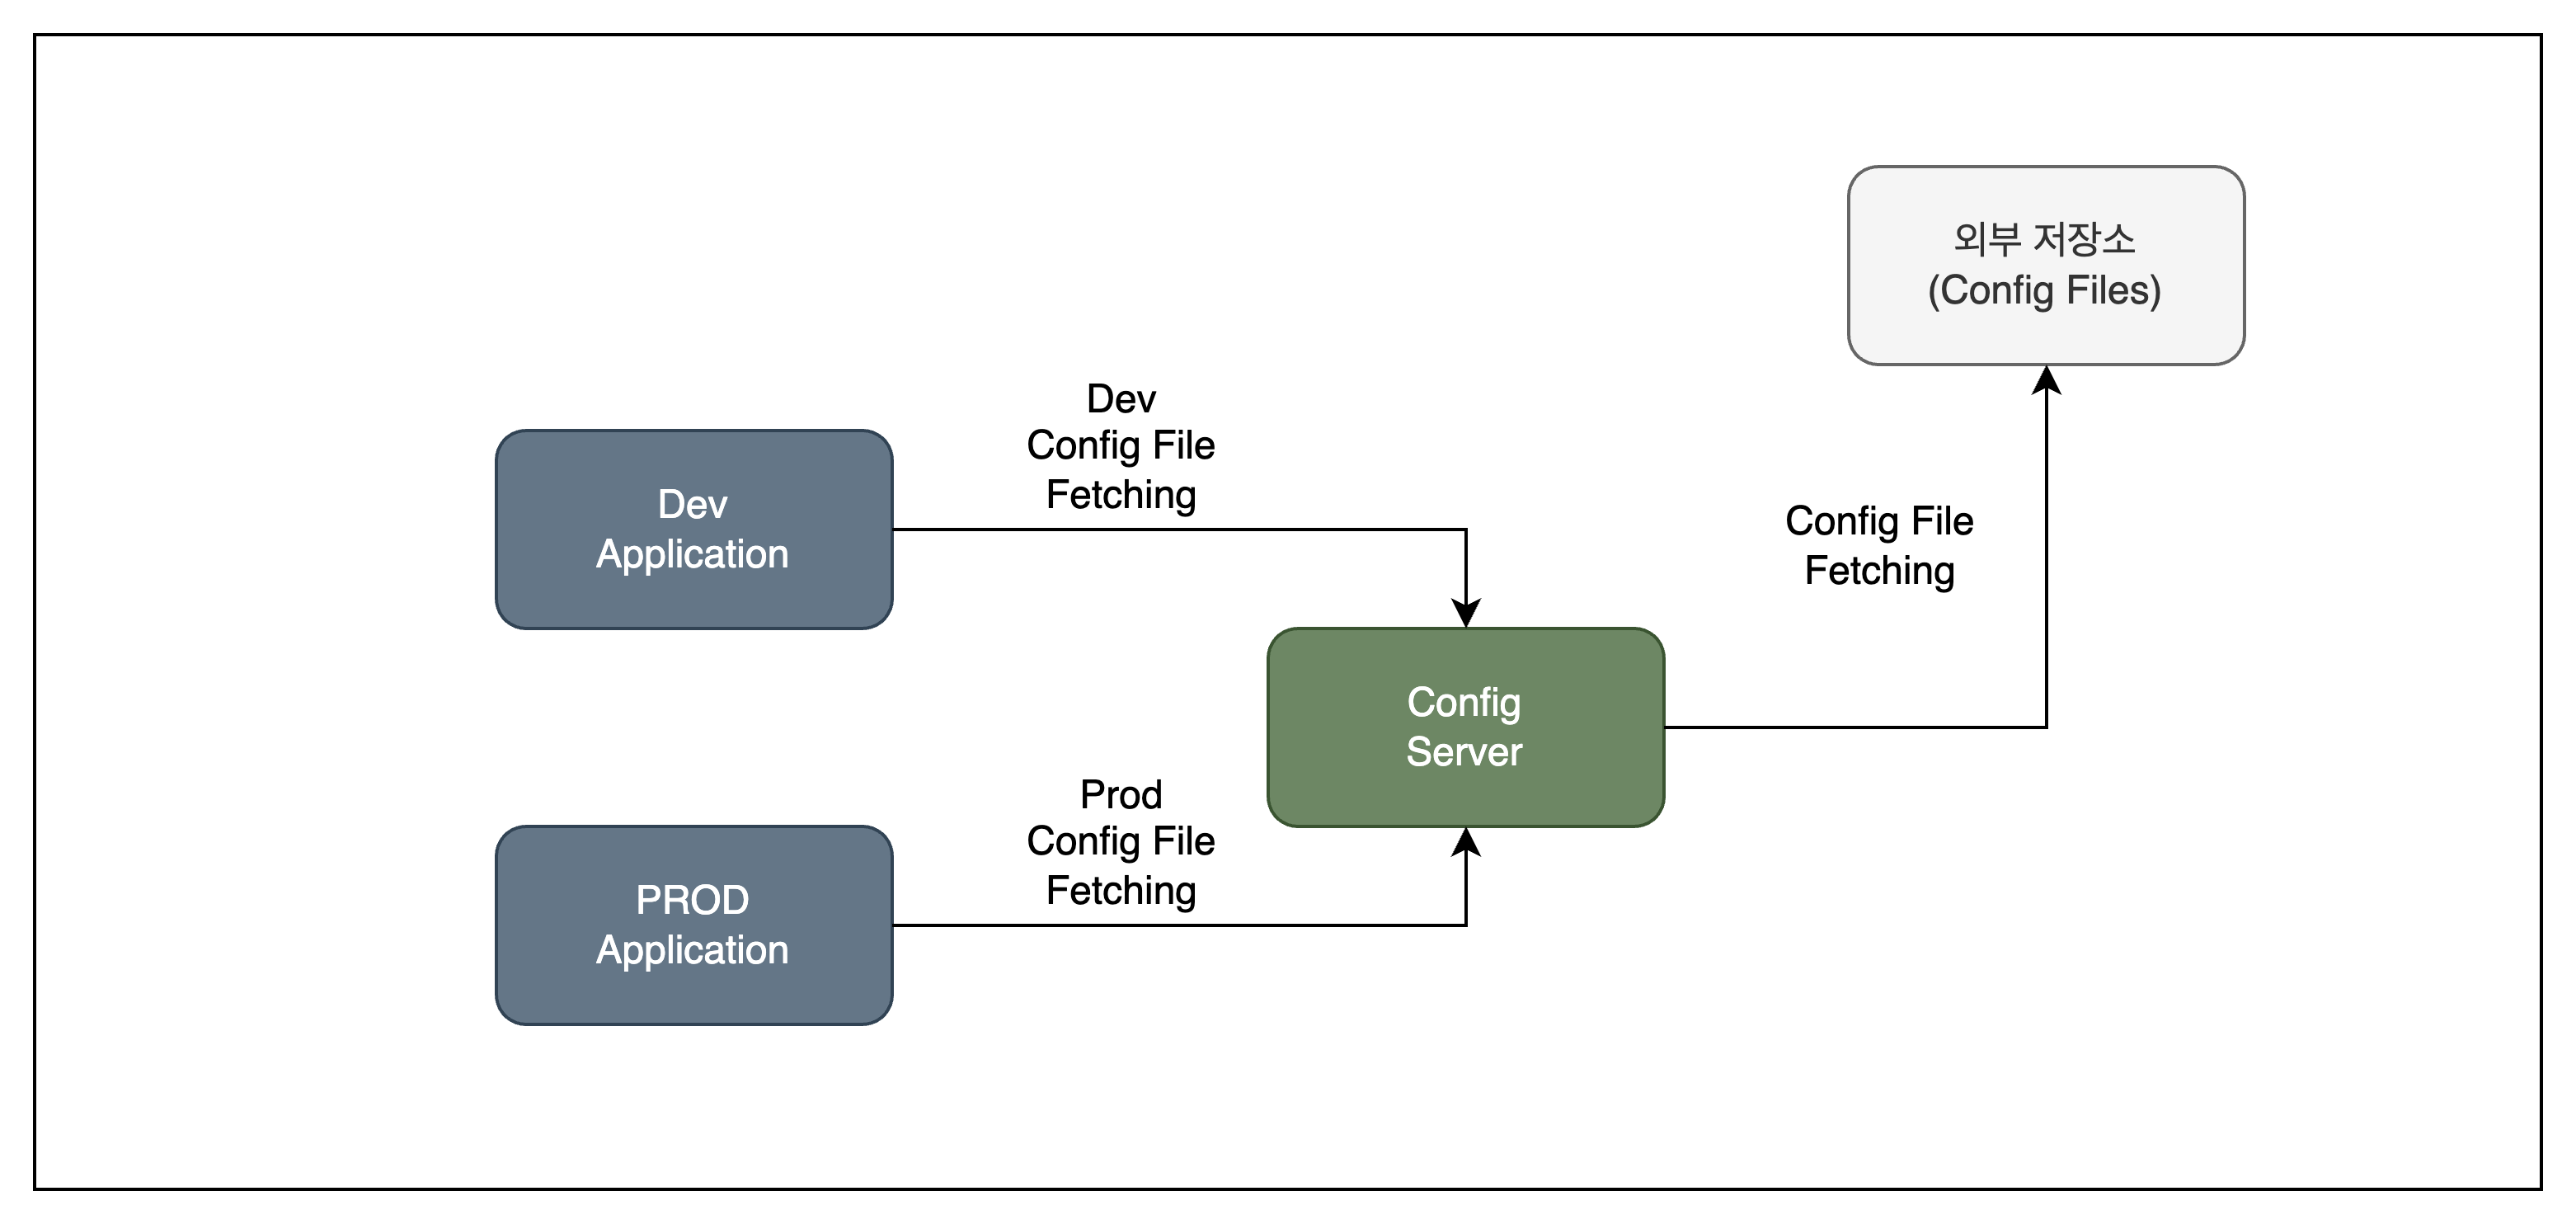
Config File을 외부저장소에 저장하는 경우 Config File들을 사용하려면 Fetching해서 가져온 다음에 어플리케이션을 실행해서 적용할 수 있습니다. 또한 설정 파일이 바뀌는 경우에는 실행중인 어플리케이션을 종료하고 기존 Config File을 삭제하고 변경된 Config File에 대해 다시 Fetching 해서 다시 어플리케이션을 실행해서 적용해야합니다. Config File이 Local Machine에 저장되기 때문에 이러한 File들도 관리해야 하고 어플리케이션이 실행 중일 때 동적으로 구성 값들을 변경할 수 없습니다. 이러한 불편함을 Spring Cloud Config를 통해 해결할 수 있습니다.
Spring Cloud Config는 별도의 구성 값들을 관리하는 Config Server를 두어 해당 Config Server는 외부 저장소에서 Config File을 가져오고 각 Service Application은 Config Server에서 어플리케이션의 Profile에 맞는 구성 값들을 Fetching 해옵니다.
Config Server Gradle 의존성 추가
ext {
    set('springCloudVersion', "2022.0.4")
}

dependencies {
    implementation 'software.amazon.awssdk:s3:2.20.162'
    implementation 'org.springframework.cloud:spring-cloud-config-server'
}

dependencyManagement {
    imports {
        mavenBom "org.springframework.cloud:spring-cloud-dependencies:${springCloudVersion}"
    }
}
AWS S3 저장소에서 Config File을 가져오기 위한 aws sdk 의존성과 config server를 구성하기 위한 spring cloud config server 의존성을 추가해줍니다.
Config Server 설정
spring:
  profiles:
    active: awss3
  cloud:
    config:
      server:
        awss3:
          bucket: your-bucket
          region: your-region
Config Server를 설정해주기 위해 Config File을 가져오기 위한 외부 저장소에 대한 정보를 추가해주어야합니다. S3를 사용하기 때문에 active profile에 awss3를 추가해주시고 bucket과 bucket의 Region을 추가해줍니다.
@SpringBootApplication
@EnableConfigServer
public class ConfigServerApplication {

    public static void main(String[] args) {
        SpringApplication.run(ConfigServerApplication.class, args);
    }
}
마지막으로 EnableConfigServer Annotation을 붙여주면 Config Server 설정이 완료됩니다.
Config Client Gradle 의존성 추가
ext {
    set('springCloudVersion', "2022.0.4")
}

dependencies {
    implementation 'org.springframework.cloud:spring-cloud-starter-config'
}

dependencyManagement {
    imports {
        mavenBom "org.springframework.cloud:spring-cloud-dependencies:${springCloudVersion}"
    }
}
Config Client 설정
spring:
  config:
    import: optional:configserver:${config.server}
  cloud:
    config:
      name: application
			label: ${spring.profiles.active}
  profiles:
    active: dev
spring.config.import에 optional:configserver:${config-server-url}로 설정하면 config server가 동작하지 않는 경우 application이 실행되지 않습니다. 만약 이런걸 원하지 않는다면 spring.cloud.config.url을 통해 config server에 대한 url를 설정해줄수있습니다. 그리고 spring.cloud.config.name에 application이라는 값을 설정해주면 application-xxxx.yaml 이런 파일들을 읽어오게 됩니다. 그리고 profiles.active 설정 값에 따라 config server에 요청할 때 활성화되어 있는 profile의 Config File들만 가져오게 됩니다. 그리고 active profile 별로 폴더 경로가 다르기 때문에 label에 ${spring.profiles.active}를 추가해줍니다.
Spring Boot Actuator
외부 저장소에 있는 Config File이 변경되었을 때 Application에 반영해야하는데 일반적으로는 Application을 종료하고 다시 실행해야합니다. 하지만 실행중일 때 동적으로 Config File을 변경하고자 하면 Spring Boot Actuator를 사용해서 변경할 수 있습니다.
Spring Boot Actuator는 여러 EndPoint를 제공해서 EndPoint를 통해 지표 수집, 추적 등등 어플리케이션을 모니터링할 수 있습니다.
Spring Boot Actuator Gradle 의존성 추가
// spring-boot-actuator 의존성 추가
implementation 'org.springframework.boot:spring-boot-starter-actuator'
Config File에 의해 변경 가능성이 있는 Bean 설정
@RefreshScope
@Service
public class TestService {

    @Value("${database.url}")
    private String url;
}
refresh endpoint로 요청을 하게 되면 RefreshScope를 선언한 Bean들이 변경된 내용을 반영하기 위해 재구성됩니다.
Refresh EndPoint만 노출 설정
management:
  endpoints:
    web:
      exposure:
        include: refresh, health
application.yaml에 위와 같이 설정해 줍니다.
Refresh EndPoint
💡 {basurl}/actuator/refreshService Discovery(Eureka)
서비스 디스커버리란?
💡 분산 시스템에서 각 서비스의 인스턴스를 자동으로 찾아내고, 등록된 서비스들의 상태를 관리하는 기술입니다. 이를 통해 서비스 간의 통신이나 로드 밸런싱과 같은 작업을 쉽게 할 수 있습니다.여기서 Service Discovery가 필요한 이유는 Application에 대한 인스턴스를 Cloud로 관리하기 때문에 ip가 유동적으로 바뀌게 됩니다. Config File이 변경 되었을 때 각 인스턴스의 Refresh Endpoint로 요청해야하는데 ip가 유동적으로 바뀌기 때문에 이러한 문제를 해결하기 위해 Service Discovery인 Eureka를 사용하게 되었습니다.
Eureka Server Gradle 의존성 추가
ext {
    set('springCloudVersion', "2022.0.4")
}

dependencies {
    implementation 'org.springframework.cloud:spring-cloud-starter-netflix-eureka-server'
}

dependencyManagement {
    imports {
        mavenBom "org.springframework.cloud:spring-cloud-dependencies:${springCloudVersion}"
    }
}
Eureka Server 설정
eureka:
  instance:
    appname: jydev-server
  client:
    register-with-eureka: false
    fetch-registry: false
app name을 설정하고 client 설정을 false로 변경해줍니다.
@EnableEurekaServer
@SpringBootApplication
public class EurekaServerApplication {

    public static void main(String[] args) {
        SpringApplication.run(EurekaServerApplication.class, args);
    }

}
그 다음 EnableEurekaServer 어노테이션을 설정 해 주면됩니다.
Application 설정
eureka:
  instance:
    instance-id: ${spring.cloud.client.hostname}:${spring.application.instance_id:${random.value}}
    metadata-map:
      profile: ${spring.profiles.active:${spring.profiles.default}}
  client:
    service-url:
      defaultZone: ${eureka.server.url}
    region: ${eureka.region}
인스턴스를 구분하기 위해 instance-id를 설정하고 dev profile 관련된 config file이 변경되는 경우 active profile이 dev인 application에만 갱신하도록 하기 위해 profile에 대한 정보를 Service Discovery에 등록해야해서 metadata-map으로 현재 활성화된 profile을 등록해줍니다.
Config Server 설정
Config File이 변경되었을 때 Config Server에서 각 Application에 Refresh EndPoint로 요청해서 Config File에 대한 변경사항을 적용해야 하므로 다른 Application에 대한 주소를 가져오기 위해 Config Server도Service Discovery에 등록 해야합니다.
eureka:
  instance:
    instance-id: ${spring.cloud.client.hostname}:${spring.application.instance_id:${random.value}}
  client:
    service-url:
      defaultZone: ${eureka.server.url}
    region: ${eureka.region}
Config File Update
AWS S3 기준으로 Object(Config File)가 Update 되었을 때 Application의 Refresh EndPoint를 호출해 변경된 Config File을 Application에 반영해야합니다. 이것을 자동화 할 수 있는 방법이 있습니다. Object가 Update 되었을 때 S3 Object의 PutObject Event가 발생합니다. 이러한 Event가 발생하면 AWS Lambda를 호출해 Application의 Refresh EndPoint를 호출하는 Flow를 구성해야합니다.
Architecture