1. Node.js와 Express의 관계
Express는 Node를 쉽게 만들 수 있도록 도와주는 프레임워크이다.
2. Node.js와 npm 다운로드
1. cmd 실행
// node.js 설치 여부를 확인
2. node -v// 가장 최신 버전보다, 검증이 된 이전 버전 다운 권장
3. chrome > node.js 검색 > 다운로드// cmd로 돌아와 'study1' 폴더 생성
4. mkdir study1// npm 설치
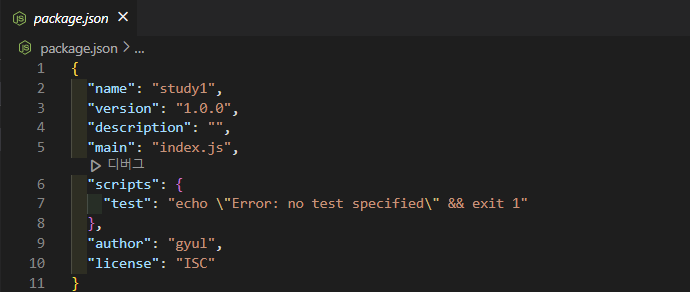
5. npm init// express 설치
6. npm install express --save👩🏻💻
--save를 하는 이유는 package.json의 dependency 항목에 모듈을 추가한다는 의미로, 모듈들의 의존성을 관리할 수 있다.
위 과정을 끝마치고 VSCode에서 study1 폴더를 열어보면 package.json이 생성된 걸 볼 수 있다.
다음으로, BE의 시작점인 index.js 파일을 생성한다.
const express = require('express'); // 다운받은 express를 가져옴
const app = express();
const port = 5000;
app.get('/', (req, res)=> res.send("Hello World"))
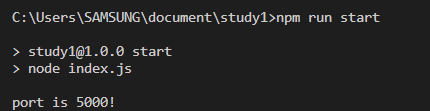
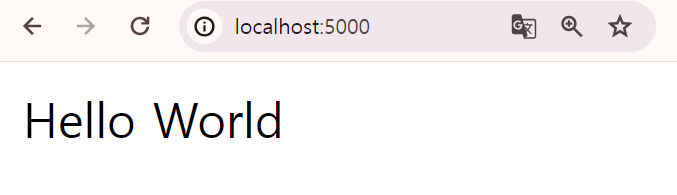
app.listen(port, ()=> console.log(`port is ${port}!`))package.json의 script에 start 추가

이제 npm run start를 하면 app.listen(port, ()=> console.log(`port is ${port}!`)) 부분이 실행되며, chrome에서 localhost:5000을 보면 app.get('/', (req, res)=> res.send("Hello World"))이 실행되는 것을 볼 수 있다,
3. app에 Mongo DB 연결
1. Mongo DB 회원가입 및 로그인
2. cluster 생성
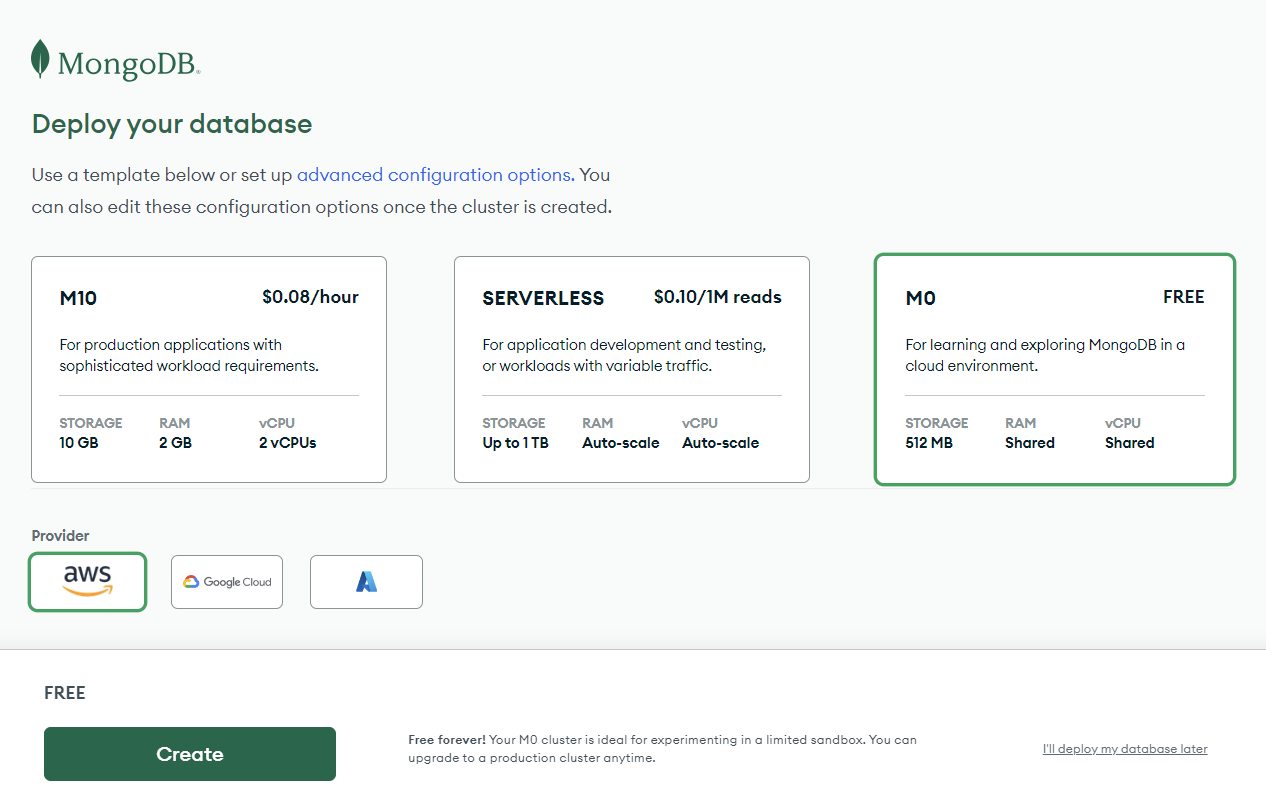
3. connect 탭에서 설정
- 유저 설정 (이름, 비밀번호)
4. 몽구스 다운로드
👩🏻💻 몽구스: 몽고디비를 간단하고 편하게 쓸 수 있게 해주는 툴
npm install mongoose --save
5. index.js 수정
⭐ index.js

const config= require("./config/key")

const mongoose= require('mongoose')
	mongoose.connect(config.mongoURI, {
    	useNewUrlParser: true, useUnifiedTopology: true
	}).then(()=>{
    console.log('Mongo DB Connect')
	}).catch((error)=> console.log(error))
⭐ key.js
if(process.env.NODE_ENV === 'production'){
// 개발 환경이 production (배포 후일 때)
module.exports= require('./prod')
} else{
// 개발 환경이 developement (로컬일 때)
module.exports= require('./dev')
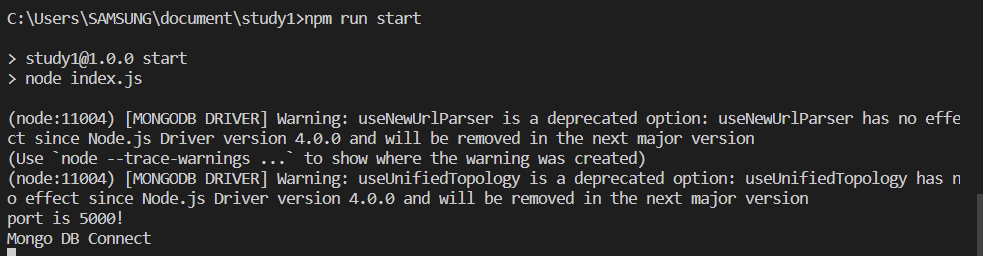
}6. npm start
하단에 MONGO DB Connect는 MONGO DB가 잘 연결 되었을 때 나타나도록 하는 콘솔 메세지이다.
4. User model 생성
👩🏻💻 Model: Schema를 감싸주는 역할
회원가입 시, 유저의 정보가 유저 DB에 들어간다. 이렇게 DB에 보관하기 위해서는 유저 모델 스키마를 만들어야 한다.
- root 디렉토리에 models 폴더 생성
- models > User.js 파일 생성
const mongoose= require('mongoose')
const saltRounds= 10

const userSchema= mongoose.Schema({
    name: {
        type: String,
        maxLength: 50
    },
    email: {
        type: String,
        trim: true,
        unique: 1
    },
    password: {
        type: String,
        minLength: 5
    },
    lastname: {
        type: String,
        maxLength: 50
    },
    // role을 주는 이유는 관리자와 유저를 구분하기 위해 (ex. 1: 관리자, 0: 일반유저)
    role: {
        type: Number,
        default: 0
    },
    image: String,
    token: {
        type: String
    },
    // 토큰 유효기간
    tokenExp: {
        type: Number
    }
})

// model로 schema를 'User'로 감싸줌
const User= mongoose.model('User', userSchema)

module.exports = { User }👩🏻💻 용어 정리
- saltRounds : salt를 이용하여 비번 암호화를 하려면 salt가 필요하다. 이때 salt의 글자수를 지정해줌
- trim : 예를들어 Gwon gyul@naver.com이라 하면 Gwon과 gyul 사이에 공백을 제거해줌
- unique : 중복 불가
5. git과 연결 (feat. SSH)
난 이미 repo랑 연결을 해놓음. 근데 원래 node.modules은 너무 많으니까 git에 올리지 않아도 됨 어떻게? .gitignore파일 생성 (git add . 하기 전에 생성해야함, 만약 git add를 했다면 git rm --cached node_modules -r로 이전 기록을 지워줌)
5-1. gitignore 파일
파일에서 node.modules는 많은 modules이 들어있으며 굳이 gitHub에 올리지 않아도 된다.
따라서 module을 설치할 때마다 node.modulse가 업데이트 되는데 이러한 변경사항을 무시하겠다는 의미 !
사용방법
- .gitignore 파일 생성
- 무시하고 싶은 폴더명 써주기
⭐ .gitignore

node_modules
5-2. SSH 연결
git과 git hub가 안전하게 연결할 수 있도록 SSH(secure shell)을 이용한다.
// git bash에서 SSH 설정 유무 확인
1. ls -a ~/.ssh// ssh key 생성하는 방법 참고> 구글 Git SSH 사이트
2. ssh-keygen -t ed25519 -C "your_email@example.com"
다시 ls -a ~/.ssh 입력 후, 정상적으로 키 페어 파일이 생성되면 아래와 같이 나타납니다.
$ ls -a ~/.ssh
./  ../  id_ed25519  id_ed25519.pub
5-3. ssh-agent에 SSH 키 추가
- ssh agent를 background에서 켠다.
// ❌ 홈페이지에 있는 명령어를 입력 했더니 오류 발생
$ start ssh-agent in the background

// ⭕ 아래와 같이 입력하니 오류 해결
$ eval $(ssh-agent)
Agent pid 2111- ssh private key를 ssh-agent에 넣는다.
$ ssh-add C:/Users/SAMSUNG/.ssh/id_ed25519
Identity added: C:/Users/SAMSUNG/.ssh/id_ed25519 (gyyul1008@gmail.com)- ssh key를 나의 github에 넣는다.
// public key 복사
$ clip < ~/.ssh/id_ed25519.pub- GitHub> Setting > SSH and GPG keys > new SSH key
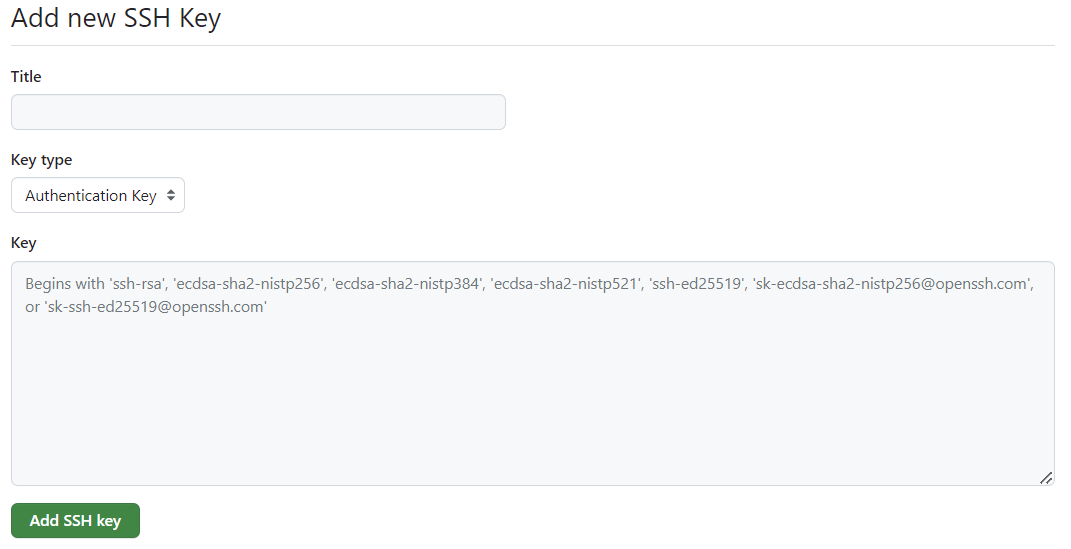
Title은 아무렇게 해주고,Key는 clip으로 복사했으니 Ctrl+v 해주면 Git에 Key를 등록하는 것이 완성된다. 이로써 안전하게 git과 연결되었다 !!