📌 여는 말
프로젝트를 구현할 때 직무를 기반으로 고민상담.. 일종의 솔루션을 제공해주는 chatbot을 구현해보고싶어 node, react, 구글의 dialogflow api를 사용하여 간단하게 챗봇 기능을 구현해보았다. 그러나 막상 프로젝트에는 socket 사용해서 사용자 간 채팅기능 구현...ㅎ
1. 구글 dialogflow 사용
1. 구글 클라우드 플랫폼에서 프로젝트 생성
2. dialogflow에서 create agent를 통해 이름, 시간대, 위치, 상담원 언어 선택
3. 다시 구글 클라우드 플랫폼으로 돌아와 service account 생성
원래 agent setting에 값이 있어야 하는데, 이는 프로젝트를 생성한 구글 클라우드 플랫폼에서 생성할 수 있다.
4. json으로 key 생성
service account를 생성했으면, key를 생성해야 한다. 그리고 폴더 하나 만들어주고 저장!!
나 같은 경우는, 바탕화면에 프로젝트를 만들 'chatbot app'폴더에 저장해두었다.
1. node, react, dialogflow 통신과정
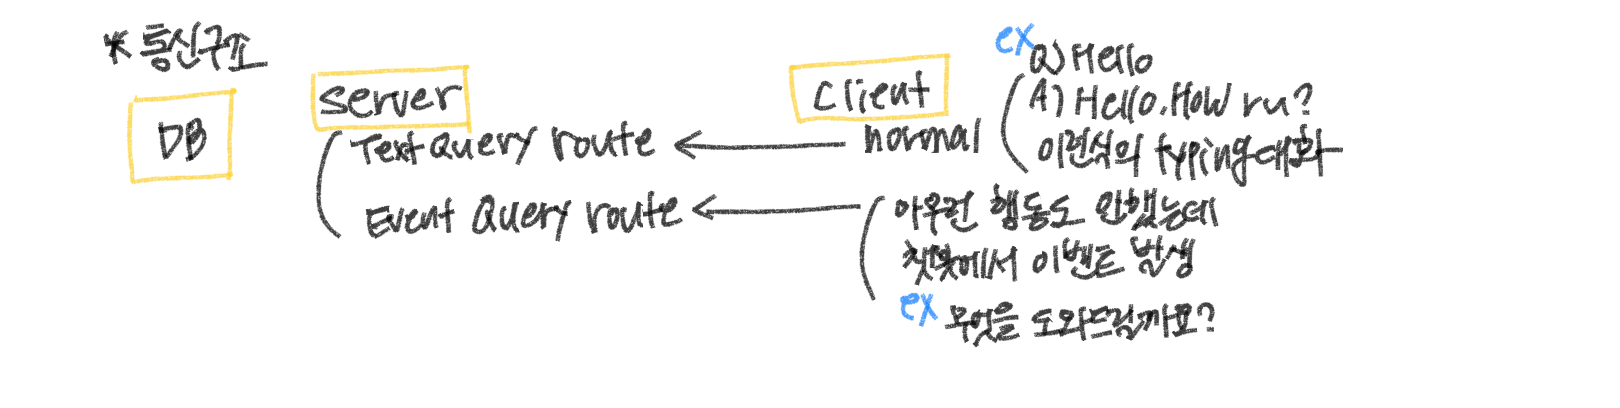
server에는 두 가지 라우터가 존재한다.
첫 번째는 Text Query Route이다. client(react)가 input에 안녕하세요와 같이 typing 대화를 server에게 보내면 server는 이를 dialogflow api에 요청을 보내고, dialogflow는 요청에 대한 응답을 가공하여 다시 라우터에게 보내준다.
Text Query Route
- client :
안녕하세요~입력- server : client로부터 받은
안녕하세요~를 dialogflow에게 요청- dialogflow : server로부터 받은 요청을 보고 응답을 server에게 전송
- client는
안녕하세요~에 대해서 챗봇에게안녕하세요. 무엇을 도와드릴까요?라는 답을 받음
두 번째는 Event Query Route이다. clinet가 챗봇에 입장했을 때, 챗봇에서 어서오세요, 챗봇 귤귤입니다. 무엇을 도와드릴까요?와 같이 클라이언트에게 메세지를 보내는 것을 처리하는 곳이다.
3. server 구성
📁 index.js
const express = require("express");
const path = require("path");
const bodyParser = require("body-parser");
const app = express();

app.use(bodyParser.urlencoded({ extended: true }));
app.use(bodyParser.json());

app.use('/api/dialogflow', require('./server/routes/dialogflow'));

if (process.env.NODE_ENV === "production") {

  app.use(express.static("client/build"));

  app.get("*", (req, res) => {
    res.sendFile(path.resolve(__dirname, "client", "build", "index.html"));
  });
}

const port = process.env.PORT || 5000;

app.listen(port, () => {
  console.log(`Server Running at ${port}`)
});
index.js에서는 app.use를 통해 Text Query Route와 Event Query Route가 들어있는 route > dialogflow.js을 라우팅 한다.
만약 process.env.NODE_ENV === "production"로 설정하여 이 챗봇을 배포 후에 사용한다면, "client/build" 디렉토리를 사용하여 모든 요청에 대해 "client/build/index.html" 파일을 제공한다.
📁 dialogflow.js
const express = require('express');
const router = express.Router();
const dialogflow = require('dialogflow');

const config = require('../config/keys');

// dev.js에 projectId와 sessionId를 넣어둠
const projectId = config.googleProjectID
const sessionId = config.dialogFlowSessionID
const languageCode = config.dialogFlowSessionLanguageCode

// dialogflow로 데이터를 전송할 때 session 필요
const sessionClient = new dialogflow.SessionsClient();
const sessionPath = sessionClient.sessionPath(projectId, sessionId);

// ✅ Text Query Route
router.post('/textQuery', async (req, res) => {

    // The text query request.
    const request = {
        session: sessionPath,
        queryInput: {
          ✔️  text: {
          		// body Parser 모듈이 있기 때문에 body.text를 사용 가능
             ✔️  text: req.body.text,
                languageCode: languageCode,
            },
        },
    };

    const responses = await sessionClient.detectIntent(request);
    console.log('Detected intent');
    const result = responses[0].queryResult;
    console.log(`  Query: ${result.queryText}`);
    console.log(`  Response: ${result.fulfillmentText}`);

    res.send(result)
})

// ✅ Event Query Route
router.post('/eventQuery', async (req, res) => {
    const request = {
        session: sessionPath,
        queryInput: {
           ✔️ event: {
              ✔️ name: req.body.event,
                languageCode: languageCode,
            },
        },
    };

    const responses = await sessionClient.detectIntent(request);
    console.log('Detected intent');
    const result = responses[0].queryResult;
    console.log(`  Query: ${result.queryText}`);
    console.log(`  Response: ${result.fulfillmentText}`);

    res.send(result)
})

module.exports = router;
여기서 두 개의 라우터가 dialogflow에게 요청을 보낼 때 차이점이 있다.
Text Query Route는 text를 보내는 것이고, Event Query Route는 event를 보내는 것이기 때문에 event로 바꿔주었다.
또한, Text Query Route는text: req.body.text이며, Event Query Route는 name: req.body.event라는 차이가 있다.
const responses = await sessionClient.detectIntent(request); 을 통해 dialogflow에게 보내준 후, response를 얻고 res.send(result) 로 다시 서버에게 보내준다.
4. client 구성
📁 Chatbot.js > textQuery 함수
const textQuery = async (text) => {
        // 아래 객체는 client가 보낸 메세지 처리 부분
        let conversation = {
            // 누가 보냈는지를 넣어줌= 나 자신(user)
            who: 'user',
            content: {
                text: {
                    text: text
                }
            }
        }
        //client가 보낸 메세지를 저장하기 위해 dispatch 호출
        dispatch(saveMessage(conversation))

        // chatbot이 보낸 메세지 처리 부분

  		// text는 user가 보낸거!!
        const textQueryVariables = {
            text : text
        }
        try {
            //서버에 있는 textQuery 라우터에게 req
            const response = await Axios.post('/api/dialogflow/textQuery', textQueryVariables)

            for (let content of response.data.fulfillmentMessages) {

                conversation = {
                    who: 'bot',
                    content: content
                }
				// chatbot이 보낸 메세지를 저장하기 위해 dispatch 호출
                dispatch(saveMessage(conversation))
            }
        } catch (error) {
            conversation = {
                who: 'bot',
                content: {
                    text: {
                        text: " Error just occured, please check the problem"
                    }
                }
            }
            dispatch(saveMessage(conversation))
        }
    }
Text Query Route와 통신을 하는 textQuery function이다.
여기서는 두 가지의 기능을 구현했다.
- 내가 보낸 메세지 처리
- 챗봇이 보낸 메세지 처리
내가 보낸 메세지는 보낸 사람(=나), 메세지 내용을 객체로 담고, dispatch를 통해 객체를 저장해주었다.
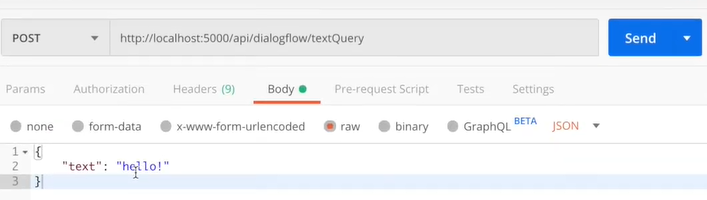
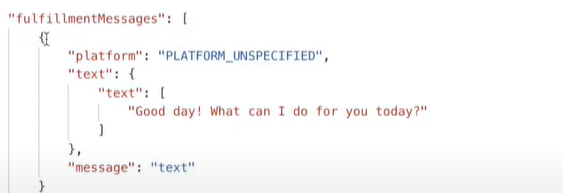 위의 이미지는
 textQueryValues= {text : hello}를 post로 전송하고 받은 결과이다.
"text": {
	"text":[
    	"Good day! What can I do for you today?"
    ]
}
위에서 이 부분은 아래에 content 부분과 동일하다.
let conversation = {
  // 누가 보냈는지를 넣어줌= 나 자신(user)
  who: 'user',
  content: {
    text: {
      text: text
    }
  }
}
챗봇이 보낸 메세지는 메세지 내용을 axios.post를 통해 Text Query Route로 전송한다. for of문으로, 라우터로부터 받은 응답인 response.data.fulfillmentMessages을 순회하며 content를 찾고, conversation 객체에 추가하여 dispatch로 저장한다.
📁 Chatbot.js > eventQuery 함수
useEffect(() => {
  eventQuery('welcome to Chat')
}, [])

const eventQuery = async (event) => {

        const eventQueryVariables = {
            event
        }
        try {
            const response = await Axios.post('/api/dialogflow/eventQuery', eventQueryVariables)
            for (let content of response.data.fulfillmentMessages) {

                let conversation = {
                    who: 'bot',
                    content: content
                }

                dispatch(saveMessage(conversation))
            }
        } catch (error) {
            let conversation = {
                who: 'bot',
                content: {
                    text: {
                        text: " Error just occured, please check the problem"
                    }
                }
            }
            dispatch(saveMessage(conversation))
        }
    }
5. 리덕스
보통은 메세지 데이터를 DB에 넣고, DB에 있는 ㄴ데이터를 가져와 그 데이터를 채팅창에 보여준다. 하지만 챗봇 기능은 새로고침하면 리셋되는 형태로 구현할 것이기 때문에 데이터 베이스가 필요없다.
DB를 데이터를 사용하지 않고 데이터를 저장하는 방법에는 두 가지가 있다.
- state에 저장
- 리덕스 스토어에 저장
나는 리덕스를 이용해서 메세지들을 채팅창에 뿌려줄 수 있도록 한다.
이게 무슨 말이냐? 리덕스에 값을 저장해주지 않으면 챗봇의 input에 값을 작성하고 전송해도 채팅창에 값이 올라가지 않는다. 그렇기 때문에 리덕스를 사용하여 채팅창에 메세지가 보이도록 해야한다.
dispatch(saveMessage(conversation)) 여기서 saveMessage는 action의 이름이다. dispatch가 reducer에게 state의 값을 수정하라고 action과 함께 요청을 보낸다. reducer는 이전 state값(빈 메세지)과 action을 통해 새로운 값을 반환하고 subscribe가 UI에 반영한다.