개요
터미널에서 뭐든 하려면 정말 많이 쓰이는 vim.
이 vim을 커스터 마이징을 하려고 한다.
Vundle
Vundle은 vim bundle의 줄임말로, vim plugin manager가 되겠다.
vundle을 고른 이유는 그냥 검색해서 제일 먼저 나온거라 의미가 없다...
Vundle의 설치는 아주 간단하다.
1. 아래와 같이 Vundle github에서 clone을 해준다.
git clone https://github.com/VundleVim/Vundle.vim.git ~/.vim/bundle/Vundle.vim- 뒤에 나올 .vimrc 파일에 vundle을 위한 코드를 넣어준다.
- 끝 (나머지는 .vimrc에서 하면 된다)
.vimrc
.vimrc 파일은 Vim Runtime Configuration File의 줄임말로, vim 설정 파일이라고 알면 된다
오늘은 다음 기능들을 추가해줬다.
- Vundle
https://github.com/VundleVim/Vundle.vim
Vundle 플러그인을 위해 다음을 추가했다. 대부분 Vundle github에서 소개하고, 필요하다고 한 것을 넣은것이며 내가 알아야 할 것은 vundle#begin()과 call vundle#end() 사이에 아래와 같이 넣는 것이다.
call vundle#begin()
...
Plugin 'github/repo'
...
call vundle#end()
위와 같이 하면 'github/repo'의 plugin을 설치하겠다는 의미이다.
그렇게 해서... vimrc 파일에 다음과 같이 넣었다.
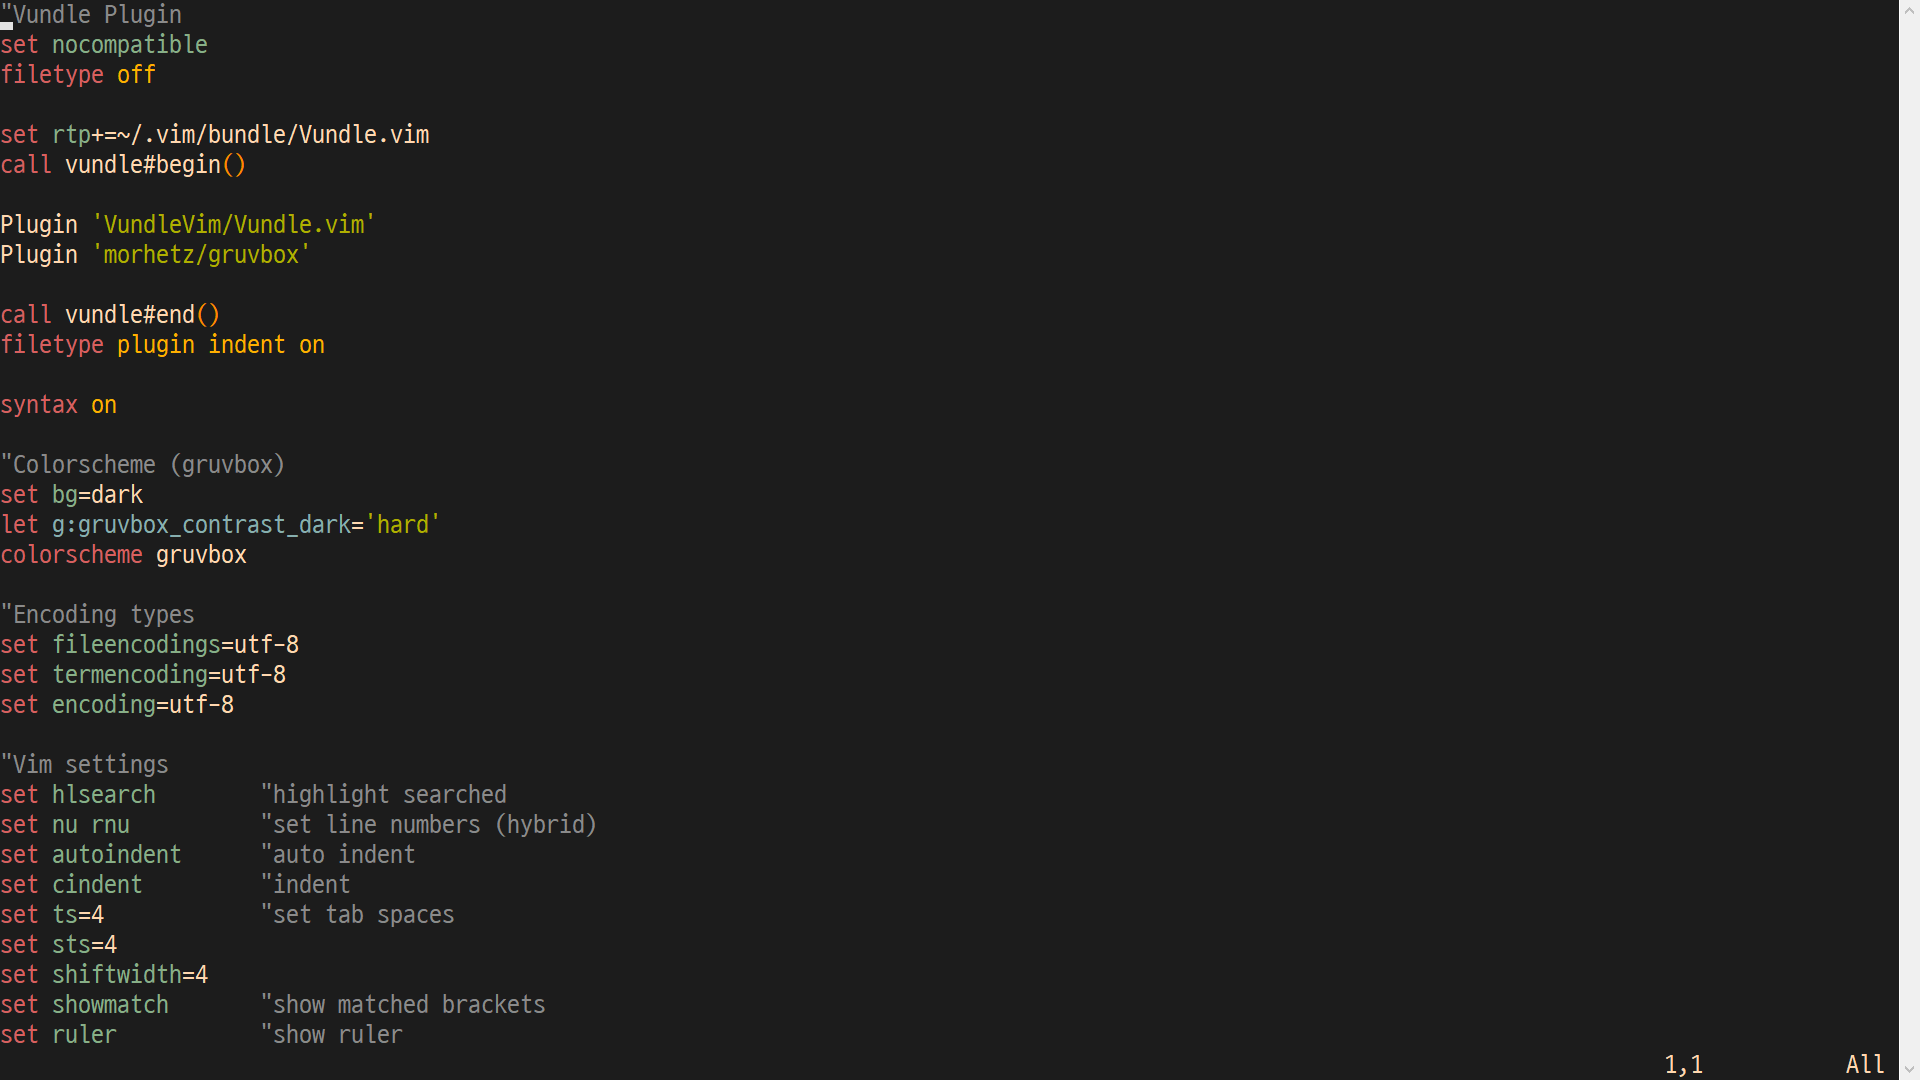
"Vundle Plugin
set nocompatible
filetype off

set rtp+=~/.vim/bundle/Vundle.vim
call vundle#begin()

Plugin 'VundleVim/Vundle.vim'
Plugin 'morhetz/gruvbox'

call vundle#end()
filetype plugin indent on

syntax on- Gruvbox
https://github.com/morhetz/gruvbox
vim을 꾸미는데는 플러그인이 최고일 것이다.
그 중 gruvbox라는 scheme 플러그인을 찾아서 적용시켜줬다.
vimrc 파일에 다음과 같이 넣어주면 된다.
"Colorscheme (gruvbox)
set bg=dark
let g:gruvbox_contrast_dark='hard'
colorscheme gruvbox
set bg=dark는 안해줘도 된다. 좀 더 어두운 배경으로 설정한 것으로 default는 medium이다.
scheme 적용 모습. 예쁘다.
- Encoding type
우리는 한국인이므로 한국어가 필요하다. 따라서 encoding type도 설정해주었다.
"Encoding types
set fileencodings=utf-8
set termencoding=utf-8
set encoding=utf-8- vim 설정
vimrc에는 여러가지를 설정 할 수 있는다.
여기저기 설명되어있는 곳이 많아서 설명은 생략한다..!
(사실 주석으로 설명돼있다. 안까먹으려고 넣어놨다)
아무튼 필요해 보이는 것들을 설정해서 넣어줬다.
"Vim settings
set hlsearch        "highlight searched
set nu rnu          "set line numbers (hybrid)
set autoindent      "auto indent
set cindent         "indent
set ts=4            "set tab spaces
set sts=4
set shiftwidth=4
set showmatch       "show matched brackets
set ruler           "show ruler
dockerfile
이젠 이걸 docker에서 자동으로 하도록 해야한다
해야 할 일은 다음과 같다
- Vundle 다운받기
- 만들어둔 .vimrc를 root폴더에 다운
- gruvbox 다운받기
- vim에서 PluginInstall 실행 (-c 옵션으로 실행)
- 환경변수 TERM을 xterm-256color로 설정 (gruvbox 적용을 위해)
그래서 다음과 같이 했다.
## Customizing vim
WORKDIR "/root"
RUN set -xe \
    # cloning Vundle(vim bundle, plugin manager) from github
    && git clone https://github.com/VundleVim/Vundle.vim.git ~/.vim/bundle/Vundle.vim \
    # download .vimrc file from my github (what I've made)
    && wget -O ./.vimrc https://raw.githubusercontent.com/KkoalaB/myUbuntu/master/configuration%20files/.vimrc \
    # cloning gruvbox (scheme)
    && git clone https://github.com/morhetz/gruvbox.git ~/.vim/bundle/gruvbox \
    # vim plugin installation
    && vim -c 'PluginInstall' -c 'qa!'
    # set environment variable 'TERM'
ENV TERM=xterm-256color
vim이 예뻐졌다.