
인터럽트 핸들러
인터럽트 핸들러(Interrupt Handler)는 인터럽트 서비스 루틴(Interrupt Service Routine, ISR)이라고도 하며, 인터럽트가 발생했을 때 특정 기능을 수행하는 부분이다.
인터럽트는 기존 실행되던 코드를 일시정지하고 실행되는 부분이기 때문에, 기능에 지장을 주지 않게 위해서는 flag 변수 바꾸는 것과 같은 최소한의 동작을 해야 한다.
인터럽트 핸들러 작성
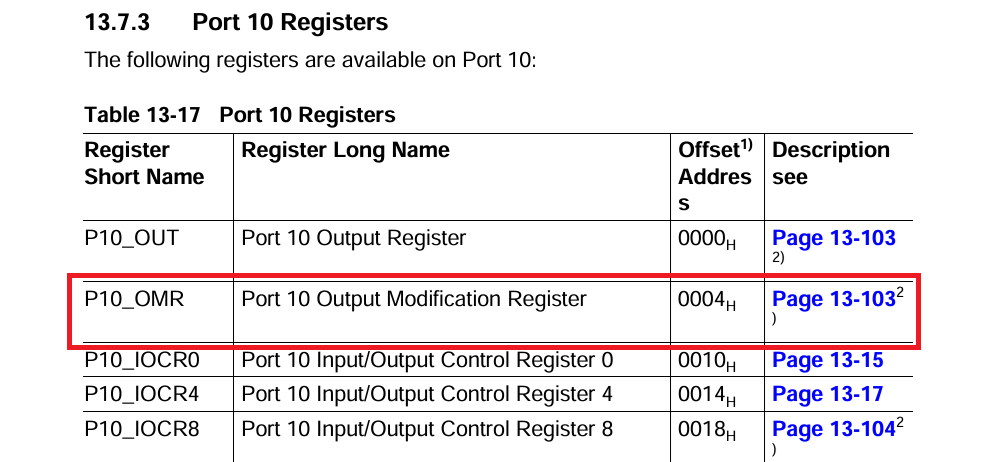
우리는 LED를 켜고 끄고 할 예정인데, 이는 Output Modification Register(OMR)로 output을 toggle해줄 수 있다.
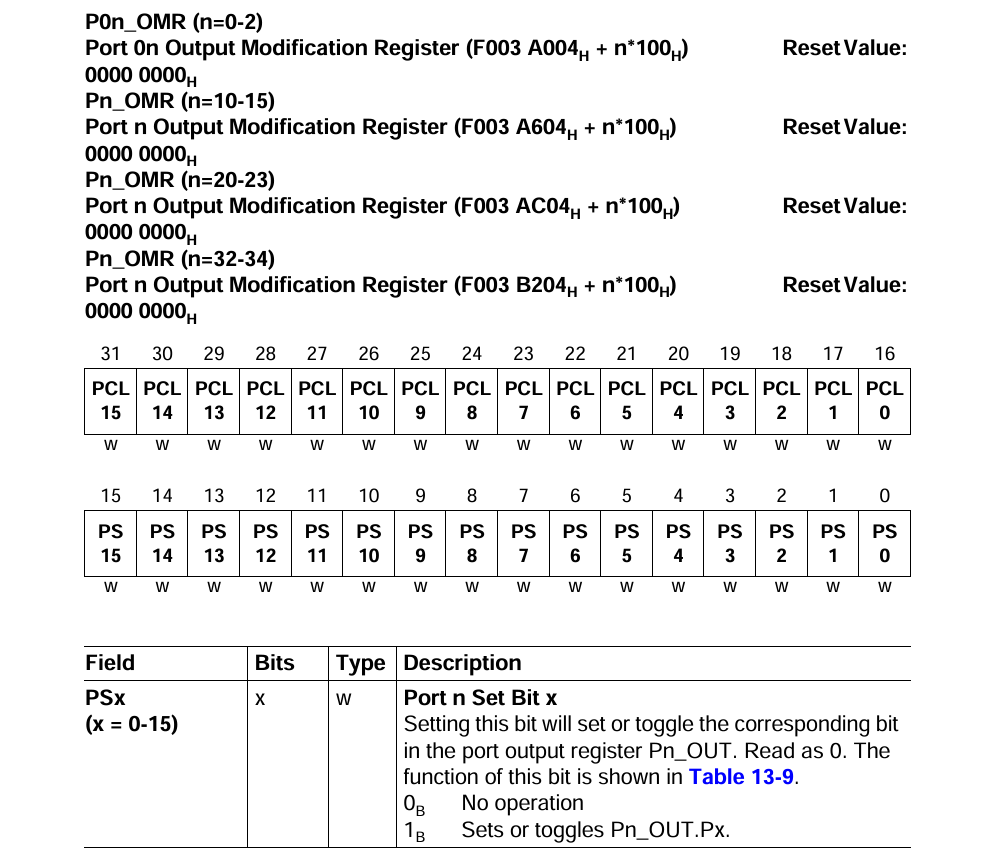
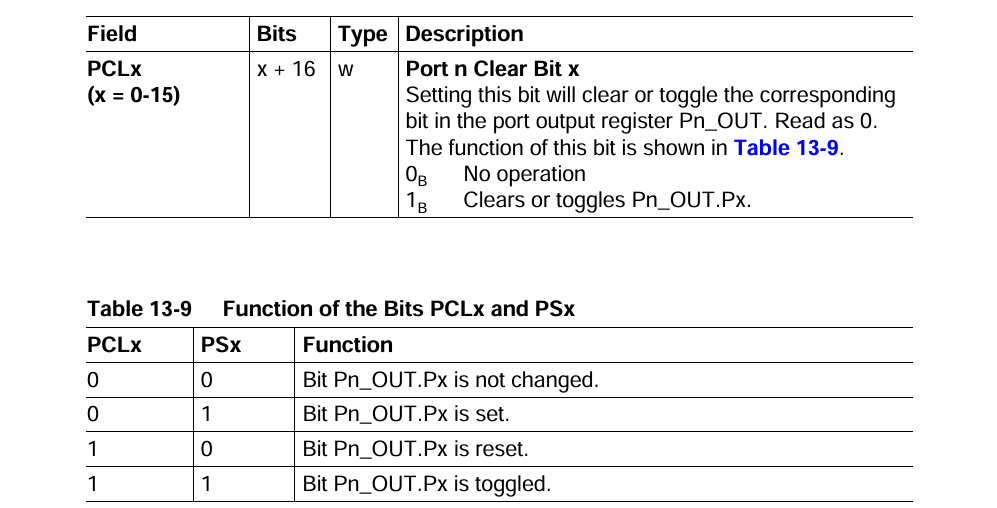
Port10의 OMR 레지스터는 위와 같이 set 하는 PSx와 clear하는 PCLx field가 있으며, 원하는 port의 bit를 어떻게 설정하느냐에 따라 not changed, set, reset, toggled로 설정할 수 있다.
우리는 함수가 실행될 때마다 toggle 해주고 싶기 때문에, PCLx를 1, PSx를 1로 설정해준다.
아래의 코드처럼 작성할 수 있다.
#define PS1		1
#define PCL1	17
#define PS2		2
#define PCL2	18

void toggleLED_RED(void) {
	/*
    0000 0000 0000 0010
	0000 0000 0000 0010
    */
    P10_OMR.U |= (1<<PS1 | 1<<PCL1);
    P10_OMR.U = 0;
}

void toggleLED_BLUE(void) {
	/*
    0000 0000 0000 0100
	0000 0000 0000 0100
    */

    P10_OMR.U |= (1<<PS2 | 1<<PCL2);
    P10_OMR.U = 0;
}
여기서 P10_OMR.U = 0으로 다시 레지스터를 바로 초기화 해주었는데, 레지스터를 1 1로 설정해주면 클럭마다 이 레지스터를 확인해서 계속 toggle을 하기 때문에 원하는 대로 기능을 하지 않는다. 따라서 toggle해준 후에 바로 다시 0 0으로 만들어주었다.
인터럽트 핸들러 등록
인터럽트는 IFX_INTERRUPT(isr, vectabNum, prio)로 등록할 수 있다.
isr(interrupt service routine)을 Vecotr table의 priority number에 등록하는 것이다.
따라 들어가보면 뭔가 말도 안되는 동작을 하는 어셈블리 코드로 이어진다.
#define IFX_INTERRUPT(isr, vectabNum, prio) IFX_INTERRUPT_INTERNAL(isr, vectabNum, prio)

#define IFX_INTERRUPT_INTERNAL(isr, vectabNum, prio) \
__asm__ (".ifndef .intr.entry.include                        \n"\
		".altmacro                                           \n"\
		".macro .int_entry.2 intEntryLabel, name # define the section and inttab entry code \n"\
        "	.pushsection .\\intEntryLabel,\"ax\",@progbits   \n"\
        "	__\\intEntryLabel :                              \n"\
        "		svlcx                                        \n"\
        "		movh.a  %a14, hi:\\name                      \n"\
        "		lea     %a14, [%a14]lo:\\name                \n"\
        "		ji      %a14                                 \n"\
        "	.popsection                                      \n"\
		".endm                                               \n"\
		".macro .int_entry.1 prio,vectabNum,u,name           \n"\
			".int_entry.2 intvec_tc\\vectabNum\\u\\prio,(name) # build the unique name \n"\
		".endm                                               \n"\
        "                                                    \n"\
		".macro .intr.entry name,vectabNum,prio              \n"\
			".int_entry.1 %(prio),%(vectabNum),_,name # evaluate the priority and the cpu number \n"\
		".endm                                               \n"\
		".intr.entry.include:                                \n"\
		".endif                                              \n"\
        ".intr.entry "#isr","#vectabNum","#prio               );\
따라서 다음과 같이 작성해준다.
// SW1(D2 포트, P2.0)을 누르면 10번 interrupt인 toggleLED_RED 실행
IFX_INTERRUPT(toggleLED_RED, 0, 10);
// SW2(D3 포트, P2.1)을 누르면 20번 interrupt인 toggleLED_BLUE 실행
IFX_INTERRUPT(toggleLED_BLUE, 0, 20);
실행
이제 main()에서 initGPIO()와 initERU()를 실행하여 초기화해주면 인터럽트로 LED를 켜고 끌 수 있다.
main () {
...
	initGPIO();
    initERU();

    while(1) {

    }
}
결과
최종 코드
#include "Ifx_Types.h"
#include "IfxCpu.h"
#include "IfxScuWdt.h"

IfxCpu_syncEvent g_cpuSyncEvent = 0;

#define PS1     1
#define PCL1    17
#define PS2     2
#define PCL2    18

// SW1(D2 포트, P2.0)을 누르면 10번 interrupt인 toggleLED_RED 실행
IFX_INTERRUPT(toggleLED_RED, 0, 10);
// SW2(D3 포트, P2.1)을 누르면 20번 interrupt인 toggleLED_BLUE 실행
IFX_INTERRUPT(toggleLED_BLUE, 0, 20);

void toggleLED_RED(void) {
    /*
    0000 0000 0000 0010
    0000 0000 0000 0010
    */
    P10_OMR.U |= (1<<PCL1 | 1<<PS1);
    P10_OMR.U = 0;
}

void toggleLED_BLUE(void) {
    /*
    0000 0000 0000 0010
    0000 0000 0000 0010
    */
    P10_OMR.U |= (1<<PCL2 | 1<<PS2);
    P10_OMR.U = 0;
}

void initGPIO(void) {
    // SW1, SW2
    P02_IOCR0.B.PC0 = 0x2;
    P02_IOCR0.B.PC1 = 0x2;

    // LED Blue, Red
    P10_IOCR0.B.PC1 = 0x10;
    P10_IOCR0.B.PC2 = 0x10;
}

void initERU(void)
{
    // P2.0
    SCU_EICR1.B.EXIS1 = 0x2; // 0b010, Input 3 2 is selected
    SCU_EICR1.B.FEN1 = 1; // Falling Edge eNabled
    SCU_EICR1.B.EIEN1 = 1; // External Input ENabled
    SCU_EICR1.B.INP1 = 0x0; // Input Node Pointer to OGU0

    SCU_IGCR0.B.IGP1 = 0x1; // Interrupt Gating Pattern IOUT

    SRC_SCU_SCU_ERU1.B.SRPN = 10; // Set Service Request Priority Number to 10
    SRC_SCU_SCU_ERU1.B.SRE = 1; // Service Request Enabled
    SRC_SCU_SCU_ERU1.B.TOS = 0x0; // Set Type of Service Control to CPU0

    // P2.1
    SCU_EICR1.B.EXIS0 = 0x1; // 0b001, Input 2 1 is selected
    SCU_EICR1.B.FEN0 = 1; // Falling Edge eNabled
    SCU_EICR1.B.EIEN0 = 1; // External Input ENabled
    SCU_EICR1.B.INP0 = 0x1; // Input Node Pointer to OGU1

    SCU_IGCR0.B.IGP0 = 0x1; // Interrupt Gating Pattern IOUT

    SRC_SCU_SCU_ERU0.B.SRPN = 20; // Set Service Request Priority Number to 20
    SRC_SCU_SCU_ERU0.B.SRE = 1; // Service Request Enabled
    SRC_SCU_SCU_ERU0.B.TOS = 0x0; // Set Type of Service Control to CPU0
}

void core0_main(void)
{
    /* 여기부터 ~~ */
    IfxCpu_enableInterrupts();

    /* !!WATCHDOG0 AND SAFETY WATCHDOG ARE DISABLED HERE!!
     * Enable the watchdogs and service them periodically if it is required
     */
    IfxScuWdt_disableCpuWatchdog(IfxScuWdt_getCpuWatchdogPassword());
    IfxScuWdt_disableSafetyWatchdog(IfxScuWdt_getSafetyWatchdogPassword());

    /* Wait for CPU sync event */
    IfxCpu_emitEvent(&g_cpuSyncEvent);
    IfxCpu_waitEvent(&g_cpuSyncEvent, 1);
    /* ~~ 여기까지는 원래 있던 코드이다. */

    initGPIO();
    initERU();

    while(1)
    {

    }
}
SW1을 누르면 파란색이 켜지고,
SW2을 누르면 빨간색이 켜진다.