📗 템플릿
❗ 토비의 스프링 3.1 vol 1 정리입니다.
책을 읽지 않으셨다면 이해가 어려울 수 있습니다!
📖 UserDao 예외처리하기
📝 JDBC 수정 기능의 예외처리 코드
- JDBC API를 이용한 DAO코드인 deleteAll()
public void deleteAll() throws SQLException {
	Connection c = dataSource.getConnection();

    // 예외 발생시 중단됨//
    PreparedStatement ps = c.prepareStatement("delete from users");
    ps.executeUpdate();
    ////////////////////

    //위에서 예외 발생시 close()실행x - 치명적인 오류 발생 가능
    ps.close();
    c.close();
}
🔸 리소스 반환과 close()
- close()메소드는 리소스를 반환한다는 의미로 이해하는 것이 좋음.
- 서버환경에서는 만들어둔 리소스를 돌려가며 사용하는 편이 유리
- 대신 리소스는 빠르게 반환해야 한다.
- 리소스 반환이 안되면 리소스 고갈로 문제가 발생
- 예외 발생 시에도 리소스를 반환하도록 수정한 deleteAll()
public void deleteAll() throws SQLException {
	Connection c = null;
    PreparedStatement ps = null;

    try{
    	c = dataSource.getConnection();
        // 예외 발생 가능 코드//
        ps = c.prepareStatement("delete from users");
        ps.executeUpdate();
        ////////////////////
    } catch (SQLException e){
    	throw e; //아직은 예외를 완벽히 처리하는 코드가 없으므로 일단 던지기
    } finally {
    	if (ps != null){
        	try{ //ps.close()에서도 예외 발생 가능
            	ps.close();
            } catch (SQLException e) { //예외 일단 잡아두기
            }
        }
        if (c != null){
        	try{ //c.close()에서도 예외 발생 가능
            	c.close();
            } catch (SQLException e) { //예외 일단 잡아두기
            }
        }
    }
}
📝 JDBC 조회 기능의 예외처리
- JDBC를 이용한 getCount()메소드
public int getCount() throws SQLException {
	Connection c == dataSource.getConnection();

    //예외 발생 가능//
    PreparedStatement ps = c.preparedStatement("select count(*) from users");

    ResultSet rs = ps.executeQuery();
    rs.next();
    int count = rs.getInt(1);
    ///////////////

    //예외 발생시 close()는 실행 x//
    res.close();
    ps.close();
    c.close();

    return count;
}- JDBC 예외처리를 적용한 getCount()메소드
public int getCount() throws SQLException {
	Connection c = null;
    PreparedStatement ps = null;
    ResultSet rs = null;

    try{
    	c = dataSource.getConnection();
        // 예외 발생 가능 코드//
        ps = c.preparedStatement("select count(*) from users");
       	rs = ps.executeQuery();
    	rs.next();
        return rs.getInt(1);
        ////////////////////
    } catch (SQLException e){
    	throw e;
    } finally { //close()는 생성의 역순으로 하는 것이 원칙!
        	if (rs != null){
        	try{
            	rs.close();
            } catch (SQLException e) {
            }
        }
    	if (ps != null){
        	try{
            	ps.close();
            } catch (SQLException e) {
            }
        }
        if (c != null){
        	try{
            	c.close();
            } catch (SQLException e) {
            }
        }
    }
}
📖 변하는 것과 변하지 않는 것
부제 : 디자인 패턴 적용하기
📝분리와 재사용을 위한 디자인 패턴 적용
- JDBC try/catch/finally 코드의 문제점
- 이중 중첩 try/catch/finally문이 모든 메소드마다 반복됨
- JDBC를 이용한 메소드들의 변하는 부분과 변하지 않는 부분 구분하기
public void deleteAll() throws SQLException {
//변하지 않는 부분 - getCount와 중복되는 부분//
Connection c = null;
PreparedStatement ps = null;
try{
c = dataSource.getConnection();
////////////////////////////////////////////
//변하는 부분 - getCount와 다른 부분//
ps = c.prepareStatement("delete from users");
//////////////////////////////////
//변하지 않는 부분 - getCount와 중복되는 부분//
ps.executeUpdate();
} catch (SQLException e){
throw e;
} finally {
if (ps != null){ try { ps.close(); } catch (SQLException e) {} }
if (c != null){ try{ c.close(); } catch (SQLException e) {} }
////////////////////////////////////////////
}
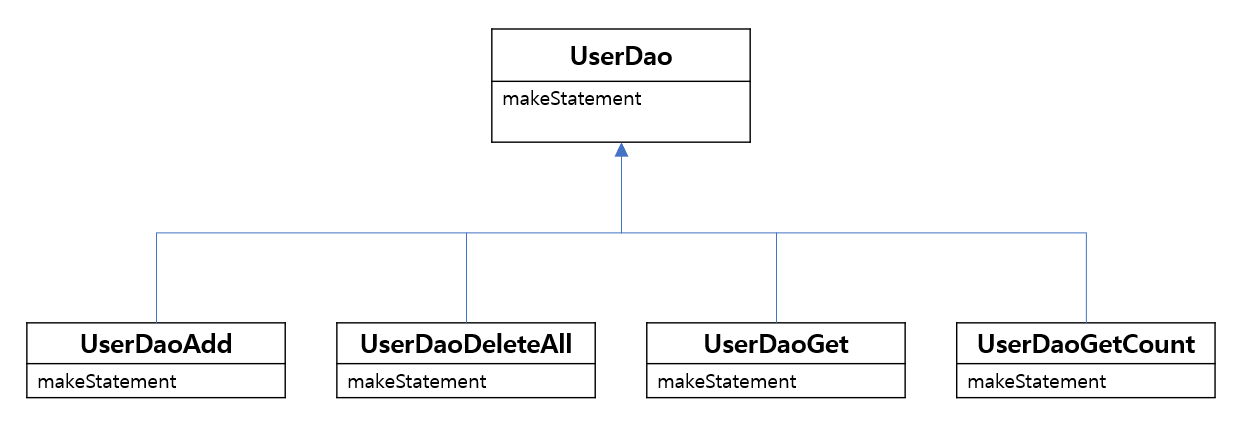
}🔷 템플릿 메소드 패턴 적용하기
🔙 템플릿 메소드 패턴이란
상속한 서브클래스에서 메소드 오버라이딩으로 기능을 재정의하여 확장하는 패턴
여기서는 변하지 않는 부분을 슈퍼클래스, 변하는 부분을 서브 클래스로 두자!
- 추출하여 독립시킨 makeStatement()를 추상 메소드 선언으로 변경
//UserDao의 메소드이므로 UserDao도 추상클래스로 변경!
abstract protected PreparedStatement makeStatement(Connection c) throws SQLException;- UserDao를 상속받는 서브클래스 생성하여 위 추상메소드를 구현
public class UserDaoDeleteAll extends UserDao {

    //변하는 부분을 오버라이딩으로 재정의//
	protected PreparedStatement makeStatement(Connection c) throws SQLException {
    	PreparedStatement ps = c.prepareStatement("delete from users");
        return ps;
    }
}
◼ 장단점
- 장점
- UserDao의 기능을 확장하고 싶으면 서브클래스를 통해 확장가능
- 기능 확장에 UserDao클래스의 변화가 없음 - OCP원칙
- 단점
- DAO로직마다 새로운 클래스를 만들어야함
- 상당히 많은 클래스가 생성될 것- 확장되는 구조가 템플릿을 만든순간 고정됨
- 변하는 부분과 변하지 않는 부분의 관계가 컴파일시점에 정해짐
- 관계의 유연성이 떨어짐
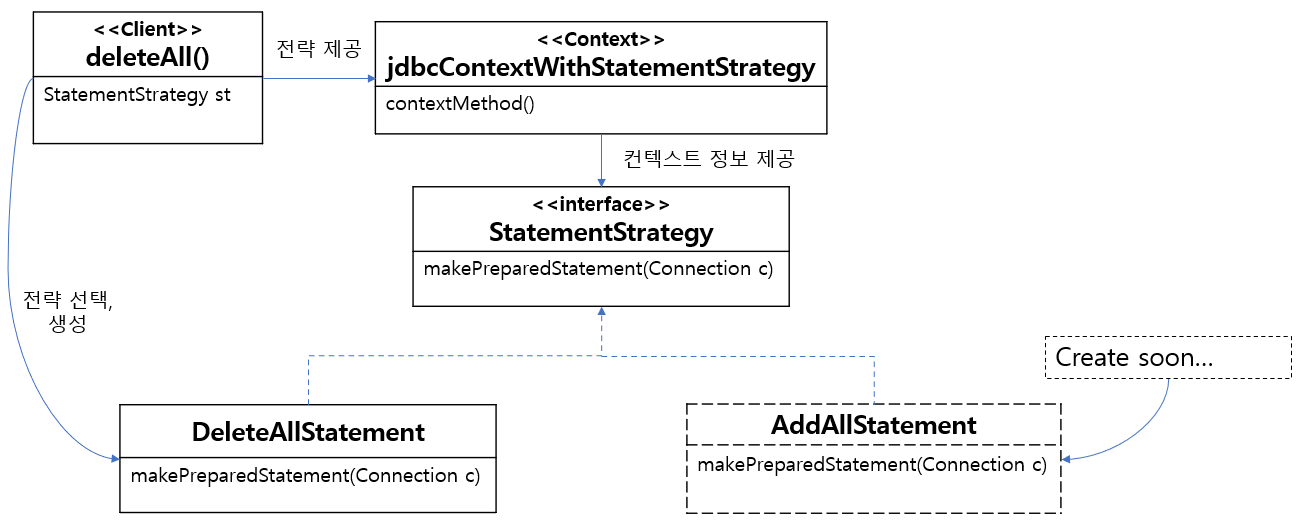
🔷 전략 패턴 적용하기
🔙 전략패턴이란
클라이언트가 상황에 따라 취사 선택이 가능하도록 하는 패턴
변하지 않는 부분을 동작하다가 변하는 부분이 왔을 때, 그에 맞는 기능을 꺼내서 쓰는 흐름으로 만들어 보자!
-
deleteAll()컨택스트 정리해보기
- DB커넥션 가져오기
- PreparedStatement를 만들어줄 외부 기능 호출하기 - 전략(변하는 부분)
- 전달받은 PreparedStatement 실행
- 예외가 발생하면 이를 다시 메소드 밖으로 던지기
- 모든 경우에 만들어진 PreparedStatement와 Connection을 적절히 닫아주기
-
전략 인터페이스 생성
package springbook.user.dao;
...
public interface StatementStrategy {
	PreparedStatement makePreparedStatement(Connection c) throws SQLException;
} - 인터페이스 구현
package springbook.user.dao;
...
public class DeleteAllStatement implements StatementStrategy {
	public PreparedStatement makePreparedStatement(Connection c) throws SQLException {
    	PreparedStatement ps = c.prepareStatement("delete from users");
        return ps;
    }
}- 구현한 전략 사용하는 deleteAll()메소드
public void deleteAll() throws SQLException {
	...
    try {
    	c = dataSource.getConnection();

        StatementStrategy strategy = new DeleteAllStatement(); //전략 선택
        ps = strategy.makePreparedStatement(c);

        ps.executeUpdate();
    } catch (SQLException e) {
    	...
}- 변하지 않는 부분 컨택스트 메소드로 분리하기
public void jdbcContextWithStatementStrategy(StatementStrategy stmt) throws
		SQLException {
	Connection c = null;
    PreparedStatement ps = null;

    try{
    	c = dataSource.getConnection();

        ps = stmt.makePreparedStatement(c);

        ps.executeUpdate();
    } catch (SQLException e){
    	throw e;
    } finally {
    	if (ps != null){ try { ps.close(); } catch (SQLException e) {} }
        if (c != null){ try{ c.close(); } catch (SQLException e) {} }
    }
}- 최종 deleteAll()메소드
//deleteAll()이 클라이언트 책임을 담당
public void deleteAll() throws SQLException {
	StatementStrategy st = new DeleteAllStatement(); //전략 선택
    jdbcContextWithStatementStrategy(st); //전략을 포함한 컨택스트 호출
}
📖 JDBC 전략 패턴의 최적화
📝 add()메소드에 전략 패턴 적용하기
- add()의 변하는 부분을 분리한 클래스
public class AddStatement implements StatementStrategy {
	public PreparedStatement makePreparedStatement(connection c) throws SQLException {
    	PreparedStatement ps =
        	c.preparedStatement("insert into users(id, name, password)
            	values(?,?,?)");
      	ps.setString(1, user.getId());
        ps.setString(2. user.getName());
        ps.setString(3, user.getPassword());

        return ps;
    }
}- User정보를 생성자로부터 제공받도록 수정
public class AddStatement implements StatementStrategy {
		User user;

        public AddStatement(User user) {
        	this.user = user;
        }
    	...
    }
}- add()메소드에서 AddStatement사용
public void add(User user) throws SQLException {
	StatementStrategy st = new AddStatement(user);
    jdbcContextWithStatementStrategy(st);
}- 현재 코드의 개선점
- 기능이 많아질수록 더욱 많아지는 클래스의 갯수
- 매 전략마다 새로운 인터페이스 구현체를 만들어야하기 때문 - 전달해야할 부가적인 정보가 존재할 경우 생성자와 인스턴스 변수를 만들어야함
- 기능이 많아질수록 더욱 많아지는 클래스의 갯수
📝 개선점을 토대로 개선하기
◼ 클래스가 많아지는 문제
- 내부 클래스로 만들기
public void add(User user) throws SQLException {
	class AddStatement implements StatementStrategy {
    	User user;

        public AddStatement(User user) {
        	this.user = user;
        }

		public PreparedStatement makePreparedStatement(connection c)
        	throws SQLException {
    		PreparedStatement ps =
        		c.preparedStatement("insert into users(id, name, password)
            		values(?,?,?)");
      		ps.setString(1, user.getId());
       	 	ps.setString(2. user.getName());
        	ps.setString(3, user.getPassword());

        return ps;
    	}
	}

    StatementStrategy st = new AddStatement(user);
    jdbcContextWithStatementStrategy(st);
}- 익명 내부 클래스로 만들기
public void add(final User user) throws SQLException {
    jdbcContextWithStatementStrategy( //피라미터로 내부클래스 선언!
    		new StatementStrategy() {
				public PreparedStatement makePreparedStatement(connection c)
        			throws SQLException {
    				PreparedStatement ps =
        			c.preparedStatement("insert into users(id, name, password)
            			values(?,?,?)");
      				ps.setString(1, user.getId());
       	 			ps.setString(2. user.getName());
        			ps.setString(3, user.getPassword());

        			return ps;
    			}
			}
	});
}- 익명 내부 클래스를 적용한 deleteAll() 메소드
public void deleteAll() throws SQLException {
	jdbcContextWithStatementStrategy( //피라미터로 내부클래스 선언!
    	new StatementStrategy() {
			public PreparedStatement makePreparedStatement(connection c)
        			throws SQLException {
                return c.prepareStatement("delete from users");
            }
        }
	);
}
📖 컨텍스트와 DI
다른 DAO에서도 사용가능한 jdbcContextWithStatementStrategy를 분리해보자
📝 클래스 분리
jdbcContextWithStatementStrategy를 하나의 클래스로 만들어서 분리
package springbook.user.dao;
...
public class JdbcContext{
	// DataSource에 의존하므로 DI받을 수 있게 준비//
	private DataSource dataSource;

    public void setDataSource(DataSource dataSource) {
    	this.dataSource = dataSource;
    }

    public void workWithStatementStrategy(StatementStrategy stmt) throws
    SQLException{
    	Connection c = null;
        PreparedStatement ps = null;

        try{
        	c = this.dataSource.getConnection();

            ps = stmt.makePreparedStatement(c);

            ps.executeUpdate();
        } catch (SQlException e) {
        	throw e;
        } finally{
        	if (ps != null){ try { ps.close(); } catch (SQLException e) {} }
        	if (c != null){ try{ c.close(); } catch (SQLException e) {} }
        }
    }
}- UserDao는 이 클래스를 DI받으면 사용가능
public class UserDao {
	...
    private JdbcContext jdbcContext;

    public void setJdbcContext(JdbcContext jdbcContext) {
    	this.jdbcContext = jdbcContext;
    }

    public void add(final User user) throws SQLException {
    	this.jdbcContext.workWithStatementStrategy(
        	new StatementStrategy() {...}
        );
    }

    public void deleteAll() throws SQLException {
    	this.jdbcContext.workWithStatementStrategy(
        	new StatementStrategy() {...}
        );
    }
}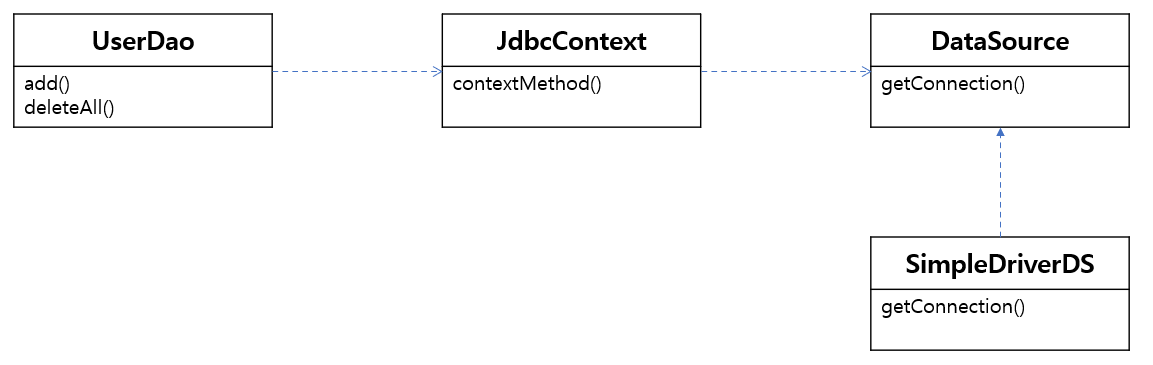
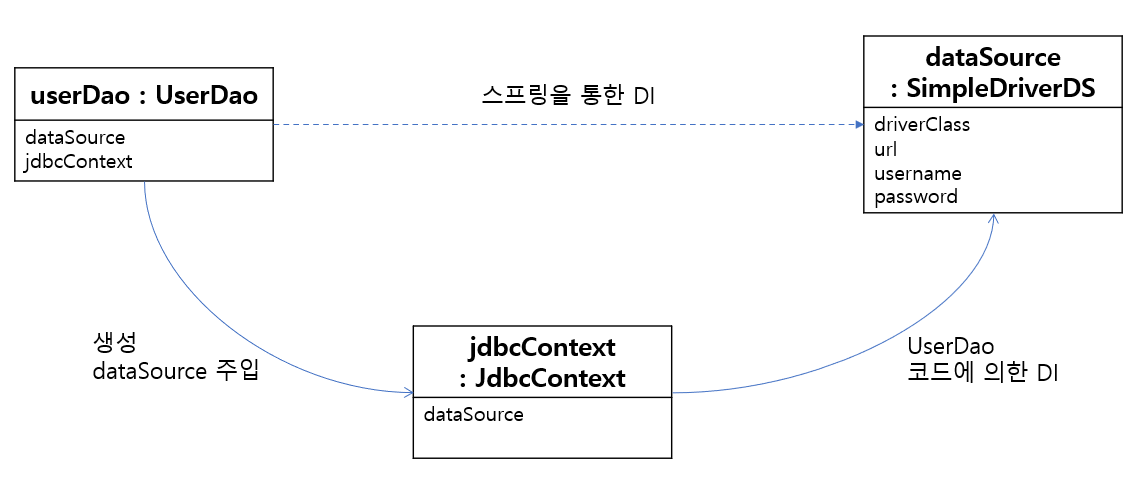
⁕ UserDao가 JdbcContext를 의존하고(DI받고) JdbcContext가 DataSource를 의존한다(DI받는다)
📝 JdbcContext의 특별한 DI
◼ 스프링 빈으로 DI
DI란 인터페이스를 통한 의존으로 더욱 유연한 관계를 만드는 것이 아닌가?
하지만 위 코드에서 UserDao는 JdbcContext라는 구체클래스를 의존받고 있다.
스프링의 DI는 넓게 보면 IoC(객체의 생성과 관계설정에 대한 권한을 외부로 위임)라는 개념을 포괄한다
- 따라서 JdbcContext를 UserDao로 사용하게 주입했다는 건 DI의 기본을 따르고 있음!
-
JdbcContext가 UserDao에 DI되도록 만들어야하는 이유가 있을까?
- JdbcContext가 싱글톤 빈이 되어 여러 오브젝트에서 공유되도록 할 수 있음
- 매 기능을 사용할 때마다 새로운 오브젝트를 생성하면 메모리 낭비 - JdbcContext가 DI를 통해 DatatSoure라는 빈에 의존하고 있기 때문
- DI받기 위해서는 두 오브젝트 모두 스프링 빈으로 등록이 되어야함
- JdbcContext가 싱글톤 빈이 되어 여러 오브젝트에서 공유되도록 할 수 있음
-
장단점
- 장점
- 오브젝트 사이 실제 의존관계가 명확하게 드러남
- 오브젝트 사이 실제 의존관계가 명확하게 드러남
- 단점
- 구체적인 클래스와의 관계가 직접 노출됨
- 장점
◼ 코드를 이용하는 수동 DI
JdbcContext를 스프링 빈으로 등록하지 않고 UserDao 내부에 직접 DI를 적용
- JdbcContext가 스프링 빈이 아니기 때문에 싱글톤이 될 수는 없음
- JdbcContext를 하나의 Dao당 하나만 가지도록 하기- JdbcContext가 스프링 빈이 아니기 때문에 DI를 받을 수 없음
- JdbcContext의 제어권을 가진 UserDao에게 DI까지 맡기기
public class UserDao {
	...
    private JdbcContext jdbcContext;

    public void setDataSource(DataSource dataSource) {
    	this.jdbcContext = new JdbcContext(); //JdbcContext 생성(IoC)

       	this.jdbcContext.setDataSource(dataSource); // DI

        this.dataSource = dataSource;
    }

    public void add(final User user) throws SQLException {
    	this.jdbcContext.workWithStatementStrategy(
        	new StatementStrategy() {...}
        );
    }

    public void deleteAll() throws SQLException {
    	this.jdbcContext.workWithStatementStrategy(
        	new StatementStrategy() {...}
        );
    }
}
- 장단점
- 장점
- 긴밀한 관계를 갖는 클래스들을 어색하게 빈으로 분리하지 않고 내부에서 만들어 사용하면서도 다른 오브젝트에 대한 DI를 적용할 수 있다.
- 긴밀한 관계를 갖는 클래스들을 어색하게 빈으로 분리하지 않고 내부에서 만들어 사용하면서도 다른 오브젝트에 대한 DI를 적용할 수 있다.
- 단점
- 싱글톤을 만들 수 없고, DI를 위한 추가적인 코드가 필요
- 장점
📖 템플릿과 콜백
📝 템플릿/콜백 패턴
전략패턴의 기본 구조에 익명 내부 클래스를 활용한 방식
- 템플릿 : 전략패턴의 컨택스트 / 콜백 : 익명 내부 클래스로 만들어지는 오브젝트
📜 콜백
실행되는 것을 목적으로 다른 오브젝트의 메소드에 전달되는 오브젝트
- 값의 참조가 아닌 특정 로직을 담은 메소드의 실행이 목적
◼ 템플릿/콜백 패턴의 특징
- 템플릿/콜백 패턴의 콜백은 보통 단일 메소드 인터페이스를 사용
- 특정 기능을 위해 한 번 호출되는 경우가 일반적이기 때문- 콜백 인터페이스의 메소드는 보통 파라미터가 존재
- 템플릿에서 생성한 오브젝트를 콜백의 메소드가 실행할 때 파라미터로 넘겨줌
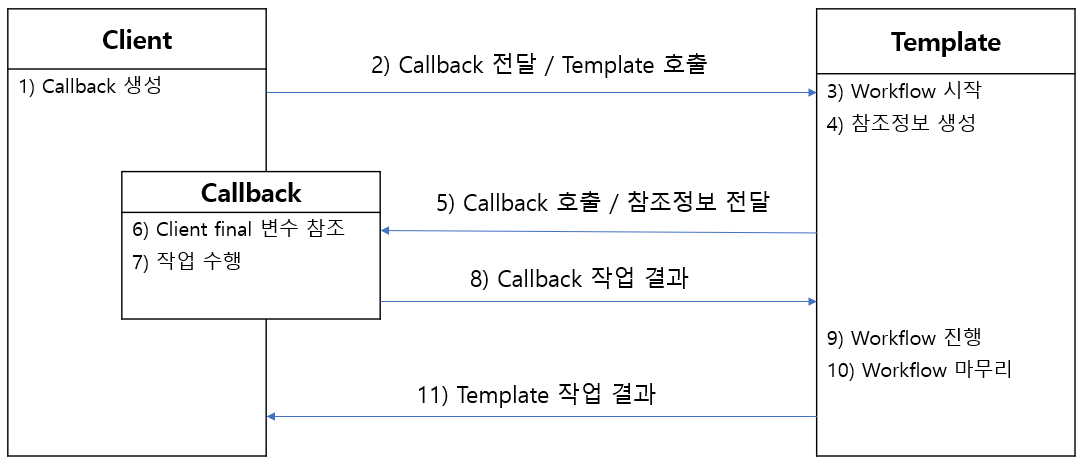
◼ 템플릿/콜백 패턴의 작업 흐름
- 클라이언트는 템플릿 안에서 1)실행될 로직을 담은 콜백 오브젝트를 만들고, 콜백이 참조할 정보를 제공한다. 만들어진 2)콜백은 클라이언트가 템플릿의 메소드를 호출할 때 피라미터로 전달된다.
- 템플릿은 3)정해진 작업 흐름을 따라 작업을 진행하다가 4)내부에서 생성한 참조정보를 가지고 5)콜백 오브젝트의 메소드를 호출한다. 6)콜백은 클라이언트 메소드에 있는 정보와 템플릿이 제공한 참조정보를 이용해서 7)작업을 수행하고 그 8)결과를 다시 템플릿에 돌려준다.
- 템플릿은 9)콜백이 돌려준 정보를 사용해서 작업을 마저 수행한다. 경우에 따라 최종 결과를 클라이언트에 돌려주기도 함.
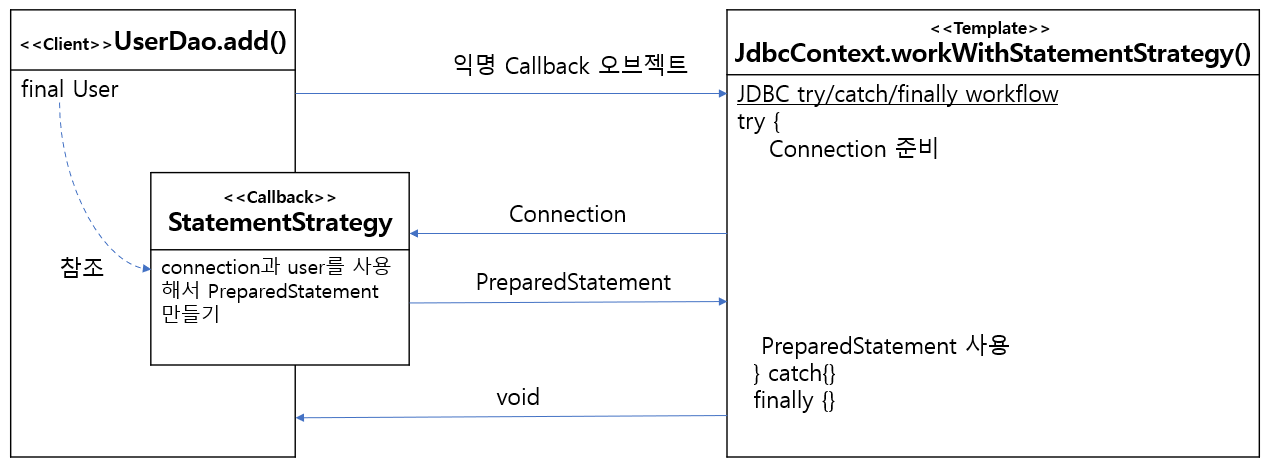
- UserDao/JdbcContext/StatementStrategy에 적용된 템플릿/콜백 패턴
- 템플릿과 클라이언트가 메소드 단위인 것이 특징
📝 콜백의 재활용
◼ 콜백의 분리와 재활용
현재 코드에서는 DAO가 실행될 때마다 익명 내부 클래스를 작성해야함
- 이를 분리하여 그 코드를 재활용하도록 하자
- 현재 deleteAll()코드
public void deleteAll() throws SQLException {
	this.jdbcContext.workWithStatementStrategy(
    	new StatementStrategy() {
			public PreparedStatement makePreparedStatement(connection c)
        			throws SQLException {
                return c.prepareStatement("delete from users"); // 변하는 부분
            }
        }
	);
}- 변하지 않는 부분을 분리하여 메소드로 선언
public void deleteAll() throws SQLException {
	executeSql("delete from users");
}


private void  excuteSql(final String query) throws SQLException {
	this.jdbcContext.workWithStatementStrategy(
    	new StatementStrategy() {
			public PreparedStatement makePreparedStatement(connection c)
        			throws SQLException {
                return c.prepareStatement(query);
            }
        }
	);
}
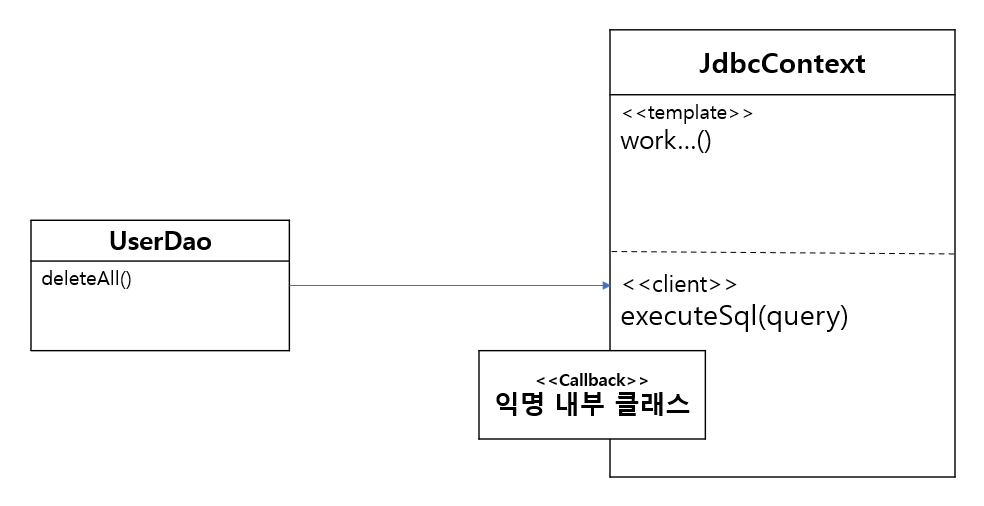
//이제 SQL을 실행하는 모든 DAO코드는 excuteSql()한줄이면 끝- 위 executeSql()을 JdbcContext로 옮겨 모든 DAO코드가 사용가능하도록 만들자
public class JdbcContext {
	...
	private void  excuteSql(final String query) throws SQLException {
		this.jdbcContext.workWithStatementStrategy(
    		new StatementStrategy() {
				public PreparedStatement 	makePreparedStatement(connection c)
        				throws SQLException {
                	return c.prepareStatement(query);
            	}
        	}
		);
	}
}
//deleteAll() 수정
public void deleteAll() throws SQLException {
this.jdbcContext.executeSql("delete from users");
}
📖 스프링과 JdbcTemplate
스프링은 JDBC 코드에 사용가능한 템플릿/콜백을 제공
- JdbcTemplate
- JdbcTemplate초기화를 위한 코드
// JdbcContext가 JdbcTemplate로 변경
public class UserDao {
	...
    private JdbcTemplate jdbcTemplate;

    public void setDataSource(DataSource dataSource) {
    	this.jdbcTemplate = new JdbcTemplate(dataSource);

        this.dataSource = dataSource;
    }
}
📝 update()
JdbcTemplate를 먼저 deleteAll()에 적용해보자
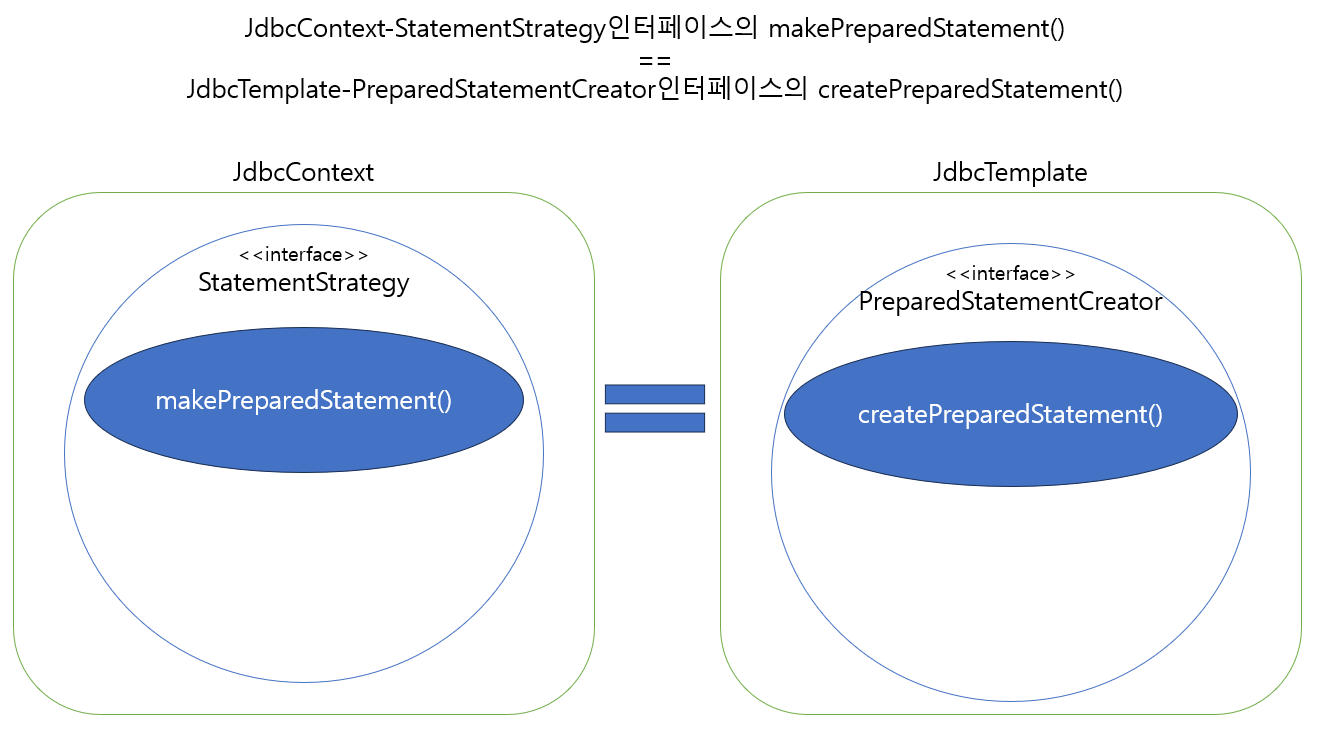
- JdbcTemplate를 적용한 deleteAll()메소드
//직접 적용하기
public void deleteAll() {
	this.jdbcTemplate.update(
    	new PreparedStatementCreator() {
        	public PreparedStatement createPreparedStatement(Connection con)
            		throws SQLException{
            	return con.prepareStatement("delete from users"):
            }
        }
    );
}
//내장 콜백을 사용
public void deleteAll() {
this.jdbcTemplate.update("delete from users");
}
//위 두 코드는 같은 행동을 함- add()의 경우 파라미터를 바인딩하여 주어야함
PreparedStatement ps =
    c.preparedStatement("insert into users(id, name, password) values(?,?,?)");
ps.setString(1, user.getId());
ps.setString(2. user.getName());
ps.setString(3, user.getPassword());- JdbcTemplate 사용 시, 순서대로 update()에 넣어주면 된다!
this.jdbcTemplate.update("insert into users(id, name, password) values(?,?,?)"),
	user.getId(), user.getName(), user.getPassword());
📝 queryForInt()
아직 템플릿/콜백 방식을 적용하지 않았던 메소드에 JdbcTemplate를 적용해보자
- SQL 쿼리를 실행하고 resultset을 가져오는 getCount()메소드
public int getCount() throws SQLException {
	Connection c = null;
    PreparedStatement ps = null;
    ResultSet rs = null;

    try{
    	c = dataSource.getConnection();
        // 예외 발생 가능 코드//
        ps = c.preparedStatement("select count(*) from users");
       	rs = ps.executeQuery();
    	rs.next();
        return rs.getInt(1);
        ////////////////////
    } catch (SQLException e){
    	throw e;
    } finally {
        	if (rs != null){
        	try{
            	rs.close();
            } catch (SQLException e) {
            }
        }
    	if (ps != null){
        	try{
            	ps.close();
            } catch (SQLException e) {
            }
        }
        if (c != null){
        	try{
            	c.close();
            } catch (SQLException e) {
            }
        }
    }
}- JdbcTemplate를 적용한 getCount()
public int getCount() {
	return this.jdbcTemplate.query(new PreparedStatementCreator() { // 첫번째 콜백
    	public PreparedStatement createPreparedStatement(Connection con)
        		throws SQLException {
        	return con.prepareStatement("select count(*) from users");
        }
    }, 	new ResultSetExtractor<Integer>() { // 두번째 콜백
    	public Integer extractData(ResultSet rs) throws SQLException,
        		DataAccessException {
        	rs.next();
            return rs.getInt(1);
        }
    });
}
//위 코드의 내용을 지닌 queryForInt()를 사용하자
public int getCount() {
return this.jdbcTemplate.queryForInt("select count(*) from users");
}
// 두 코드는 같은 행동을 한다📝 queryForObject()
get()에 JdbcTemplate를 적용해보자
- 현재 get() 메소드
public User get(String id) throws SQLException {
	...
    ResultSet rs = ps.executeQuery();

    User user = null; //초기값 null로 설정
    if(rs.next()){ //있다면 값 저장하기 -SQLException이 발생하지 않도록
    	user = new User();
    	user.setId(rs.getString("id"));
    	user.setName(rs.getString("name"));
    	user.setPassword(rs.getString("password"));
    }

    rs.close();
    ps.close();
    c.close();

    if(user == null) throw new EmptyResultDataAccessException(1); //null이라면 예외 발생

    return User;
}- queryForObject()와 RowMapper를 적용한 get()메소드
public User get(String id){
	return this.jdbcTemplate.queryForObject("select * from users where id=?",
    new Object[] {id}, // SQL에 바인딩할 파라미터 값.
    new RowMapper<User>() { // RowMapper콜백
    	public User mapRow(ResultSet rs, int rowNum)
        		throws SQLException {
             User user = new User();
    		user.setId(rs.getString("id"));
    		user.setName(rs.getString("name"));
   		 	user.setPassword(rs.getString("password"));
            return User;
        }
    });
}

//queryForInt()는 row갯수가 하나 이하면 예외를 던지도록 만들어짐
📝 query()
현재 등록되어있는 모든 사용자 정보를 가져오는 getAll()메소드 추가
- getAll()에 대한 테스트
@Test
public void getAll() {
	dao.deleteAll();

    dao.add(user1);
    List<User> users1 = dao.getAll();
    assertThat(users1.size(), is(1));
    checkSameUser(user1, users1.get(0));

    dao.add(user2);
    List<User> users2 = dao.getAll();
    assertThat(users2.size(), is(2));
    checkSameUser(user1, users1.get(0));
    checkSameUser(user2, users2.get(1));

    dao.add(user3);
    List<User> users3 = dao.getAll();
    assertThat(users3.size(), is(3));
    checkSameUser(user1, users1.get(0));
    checkSameUser(user2, users2.get(1));
    checkSameUser(user3, users3.get(2));
}

private void checkSameUser(User user1, User user2) {
	assertThat(user1.getId(), is(user2.getId()));
    assertThat(user1.getName(), is(user2.getName()));
    assertThat(user1.getPassword(), is(user2.getPassword()));
}- 테스트를 성공시키는 getAll()메소드 작성 (TDD)
public List<User> getAll() {
	return this.jdbcTemplate.query("select * from users order by id",
    		new RowMapper<User>() {
            	public User mapRow(ResultSet rs, int rowNum)
                		throws SQLException {
                	User user = new User();
    				user.setId(rs.getString("id"));
    				user.setName(rs.getString("name"));
   		 			user.setPassword(rs.getString("password"));
            		return User;
                }
            });
}
◼ 테스트 보완하기
getAll()을 실행할 때, 데이터가 없는 경우에 대한 검증코드를 작성해보자
- 데이터가 없는 경우에 대한 검증 코드가 추가된 getAll()테스트
@Test
public void getAll() {
	dao.deleteAll();


    List<User> users0 = dao.getAll();
    assertThat(users0.size(), is(0));
    // 데이터가 없을 때는 크기가 0인 리스트 오브젝트가 리턴되어야 한다
    ...
}
📝 재사용 가능한 코드의 분리
◼ DI를 위한 코드 정리
JdbcTemplate를 사용함으로써 DataSource를 변수로 가지고 있을 필요가 없음
- DataSource 인스턴스 변수를 제거하자
public class UserDao {
	...
    private JdbcTemplate jdbcTemplate;

    public void setDataSource(DataSource dataSource) {
    	this.jdbcTemplate = new JdbcTemplate(dataSource);

        //this.dataSource = dataSource;//인스턴스 변수는 이제 필요 없다!
    }
}
◼ 중복 제거
get()과 getAll()에 사용한 RowMapper가 같은 내용으로 중복됨
- 이를 분리하여 재사용하도록 하자
- 추후 수정시 분리한 코드만 수정하면 모두 적용
- 재사용 가능하도록 독립시킨 RowMapper
public class UserDao {
	...
    private RowMapper<User> userMapper =
    	new RowMapper<User>() {
        	public User mapRow(ResultSet rs, int rowNum) throws SQLException {
            	User user = new User();
    			user.setId(rs.getString("id"));
    			user.setName(rs.getString("name"));
   		 		user.setPassword(rs.getString("password"));
            	return User;
            }
        };
    ...
}- userMapper를 사용하도록 수정한 get(), getAll()
public User get(String id) {
	return this.jdbcTemplate.queryForObject("select * from users where id =?",
    		new Object[] {id}, this.userMapper);
}
public List<User> getAll() {
return this.jdbcTemplate.query("select * from users order by id",
this.userMapper);
}❗ 더욱 상세한 내용을 알고싶으시다면 책을 구매하시는 것을 추천드립니다.