이번 시간에는 3가지의 기능을 확장해보았다. 하나씩 살펴보도록 하자.
(엔티티, 리포지토리,서비스,컨트롤러,프론트 코드를 모두 보여주기엔 글이 너무 길어지고, 항상 같은 패턴이므로 전체 코드를 보고싶다면 깃허브에 방문해주시면 감사하겠습니다.)
상품 별점을 상품 검색시 표시되도록 하기
상품의 리뷰가 작성된 경우, 평점이 검색창에 뜨는 것을 아마 쇼핑몰 사이트에서 본 적이 있을 것이다. 여기서는 그 기능을 구현해보았다.
1. 상품 테이블에 상품 평점 총합과 상품 리뷰 갯수를 저장
@Column(name = "rating_sum")
    private int ratingSum;

@Column(name = "rating_cnt")
    private int ratingCnt;
엔티티에서 저렇게 추가하면된다.
(테이블에서 먼저 디폴트 값을 0으로 하고 작성한 코드)
2. 프론트코드에서 해당 상품의 총합 가져오기
<div class="rating">
<!-- 평균 평점 가져오기 -->
<span th:each="i : ${#numbers.sequence(1, 5)}"
th:classappend="${product.products.getAverageRating() >= i ? 'filled' : 'empty'}">★</span>
<span class="average-rating" th:text="${product.products.getAverageRating()}">0.0</span>
</div>챗지피티의 도움을 받아 다음의 코드를 받아왔다.
css까지 추가해준다면 별을 다른 색으로 칠할 수도 있다.
상품 별점을 추가하는 것은 생각보다 간단했다.
테스트 결과

위와 같이 리뷰를 작성하게되면

해당하는 상품은 평점을 더하고, 갯수를 +1 한다.
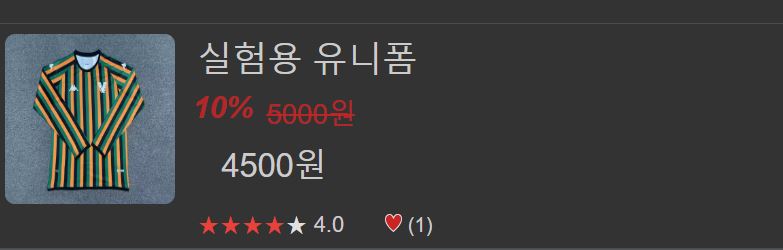
다음과 같이 별점을 받아서 나타내는 것을 확인할 수 있다.
찜하기를 검색창에서도 추가 가능하도록 하기
상품 상세정보에서만 가능했던 찜하기 기능을 검색창에서도 가능하도록 확장해보았다.
여기서는 상품 상세정보에서 이미 컨트롤러까지 모두 작성이 되어있으므로 프론트 코드만 고쳐주면 된다.
프론트 코드 수정
		document.querySelectorAll('.wish').forEach(image => {
                image.addEventListener('click', function () {
                    const productId = this.getAttribute('data-product-id');
                    const isWishlist = this.src.includes('wishlist-wish');
                    const countSpan = this.nextElementSibling;
                    const url = new URL(isWishlist ? 'http://localhost:8080/delWishlist' : 'http://localhost:8080/addWishlist');
                    url.searchParams.append('productId', productId);

                    fetch(url, {
                        method: 'POST',
                        headers: {
                            'X-Requested-With': 'XMLHttpRequest'
                        }
                    })
                        .then(response => {
                            if (response.status === 401) {
                                // 401 상태 코드인 경우 로그인 창으로 이동할지 물어보는 prompt 표시
                                const shouldRedirect = confirm('로그인이 필요합니다. 로그인 페이지로 이동하시겠습니까?');
                                if (shouldRedirect) {
                                    window.location.href = '/login'; // 로그인 페이지로 이동
                                }
                                throw new Error('Unauthorized'); // 에러를 throw하여 나머지 then 블록이 실행되지 않도록 함
                            } else {
                                return response.text();
                            }
                        })
                        .then(data => {
                            if(data === "success"){
                                // 성공적으로 처리된 경우 이미지 경로를 업데이트
                                if (isWishlist) {
                                    this.src = '/images/icons/wishlist-nowish.png';
                                    countSpan.textContent = "(" + (parseInt(countSpan.innerText.replace("(", "").replace(")", "")) - 1).toFixed(0) + ")";
                                } else {
                                    this.src = '/images/icons/wishlist-wish.png';
                                    countSpan.textContent = "(" + (parseInt(countSpan.innerText.replace("(", "").replace(")", "")) + 1).toFixed(0) + ")";
                                }
                            }

                        })
                        .catch(error => {
                            console.error('Error:', error);
                            if (error.message === 'Unauthorized') {
                                // 이미 처리된 경우 예외 처리
                            } else {
                                alert('네트워크 오류.');
                            }
                        });
                });
            });
위의 코드를 작성하는데에 애를 좀 먹었다.. (프론트는 역시 알듯말듯한데 어렵다)
이 코드를 작성하면서 새로 알게된 점은 URL을 작성할 때에도 삼항연산자를 사용할 수 있었다는 것이다. 이전에 코드를 작성할 때에는 저게 안된다고 생각해 중복되는 코드를 두 번 작성했던 적이 있었는데 이제부턴 이렇게 작성해야겠다.
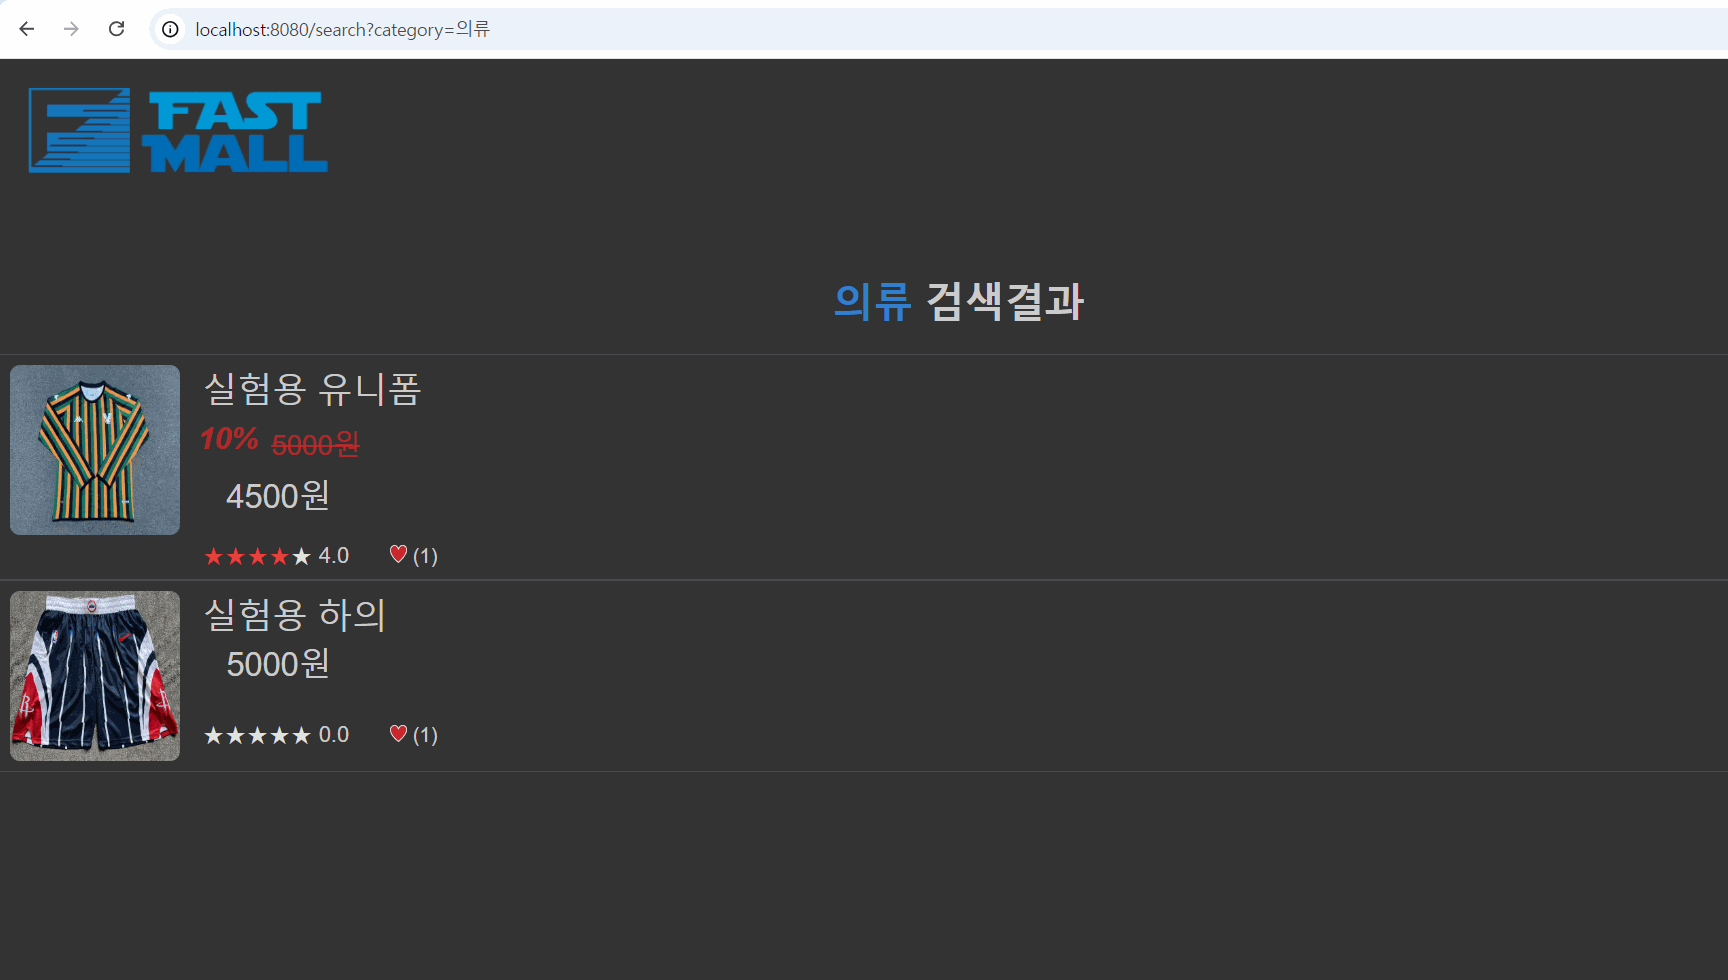
테스트 결과
테스트 결과는 다음과 같다.
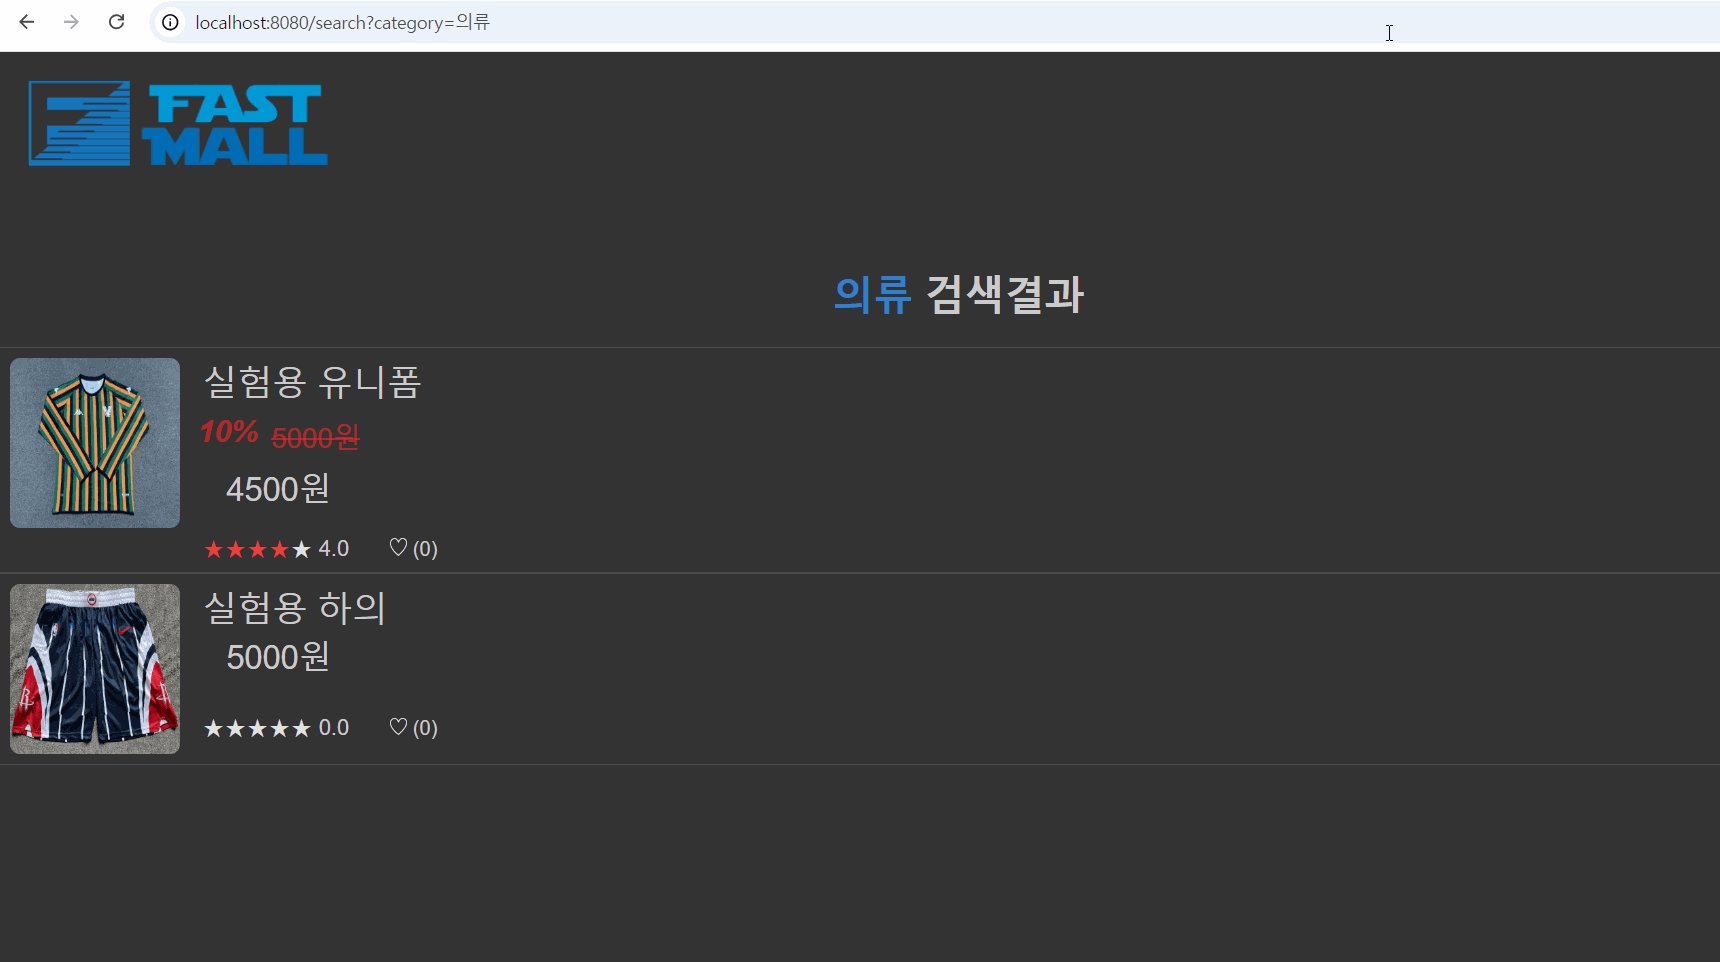
검색창에서도 찜하기가 가능해졌고, 상품 상세페이지의 찜하기와도 연동이 잘 되어있음을 확인할 수 있다.
찜한 상품을 볼 수 있는 페이지 추가
위에서 찜하기를 했어도 찜한 상품을 볼 수 없다면 의미가 없다. 찜한 상품을 볼 수 있는 페이지를 만들어서 사용자가 찜한 상품들을 확인할 수 있도록 하자.
백엔드쪽에서는 컨트롤러로 찜한 상품 페이지로 get요청을 보내주는 코드만 작성해주면 된다.
@GetMapping("/user/wishlist")
    public String wishlistPage(@AuthenticationPrincipal UserDetails userDetails,
                               Model model){
        Users users = userService.findById(userDetails.getUsername());
        List<Wishlist> wishlists = wishlistService.getAllWishlistByUserId(users.getId());
        model.addAttribute("user", users);
        model.addAttribute("wishlists", wishlists);

        return "/user/wishlist";
    }
user와 wishlist를 모델로 받아서 html로 보내준다.
모델로 보내준 값들을 타임리프를 사용하여 사용자에게 보여주면된다
찜한 상품 페이지 추가
<!DOCTYPE html>
<html lang="ko">
<html xmlns:th="http://www.thymeleaf.org">
<head>
  <meta charset="UTF-8">
  <title>회원정보</title>
  <link rel="stylesheet" href="/css/statusTemplate.css">
  <link href="/css/status.css" rel="stylesheet" />
</head>
<body>
<div class="header">
  <a href="/" id="home_logo">
    <img src="/images/icons/logo.png" />
  </a>
</div>
<div id="body_container">
  <div class="aside">
    <div id="profile">
      <div style="display: grid">
        <label th:text="${user.id}" style="padding-bottom: 12px"></label>
        <label th:text="${user.role} + ' 등급'" style="padding-bottom: 12px"></label>
      </div>
      <button id="status" onclick="info()">회원정보</button>
      <form th:action="@{/logout}" method="post">
        <button id="logout" type="submit">로그아웃</button>
      </form>
    </div>
    <div id="link_box">
      <button class="link" id="coupon" onclick="myCoupon()">쿠폰함</button>
      <button class="link" id="order" onclick="orderHistory()">주문내역</button>
      <button class="link" id="wishlist" onclick="myWishlist()">내가 찜한 상품</button>
      <button class="link" id="quit" onclick="quit()">회원탈퇴</button>
    </div>
  </div>
  <div id="content" style="border-left: #e0e6eb solid 1px">
    <div>
      <h2 style="text-align: center">내가 찜한 상품</h2>
    </div>
    <ul>
      <li th:each="wishlist : ${wishlists}">
        <div class="order_box" style="display: flex">
          <div class="photo">
            <a th:href="'/products/'+${wishlist.product_id}">
              <img id="image" th:src="@{'/images/uploads/' + ${wishlist.product.photo}}" alt="Product Image" width="150" height="150">
            </a>
          </div>
          <div class="product_name">
            <a  class="product_name" th:href="'/products/'+${wishlist.product_id}" th:text="${wishlist.product.product_name}"></a>
          </div>
          <div class="product_info">
            <span th:text="${#numbers.formatDecimal(wishlist.product.price * (1 - (wishlist.product.discount / 100)),0,0,'COMMA')} + '원'"></span>
          </div>
          <div class="but_box">
            <button class="cancel" th:text="'삭제'"
                    th:attr="data-product-id=${wishlist.product_id}">
            </button>
          </div>
        </div>
      </li>
    </ul>
  </div>
</div>
<script>
	document.addEventListener("DOMContentLoaded", function () {
    const cancel = document.querySelectorAll(".cancel");
    cancel.forEach(button => {
      button.addEventListener("click", function () {
        const li = button.closest('li');
        const productId = button.getAttribute('data-product-id');
        const url = new URL('http://localhost:8080/delWishlist');
        url.searchParams.append('productId', productId);

        fetch(url, {
          method: 'POST',
          headers: {
            'X-Requested-With': 'XMLHttpRequest'
          }
        }).then(response => {
          return response.text();
        }).then(data => {
          if (data === "success") {
            li.remove();
          }
        }).catch(error => {
          console.error('Error:', error);
          if (error === 'Network response was not ok.')
            alert('네트워크 오류.');
        });
      });
    });
  });
  //다른 페이지로 이동하는 코드들은 생략//
  </script>
프론트코드는 이전에 만들었던 주문내역 코드를 살짝 수정해서 만들었다. li도 테이블과 마찬가지로 remove()해주면 정상적으로 삭제된다
테스트 결과
찜해둔 상품을 내가 찜한 상품을 눌러서 확인할 수 있으며, 삭제버튼을 누르면 찜하기에서 제외가 되도록 했다. 다시 검색해서 찜하기를 눌렀을 때, 정상적으로 추가가 됨을 확인할 수 있었다.
(데이터베이스도 정상적으로 추가 삭제가 이뤄짐을 확인함)