필요한 준비물
- 배포판 리눅스가 설치된 PC, 혹은 가상머신(호스트)
- Raspberry PI OS가 설치되어 있는 라즈베리파이(타겟)
빌드에 필요한 패키지 설치 및 유틸리티 다운로드
Host> sudo apt update
Host> sudo apt install lib32stdc++6  lib32z1 lzop
Host> sudo apt install build-essential gcc
Host> sudo apt install python- 빌드에 필요한 패키지를 설치합니다
- 앞으로 쉘 커맨드를 작성할 때 호스트면 Host> 타겟이면 Target>으로 작성하겠습니다
Host> mkdir qt5
Host> mkdir qt5/qt-build #qt라이브러리의 컴파일을 수행할 디렉토리
Host> mkdir qt5/sysroot #타겟보드의 root파일 시스템을 가져올 디렉토리, 뒤에서 자세히 설명- 작업을 진행 할 디렉토리들을 생성
- 꼭 필요한건 아니고 정리를 위함...
Host> cd qt5 #앞으로 모든 작업은 이 디렉토리에서 수행
Host> wget https://releases.linaro.org/components/toolchain/binaries/4.9-2017.01/arm-linux-gnueabihf/gcc-linaro-4.9.4-2017.01-x86_64_arm-linux-gnueabihf.tar.xz #크로스 툴체인 다운로드
Host> wget http://qtmirror.ics.com/pub/qtproject/archive/qt/5.6/5.6.3/single/qt-everywhere-opensource-src-5.6.3.tar.xz #qt5 소스코드 다운로드
Host> tar -xvf gcc-linaro-4.9.4-2017.01-x86_64_arm-linux-gnueabihf.tar.xz
Host> tar -xvf qt-everywhere-opensource-src-5.6.3.tar.xz #압축풀기- 크로스 툴체인과 qt5.6.3의 소스코드를 다운로드 하고 압축을 해제
- 크로스 툴체인에는 크로스 컴파일을 위한 다양한 툴을 제공
- 5.6.3을 선택한 이유는 LGPL v2.1 라이센스를 지원하는 마지막 버전
qmake.conf 설정
qt5/qt-src/qt-everywhere-opensource-src-5.6.3/qtbase/mkspecs/linux-arm-gnueabi-g++/qmake.conf
#
# qmake configuration for building with arm-linux-gnueabi-g++
#

MAKEFILE_GENERATOR      = UNIX
CONFIG                 += incremental
QMAKE_INCREMENTAL_STYLE = sublib

include(../common/linux.conf)
include(../common/gcc-base-unix.conf)
include(../common/g++-unix.conf)

# modifications to g++.conf
QMAKE_CC                = /Your/Directory/qt5/gcc-linaro-4.9.4-2017.01-x86_64_arm-linux-gnueabihf/bin/arm-linux-gnueabihf-gcc
QMAKE_CXX               = /Your/Directory/qt5/gcc-linaro-4.9.4-2017.01-x86_64_arm-linux-gnueabihf/bin/arm-linux-gnueabihf-g++
QMAKE_LINK              = /Your/Directory/qt5/gcc-linaro-4.9.4-2017.01-x86_64_arm-linux-gnueabihf/bin/arm-linux-gnueabihf-g++
QMAKE_LINK_SHLIB        = /Your/Directory/qt5/gcc-linaro-4.9.4-2017.01-x86_64_arm-linux-gnueabihf/bin/arm-linux-gnueabihf-g++

# modifications to linux.conf
QMAKE_AR                = /Your/Directory/qt5/gcc-linaro-4.9.4-2017.01-x86_64_arm-linux-gnueabihf/bin/arm-linux-gnueabihf-ar cqs
QMAKE_OBJCOPY           = /Your/Directory/qt5/gcc-linaro-4.9.4-2017.01-x86_64_arm-linux-gnueabihf/bin/arm-linux-gnueabihf-objcopy
QMAKE_NM                = /Your/Directory/qt5/gcc-linaro-4.9.4-2017.01-x86_64_arm-linux-gnueabihf/bin/arm-linux-gnueabihf-nm -P
QMAKE_STRIP             = /Your/Directory/qt5/gcc-linaro-4.9.4-2017.01-x86_64_arm-linux-gnueabihf/bin/arm-linux-gnueabihf-strip
load(qt_config)- .../linux-arm-gnueabi-g++/qmake.conf에 다운로드 받은 크로스 툴체인의 경로 설정
- qt의 라이브러리를 컴파일 할때 사용할 툴체인을 설정하는 과정
Host> cd qt-everywhere-opensource-src-5.6.3/qtbase/mkspecs/devices
Host> cp qt-everywhere-opensource-src-5.6.3/qtbase/mkspecs/devices/linux-rasp-pi2-g++ linux-myrasp-pi-g++
qt5/qt-src/qt-everywhere-opensource-src-5.6.3/qtbase/mkspecs/devices/linux-myrasp-pi-g++/qmake.conf
# qmake configuration for the Raspberry Pi 3B

include(../common/linux_device_pre.conf)

QMAKE_CFLAGS            += -march=armv7-a -marm -mthumb-interwork -mfpu=neon-vfpv4 -mtune=cortex-a7 -mabi=aapcs-linux
QMAKE_CXXFLAGS          = $$QMAKE_CFLAGS

DISTRO_OPTS += hard-float
DISTRO_OPTS += deb-multi-arch

# Preferred eglfs backend
EGLFS_DEVICE_INTEGRATION = eglfs_brcm

include(../common/linux_arm_device_post.conf)

load(qt_config)- 위의 파일에서 툴체인의 경로를 설정하였다면 이 파일은 타겟보드에 맞는 컴파일 관련 플래그를 설정
- 라즈베리파이3B는 armv8 명령어를 지원하고 cortex-a53이긴 한데 그에 맞게 설정하면 문제가 발생한다... 아마도 Raspberry PI OS가 하위버전의 라즈베리파이와의 호환성을 위해 cortex-a7을 타겟으로 빌드된듯 하다
sysroot 싱크 맞추기
Host> cd sysroot
Host> mkdir lib
Host> mkdir usr
Host> mkdir usr/local
Host> rsync -r --copy-links pi@yourpiaddress:/lib/ lib/
Host> rsync -r --copy-links pi@yourpiaddress:/usr/include/ usr/include/
Host> rsync -r --copy-links pi@yourpiaddress:/usr/lib/ usr/lib/
Host> rsync -r --copy-links pi@yourpiaddress:/usr/local/include/ usr/local/include/
Host> rsync -r --copy-links pi@yourpiaddress:/usr/local/lib/ usr/local/lib/- 라즈베리파이의 ssh설정이 되어있다는 가정 하에 진행
- 처음에 만들어둔 sysroot 폴더로 가서 라즈베리파이의 라이브러리 및 헤더파일을 host pc로 가져온다
- 가져온 헤더파일과 라이브러리 파일들을 크로스 컴파일할때 사용, 타겟보드와 환경을 맞추기 위함
- --copy-links 옵션은 심볼릭링크로 연결된 라이브러리가 가르키고 있는 본파일을 가져오기 위함, 심볼릭링크만 가져온 경우 컴파일에서 문제가 발생할 수 있음
Configure
Host> cd qt-build
Host> ../qt-everywhere-opensource-src-5.6.3/configure -xplatform linux-arm-gnueabi-g++ -release -opengl es2 -device linux-myrasp-pi-g++ -sysroot /your/directory/qt5/sysroot -prefix /usr/local/qt5 -device-option CROSS_COMPILE=/your/directory/qt5/gcc-linaro-4.9.4-2017.01-x86_64_arm-linux-gnueabihf/bin/arm-linux-gnueabihf- -qt-xcb- qt 라이브러리의 qmake와 Makefile을 만들기 위한 설정작업
- -xplatform: 크로스 툴체인관련 설정 (linux-arm-gnueabi-g++/qmake.conf)
- -device: 타겟보드 관련 설정 (linux-myrasp-pi-g++/qmake.conf)
- -sysroot: 싱크를 맞추어둔 sysroot의 경로
- -prefix: qt5를 설치할 경로, sysroot를 기준으로 설치됨, 위와 같이 수행하면 호스트 pc기준, /your/directory/qt5/sysroot/usr/local/qt5에 설치
- -device-option CROSS_COMPILE=: 크로스 툴체인의 경로
- 실행을 하면 사용할 라이센스 및 관련 동의를 묻는다, 오픈소스를 선택해주고 yes를 해주자
- configure와 관련해서 좀더 자세한 내용은
Host>....
The OpenGL ES 2.0 functionality test failed!
 Use of pkg-config is not enabled, maybe you want to pass -pkg-config?
 You might need to modify the include and library search paths by editing
 QMAKE_INCDIR_OPENGL_ES2, QMAKE_LIBDIR_OPENGL_ES2 and QMAKE_LIBS_OPENGL_ES2 in
/root/qt5/qt-src/qt-everywhere-opensource-src-5.6.3/qtbase/mkspecs/devices/linux-myrasp-pi-g++.- 앗 에러가 난다... configure과정에서 sysroot를 탐색하며 컴파일에 필요한 라이브러리가 있는지 확인을 하는 과정을 거치는데 OpenGL ES 2.0이 없는 모양이다
Target> sudo apt install libglfw3-dev libgles2-mesa-dev- 라즈베리파이에 접속하여 다음과 같이 필요한 패키지를 설치해 준 뒤에, 다시 위의 sysroot의 싱크를 맞추는 과정을 수행한다
- 필요한 라이브러리가 존재하지 않아 configure에서 fail이 뜬다면 위와 같은 과정을 반복
Build options:
  Configuration .......... accessibility accessibility-atspi-bridge audio-backend c++11 c++14 clock-gettime clock-monotonic compile_examples concurrent cross_compile dbus egl eglfs enable_new_dtags evdev eventfd freetype full-config getaddrinfo getifaddrs harfbuzz iconv inotify ipv6ifname large-config largefile linuxfb medium-config minimal-config mremap neon no-pkg-config opengl opengles2 pcre png posix_fallocate precompile_header qpa qpa reduce_exports release rpath shared small-config system-png system-zlib threadsafe-cloexec xcb xcb-plugin xcb-qt xkbcommon-qt xlib xrender
  Build parts ............ libs examples
  Mode ................... release
  Using sanitizer(s)...... none
  Using C++ standard ..... c++14
  Using gold linker....... no
  Using new DTAGS ........ yes
  Using PCH .............. yes
  Using LTCG ............. no
  Target compiler supports:
    Neon ................. yes

Qt modules and options:
  Qt D-Bus ............... yes (loading dbus-1 at runtime)
  Qt Concurrent .......... yes
  Qt GUI ................. yes
  Qt Widgets ............. yes
  Large File ............. yes
  QML debugging .......... yes
  Use system proxies ..... no

Support enabled for:
  Accessibility .......... yes
  ALSA ................... no
  CUPS ................... no
  Evdev .................. yes
  FontConfig ............. no
  FreeType ............... yes (bundled copy)
  Glib ................... no
  GStreamer .............. no
  GTK theme .............. no
  HarfBuzz ............... yes (bundled copy)
  Iconv .................. yes
  ICU .................... no
  Image formats:
    GIF .................. yes (plugin, using bundled copy)
    JPEG ................. yes (plugin, using bundled copy)
    PNG .................. yes (in QtGui, using system library)
  libinput................ no
  Logging backends:
    journald ............... no
    syslog   ............... no
  mtdev .................. no
  Networking:
    getaddrinfo .......... yes
    getifaddrs ........... yes
    IPv6 ifname .......... yes
    libproxy.............. no
    OpenSSL .............. no
  OpenGL / OpenVG:
    EGL .................. yes
    OpenGL ............... yes (OpenGL ES 2.0+)
    OpenVG ............... no
  PCRE ................... yes (bundled copy)
  pkg-config ............. no
  PulseAudio ............. no
  QPA backends:
    DirectFB ............. no
    EGLFS ................ yes
      EGLFS i.MX6 ........ no
      EGLFS i.MX6 Wayland. no
      EGLFS EGLDevice .... no
      EGLFS GBM .......... no
      EGLFS Mali ......... no
      EGLFS Raspberry Pi . no
      EGLFS X11 .......... no
    LinuxFB .............. yes
    Mir client............ no
    XCB .................. yes (bundled copy)
      EGL on X ........... no
      GLX ................ no
      MIT-SHM ............ yes
      Xcb-Xlib ........... no
      Xcursor ............ yes (loaded at runtime)
      Xfixes ............. yes (loaded at runtime)
      Xi ................. yes (loaded at runtime)
      Xi2 ................ no
      Xinerama ........... yes (loaded at runtime)
      Xrandr ............. yes (loaded at runtime)
      Xrender ............ yes
      XKB ................ yes
      XShape ............. yes
      XSync .............. yes
      XVideo ............. yes
  Session management ..... yes
  SQL drivers:
    DB2 .................. no
    InterBase ............ no
    MySQL ................ no
    OCI .................. no
    ODBC ................. no
    PostgreSQL ........... no
    SQLite 2 ............. no
    SQLite ............... yes (plugin, using bundled copy)
    TDS .................. no
  tslib .................. no
  udev ................... no
  xkbcommon-x11........... yes (bundled copy, XKB config root: /usr/share/X11/xkb)
  xkbcommon-evdev......... no
  zlib ................... yes (system library)


NOTE: Qt is using double for qreal on this system. This is binary incompatible against Qt 5.1.
Configure with '-qreal float' to create a build that is binary compatible with 5.1.

Qt is now configured for building. Just run 'make'.
Once everything is built, you must run 'make install'.
Qt will be installed into /usr/local/qt5

Prior to reconfiguration, make sure you remove any leftovers from
the previous build.- configure가 정상적으로 완료되면 다음과 같이 출력
- sysroot의 존재하는 라이브러리들을 확인하여, 존재하면 이에 대한 wrapping 라이브러리도 제공, Open GL ES 2.0의 경우 qt의 필수 라이브러리라서 Configure에서 실패가 뜸
- 만약 wrapping라이브러리를 사용하고 싶다면 타겟보드에 패키지를 설치하고 sysroot의 싱크를 맞춘뒤에 configure를 하면 된다
Host> make
Host> make install- 이제 생성된 Makefile을 동작시켜 컴파일을 하고 설치
Target> cd /usr/local
Target> sudo mkdir qt5
Target> sudo chown pi qt5- 라즈베리파이에 접속하여 설치가 될 디렉토리를 생성하고 권한을 사용할 계정에게 부여
- 필자는 Raspberyy OS의 기본계정인 pi로 작업을 한다고 가정하고 진행
Host> rsync -r --copy-links /Your/Directory/qt5/usr/local/qt5 pi@1yourpiaddress:/usr/local/- Host에서 Target(라즈베리파이)으로 컴파일된 라이브러리를 복사
IDE 설정(qtcreator)
- 필요한 툴체인과 라이브러리가 갖추어 졌지만 이를 커맨드라인 환경에서 개발하는 것은 매우 비효율적이다
- qtcreator는 Qt GUI Application을 개발하는데 최적화 되어있는 IDE이다
Host> apt install qtcreator
Host> qtcreator- Host에 qtcreator를 설치하고 실행

- 실행하면 다음과 같은 화면이 뜬다, 이제 툴체인과 qt관련 라이브러리의 경로를 설정해주자
- 툴바의 Tools에 Options를 클릭
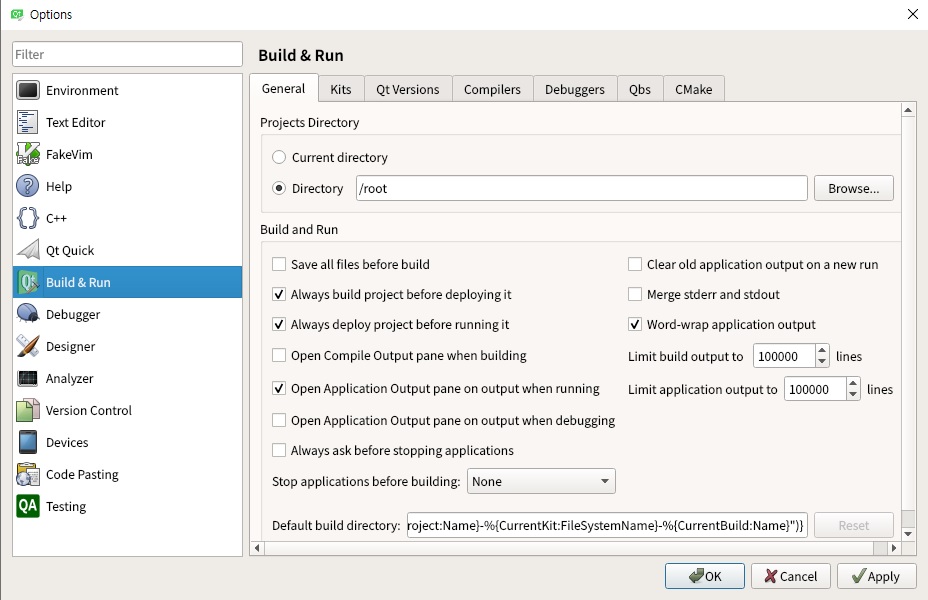
- 여기서 Build & Run을 클릭하면 빌드를 위한 설정을 할 수 있다. Qt는 크로스 플랫폼을 지원하는 프레임워크로 qtcreator에서는 하나의 플랫폼을 Kit라는 단위로 설정할 수 있다.
- 하나의 Kit를 설정하기 위해선 다음과 같은 항목이 필요하다
- C컴파일러
- C++컴파일러
- qmake(qt라이브러리를 컴파일하면 나옴)
- GDB(Option)
- CMAKE(Option)
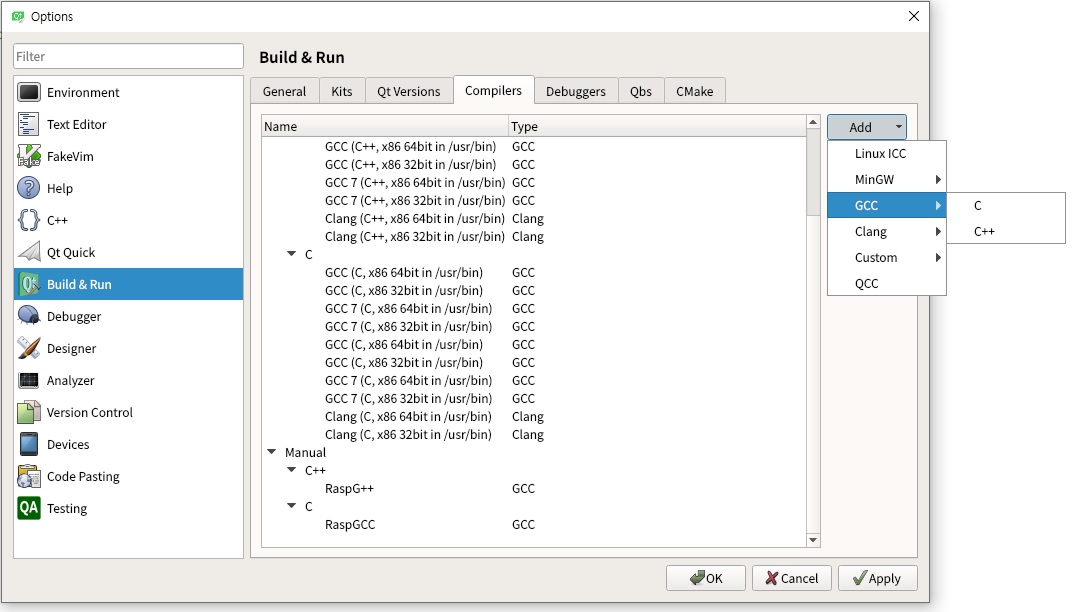
- 크로스 컴파일을 할때 사용한 GCC와 G++의 경로를 설정해주자, 우리가 컴파일할때 사용한 툴체인의 경로를 사용하면 된다
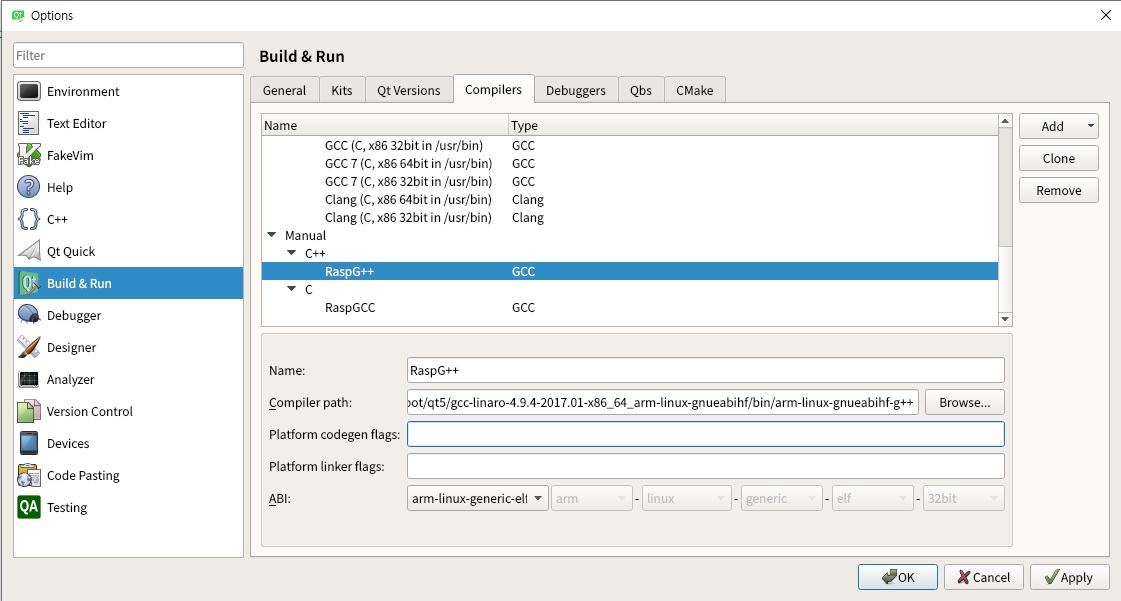
- Add -> GCC -> C를 선택하여 GCC를, Add -> G++ -> C++를 선택하여 G++ 경로를 설정해주자, 위의 내용을 따라서 했다면 /Your/Directory/qt5/gcc-linaro-4.9.4-2017.01-x86_64_arm-linux-gnueabihf/bin/ 이 경로에 있을 것 이다.
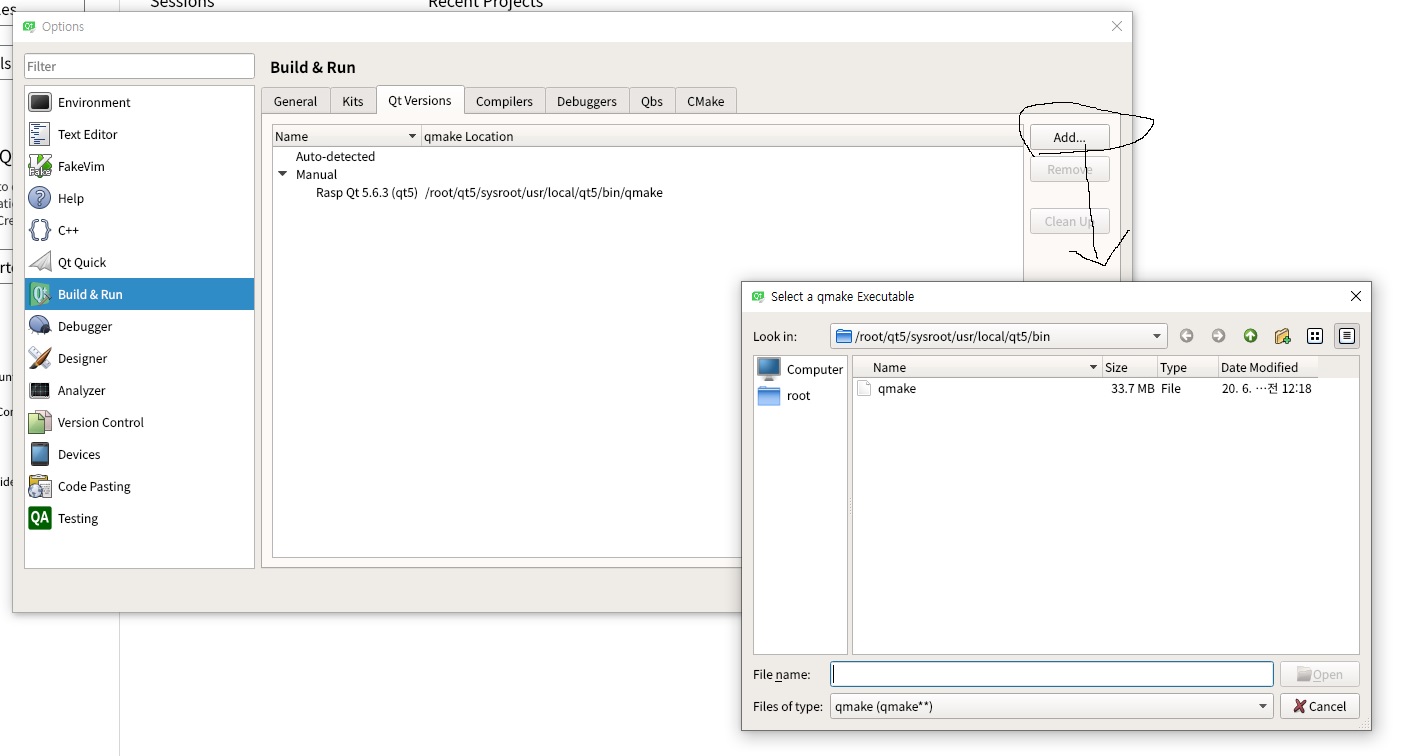
- Qt Versions 탭으로 가서 Add를 클릭하여 qmake의 경로도 추가해주자, 위의 내용을 따라 했다면 qmake는 .../sysroot/usr/local/qt5/bin/ 에 있을 것이다.
- qmake는 자동으로 Makefile을 생성하는 툴로 .pro(qt가 프로젝트를 관리할때 사용하는 확장자) 파일을 qmake의 문법에 맞게 작성하면 이에 맞는 Makefile과 C++파일을 작성해 준다.
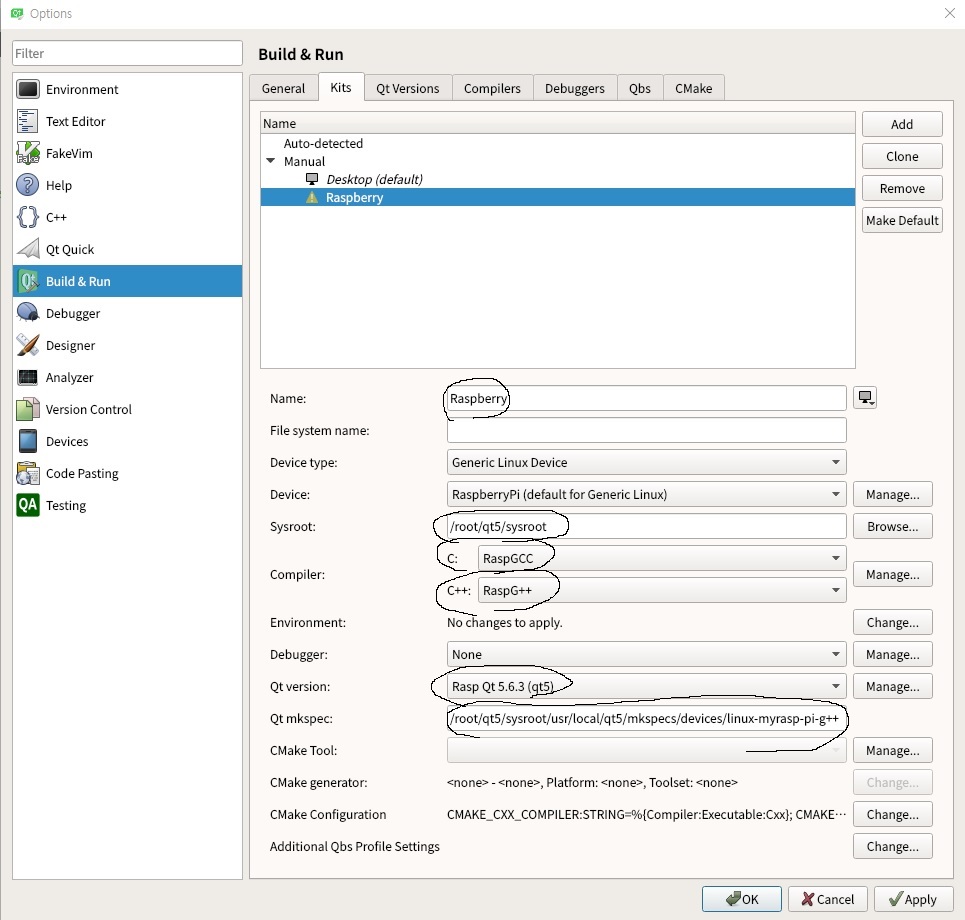
- 이제 Kit을 설정해주자, Kits탭으로 가서 Add를 클릭하여 설정해둔 컴파일러와 sysroot, mkspec의 경로를 설정해주자
- mkspec은 우리가 configure를 할 때 사용했던 qmake.conf가 있는 경로를 설정하면 되는데 qt5를 설치한 경로에도 복사가 되있을 것 이다. /설치/경로/mkspecs/devices/ 에 있다.
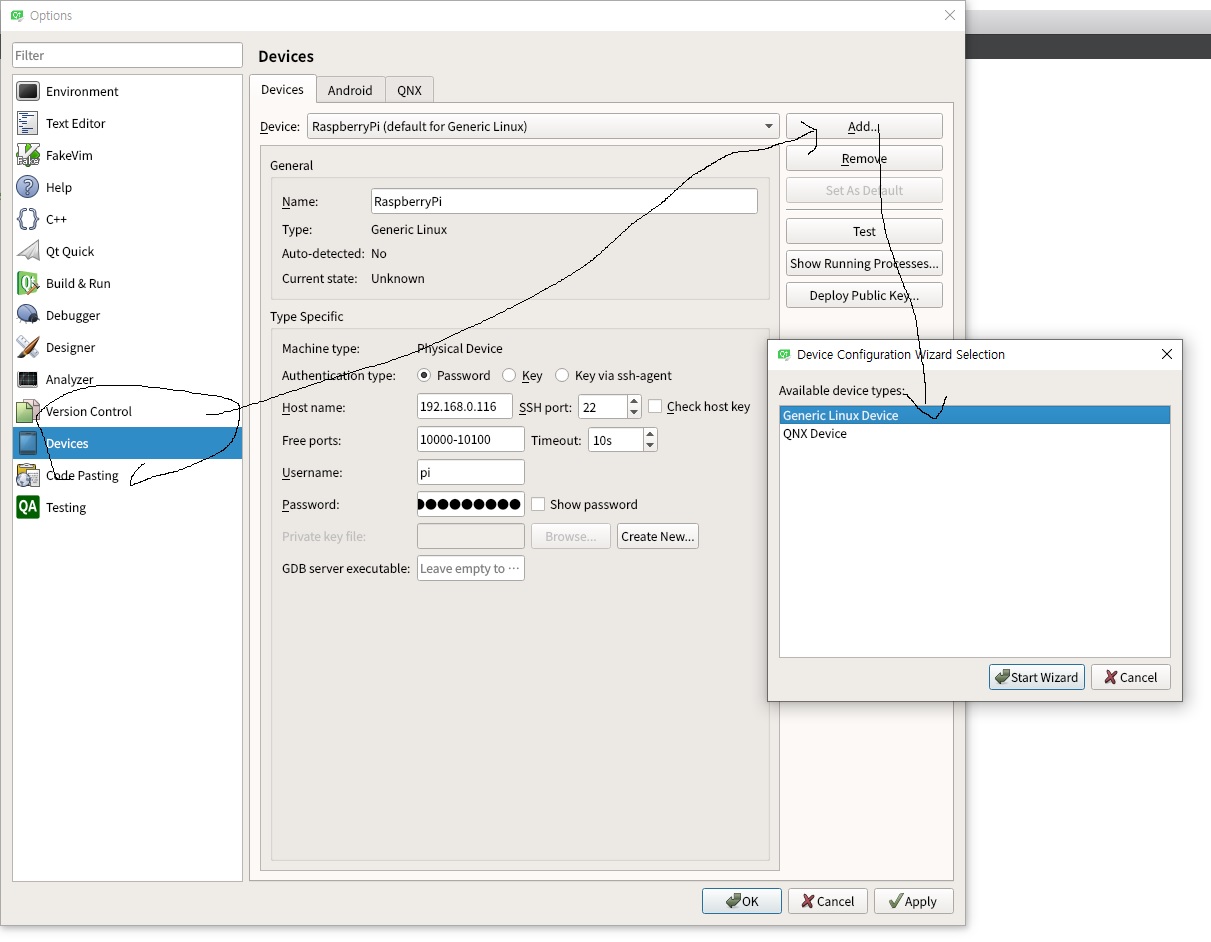
- 이제 Options에 Devices로 가서 원격접속을 할 타겟의 정보를 설정한다.
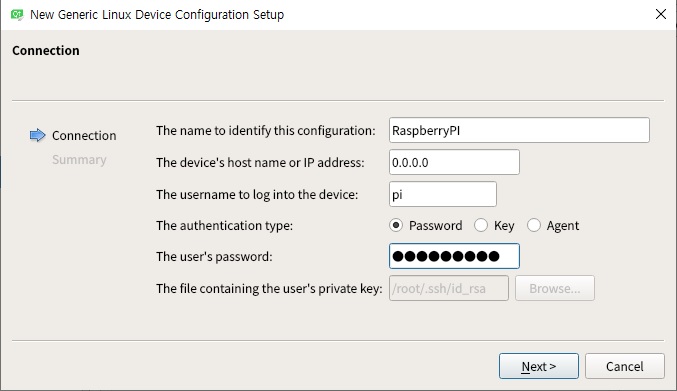
- Add -> Generic Linux Device를 클릭하여 타겟보드의 ssh에 접속하기 위한 정보를 입력하여 저장하면 된다.
- 다시 Build & Run의 Kits로 돌아와 Kit에 Device에 방금 저장한 타겟을 클릭하면 IDE 설정은 끝
프로젝트 생성 및 배포
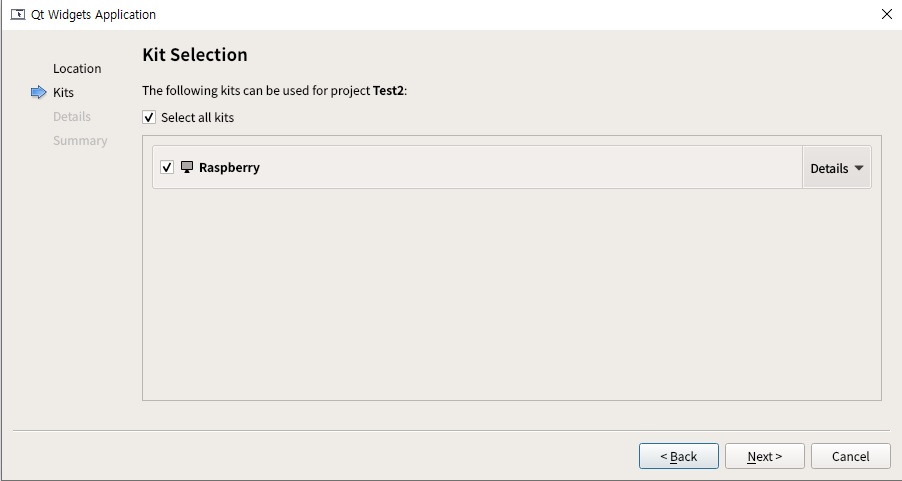
- 툴바의 File -> New File or Project -> Qt Widgets Application을 클릭
- 프로젝트 이름을 설정하고 Kit Selection에서 제대로 설정이 되었다면 그림과 같이 뜰 것입니다. 이제 Next를 클릭하여 자잘한 설정은 전부 넘겨줍시다.
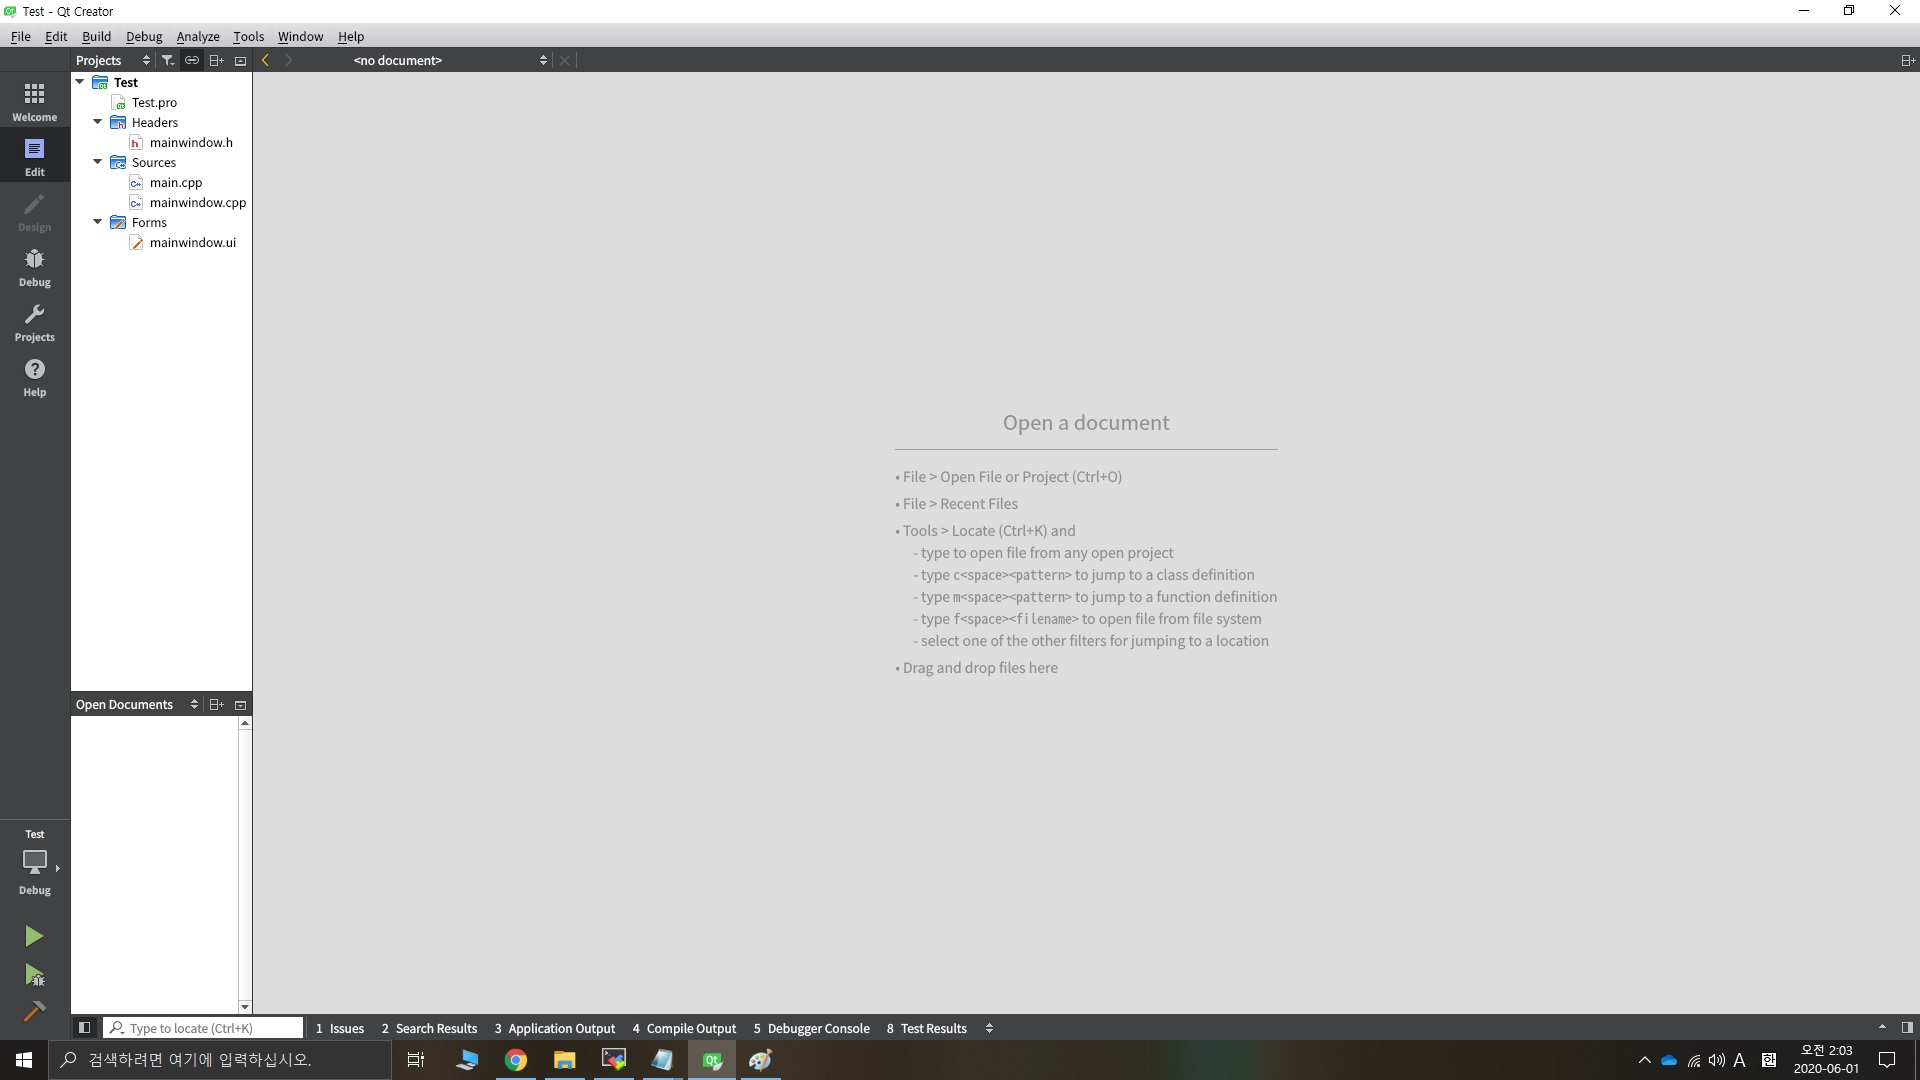
- 기본으로 생성되는 파일들 입니다. 이제 툴바에서 Build -> Build All 을 클릭해서 제대로 빌드가 되는지 확인
- 제대로 된다면 이제 빌드된 바이너리를 타겟에 배포 하면 됩니다.
- 바로 Build -> Run 을 선택하면 배포할 위치를 설정하지 않았기 때문에 프로젝트는 빌드만 하고 그 뒤에 배포를 수행하지 않습니다.
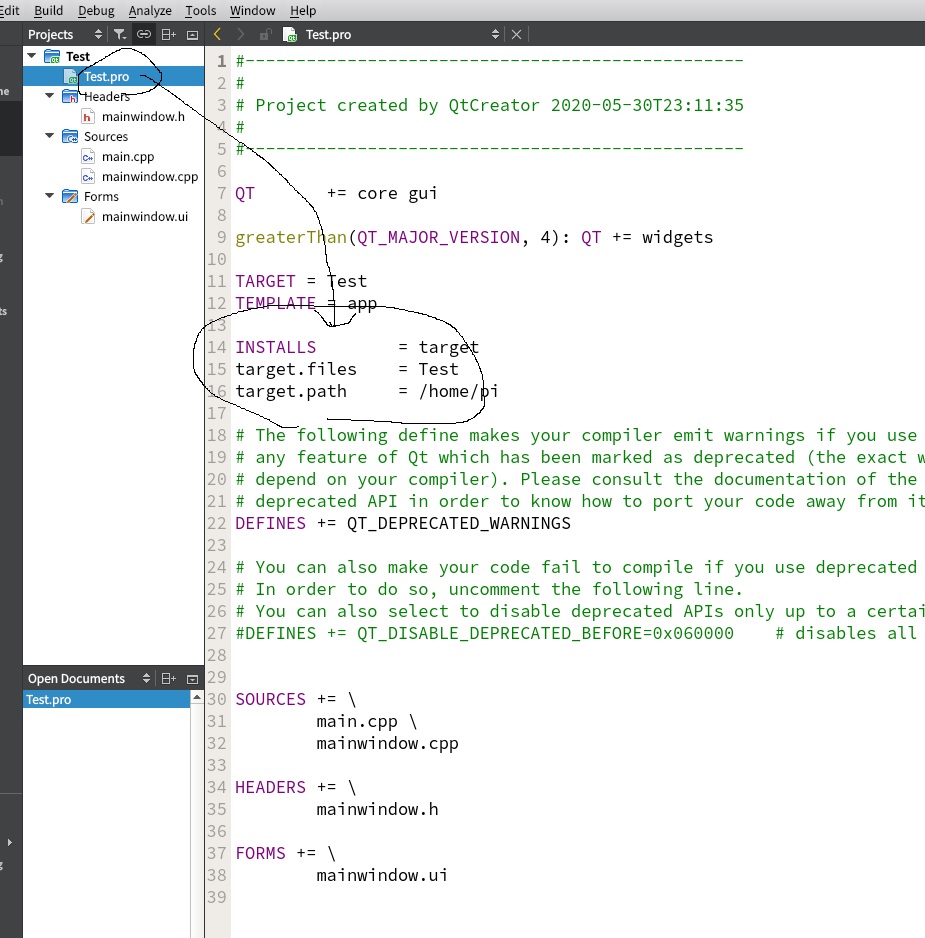
- 생성된 project이름.pro 에 그림과 같이 배포를 위한 설정을 하고 Run을 돌려주면 타겟보드에서 실행이 될 것 입니다.
- target.path: 배포경로
- target.files: 배포파일
대충 마무리 글
사실 지금은 qt를 업무적으로 하고 있진 않지만 전 회사에서 qt 크로스 컴파일 환경을 만들다 엄청 고생했던 기억이 있어서 남겨두지 않으면 아깝다라는 생각이 들어 이렇게 남겨두게 되었습니다. 그 때는 windows에 개발환경을 세팅하느라 더 고생했던 감도 없지않아 있긴 하지만..