프로토타입
Prototype 객체는 생성자 함수가 생성한 각각의 객체에 공유 프로퍼티를 제공하기 위해 사용한다.
객체지향 언어인 자바스크립트에는 클래스라는 개념이 없고, 대신 프로토타입(Prototype)이라는 것이 존재해서 자바스크립트를 프로토타입 기반 언어라고 부른다.
자바스크립트의 모든 객체는 자신의 부모 역할을 담당하는 객체와 연결되어 있다.
그리고 이것은 마치 객체 지향의 상속 개념과 같이 부모 객체의 프로퍼티 또는 메소드를 상속받아 사용할 수 있게 한다.
이러한 부모 객체를 Prototype(프로토타입) 객체 또는 줄여서 Prototype(프로토타입)이라 한다.
var student = {
  name: 'Lee',
  score: 90
};

// student에는 hasOwnProperty 메소드가 없지만 아래 구문은 동작한다.
console.log(student.hasOwnProperty('name')); // true
console.dir(student);
ECMAScript spec에서는 아래와 같이 설명한다.
자바스크립트의 모든 객체는
[[Prototype]]이라는 인터널 슬롯(internal slot, 자바스크립트 엔진의 내부 로직)을 가진다.
[[Prototype]]의 값은 null 또는 객체이며 상속을 구현하는데 사용된다.
[[Prototype]]객체의 데이터 프로퍼티는 get 액세스를 위해 상속되어 자식 객체의 프로퍼티처럼 사용할 수 있다. 하지만 set 액세스는 허용되지 않는다.
[[Prototype]]의 값은 프로토타입 객체이며 __proto__ accessor property로 접근할 수 있다.
__proto__ 프로퍼티에 접근하면 내부적으로 Object.getPrototypeOf가 호출되어 프로토타입 객체를 반환한다.
여기서 student 객체는 __proto__ 프로퍼티로 자신의 부모 객체(프로토타입 객체)인 Object.prototype을 가리키고 있다.
var student = {
  name: 'Lee',
  score: 90
}
console.log(student.__proto__ === Object.prototype); // true
객체를 생성할 때 프로토타입은 결정된다.
결정된 프로토타입 객체는 다른 임의의 객체로 변경할 수 있다.
이것은 부모 객체인 프로토타입을 동적으로 변경할 수 있다는 것을 의미한다.
이러한 특징을 활용하여 객체의 상속을 구현할 수 있다.
[[Prototype]] vs prototype 프로퍼티
모든 객체는 자신의 프로토타입 객체를 가리키는 [[Prototype]] 인터널 슬롯을 가지며 상속을 위해 사용된다.
함수도 객체이므로 [[Prototype]] 인터널 슬롯을 갖는다.
그런데 함수 객체는 일반 객체와는 달리 prototype 프로퍼티도 소유하게 된다.
주의해야 할 것은 prototype 프로퍼티는 프로토타입 객체를 가리키는 [[Prototype]] 인터널 슬롯은 다르다는 것이다.
prototype 프로퍼티와 [[Prototype]]은 모두 프로토타입 객체를 가리키지만 관점의 차이가 있다.
function Person(name) {
  this.name = name;
}

var foo = new Person('Lee');

console.dir(Person); // prototype 프로퍼티가 있다.
console.dir(foo); // prototype 프로퍼티가 없다.-
[[Prototype]]
함수를 포함한 모든 객체가 가지고 있는 인터널 슬롯
객체의 입장에서 자신의 부모 역할을 하는 프로토타입 객체를 가리키며 함수 객체의 경우 Function.prototype을 가리킨다. -
prototype 프로퍼티
함수 객체만 가지고 있는 프로퍼티
함수 객체가 생성자로 사용될 때 이 함수를 통해 생성될 객체의 부모 역할을 하는 객체(프로토타입 객체)를 가리킨다.
(내가 생성할 객체들의 [[Prototype]]을 가리킨다.)
constructor 프로퍼티
프로토타입 객체는 constructor 프로퍼티를 갖는다.
이 constructor 프로퍼티는 객체의 입장에서 자신을 생성한 객체를 가리킨다.
예를 들어 Person() 생성자 함수에 의해 생성된 객체를 foo라 하자.
이 때 foo 객체 입장에서 자신을 생성한 객체는 Person() 생성자 함수이며, foo 객체의 프로토타입 객체는 Person.prototype이다.
따라서 프로토타입 객체 Person.prototype의 constructor 프로퍼티는 Person() 생성자 함수를 가리킨다.
(Person.prototype = 내가 생성할 객체의 [[Prototype]]
따라서 내가 생성할 객체의 생성자는 나 자신이므로 Person.prototype의 constructor 프로퍼티는 Person() 생성자 함수를 가리킨다.)
function Person(name) {
  this.name = name;
}

var foo = new Person('Lee');

// Person() 생성자 함수에 의해 생성된 객체를 생성한 객체는 Person() 생성자 함수이다.
console.log(Person.prototype.constructor === Person);

// foo 객체를 생성한 객체는 Person() 생성자 함수이다.
console.log(foo.constructor === Person);

// Person() 생성자 함수를 생성한 객체는 Function() 생성자 함수이다.
console.log(Person.constructor === Function);
Prototype chain
자바스크립트는 특정 객체의 프로퍼티나 메소드에 접근하려고 할 때 해당 객체에 접근하려는 프로퍼티 또는 메소드가 없다면 [[Prototype]]이 가리키는 링크를 따라 자신의 부모 역할을 하는 프로토타입 객체의 프로퍼티나 메소드를 차례대로 검색한다. 이것을 프로토타입 체인이라 한다. (스코프 체인과 비슷한 논리)
var student = {
  name: 'Lee',
  score: 90
}

// Object.prototype.hasOwnProperty()
console.log(student.hasOwnProperty('name')); // true
student 객체는 hasOwnProperty 메소드를 가지고 있지 않으므로 에러가 발생해야하나 정상적으로 결과가 출력되었다.
이는 student 객체의 [[Prototype]]이 가리키는 링크를 따라가서 student 객체의 부모 역할을 하는 프로토타입 객체(Object.prototype)의 메소드 hasOwnProperty를 호출하였기 때문에 가능한 것이다.
var student = {
  name: 'Lee',
  score: 90
}
console.log(student.hasOwnProperty('name')); // true
console.log(student.__proto__ === Object.prototype); // true
console.log(Object.prototype.hasOwnProperty('hasOwnProperty')); // true
hasOwnProperty : 객체에 지정된 이름을 가진 속성이 있는지 여부를 반환하는 함수
객체 리터럴 방식으로 생성된 객체의 프로토타입 체인
객체 생성 방법은 3가지가 있다.
- 객체 리터럴
- 생성자 함수
Object()생성자 함수
자바스크립트 엔진은 객체 리터럴로 객체를 생성하는 코드를 만나면 내부적으로 Object() 생성자 함수를 사용하여 객체를 생성한다.
함수 객체인 Object() 생성자 함수는 일반 객체와 달리 prototype 프로퍼티가 있다.
prototype 프로퍼티는 함수 객체가 생성자로 사용될 때 이 함수를 통해 생성된 객체의 부모 역할을 하는 객체, 즉 프로토타입 객체를 가리킨다.
[[Prototype]]은 객체의 입장에서 자신의 부모 역할을 하는 객체, 즉 프로토타입 객체를 가리킨다.
var person = {
  name: 'Lee',
  gender: 'male',
  sayHello: function(){
    console.log('Hi! my name is ' + this.name);
  }
};

console.log(person.__proto__ === Object.prototype);   // true
console.log(Object.prototype.constructor === Object); // true
console.log(Object.__proto__ === Function.prototype); // true. Obeject는 함수
console.log(Function.prototype.__proto__ === Object.prototype); // true
결론적으로 객체 리터럴을 사용하여 객체를 생성한 경우, 그 객체의 프로토타입 객체는 Object.prototype이다.
생성자 함수로 생성된 객체의 프로토타입 체인
생성자 함수로 객체를 생성하기 위해서는 우선 생성자 함수를 정의하여야 한다.
함수를 정의하는 방식은 3가지가 있다.
- 함수선언식(Function declaration)
- 함수표현식(Function expression)
Function()생성자 함수
3가지 함수 정의 방식 모두 결국 Function() 생성자 함수를 통해 함수 객체를 생성한다.
따라서 어떠한 방식으로 함수 객체를 생성하여도 모든 함수 객체의 prototype 객체는 Function.prototype이다.
이제 객체의 관점에서 prototype 객체를 살펴보자.
3가지 객체 생성 방식에 의해 생성된 객체의 prototype 객체를 정리해 보면 아래와 같다.
| 객체 생성 방식 | 엔진의 객체 생성 | 인스턴스의 prototype 객체 |
|---|---|---|
| 객체 리터럴 | Object() 생성자 함수 | Object.prototype |
| Object() 생성자 함수 | Object() 생성자 함수 | Object.prototype |
| 생성자 함수 | 생성자 함수 | 생성자 함수 이름.prototype |
function Person(name, gender) {
  this.name = name;
  this.gender = gender;
  this.sayHello = function(){
    console.log('Hi! my name is ' + this.name);
  };
}
var foo = new Person('Lee', 'male');

console.dir(Person);
console.dir(foo);

console.log(foo.__proto__ === Person.prototype);                // true
console.log(Person.prototype.__proto__ === Object.prototype);   // true
console.log(Person.prototype.constructor === Person);           // true
console.log(Person.__proto__ === Function.prototype);           // true. Person은 생성자 함수
console.log(Function.prototype.__proto__ === Object.prototype); // true
foo 객체의 프로토타입 객체 Person.prototype 객체와 Person() 생성자 함수의 프로토타입 객체인 Function.prototype의 프로토타입 객체는 Object.prototype 객체이다.
이는 객체 리터럴 방식이나 생성자 함수 방식이나 결국은 모든 객체의 부모 객체인 Object.prototype 객체에서 프로토타입 체인이 끝나기 때문이다. 이때 Object.prototype 객체를 프로토타입 체인의 종점(End of prototype chain)이라 한다.
프로토타입 객체의 확장
프로토타입 객체도 객체이므로 일반 객체와 같이 프로퍼티를 추가/삭제할 수 있다. 그리고 이렇게 추가/삭제된 프로퍼티는 즉시 프로토타입 체인에 반영된다.
function Person(name) {
  this.name = name;
}

var foo = new Person('Lee');

Person.prototype.sayHello = function(){
  console.log('Hi! my name is ' + this.name);
};

foo.sayHello(); // Hi! my name is Lee
Person.prototype 객체는 일반 객체와 같이 프로퍼티를 추가/삭제가 가능하다.
위의 코드에서는 Person.prototype 객체에 메소드 sayHello를 추가하였다.
이 때 sayHello 메소드는 프로토타입 체인에 반영된다.
따라서 생성자 함수 Person에 의해 생성된 모든 객체는 프로토타입 체인에 의해 부모객체인 Person.prototype의 메소드를 사용할 수 있게 되었다.
프로토타입 객체의 변경
객체를 생성할 때 프로토타입은 결정된다. 결정된 프로토타입 객체는 다른 임의의 객체로 변경할 수 있다. 이러한 특징을 활용하여 객체의 상속을 구현할 수 있다.
이 때 주의할 것은 프로토타입 객체를 변경하면
-
프로토타입 객체 변경 시점 이전에 생성된 객체는 기존 프로토타입 객체를
[[Prototype]]에 바인딩한다. -
프로토타입 객체 변경 시점 이후에 생성된 객체는 변경된 프로토타입 객체를
[[Prototype]]에 바인딩한다.
function Person(name) {
  this.name = name;
}

var foo = new Person('Lee');

// 프로토타입 객체의 변경
Person.prototype = { gender: 'male' };

var bar = new Person('Kim');

console.log(foo.gender); // undefined
console.log(bar.gender); // 'male'

console.log(foo.constructor); // 1. Person(name)
console.log(bar.constructor); // 2. Object()-
constructor프로퍼티는Person()생성자 함수를 가리킨다. -
프로토타입 객체 변경 후,
Person()생성자 함수의prototype프로퍼티가 가리키는 객체를 일반 객체로 변경하면서bar.constructor의 값은 프로토타입 체이닝에 의해Object()생성자 함수가 되었다.
프로토타입 체인 동작 조건
객체의 프로퍼티를 참조하는 경우, 해당 객체에 프로퍼티가 없는 경우, 프로토타입 체인이 동작한다.
객체의 프로퍼티에 값을 할당하는 경우, 프로토타입 체인이 동작하지 않는다.
이는 객체에 해당 프로퍼티가 있는 경우, 값을 재할당하고 해당 프로퍼티가 없는 경우는 해당 객체에 프로퍼티를 동적으로 추가하기 때문이다.
function Person(name) {
  this.name = name;
}

var foo = new Person('Lee');
// foo 객체에 gender 프로퍼티 추가
foo.gender = 'female';

console.log(foo.gender); // 'female'
foo 객체의 gender 프로퍼티에 값을 할당하면 프로토타입 체인이 발생하여 Person.prototype 객체의 gender 프로퍼티에 값을 할당하는 것이 아니라 foo 객체에 프로퍼티를 동적으로 추가한다.
정리
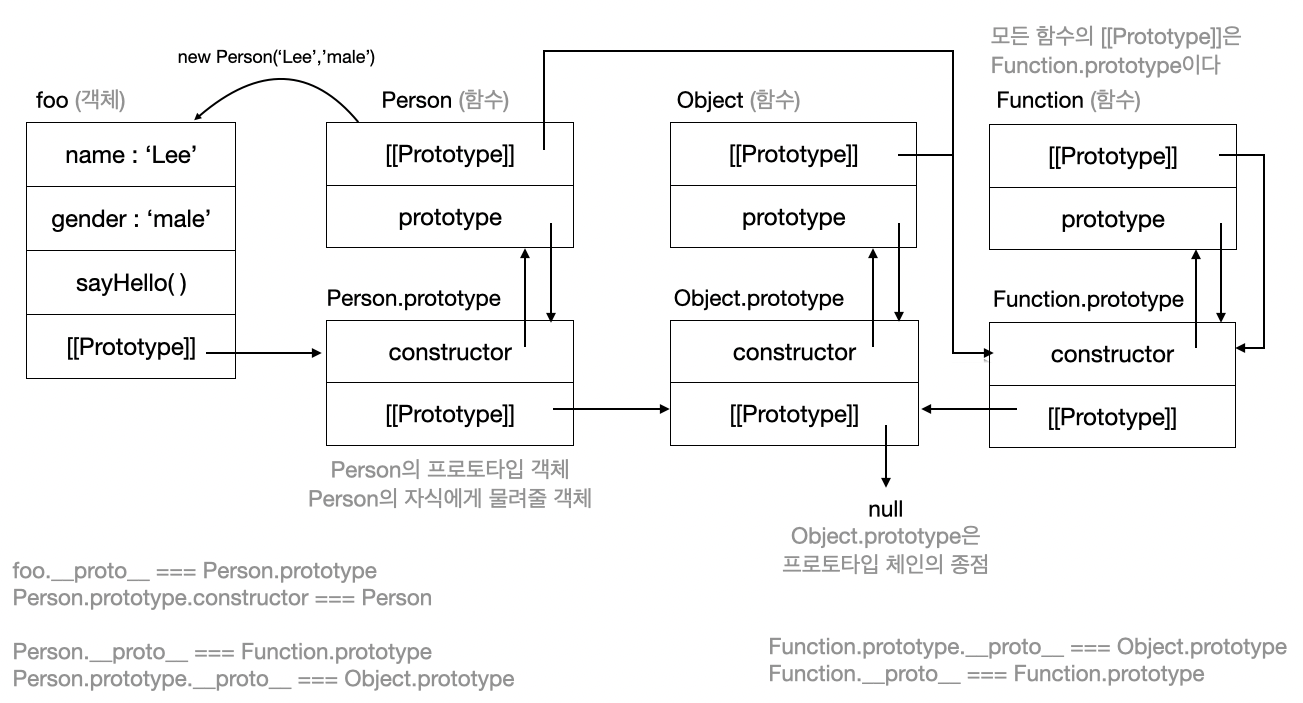
function Person(name, gender) {
  this.name = name;
  this.gender = gender;
  this.sayHello = function(){
    console.log('Hi! my name is ' + this.name);
  };
}
var foo = new Person('Lee', 'male')
이 코드의 프로토타입 체인을 그림으로 정리해봤다.
그림으로 한 번 정리해보면서 머릿속에서는 정리가 됐는데 그림이 좀 복잡하다..
특히 Function과 Object와 다른 함수, 객체들 간의 관계가 너무 헷갈렸는데 좀 정리가 된 것 같다.

Reference
https://poiemaweb.com/js-prototype
https://medium.com/@bluesh55/javascript-prototype-이해하기-f8e67c286b67
