기본 애니메이션
setInterval, setTimeout과 같은 내장 함수를 이용할 수도 있고 requestAnimationFrame()과 같은 내장 함수를 이용할 수 있다.
컴퓨터의 성능이 좋아진 요즘은 거의 상관없는 일이지만 모든 컴퓨터의 호환성을 위해 requestAnimationFrame을 사용하는 것을 권고한다.
기본 애니메이션 단계
기본적인 애니메이션 단계는 다음과 같다.
- 캔버스를 비운다.
- 그리려는 도형이 캔버스를 가든 채우는 것이 아니라면, 이전에 그려진 모든 도형을 지울 필요가 있다. 가장 쉬운 방법은 clearRect()메소드를 사용하는 것이다.
- 캔버스 상태를 저장한다.
- 캔버스 상태에 영향을 주는 설정값을 바꾸려고 하고, 바뀐 값을 각 장면 마다 사용하려고 한다면, 원래 상태를 저장할 필요가 있다.
- 애니메이션할 도형을 그린다.
- 실제 장면을 그리는 단계
- 캔버스 상태를 복원한다.
- 새로운 장면을 그리기 전에 저장된 상태를 복원한다.
애니메이션 제어하기
캔버스 메소드를 사용하거나 사용자 함수를 사용하여 캔버스에 도형을 그린다. for 반복문에서는 애니메이션 실행이 불가능하다.
정해진 시간마다 그리기 함수를 실행하는 방법이 필요하다.
-
setInterval(function, delay)
- delay 밀리세컨드(1,000분의 1초)마다 function 함수 반복 실행을 시작합니다.
-
setTimeout(function, delay)
- delay 밀리세컨드(1,000분의 1초) 경과후, function 함수를 실행합니다.
-
window.requestAnimationFrame(function)
- 본인이 속한 함수를 반복 실행한다.
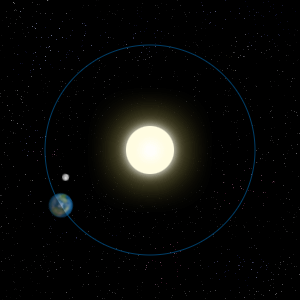
태양계 애니메이션
 //이미지를 가져올 준비를 한다.
    var sun = new Image();
    var moon = new Image();
    var earth = new Image();
    //실행함수를 만든다.
    function init(){
        //각각 이미지의 소스를 정해준다.
        sun.src = 'https://mdn.mozillademos.org/files/1456/Canvas_sun.png';
        moon.src = 'https://mdn.mozillademos.org/files/1443/Canvas_moon.png';
        earth.src = 'https://mdn.mozillademos.org/files/1429/Canvas_earth.png';

        //아래의 함수를 100밀리초마다 실행 시켜 애니메시션을 구현한다.
        setInterval(draw, 100);

    }
    //캔버스에 그리는 함수를 만든다.
    function draw(){
        //캔버스를 사용할 준비를 한다
        const ctx = document.getElementById('canvas').getContext('2d');
        //합성 속성을 결정한다.
        ctx.globalCompositeOperation  = 'destination-over';
        //처음 실행은 캔버스를 지워주는 것이다.
        ctx.clearRect(0,0,500,500);
        //fill, stroke 색상 속성을 결정한다.
        ctx.fillStyle = 'rgba(0,0,0,0.4)';
        ctx.strokeStyle = 'rgba(0,153,255,0.4)';
        //여기까지 속성을 저장한다.
        ctx.save();
        //캔버스를 그릴 위치를 옮긴다.
        //태양은 보통 위치가 고정되어 있어 지구와 달의 위치를 결정한다.
        ctx.translate(150,150);

        // 지구를 그린다.
        //초당 60라디언 + 6라디언 씩 rotate 시킨다. 한바퀴에 이미지를 자전시키는 효과
        var time = new Date();
        ctx.rotate( ((2*Math.PI)/60)*time.getSeconds() + ((2*Math.PI)/60000)*time.getMilliseconds() );
        //지구를 정해진 궤도 안에 들어오게 만들기 위해 설정함.
        ctx.translate(105,0);
        //그림자의 생성함
        ctx.fillRect(0,-12,50,2); // Shadow
        //지구 이미지를 그리고 위치를 조정한다
        ctx.drawImage(earth,-12,-12);

        // 달
        ctx.save();
        ctx.rotate( ((2*Math.PI)/6)*time.getSeconds() + ((2*Math.PI)/6000)*time.getMilliseconds() );
        ctx.translate(0,28.5);
        ctx.drawImage(moon,-3.5,-3.5);
        //1번 세이브복구
        ctx.restore();
        //2번 세이브 복구
        ctx.restore();
        //선을 그린다.
        ctx.beginPath();
        //원형으로 그린다. (지구궤도로 씀)
        ctx.arc(150,150,105,0,Math.PI*2,false); // 지구 궤도
        //stroke로 그림
        ctx.stroke();
        //태양을 그림
        ctx.drawImage(sun,0,0,300,300);
    }
    init()
시계 애니메이션
function init(){
clock();
setInterval(clock,1000);
}
function clock(){
let now = new Date();
const ctx = document.getElementById('canvas').getContext('2d');
ctx.save();
ctx.clearRect(0,0,150,150);
ctx.translate(75,75);
ctx.scale(0.4,0.4);
ctx.rotate(-Math.PI/2);
ctx.strokeStyle = 'black';
ctx.fillStyle = 'white';
ctx.lineWidth = 8;
ctx.lineCap = "round";
// 시계 프레임 만들기
ctx.save();
for (let i = 0; i < 12; i++) {
ctx.beginPath();
ctx.rotate(Math.PI/6);//30도
ctx.moveTo(100,0);
ctx.lineTo(120,0);
ctx.stroke();
}
ctx.restore();
ctx.save();
ctx.lineWidth = 5;
for (i=0;i<60;i++){
if (i%5!=0) {
ctx.beginPath();
ctx.moveTo(117,0);
ctx.lineTo(120,0);
ctx.stroke();
}
ctx.rotate(Math.PI/30);
}
ctx.restore();
ctx.save();
ctx.lineWidth = 5;
for (i=0;i<60;i++){
if (i%5!=0) {
ctx.beginPath();
ctx.moveTo(117,0);
ctx.lineTo(120,0);
ctx.stroke();
}
ctx.rotate(Math.PI/30);
}
ctx.restore();
// 초, 분, 시 가져오기
var sec = now.getSeconds();
var min = now.getMinutes();
var hr = now.getHours();
//12시간밖에 표현 못함으로 12시간 단위로 바꿔줌
hr = hr>=12 ? hr-12 : hr;
// 검정색으로 설정
ctx.fillStyle = "black";
// (시간 가져오기)지금까지 속성 저장
ctx.save();
// 시간 표시 - 시
ctx.rotate( hr*(Math.PI/6) + (Math.PI/360)*min + (Math.PI/21600)*sec )
ctx.lineWidth = 14;
ctx.beginPath();
ctx.moveTo(-20,0);
ctx.lineTo(80,0);
ctx.stroke();
// (시간 가져오기)로 복구
ctx.restore();
// 시간 표시 - 분
ctx.save();
ctx.rotate( (Math.PI/30)*min + (Math.PI/1800)*sec )
ctx.lineWidth = 10;
ctx.beginPath();
ctx.moveTo(-28,0);
ctx.lineTo(112,0);
ctx.stroke();
// (시간 가져오기)로 복구
ctx.restore();
// 시간 표시 - 초
ctx.save();
ctx.rotate(sec * Math.PI/30); // 6도씩 60초는 360도 한바퀴
ctx.strokeStyle = "#D40000";
ctx.fillStyle = "#D40000";
ctx.lineWidth = 6;
//중앙에 있는 붉은색 원 그리기
ctx.beginPath();
ctx.moveTo(-30,0);
ctx.lineTo(83,0);
ctx.stroke();
ctx.beginPath();
ctx.arc(0,0,10,0,Math.PI*2,true);
ctx.fill();
//끝부분의 비어있는 원그리기
ctx.beginPath();
ctx.arc(95,0,10,0,Math.PI*2,true);
ctx.stroke();
// 배경이 바뀔때 색상 변경
ctx.fillStyle = "rgba(0,0,0,0)";
ctx.arc(0,0,10,0,Math.PI*2,true);
ctx.fill();
ctx.restore();
//겉의 파랑색 원 그리기
ctx.beginPath();
ctx.lineWidth = 14;
ctx.strokeStyle = '#325FA2';
ctx.arc(0,0,142,0,Math.PI*2,true);
ctx.stroke();
// (시간 가져오기)로 복구
ctx.restore();
}
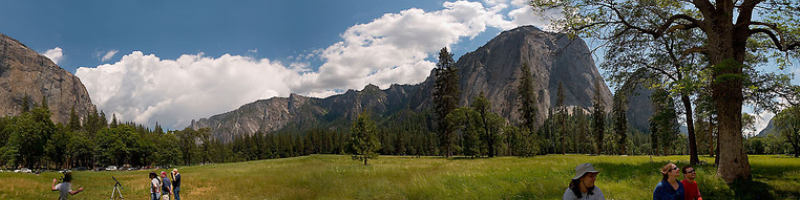
init();움직이는 파라노마 사진
  const ctx = document.getElementById('canvas').getContext('2d');
  //이미지를 사용하기 위한 초기화
  const img = new Image();
  //이미지 소스 경로
  img.src = 'https://mdn.mozillademos.org/files/4553/Capitan_Meadows,_Yosemite_National_Park.jpg';

  //전역으로 사용해야함
  //캔버스 크기도 변수로 담자
  const CanvasXSize = 800;
  const CanvasYSize = 200;
  const scale = 1.05;
  //setIntaval의 속도를 조절할꺼임.
  //요 친구를 조절하면 인터벌 속도를 조절함
  const speed = 30;
  //이친구를 조절하면 x의 증가량을
  const dx = 1;
  let imgW;
  let imgH;
  //이미지 크기에 따라 지워주는 변수를 만들꺼임.
  let clearX;
  let clearY;
  let x = 0;
  let y = -4.5;
//이미지가 로드되면 다음을 실행함.
  img.onload = function(){
    imgW = img.width * scale;
    imgH = img.height * scale;
    //캔버스보다 큰 이미지는 x를 캔버스사이즈에 - 이미지 사이즈를 하여 좌측으로 최대한 보냄.
    if(imgW > CanvasXSize){x = CanvasXSize -imgW;}
    //캔버스보다 큰 이미지는 새로고치는 사이즈는 이미지 크기임
    if(imgW > CanvasXSize){clearX = imgW;}
    //그렇지 않으면 그냥 캔버스 크기로 설정하면 됨
    else{clearX = CanvasXSize;}
    if(imgH > CanvasYSize){clearY = imgH;}
    else{clearY = CanvasYSize;}


    return setInterval(draw, speed);
  }

  //이미지를 그리는 함수
  function draw(){
    //캔버스 크기만큼 지워야함
    ctx.clearRect(0,0,clearX,clearY);
    //이미지가 캔버스보다 작은 경우도 생각하자 우리는 친절한 개발자임
    if(imgW <= CanvasXSize){
      //캔버스 크기보다 x가 더 크면 즉 우측으로 넘어가면 x를 초기화함
      if(x > CanvasXSize){ x=0;}
      //이친구는 x - 캔버스 크기를 해야 그림이 끊김없다.
      if(x > (CanvasXSize-imgW)){ctx.drawImage(img, x-CanvasXSize, y, imgW, imgH)}
    }else{
      //그림을 우측으로 보내면 다시 그림을 그려야 끊김없음
      //x가 캔버스 너비보다 크면 다시시작함
      if(x>CanvasXSize){x = CanvasXSize-imgW;}
      if(x>(CanvasXSize-imgW)){
        //이미지를 새로그려서 끊김 없이 실행함.
        ctx.drawImage(img, x-imgW, y, imgW, imgH);
        console.log(x-imgW)
      }
    }
    //원 이미지임
    ctx.drawImage(img,x,y,imgW,imgH);
    //x를 증가시켜서 그림을 점점 우측으로 보낸다.
    x+= dx;
  }

AllTimeDevelop