❓ 문제점
Spring Security를 사용하지 않고 JWT 인증 방식으로만 유저의 인증 인가를 구현했었는데 Spring Security를 적용해서 구현하는 방식으로 바꿔보려고 한다.
🔑 시도 && 해결 방법
'Spring Security' 프레임워크는 Spring 서버에 필요한 인증 및 인가를 위해 많은 기능을 제공해 줌으로써 개발의 수고를 덜어 줍니다. 마치 'Spring' 프레임워크가 웹 서버 구현에 편의를 제공해 주는 것과 같습니다.
라고 한다. 어떤 방식? 구조?를 가지고 동작하는지 알아보자
일단 스프링에서 모든 REQ은 DispatcherServlet을 통과하는데 이전 단계에서 FILTER 가 동작하는건 이전에 공부했다. 그리고 여러가지의 필터들이 연결된 Filter Chain 속에 FilterChainProxy를 통해서 상세 로직을 구현한다.
Securtiy 필터 체인으로 들어오면 다음과 같은 구조를 가지는데
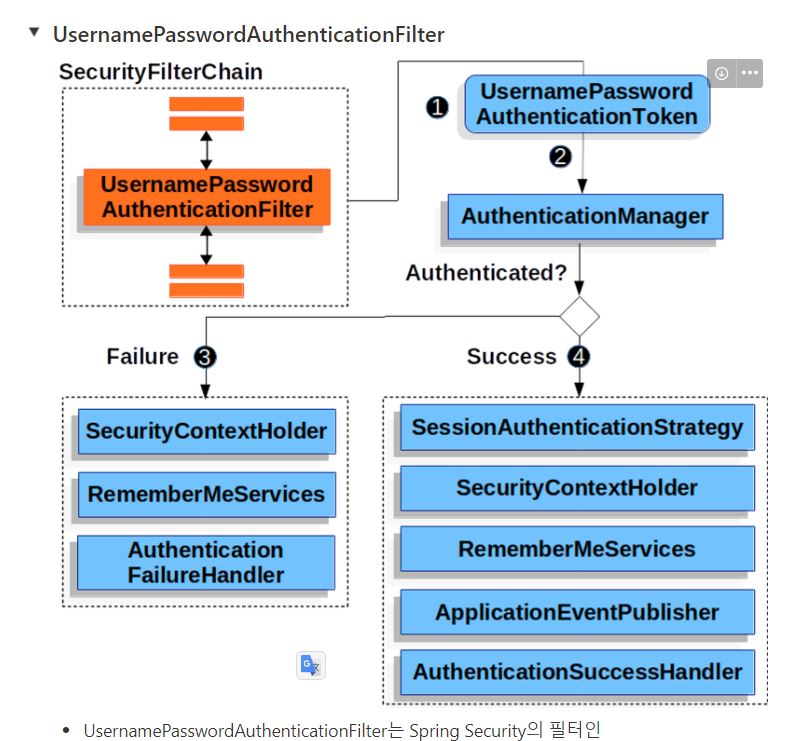
- UsernamePasswordAuthenticationFilter는 Spring Security의 필터인 AbstractAuthenticationProcessingFilter를 상속한 Filter입니다.
- 기본적으로 Form Login 기반을 사용할 때 username 과 password 확인하여 인증합니다.
=> 로그인을 시도하면 UsernamePasswordAuthenticationFilter 가 id,password를 입력받고 인증을 한다.
- 인증 과정
1. 사용자가 username과 password를 제출하면 UsernamePasswordAuthenticationFilter는 인증된 사용자의 정보가 담기는 인증 객체인 Authentication의 종류 중 하나인 UsernamePasswordAuthenticationToken을 만들어 AuthenticationManager에게 넘겨 인증을 시도합니다 (JWT 토큰은 아님!
).
=> 입력받은 사용자 정보를 토큰에 저장해서 AuthenticationManager라는 곳에 넘긴다.
- 실패하면 SecurityContextHolder를 비웁니다.
- 성공하면 SecurityContextHolder에 Authentication를 세팅합니다.
SecurityContextHolder의 구조는 아래와 같다.
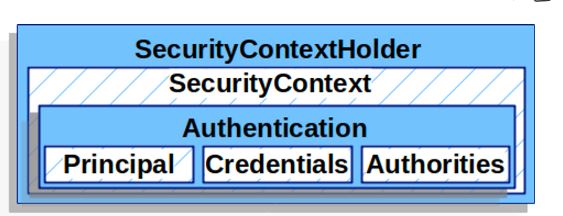
principal => 사용자 식별 관련 (유저 정보 )
authorities -> 사용자 권한 관련
그래서 결국 코드의 흐름을 보면
- 사용자가 username과 password를 제출하면 UsernamePasswordAuthenticationFilter는 인증된 사용자의 정보가 담기는 인증 객체인 Authentication의 종류 중 하나인 UsernamePasswordAuthenticationToken을 만들어 AuthenticationManager에게 넘겨 인증을 시도합니다
가 아래와 같이 구현된다 .
@Override
    public Authentication attemptAuthentication(HttpServletRequest request, HttpServletResponse response) throws AuthenticationException {
        log.info("로그인 시도");
        try {
            LoginRequest requestDto = new ObjectMapper().readValue(request.getInputStream(), LoginRequest.class);

            return getAuthenticationManager().authenticate(
                    new UsernamePasswordAuthenticationToken(
                            requestDto.id(),
                            requestDto.pw(),
                            null
                    ) // manager에 토큰 전해주는 로직
            );
        } catch (IOException e) {
            log.error(e.getMessage());
            throw new RuntimeException(e.getMessage());
        }
}- 그리고 이전에 jwt 구현할때 봤던거처럼
1.req에서 유저정보 뽑고, - 해당 유저 정보 사용해서 토큰 만들고 ,
- 쿠키에 넣고 의 작업을 수행한다.
이제 다른 로그인 회원가입 이외에 다른 작업을 수행하려면 인가 처리가 되는데 그 부분이 성공하면 SecurityContextHolder에 Authentication를 세팅합니다. 인거같다. 코드 요약해보면
String tokenValue = jwtUtil.getTokenFromRequest(req);

        if (StringUtils.hasText(tokenValue)) {
            // JWT 토큰 substring
            tokenValue = jwtUtil.substringToken(tokenValue);
            log.info(tokenValue);

            if (!jwtUtil.validateToken(tokenValue)) {
                log.error("Token Error");
                return;
            }

            Claims info = jwtUtil.getUserInfoFromToken(tokenValue);

            try {
                setAuthentication(info.getSubject());
            } catch (Exception e) {
                log.error(e.getMessage());
                return;
            }
        }
request에서 토큰 뽑고 validation 까지 진행한다.
그리고 토큰에서 뽑은 유저 정보로 Authentication을 세팅하는데
아래와 같은 코드로 구현된다 .
public void setAuthentication(String username) {
        SecurityContext context = SecurityContextHolder.createEmptyContext();
        Authentication authentication = createAuthentication(username);
        context.setAuthentication(authentication);

        SecurityContextHolder.setContext(context);
    }

    // 인증 객체 생성
    private Authentication createAuthentication(String username) {
        UserDetails userDetails = loginService.loadUserByUsername(username);
        return new UsernamePasswordAuthenticationToken(userDetails, null, userDetails.getAuthorities());
    }
그리고 WebSecurity Config 에서
http.authorizeHttpRequests((authorizeHttpRequests) ->
                authorizeHttpRequests
                        .requestMatchers(
                                "/login",
                                "/register",
                                "/api/board/find/{id}",
                                "/api/board/findall"
                        ).permitAll() // '/api/user/'로 시작하는 요청 모두 접근 허가
                        .anyRequest().authenticated() // 그 외 모든 요청 인증처리
        );
인가가 필요없는 경로를 설정해줄수도 있다. 다만
@Configuration
@EnableWebSecurity
@RequiredArgsConstructor
public class WebSecurityConfig
@EnableWebSecurity 어노테이션을 써서 security 기능을 쓴다는걸 알려줘야한다.
💡 알게 된 점
시큐리티를 사용하고 바뀐점은
- 허가된 url을 쉽게 설정가능하다.
- 로그인 기능을 따로 구현하지 않아도 security에서 인증해준다.
- 다른 기능을 사용할떄 인가처리도 해준다.
- 유저 정보를 @AuthenticationPrincipal UserDetailsImpl userDetails 처럼 쉽게 뽑을 수 있다.