
서론
사이드 프로젝트를 진행하다 보면 데이터를 실시간이 아닌 일괄적으로 처리해야 하는 경우가 종종 있다. 이를 배치(batch) 작업이라고 하는데, 다음과 같은 작업일 경우 배치 작업에 대해 고민해볼 수 있다.
- 대량의 데이터를 처리하는 경우
- 특정 시간에 처리하는 경우
- 일괄적으로 처리하는 경우
Spring Framework에서 배치 관련 프레임워크로 Spring Batch을 제공한다. Spring Batch는 대용량 데이터 처리, 트랜잭션 관리, 재시도 기능 등 다양한 기능을 제공한다. 배치 서버를 구성할 때 활용하지 않을 이유가 없다.
케이크크는 공짜를 원해요.
현재 런칭을 앞두고 있는 케이크크 서비스에도 배치성 작업이 몇 가지 있는데, 바로 redis에 저장된 검색어 조회수와 케이크 조회수 초기화 작업이다. 사실 Batch 서버를 따로 구현하기엔 너무 작은 작업이........긴 하지만! phase 2에서 더 많은 배치 작업이 추가될 예정이라 미리 서버를 분리하고 Spring Batch를 도입하기로 했다.
그런데 문제는 비용이다. 서비스를 운영해보면 알겠지만, EC2의 프리 티어 스펙은 반복되는 배포도 버거워한다. 따라서 운영 서버로는 t2.small 스펙을 즐겨쓰는 편인데, 생각보다 비용이 싸지 않다. 따라서 현재 문제는 다음과 같다.
- Batch 서버를 구성해야 한다.
- 작은 스펙이어도 서버 비용이 부담된다.
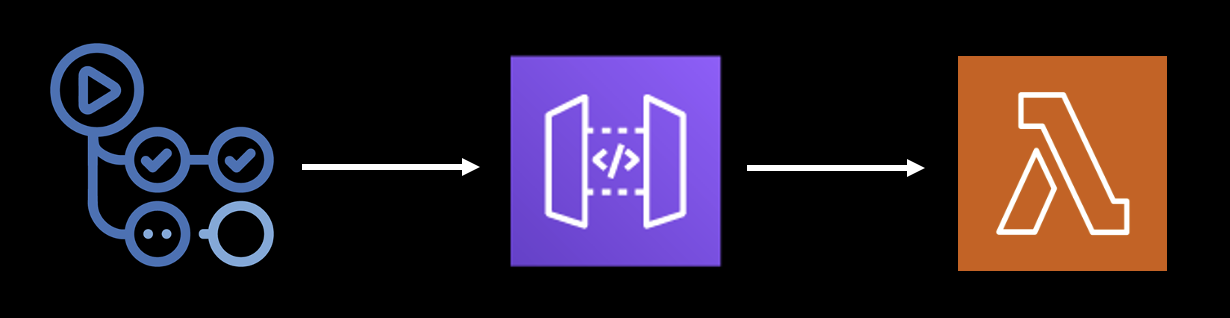
라고 하니 떠오른 것은 공짜와 공짜 비스무리 한 것들이다. 먼저 Github Actions이다. Batch 서버에서 잡(Job)을 실행하기 위한 트리거(Trigger)가 필요한데, 실무에서는 Java 진영의 대표적인 CI 툴인 젠킨스(Jenkins)가 많이 쓰인다. 하지만 젠킨스를 ec2나 로컬에서 띄워두는건 아무래도 부담스럽다. 따라서 ~(빈약하지만)~ 간단하고 공짜인 Github Actions을 트리거로 사용해보고자 한다.
Aws Lambda를 활용한 서버리스(serverless) 배포다. 다른 자원과 대비했을 때 Lambda는 굉장히 저렴하다. 또 현재 매주 월요일 00시에 배치 작업만 잘 실행된다면 서버가 내려가 있어도 문제 없다. 콜드 스타트(cold start)가 문제라지만 공짜는 거절할 수 없는 제안이었다.
Github Actions로만 해결할 수 없을까?
그럼 단순하게 Github Actions로만 해결할 수는 없는지에 대해 생각해 볼 수 있다. 다음과 같이 Spring Application이 실행되면 Job들을 실행하도록 구성하였다.
@RequiredArgsConstructor
@SpringBootApplication
public class BatchApplication implements ApplicationRunner {

	private final WeeklyJobLauncher jobLauncher;

	@PostConstruct
	public static void started() {
		TimeZone.setDefault(TimeZone.getTimeZone("Asia/Seoul"));
	}

	public static void main(String[] args) {
		started();

		final ConfigurableApplicationContext context = SpringApplication.run(BatchApplication.class, args);
		final int exitCode = SpringApplication.exit(context, () -> 0);

		System.exit(exitCode);
	}

	@Override
	public void run(ApplicationArguments args) throws Exception {
		jobLauncher.launch();
	}
}
이 애플리케이션은 실행 후 자동으로 해당 Batch 작업을 마친 뒤 종료한다. 그렇다면 Github Actions로 jar 파일을 말아 실행시키면 애플리케이션은 자연스럽게 배치 작업을 실행 및 종료 후 종료(exit)할 것이다. 아래는 해당 워크플로우 코드다.
name: weekly-batch-job

. . .

jobs:
  build:
    name: execute batch job
    runs-on: ubuntu-latest
    environment: Cakk-Weekly-Batch

    steps:
      . . .
      - name: Run batch
        run: java -jar -Dspring.profiles.active=prod cakk-batch-1.0.0-SNAPSHOT.jar
      . . .
하지만 문제는 다른 자원과의 커넥션(Connection)이다. Github Actions에서 Spring Application을 실행시키면 RDS나 Elastic Cache와의 커넥션 생성이 힘들다. 따라서 Aws Lambda에 배포 후 트리거(Trigger)로 Github Actions를 활용하기로 결정하였다.
Batch 개발
Spring Batch 5버전은 뭐가 달라졌을까?
Spring Boot 3.x 버전이 등장하며 Spring Batch 버전 또한 익히 알려져있는 4버전이 아닌 5버전을 활용하게 되었다. Spring Batch 4.x와 5.x의 차이에 대해 간단하게 이야기 해보자.
다양한 JobParameter Type를 제공한다.
Spring Batch 5.x에서는 다양한 JobParameter Type을 제공한다. 4.x까지는 Long, Double, String, Date, 총 4개의 Type만을 지원했는데, 5.0부터는 JobParameter를 커스텀해서 사용할 수 있다. 변경사항을 확인하면 Generic이 들어간 걸 확인할 수 있다.
public class JobParameter<T> implements Serializable {
    private final T value;
    private final Class<T> type;
    . . .
StepBuilderFactory와 JobBuilderFactory가 deprecated 됐다.
StepBuilderFactory와 JobBuilderFactory가 deprecated 되었다. 사실 필자는 Spring Batch 4.x를 사용해본 적이 없어서 잘 모르지만, 사용자가 문서를 읽어보지 않는 한 Builder에서 JobRepository나 TransactionManager를 생성하고 설정한다는 사실을 알 수가 없다는 문제점을 가지고 있다. 따라서 다음과 같이 JobBuilder와 StepBuilder로 생성하면서 JobRepository나 TransactionManager를 명시해줘야 한다.
// Job 구성
@Bean(name = JOB_NAME)
public Job runJob() {
	return new JobBuilder(JOB_NAME, jobRepository)
		.listener(jobLoggingListener)
		.start(findKeywordListStep())
		.next(clearKeywordListTasklet())
		.build();
}

// Step 구성
@JobScope
@Bean(name = FIND_KEYWORD_LIST_STEP_NAME)
public Step findKeywordListStep() {
	return new StepBuilder(FIND_KEYWORD_LIST_STEP_NAME, jobRepository)
		.tasklet(findKeywordListTaskLet, transactionManager)
		.build();
}
DefaultBatchConfiguration 클래스가 추가됐다.
DefaultBatchConfiguration는 필요에 따라 사용자 정의할 수 있는 기본 설정의 Infrastructure Bean을 제공한다. 아래와 같이 getDataSource(), getTransactionManager() 등의 메서드도 제공하는데, @EnableBatchProcessing과 함께 쓰지 않도록 주의해야 한다.
@Configuration(
    proxyBeanMethods = false
)
@Import({ScopeConfiguration.class})
public class DefaultBatchConfiguration implements ApplicationContextAware {

    @Autowired
    protected ApplicationContext applicationContext;
    private final JobRegistry jobRegistry = new MapJobRegistry();

    . . .

    protected DataSource getDataSource() {
        String errorMessage = " To use the default configuration, a data source bean named 'dataSource' should be defined in the application context but none was found. Override getDataSource() to provide the data source to use for Batch meta-data.";
        if (this.applicationContext.getBeansOfType(DataSource.class).isEmpty()) {
            throw new BatchConfigurationException("Unable to find a DataSource bean in the application context." + errorMessage);
        } else if (!this.applicationContext.containsBean("dataSource")) {
            throw new BatchConfigurationException(errorMessage);
        } else {
            return (DataSource)this.applicationContext.getBean("dataSource", DataSource.class);
        }
    }

    protected PlatformTransactionManager getTransactionManager() {
        String errorMessage = " To use the default configuration, a transaction manager bean named 'transactionManager' should be defined in the application context but none was found. Override getTransactionManager() to provide the transaction manager to use for the job repository.";
        if (this.applicationContext.getBeansOfType(PlatformTransactionManager.class).isEmpty()) {
            throw new BatchConfigurationException("Unable to find a PlatformTransactionManager bean in the application context." + errorMessage);
        } else if (!this.applicationContext.containsBean("transactionManager")) {
            throw new BatchConfigurationException(errorMessage);
        } else {
            return (PlatformTransactionManager)this.applicationContext.getBean("transactionManager", PlatformTransactionManager.class);
        }
    }
    . . .
}Application 실행과 함께 시작될 수 있는 Job은 하나다.

Multiple Batch 실행은 더 이상 지원되지 않는다. 자동 구성에서 단일 작업이 감지되면 시작 시 해당 Job이 실행된다. Job Name은 spring.batch.job.name을 설정하여 지정할 수 있고, 만약 지정하지 않았는데 여러 Job이 있다면 다음과 같은 에러를 만날 수 있다.
Caused by: java.lang.IllegalArgumentException: Job name must be specified in case of multiple jobsSpring Batch 5.x로 배치 구현하기
케이크크에서는 총 두 개의 Job을 한번에 처리할 것이다. 따라서 Controller도 하나 구현하여 Job들을 실행해 주기로 했다. 해당 포스팅에서는 케이크 조회수를 초기화 하는 Job의 코드만 첨부하겠다.
application.yml
spring:
  . . .
  batch:
    jdbc:
      initialize-schema: never
    job:
      enabled: false
      name: ${job.name:NONE}
. . .
먼저 Application 실행 시 동작하는 Job은 NONE 상태로 두었다. 어차피 API 요청을 통해 Job을 실행할 것이기 때문이다.
FindViewsCakeIdListTaskLet.java
@StepScope
@Component
@RequiredArgsConstructor
public class FindViewsCakeIdListTaskLet implements Tasklet {

	private final CakeViewRedisRepository cakeViewRedisRepository;

	@Override
	public RepeatStatus execute(final StepContribution contribution, final ChunkContext chunkContext) {
		final ExecutionContext executionContext = chunkContext.getStepContext()
			.getStepExecution()
			.getJobExecution()
			.getExecutionContext();

		final List<Long> cakeIds = cakeViewRedisRepository.findAll();
		executionContext.put(BatchConstants.CAKE_ID_LIST, cakeIds);

		return RepeatStatus.FINISHED;
	}
}
먼저 Redis로부터 조회된 케이크들의 id 리스트를 가져와 ExecutionContext에 저장했다. 여기서 ExecutionContext란, Job을 실행하면서 필요한 데이터를 지속가능한 상태로 저장할 수 있도록 Spring Batch에서 제공하는 데이터 공간이다.
ClearViewsCakeIdListTasklet.java
@StepScope
@Component
@RequiredArgsConstructor
public class ClearViewsCakeIdListTasklet implements Tasklet {

	private final CakeViewRedisRepository cakeViewRedisRepository;

	@Override
	public RepeatStatus execute(final StepContribution contribution, final ChunkContext chunkContext) {
		final ExecutionContext executionContext = BatchUtils.getExecutionContext(chunkContext);
		final List<Long> cakeIds = (List<Long>) executionContext.get(BatchConstants.CAKE_ID_LIST);

		if (nonNull(cakeIds) && !cakeIds.isEmpty()) {
			cakeIds.forEach(cakeViewRedisRepository::deleteByValue);
		}

		contribution.setExitStatus(ExitStatus.COMPLETED);
		return RepeatStatus.FINISHED;
	}
}
앞서 ExecutionContext에 담아놓은 케이크 id를 삭제하는 Tasklet이다. 삭제를 마치면 StepExecution 상태를 업데이트하는 객체인 StepContribution의 종료 상태를 완료 상태로 설정한다.
ClearViewsCakeIdListJobConfig.java
@RequiredArgsConstructor
@Configuration
public class ClearViewsCakeIdListJobConfig {

	private static final String JOB_NAME = "clearViewsCakeIdListJob";
	private static final String FIND_ID_LIST_STEP_NAME = "findViewsCakeIdListStep";
	private static final String CLEAR_ID_LIST_STEP_NAME = "clearViewsCakeIdListStep";

	private final FindViewsCakeIdListTaskLet findViewsCakeIdListTaskLet;
	private final ClearViewsCakeIdListTasklet clearViewsCakeIdListTasklet;

	private final JobLoggingListener jobLoggingListener;
	private final PlatformTransactionManager transactionManager;
	private final JobRepository jobRepository;

	@Bean(name = JOB_NAME)
	public Job runJob() {
		return new JobBuilder(JOB_NAME, jobRepository)
			.listener(jobLoggingListener)
			.start(findViewsCakeIdListStep())
			.next(clearViewsCakeIdListTasklet())
			.build();
	}

	@JobScope
	@Bean(name = FIND_ID_LIST_STEP_NAME)
	public Step findViewsCakeIdListStep() {
		return new StepBuilder(FIND_ID_LIST_STEP_NAME, jobRepository)
			.tasklet(findViewsCakeIdListTaskLet, transactionManager)
			.build();
	}

	@JobScope
	@Bean(name = CLEAR_ID_LIST_STEP_NAME)
	public Step clearViewsCakeIdListTasklet() {
		return new StepBuilder(CLEAR_ID_LIST_STEP_NAME, jobRepository)
			.tasklet(clearViewsCakeIdListTasklet, transactionManager)
			.build();
	}
}
ClearViewsCakeIdListJobConfig.java에서는 Job과 Step을 구성하였다.
WeeklyJobLauncher.java
@RequiredArgsConstructor
@Component
public class WeeklyJobLauncher {

	private final JobLauncher jobLauncher;

	private final ClearKeywordListJobConfig clearKeywordListJobConfig;
	private final ClearViewsCakeIdListJobConfig clearViewsCakeIdListJobConfig;

	public void launch() throws Exception {
		final JobParameters clearKeywordListJobParams = new JobParametersBuilder()
			.addLocalDateTime("clearKeywordListDate", LocalDateTime.now())
			.toJobParameters();

		final JobParameters clearViewsCakeIdListJobParams = new JobParametersBuilder()
			.addLocalDateTime("clearViewsCakeIdListDate", LocalDateTime.now())
			.toJobParameters();

		jobLauncher.run(clearKeywordListJobConfig.runJob(), clearKeywordListJobParams);
		jobLauncher.run(clearViewsCakeIdListJobConfig.runJob(), clearViewsCakeIdListJobParams);
	}
}
만들어놓은 두 개의 Job을 실행하는 JobLauncher다.
WeeklyJobController.java
@RequiredArgsConstructor
@RestController
@RequestMapping("/api/v1")
public class WeeklyJobController {

	private final WeeklyJobLauncher jobLauncher;

	@GetMapping("/weekly-job")
	public ApiResponse<Void> executeWeeklyJob() throws Exception {
		jobLauncher.launch();

		return ApiResponse.success();
	}
}
마지막으로 Api를 명시하는 WeeklyJobController를 구현하였다.
공짜1: Lambda에 배포하자.
Lambda에 배포하기 앞서 살펴보았던 방법은 다음과 같다.
- Aws Lambda에 직접 배포
- serverless.yaml을 작성하여 배포
- SAM(AWS Serverless Application Model)를 이용하여 배포
먼저 2번은 Java21을 지원하지 않아서 넘어갔다. 3번은 자료를 열심히 찾아보았지만 멀티 모듈 환경에서 배포하는 레퍼런스를 찾지 못했다. 직접 테스트 해보며 파보고 싶었지만, 시간이 부족하여 테스트 도중 다음에 해보기로 결정하였다.
또 사실 Aws Lambda는 길지 않게 이용할 예정이고, 코드의 수정도 없을 예정이기에 수동 배포를 해도 괜찮겠다 생각이 들었다. (그래도 다음에 SAM을 활용할 기회가 왔으면 좋겠다...!)
배포 준비1: Bean 개수를 최대한 줄이자.
Bean의 개수가 많을수록 애플리케이션이 시작하는 시간이 길어진다. 따라서 domain 모듈에서 스캔하는 Bean의 개수를 최소한으로 두었다.
@Configuration
@ComponentScan(basePackages = {
	"com.cakk.domain.redis",
	"com.cakk.batch"
}, basePackageClasses = {
	DataSourceConfig.class,
	JpaConfig.class
})
public class ComponentScanConfig {
}
배포 준비2: Tomcat을 유배 보내라.
Lambda에 배포할 때는 Tomcat이 필요하지 않다. Spring Boot는 Tomcat이 내장돼 있다. 따라서 spring-boot-starter-web 의존성에서 Tomcat을 제외시키면 된다.
// build.gradle

implementation('org.springframework.boot:spring-boot-starter-web') {
	exclude group: 'org.springframework.boot', module: 'spring-boot-starter-tomcat'
}
배포 준비3: LambdaHandler를 작성하자.
Lambda을 사용해봤다면 알겠지만, Hanlder를 통해 동작한다. 따라서 Handler를 구현해줘야 한다. 먼저 아래의 의존성을 추가해준다.
implementation 'com.amazonaws.serverless:aws-serverless-java-container-springboot3:2.0.1'그 다음 LambdaHandler를 작성해주면 된다.
public class LambdaHandler implements RequestHandler<AwsProxyRequest, AwsProxyResponse> {

	private static final SpringBootLambdaContainerHandler<AwsProxyRequest, AwsProxyResponse> handler;

	static {
		try {
			handler = SpringBootLambdaContainerHandler.getAwsProxyHandler(BatchApplication.class);
		} catch (ContainerInitializationException e) {
			throw new RuntimeException("Fail to start Spring Boot Application", e);
		}
	}

	@Override
	public AwsProxyResponse handleRequest(AwsProxyRequest input, Context context) {
		return handler.proxy(input, context);
	}
}
배포 준비4: buildZip
Lambda에 배포하기 위해 zip 파일로 만들어야 한다. build.gradle에 buildZip Task를 등록해주자.
tasks.register('buildZip', Zip) {
	dependsOn('bootJar')

	from compileJava
	from processResources

	into('lib') {
		from(jar)
		from(configurations.runtimeClasspath)
	}
}
이후 zip을 생성한 후 S3 Bucket에 업로드 한다. (보통 10mb 이상일텐데, 크기가 10mb가 넘어가면 S3에 올려서 Lambda에 업로드 해야한다.)
Aws Lambda에 배포하기
(Lambda를 생성하거나 RDS 연결, Elastic Cache 연결에 대해서는 다루지 않습니다.)
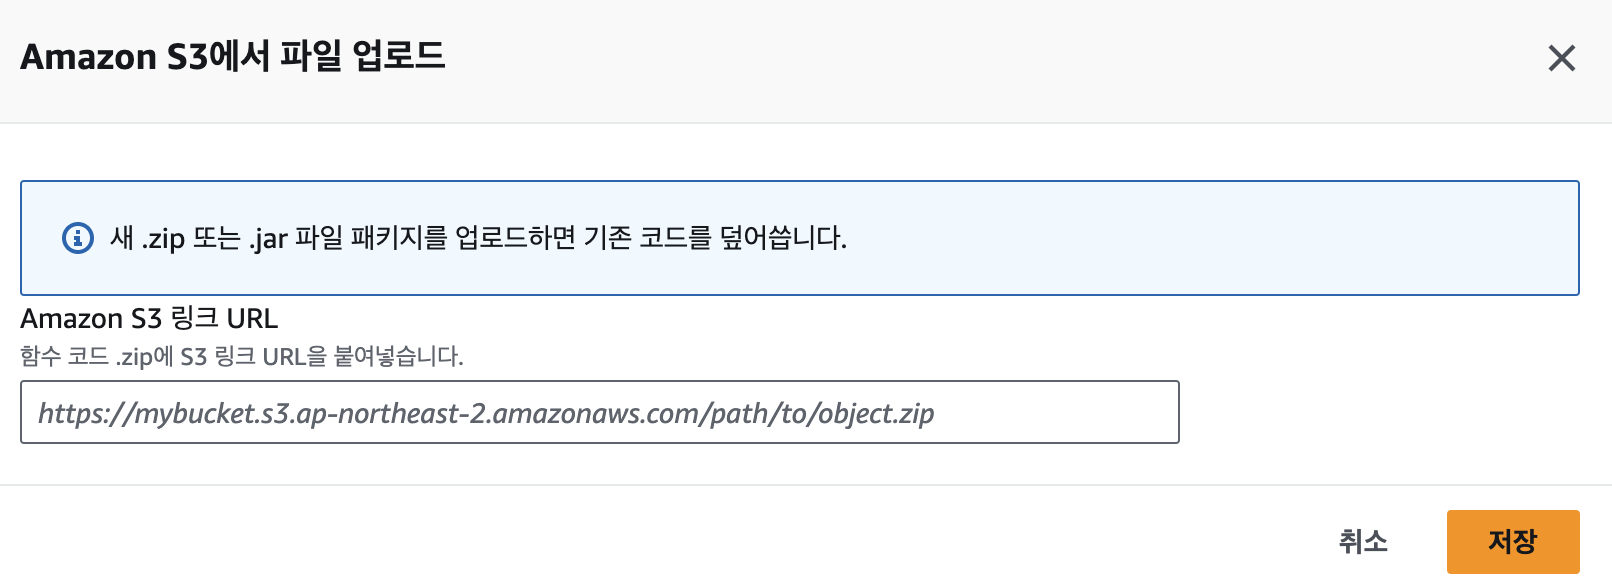
먼저 S3 링크를 통해 Lambda에 zip 파일을 업로드 해준다.

런타임도 버전에 맞게 설정하고, 핸들러도 잘 설정해준다.
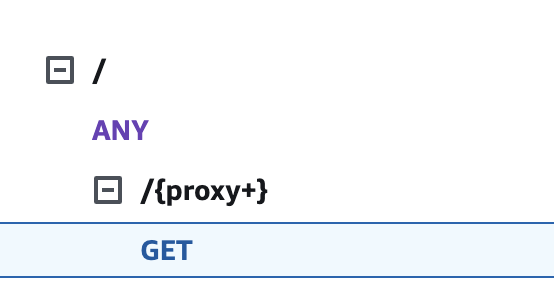
API Gateway는 위와 같이 구성하여 배포 후 요청해 본 결과,
{
  "returnCode": "1000",
  "returnMessage": "요청에 성공하셨습니다."
}
성공한 것을 확인할 수 있다.
공짜2: Github Actions를 트리거로 사용하자.
Github Actions 도큐먼트를 보면 Github Actions에서 스케줄링 작업이 가능하다. 사실 별 내용이 없기에 작성된 workflow를 보자.
name: weekly-batch-job

on:
  schedule:
    - cron: '*/1 * * * *'

jobs:
  build:
    name: execute batch job
    runs-on: ubuntu-latest
    environment: Cakk-Weekly-Batch

    steps:
      - name: Get Current Time
        uses: 1466587594/get-current-time@v2
        id: current-time
        with:
          format: YYYY-MM-DDTHH:mm:ss
          timezone: 'Asia/Seoul'
      - name: Print Current Time
        run: echo "Current Time=${{steps.current-time.outputs.formattedTime}}"
        shell: bash

      - name: Send GET request to Lambda
        env:
          SERVER_URL: ${{ secrets.PROD_BATCH_LAMBDA }}
        run: |
          curl -X GET $SERVER_URL
먼저 테스트를 위해 매분 실행되게 설정했다. 단, Github Actions에서는 1분마다 실행되진 않지만 최소 5분에 한번 실행은 보장해준다고 한다. (사실 나도 매분 실행할건 아니라 상관 없다.) 대충 5분 후 확인해보니 잘 실행된 것을 확인할 수 있었다.
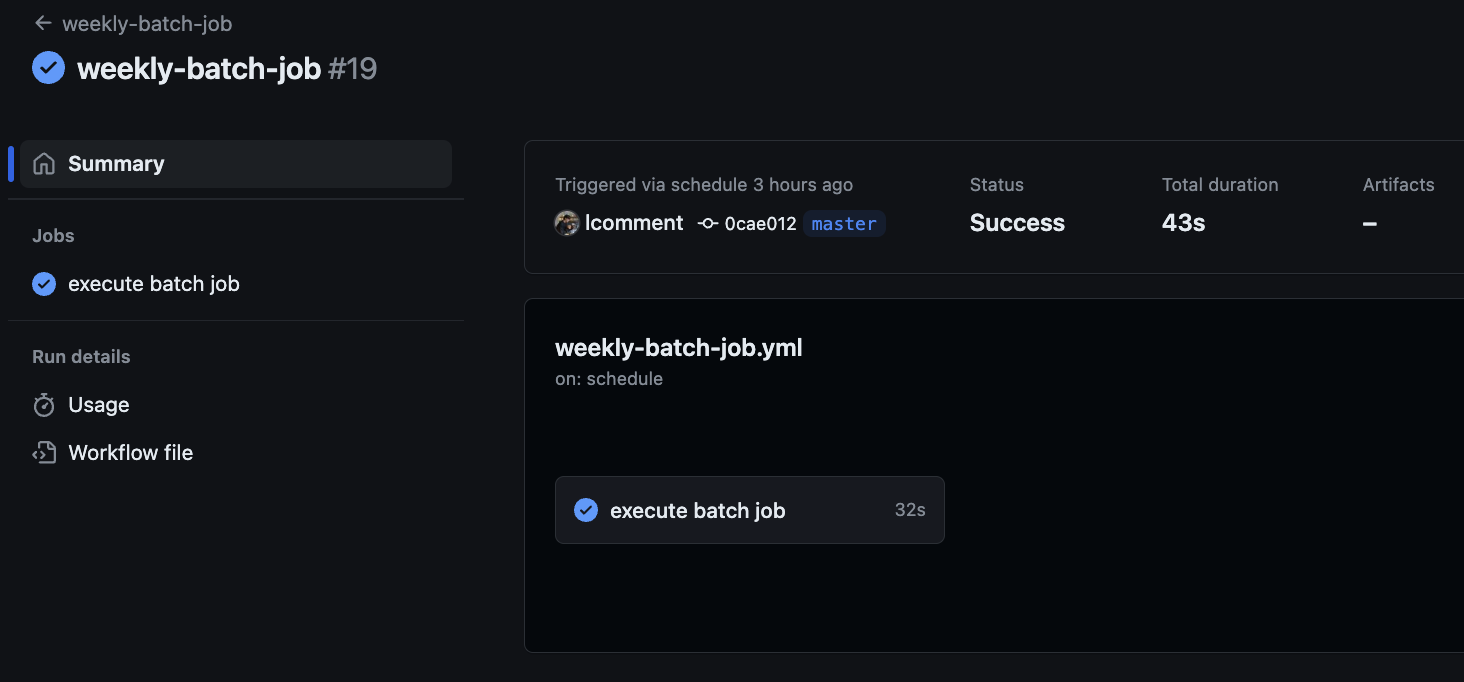
이제 다시 매주 월요일 00시에 실행되도록 수정하자. 또, 보안을 위해 헤더에 Authorization을 설정할 예정이기에 헤더 또한 설정해주었다.
name: weekly-batch-job

on:
 schedule:
   - cron: '0 0 * * 1'

jobs:
  build:
    name: execute batch job
    runs-on: ubuntu-latest
    environment: Cakk-Weekly-Batch

    steps:
      - name: Get Current Time
        uses: 1466587594/get-current-time@v2
        id: current-time
        with:
          format: YYYY-MM-DDTHH:mm:ss
          timezone: 'Asia/Seoul'
      - name: Print Current Time
        run: echo "Current Time=${{steps.current-time.outputs.formattedTime}}"
        shell: bash

      - name: Send GET request to Lambda
        env:
          SECRET_TOKEN: ${{ secrets.SECRET_TOKEN }}
          SERVER_URL: ${{ secrets.PROD_BATCH_LAMBDA }}
        run: |
          curl -X GET $SERVER_URL \
          	   -H "Authorization: Bearer $SECRET_TOKEN"
진짜 공짜일까..?
케이크크 Repository는 public이기 때문에 Github Actions는 비용이 발생하지 않기 때문에 공짜가 맞다. 그렇다면 Lambda는 어떨까? 한 달에 최대 5번 정도 요청을 보낼 것이다. 지금까지 테스트하면서 그 이상을 요청했기 때문에 지금 비용을 보면 알 수 있을 것 같아 확인해보니,

완전 럭키비키잖아? ⭐️
포스팅과 관련된 코드는 케이크크 서버 Github에 저장돼 있습니다.

올려주신 글 유익하게 잘 봤습니다 !! 🙇🏻♀️ 궁금한게 있는데, BatchApplication 을 실행시키면 Job 을 실행시키고, 끝나면 강제로 exit 시키고 있네요 이때 만약 여러개의 Job을 스케쥴러로 등록해놨을 때 현재 생각나는 건 동시성 문제가 있지 않을까? 하는 궁금증이 드는데 이런 부분에 있어 문제가 있을지 궁금합니다..!😮