1. 서론
애플 로그인은 악명이 높다. 한번도 해본적은 없지만 한번도 하기 싫어지게 만드는(?) 소문들이 자자하다. 그래서 되도록 구현하지 않으려 했다. 하지만 간과한 부분이 있었다. 바로 앱 스토어(App Store)에 등록할 때 소셜 로그인이 하나라도 있다면 애플 로그인도 필수로 있어야 한다는 점. 매는 나중에 맞는 것이 좋다고 해서 최대한 뒤로 미루어 보았지만 더 이상 미룰 수 없어서 구현하기로 했다.
2. Flow 이해하기
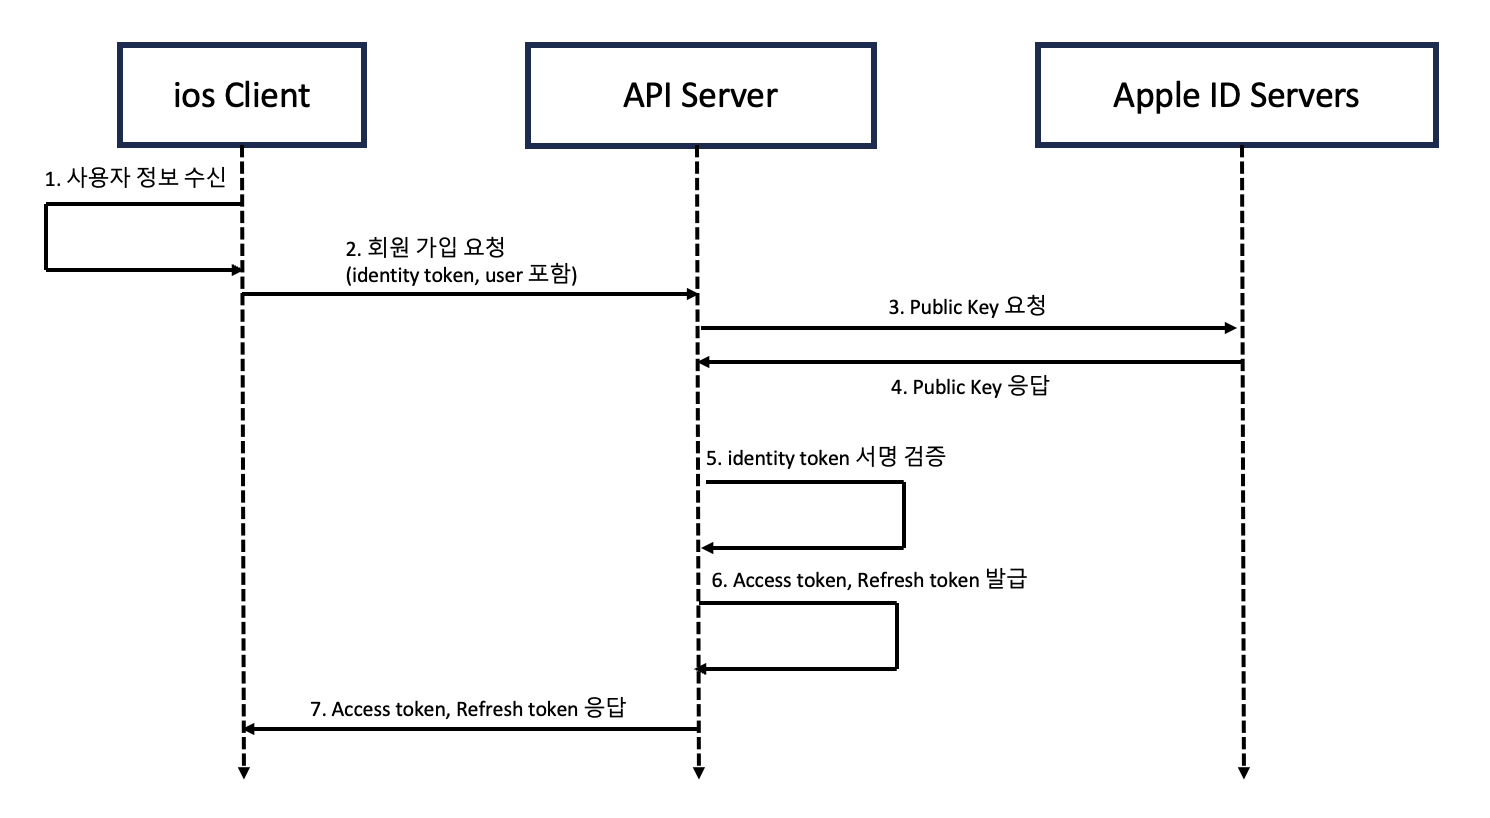
Apple ID Server는 검증 후 유효기간이 없는 Refresh Token을 발급하여 유저 세션을 유지해준다. 하지만 필자가 구현하는 서비스는 인증 후 자체 토큰을 발급하기 때문에, 이 포스팅에서는 이후 프로세스는 생략하고 Public Key를 발급 받아 Identity Token 검증하는 과정까지 다룰 예정이다.
또 Apple 로그인은 SSL이 적용돼있고, 도메인이 있는(localhost, ip X) 서버로 동작 가능하니 만약 준비되지 않았다면 이것부터 설정해야 한다.
3. Apple Developer에서 설정하기
i) App ID 등록
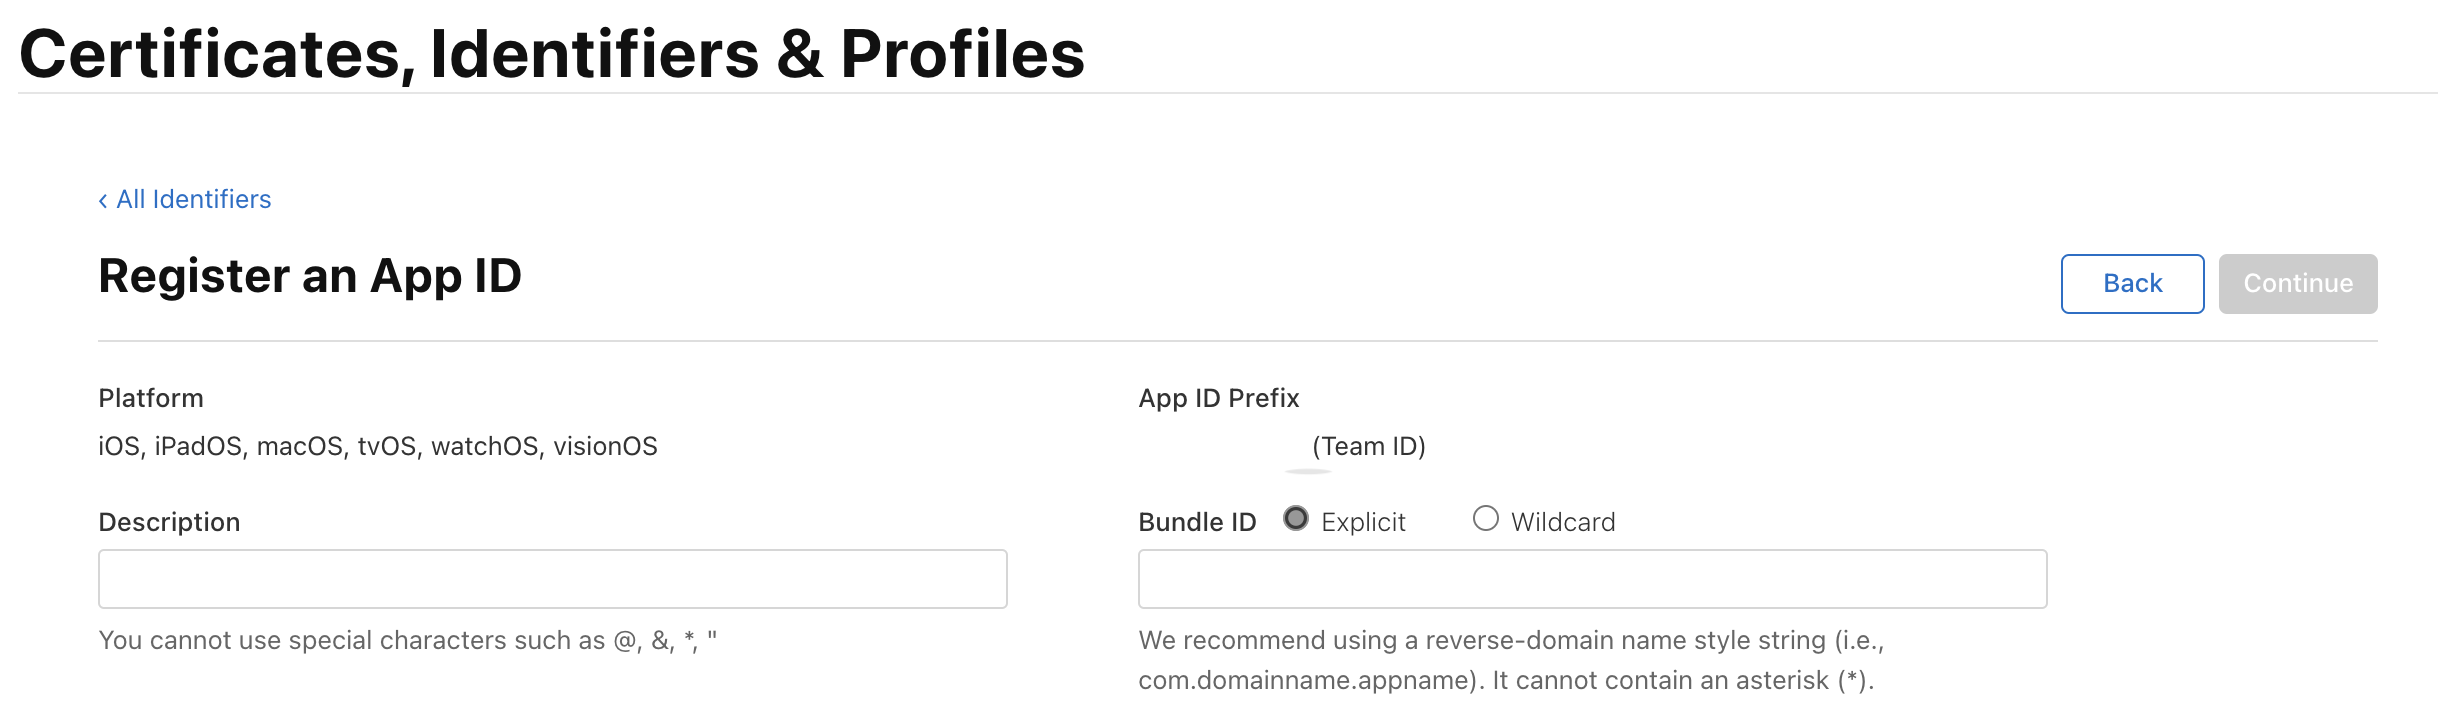
먼저 Identifiers 탭에서 App ID를 등록해준다.

밑으로 스크롤 해서 Sign In with Apple을 선택하고 Edit을 눌러준다.
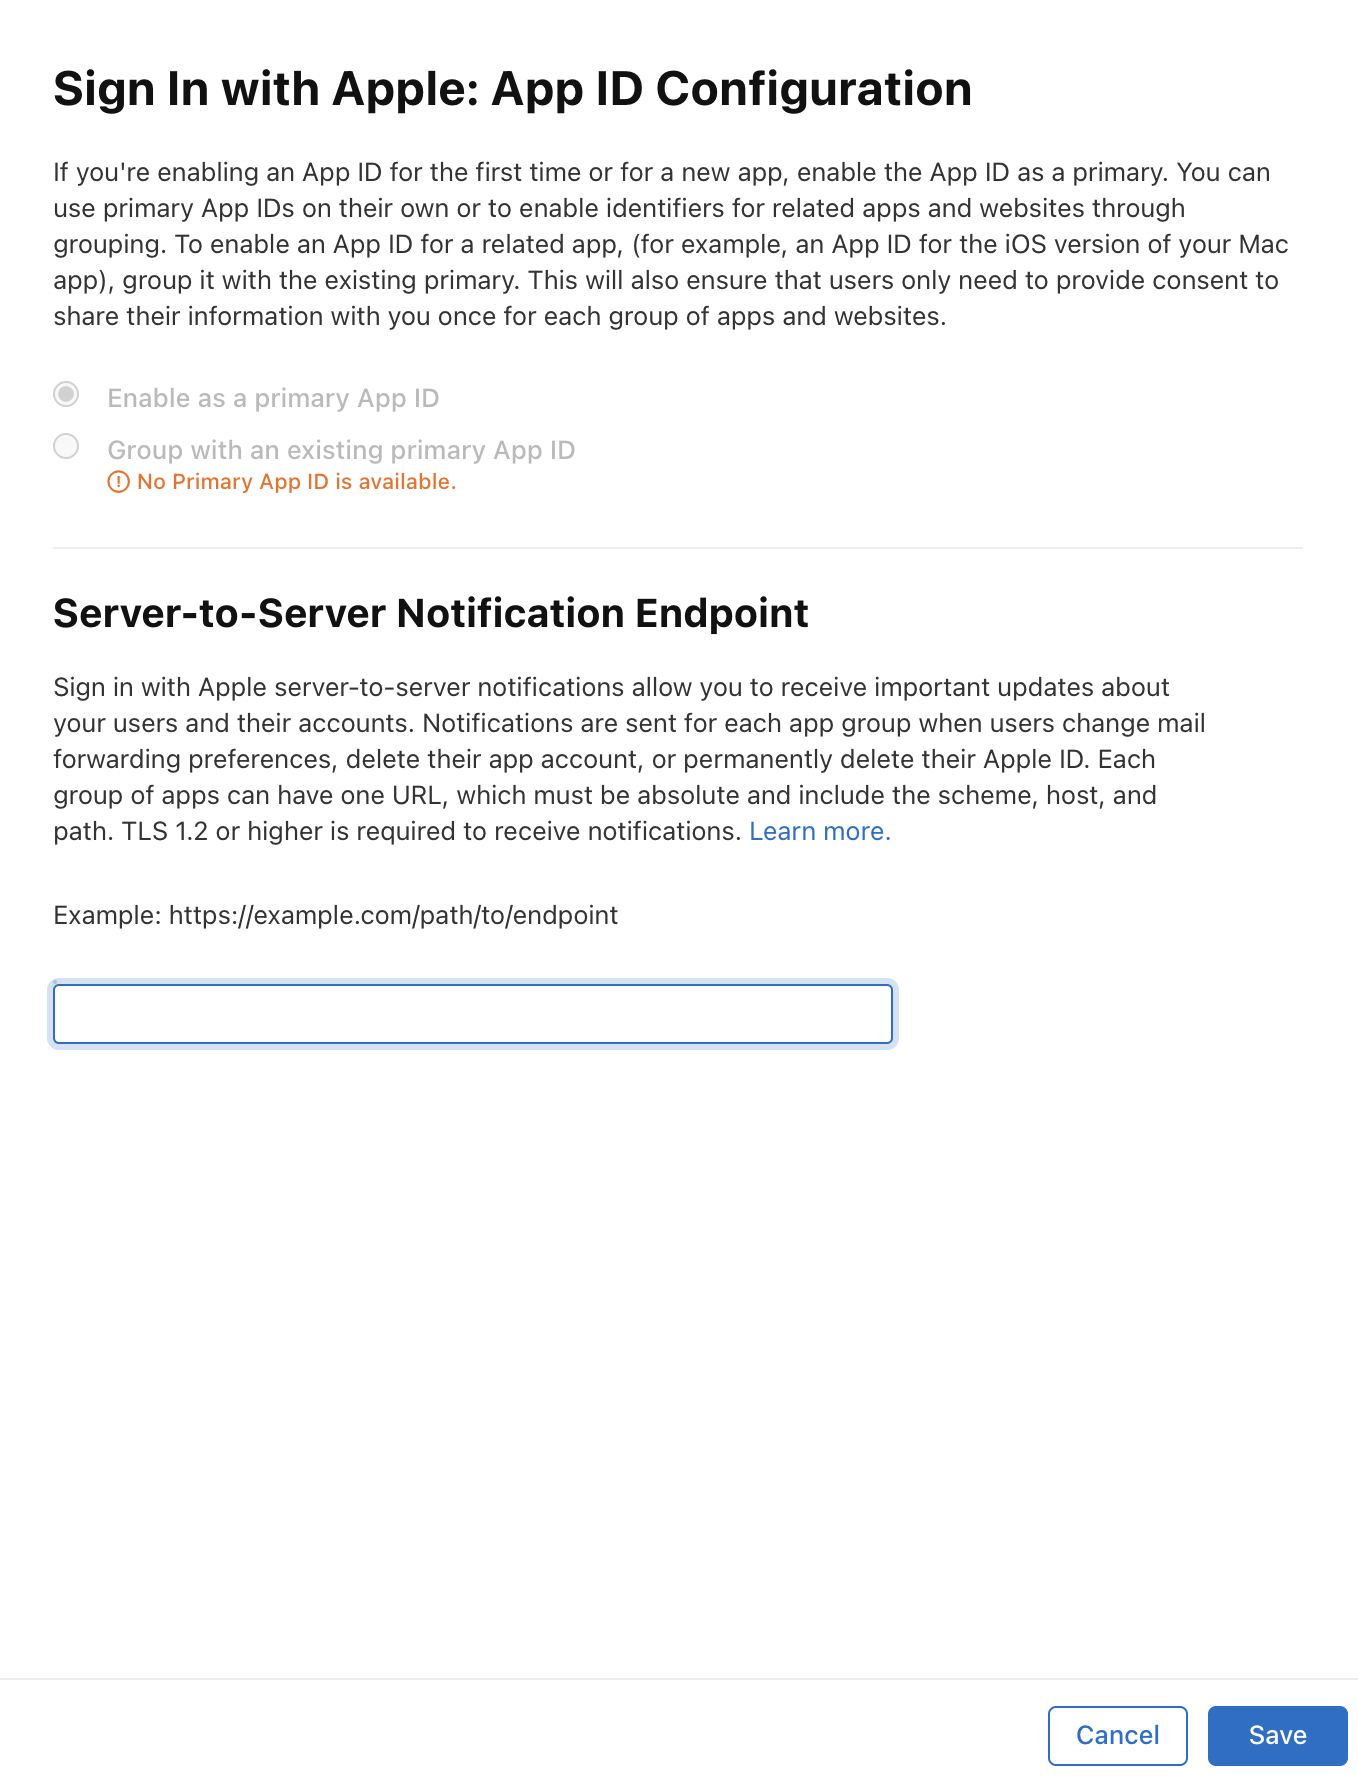
Enable as a primary App ID를 선택하고, Endpoint URL을 작성한다. Endpoint URL은 Apple이 유저가 이메일 변경, 앱 서비스 해지, 애플 계정 탈퇴 등의 동작을 했을 때, 이 이벤트를 PAYLOAD 데이터에 담아 전송할 URL이다. Endpoint URL는 도메인 형식이며, 443 포트로 SSL 적용이 되어 있어야 한다. 당장 구성해놓지 않았다면 아무거나 적고 넘겨도 된다!
등록이 완료됐다면 App ID Prefix(Team ID)는 따로 기억해두자.
ii) Services 등록
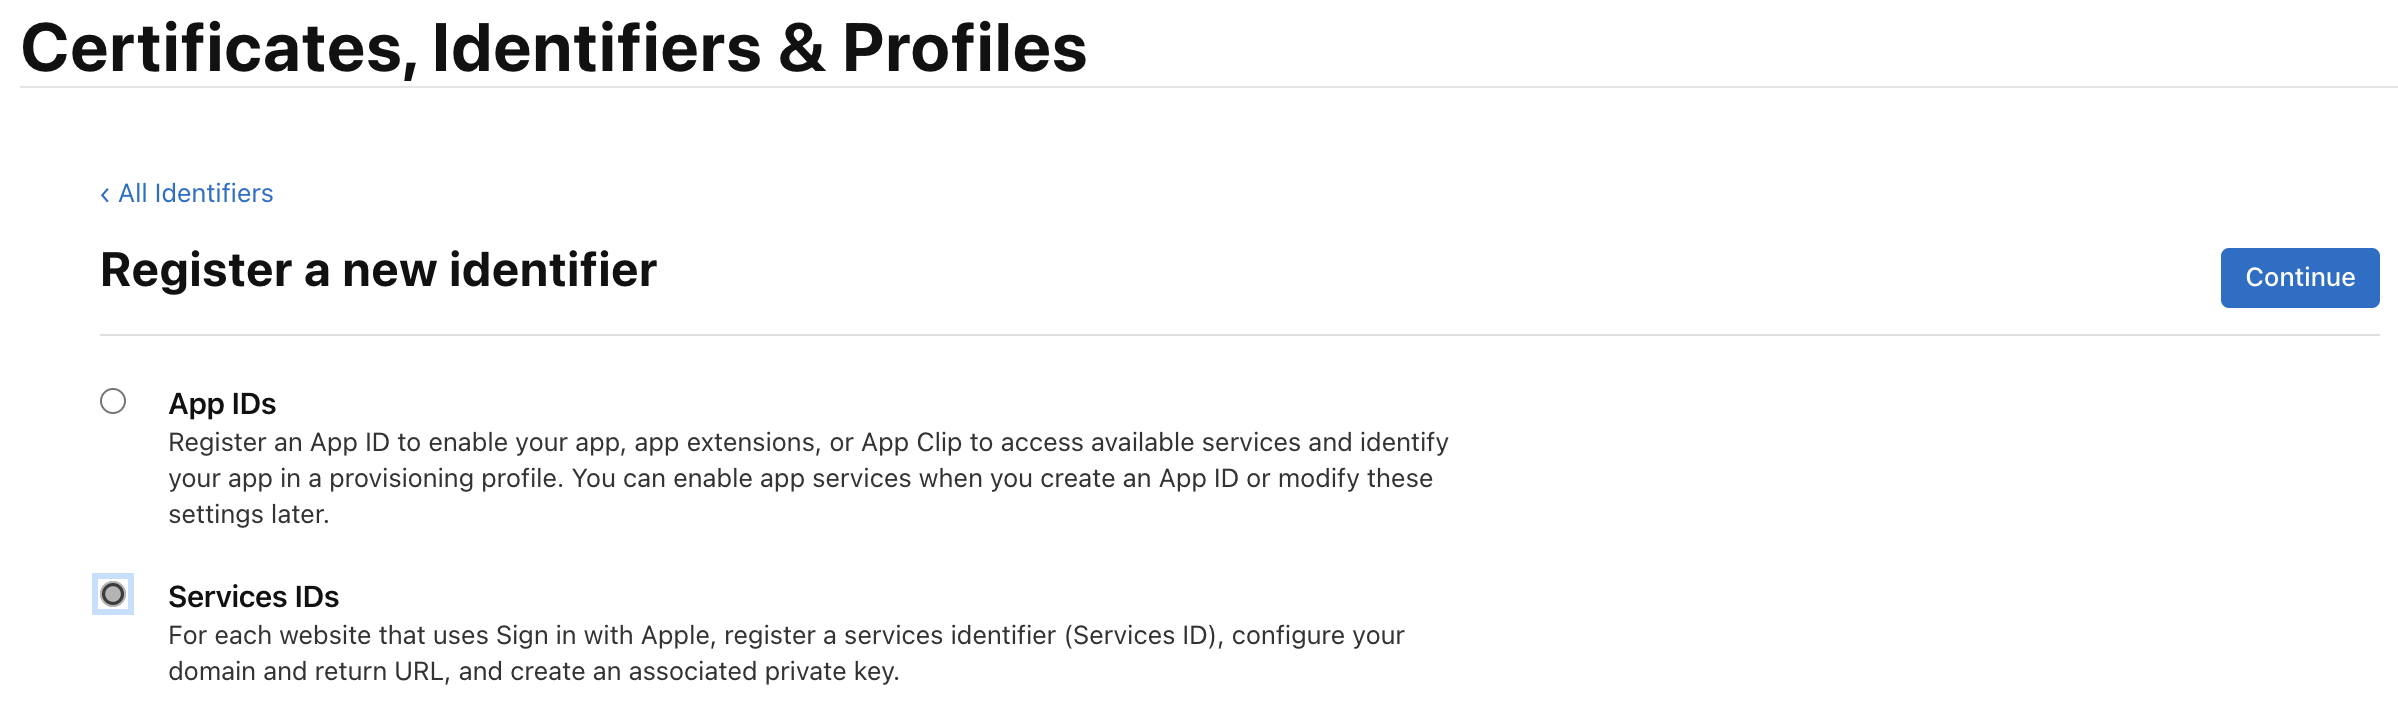
아까와 동일하게 Identifiers 탭에서 이번엔 Services를 등록해보자.
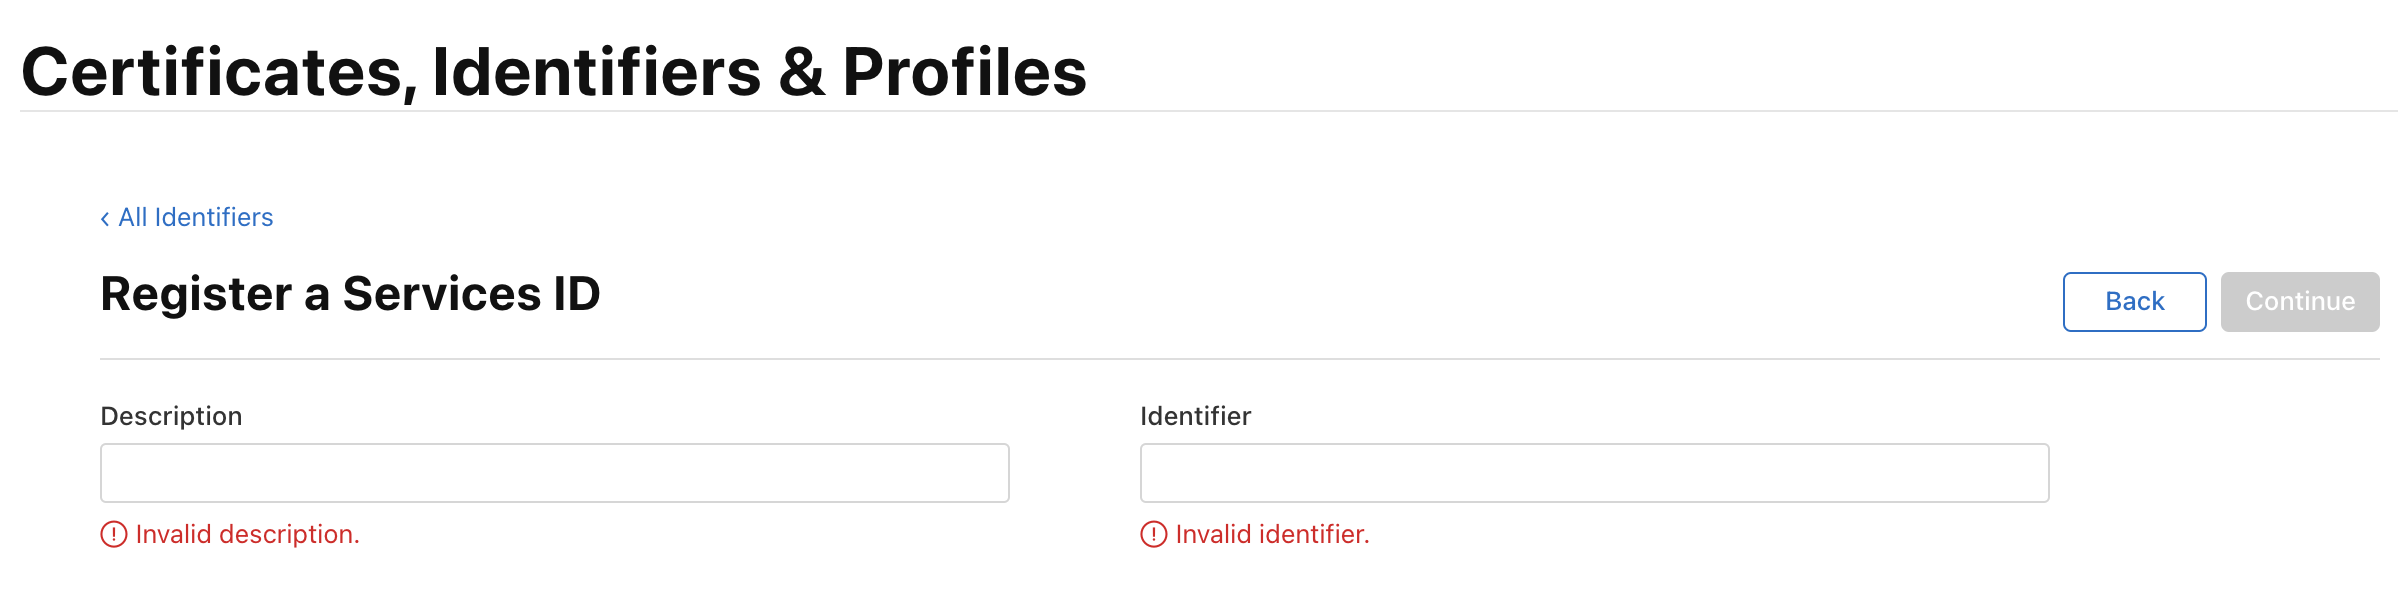
본인이 원하는대로 Description과 identifier을 작성 후 등록해준다.

등록한 Service를 클릭하여 들어가서 하단의 Configure을 클릭한다.
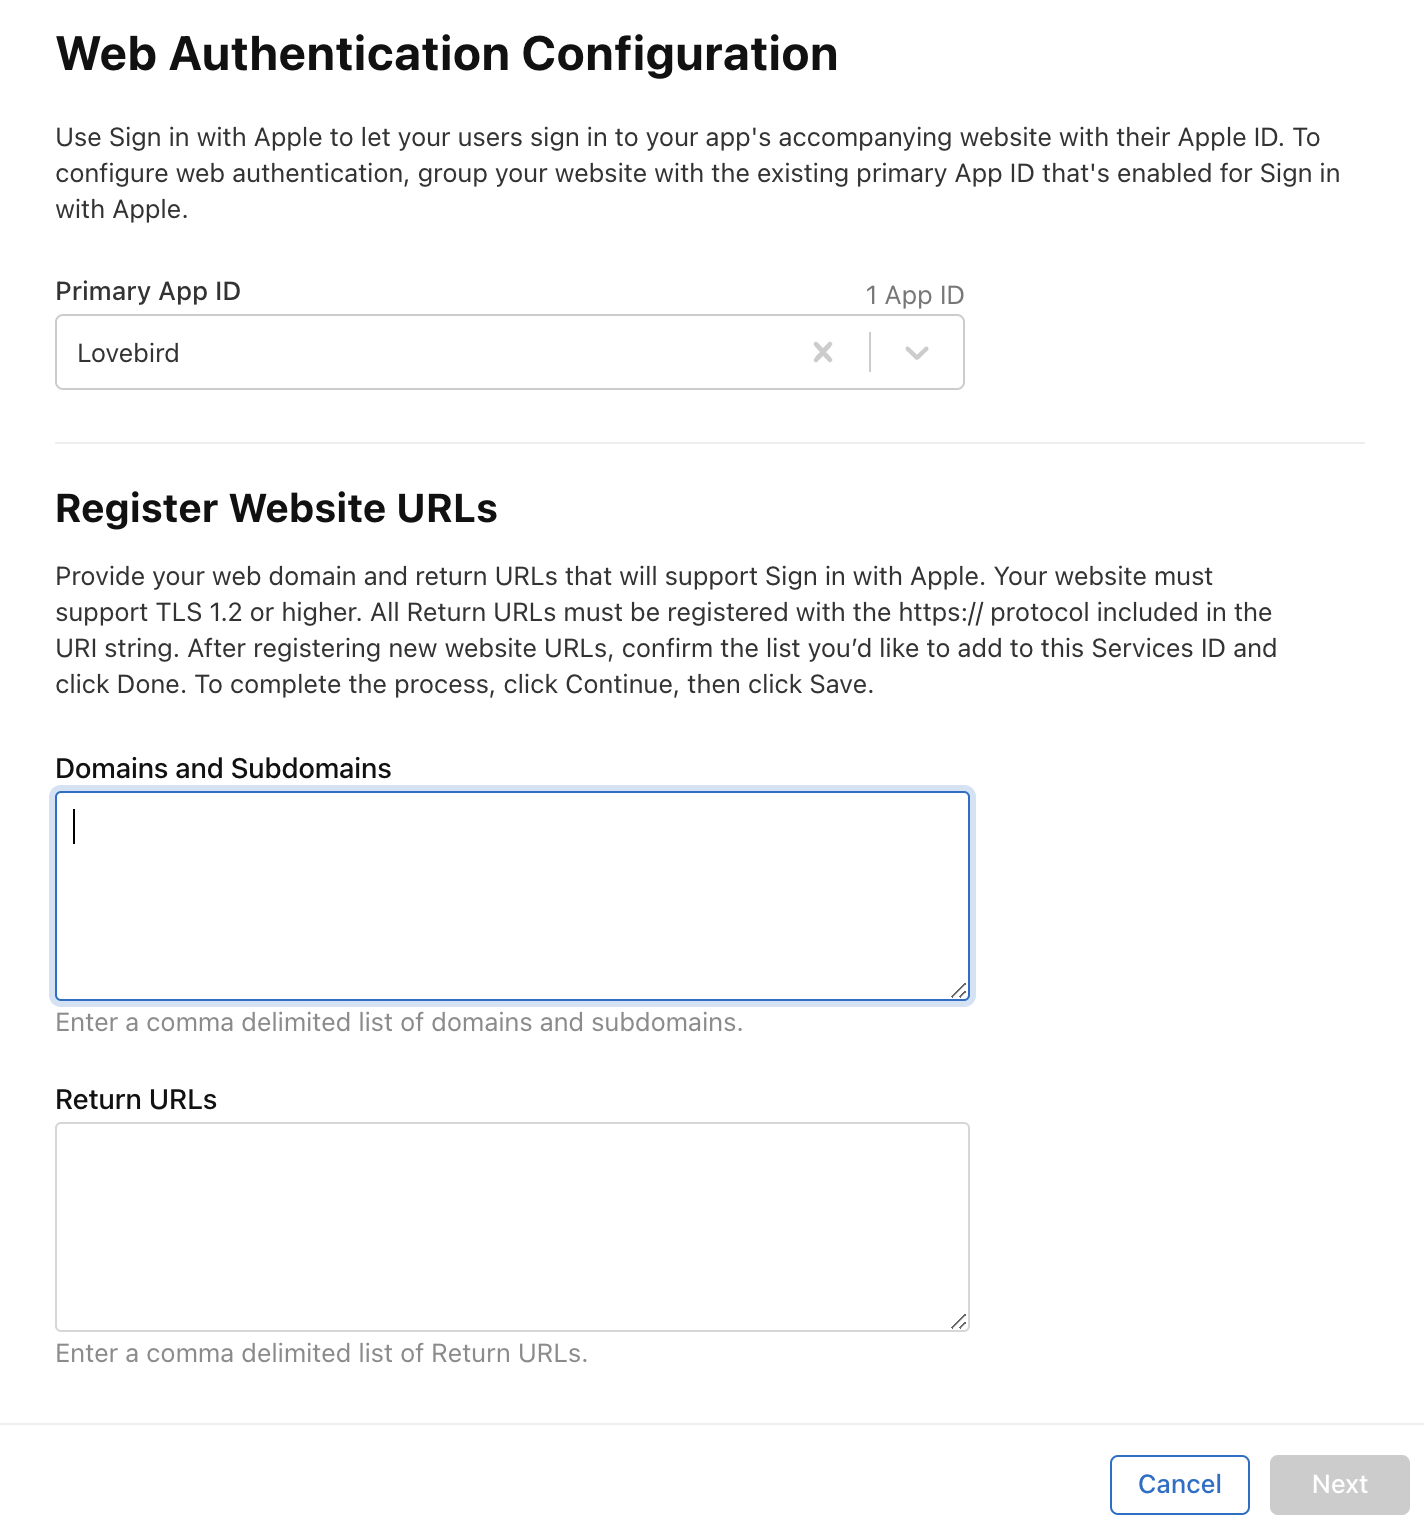
Primary App ID에 설정한 App을 선택해주고, Domain과 Return URLs를 채워준다. 필자는 다른 소셜 로그인과 동일한 형식의 url로 설정해줬다. (ex. ~/login/oauth2/code/apple)
등록이 완료된 Services에서 Identifier을 기억하자. 이후 client_id, aud로 사용된다.
iii) Key 등록
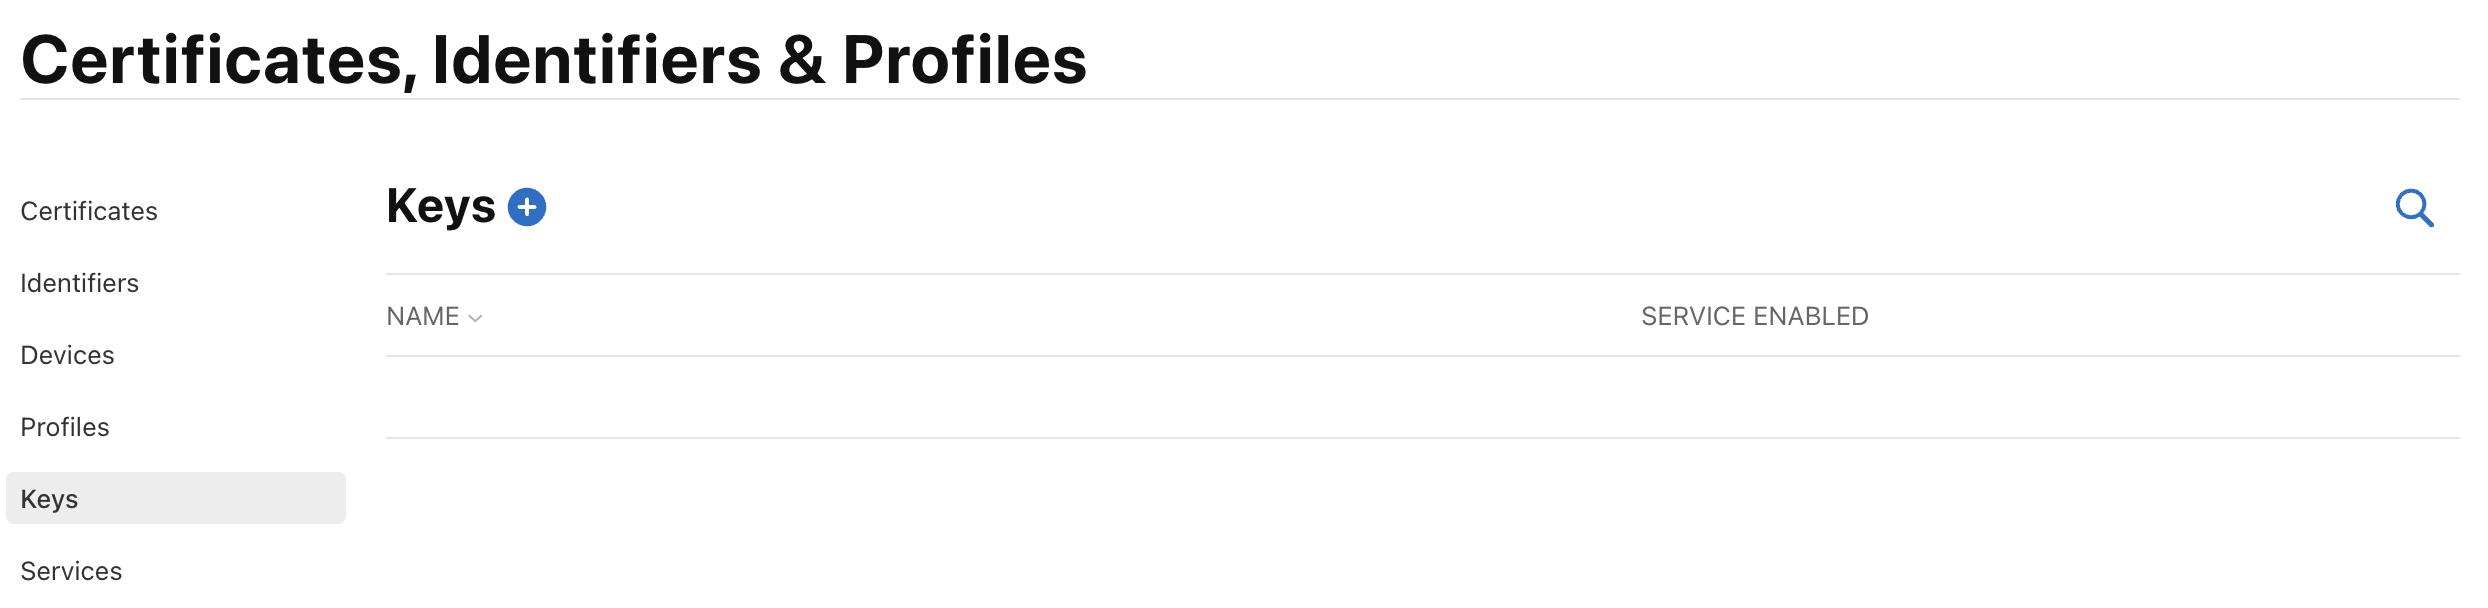
이제 Key를 등록해보자.

Sign in with Apple을 선택 후, Configure 버튼을 눌러준다.
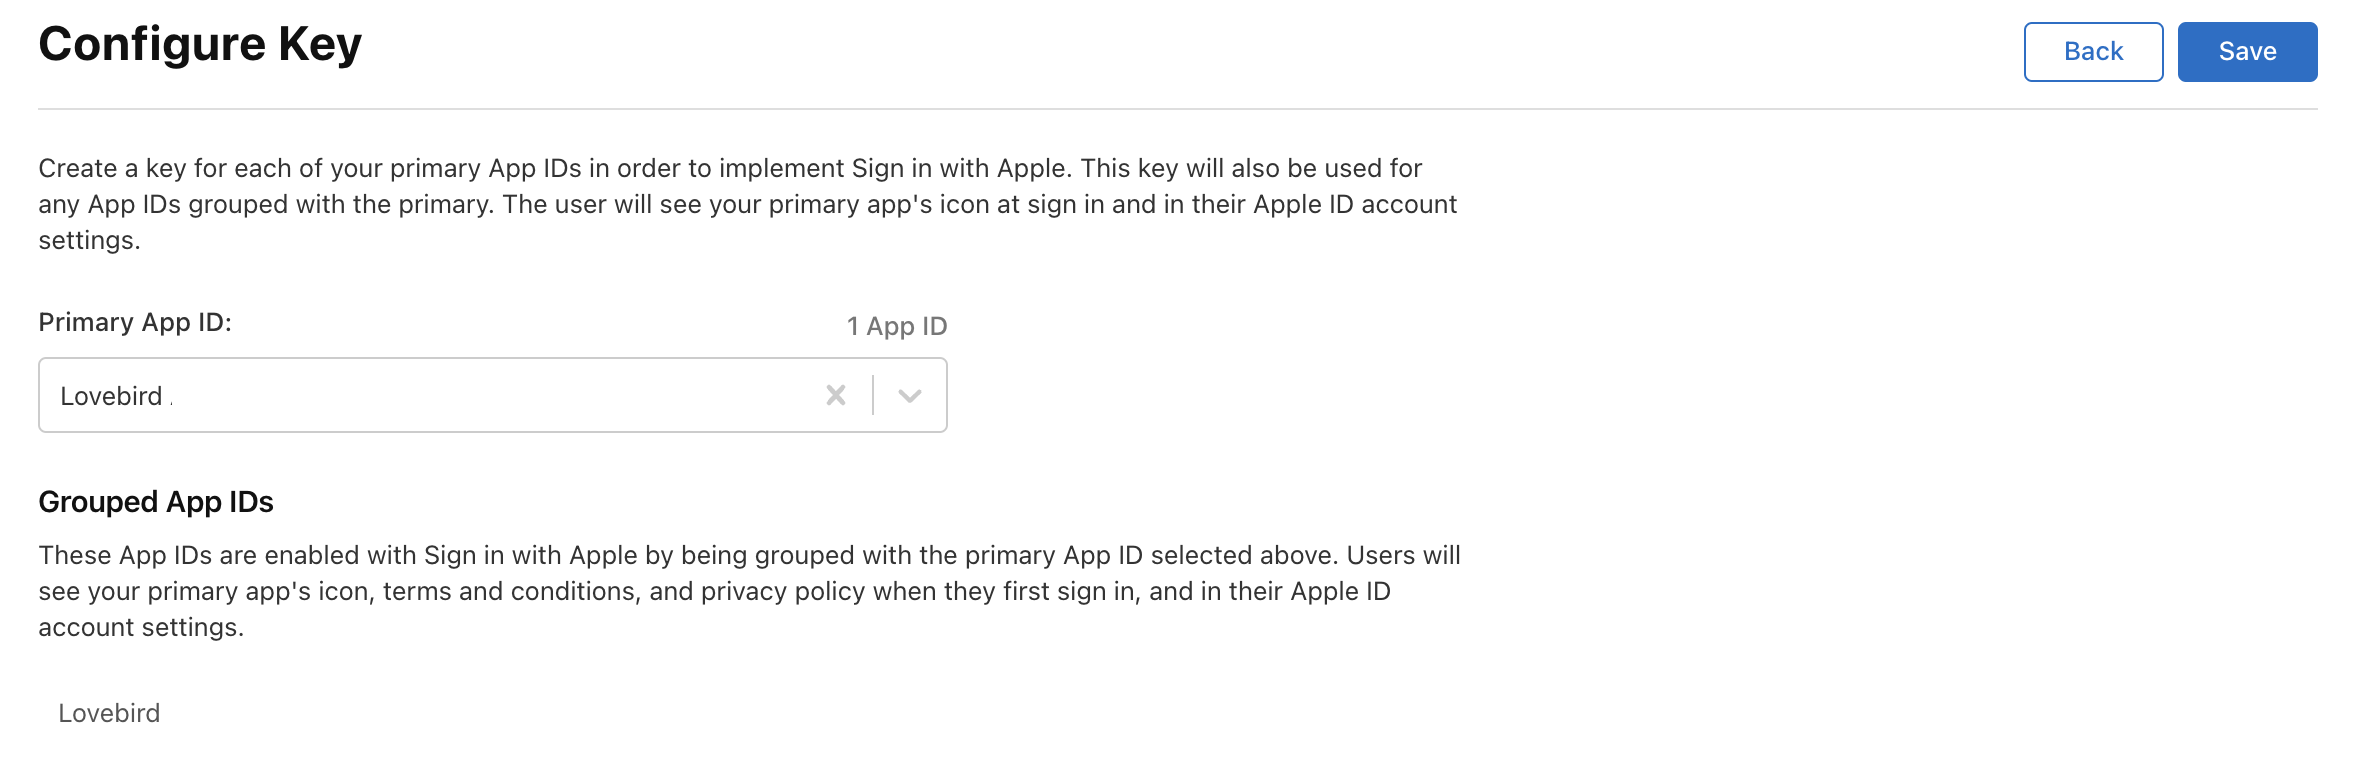
설정할 App을 골라주고, Save를 눌러준다. 생성한 키는 잃어버리면 다시 발급이 힘들기 때문에 잘 보관해두고, Key ID를 잘 기억해두자.
여기까지가 Apple 로그인 설정 과정이다.
4. identity token 검증하기
Apple 공식문서에 따르면 ios에서 사용자 정보를 수신한 응답은 다음과 같은 형태다.
{
  "state" : " ... ",
  "authorizationCode" : " ... “,
  "identityToken" : " ... “,
  "user":"{
    "email" : " ... ",
    "name" : {
       "firstName" : " ... ",
       "lastName" : " ... "
    }
  }
}
여기서 user에 대한 데이터는 처음 로그인 할 때만 주기 때문에 저장할 계획이 있다면 처음에 잘 받아서 저장해야 한다. 우리 서비스에서는 user와 identity token을 받아 identity token 검증 후 accountId를 추출해 user 정보와 함께 DB에 저장할 것이다. 패키지 구조는 다음과 같이 작성했다.
ios
 |--controller
 |   |- AppleEventController.java
 |--dto
 |   |- key
 |   |   |- ApplePublicKey.java
 |   |   |- ApplePublicKeyResponse.java
 |   |- user
 |   |   |- AppleUser.java
 |   |   |- Name.java
 |   |- AppleAuthRequest.java
 |   |- AppleEventResponse.java
 |--feign
 |   |- AppleAuthClient.java
 |--service
 |   |- AppleAuthService.java
 |--util
     |- ApplePublicKeyGenerator.java
i) application.yml
먼저 yml 파일을 설정하고 진행하자.
- APPLE_REDIRECT_URL : 설정한 redirect-uri
- APPLE_CLIENT_ID : Services의 Identifier
- APPLE_TEAM_ID : App ID의 Prefix
- APPLE_KEY_ID : Key ID
. . .

apple:
  auth:
    token-url: https://appleid.apple.com/auth/token
    public-key-url: https://appleid.apple.com/auth/keys
  redirect-uri: ${APPLE_REDIRECT_URL}
  iss: https://appleid.apple.com
  aud: ${APPLE_CLIENT_ID}
  team-id: ${APPLE_TEAM_ID}
  key:
    id: ${APPLE_KEY_ID}
    path: classpath:/apple/AuthKey_${APPLE_KEY_ID}.p8

. . .
ii) ApplePublicKey.java , ApplePublicKeyResponse.java
Apple Public Key를 조회하기 위해 다음과 같은 Dto를 만들어준다.
public record ApplePublicKey(String kty,
                             String kid,
                             String alg,
                             String n,
                             String e) {
}
Apple Public Key를 조회하면 2개의 Key가 조회되고, 그 중 kid와 alg가 일치하는 것을 사용하면 된다. 따라서 다음과 같은 Response Dto와 Dto 안에 match 메서드를 구현해준다.
public record ApplePublicKeyResponse(List<ApplePublicKey> keys) {

    public ApplePublicKey getMatchedKey(String kid, String alg) throws AuthenticationException {
        return keys.stream()
                   .filter(key -> key.kid().equals(kid) && key.alg().equals(alg))
                   .findAny()
                   .orElseThrow(AuthenticationException::new);
    }
}
iii) AppleAuthClient.java
Apple 공식 문서를 보면 요청 url과 응답을 알 수 있다. 요청을 보내는 방법은 RestTemplate, OpenFeign, HttpClient 등이 있는데, 사실 HttpClient가 가장 좋아보이지만, OpenFeign을 사용하기로 했다. (이전 회사에서 사용했던 기술이라 보다 익숙해서 선택했다.)
@FeignClient(name = "appleAuthClient", url = "${apple.auth.public-key-url}")
public interface AppleAuthClient {
    @GetMapping
    ApplePublicKeyResponse getAppleAuthPublicKey();
}
위와 같이 Feign Interface를 구현해주었고, 실패 시 Retry를 하도록 다음과 같은 설정을 해주었다.
@Configuration
public class FeignRetryConfig {
    @Bean
    public Retryer retryer() {
        return new Default(1000, 1500, 1);
    }
}spring:
...
cloud:
openfeign:
client:
config:
appleAuthClient:
connect-timeout: 3
read-timeout: 1iv) ApplePublicKeyGenerator.java
@Component
@RequiredArgsConstructor
public class ApplePublicKeyGenerator {
    public PublicKey generatePublicKey(Map<String, String> tokenHeaders,
                                       ApplePublicKeyResponse applePublicKeys)
            throws AuthenticationException, NoSuchAlgorithmException, InvalidKeySpecException {
        ApplePublicKey publicKey = applePublicKeys.getMatchedKey(tokenHeaders.get("kid"),
                                                                 tokenHeaders.get("alg"));

        return getPublicKey(publicKey);
    }

    private PublicKey getPublicKey(ApplePublicKey publicKey)
            throws NoSuchAlgorithmException, InvalidKeySpecException {
        byte[] nBytes = Base64.getUrlDecoder().decode(publicKey.n());
        byte[] eBytes = Base64.getUrlDecoder().decode(publicKey.e());

        RSAPublicKeySpec publicKeySpec = new RSAPublicKeySpec(new BigInteger(1, nBytes),
                                                              new BigInteger(1, eBytes));


        KeyFactory keyFactory = KeyFactory.getInstance(publicKey.kty());
        return keyFactory.generatePublic(publicKeySpec);
    }
}
위의 코드는 Apple Public Key를 바탕으로 Public Key를 생성하는 Bean이다. client로부터 받은 identity token을 디코딩 하여 header를 얻어와, 조회한 Apple Public Key들 중 매치되는 Key를 찾아 생성한다. (당연히 매치되지 않으면 에러가 발생한다.)
v) JwtValidator.java
@Component
@RequiredArgsConstructor
public class JwtValidator {

	. . .

    public Map<String, String> parseHeaders(String token) throws JsonProcessingException {
        String header = token.split("\\.")[0];
        return new ObjectMapper().readValue(decodeHeader(header), Map.class);
    }

    public String decodeHeader(String token) {
        return new String(Base64.getDecoder().decode(token), StandardCharsets.UTF_8);
    }

    public Claims getTokenClaims(String token, PublicKey publicKey) {
        return Jwts.parserBuilder()
                   .setSigningKey(publicKey)
                   .build()
                   .parseClaimsJws(token)
                   .getBody();
    }
    . . .
}
위에서 디코드에 대해 말했다. identity token에서 헤더를 가져와야 하기 때문에 이전에 구현해놓은 JwtValidator 클래스에 세 개의 메서드를 추가했다. 마지막 메서드인 getTokenClaims() 메서드는 나중에 Claims로부터 accountId를 받아오기 위해 만들어둔 메서드다.
vi) AppleAuthService.java
전체적인 흐름을 다시 집고 넘어가자면, 우리는 Public Key를 통해 Identity Token에 대해 서명 검증을 하고 있다. 그리고 다음과 같은 부분을 검증해야 한다.
- Verify the JWS E256 signature using the server’s public key
- Verify the nonce for the authentication
- Verify that the iss field contains https://appleid.apple.com
- Verify that the aud field is the developer’s client_id
- Verify that the time is earlier than the exp value of the token
이는 Apple 공식문서에 나와 있는 내용이다.
@Service
@RequiredArgsConstructor
public class AppleAuthService {
    private final AppleAuthClient appleAuthClient;
    private final ApplePublicKeyGenerator applePublicKeyGenerator;
    private final JwtValidator jwtValidator;
    private final MemberService memberService;
    private final PrincipalUserMapper principalUserMapper;

    public PrincipalUser loadUser(AppleAuthRequest appleAuthRequest)
            throws AuthenticationException, NoSuchAlgorithmException, InvalidKeySpecException,
                   JsonProcessingException {
        String accountId = getAppleAccountId(appleAuthRequest.identityToken());
        Member member = memberService.findByAccountId(accountId);

        if(!isNull(member)) {
            return principalUserMapper.toPrincipalUser(member);
        }

        String name = appleAuthRequest.user().name().lastName() + appleAuthRequest.user().name().firstName();
        String email = appleAuthRequest.user().email();

        OAuth2Request oAuth2Request = OAuth2Request.builder()
                                                   .accountId(accountId)
                                                   .name(name)
                                                   .email(email)
                                                   .build();

        return principalUserMapper.toPrincipalUser(memberService.saveIfNewMember(oAuth2Request));
    }

    public String getAppleAccountId(String identityToken)
            throws JsonProcessingException, AuthenticationException, NoSuchAlgorithmException,
                   InvalidKeySpecException {
        Map<String, String> headers = jwtValidator.parseHeaders(identityToken);
        PublicKey publicKey = applePublicKeyGenerator.generatePublicKey(headers,
                                                                        appleAuthClient.getAppleAuthPublicKey());

        return jwtValidator.getTokenClaims(identityToken, publicKey).getSubject();
    }
}
위는 AppleAuthService 코드이고, 검증과 함께 Claims의 Subject를 추출해 accountId로 활용한다. 위의 메서드는 MemberController에서 사용하고 있고, 첫 로그인 시 추출한 accountId와 요청 받은 name, email을 통해 PrincipalUser를 생성하여 Member 엔티티를 생성해준다. 이후의 요청에 대해서는 검증만 하여 리턴해준다.
처음엔 다른 소셜 로그인과 Flow가 다르다고 생각했지만 직접 구현해보니 크게 차이점이 있진 않았다.
Project Repository
References
- https://whitepaek.tistory.com/60
- https://developer.apple.com/documentation
- https://hwannny.tistory.com/71
- https://labs.brandi.co.kr//2021/04/09/chosh.html
- https://velog.io/@selenium/UniLetter-Sign-in-with-Apple-%EC%95%A0%ED%94%8C-%EB%A1%9C%EA%B7%B8%EC%9D%B8%ED%9A%8C%EC%9B%90%EA%B0%80%EC%9E%85-%EA%B5%AC%ED%98%84%EC%84%9C%EB%B2%84%EC%B8%A1