
서론
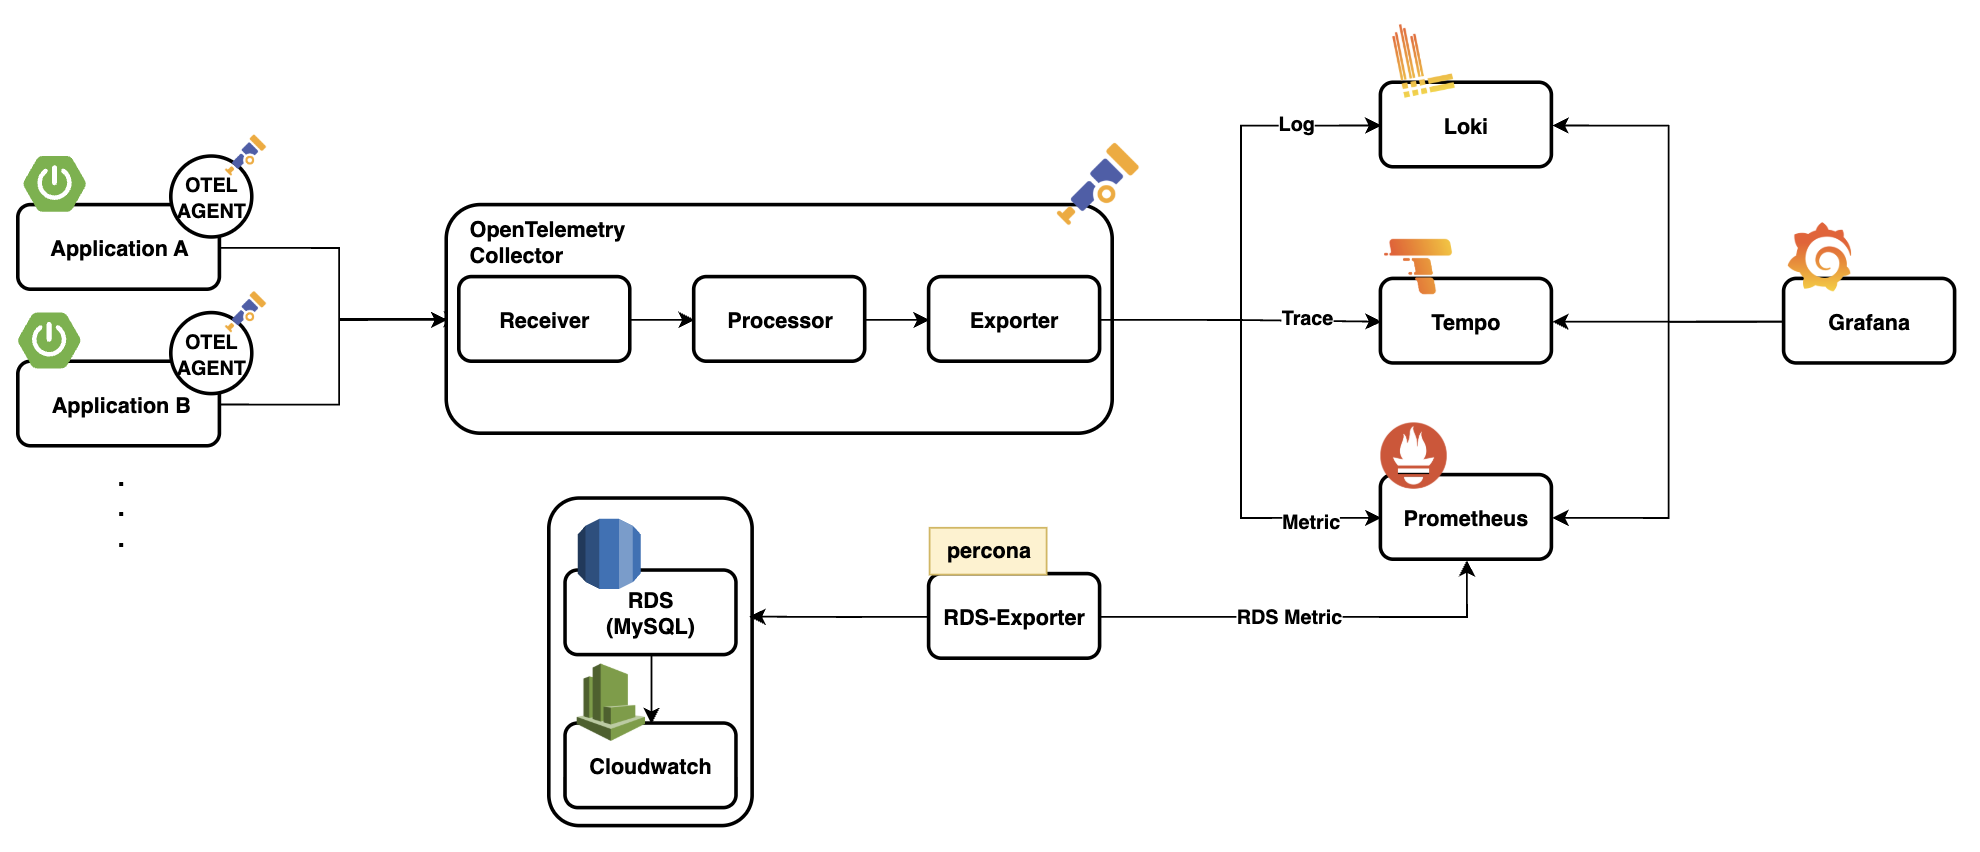
최근 회사에서 서비스를 출시한지 약 1년만에 장애 감지 및 대응 프로세스를 개선하기 위해 옵저버빌리티(Observability) 시스템을 개선했다. 학부 시절(까마득한 4년 전)에 Prometheus와 Grafana를 만져본 경험, 첫번째 회사에서 관측을 해본 경험은 있으나 직접 설계하고 구축하는건 처음이었기에 개인 시간까지 할애하여 공부할 정도로 재밌는 업무였다. 이번 포스팅에서 다루는 내용이 아니긴 해서 사내 기술 블로그에 기고한 글을 링크만 남기고 넘어가려는데.... 그래도 조금은 관련이 있기에 아키텍처를 남기면 다음과 같다.
이번 포스팅은 제목에서도 알다시피 로그 수집과 관련있다. 현재 활용하고 있는 프레임워크는 Spring으로, Node js와 다르게 멀티쓰레드로 동작한다는 특징이 있다. 그럼 이 때, 로그는 어떻게 쌓이게 될까? (Spring MVC를 기준으로 작성됩니다.)
Thread Per Request
Spring MVC는 Thread Per Request, 요청당 하나의 스레드로 동작한다. 어떻게 로그가 쌓이는지 다들 예상가겠지만, 예상과 일치하는지 알기 위해 간단한 코드를 작성해보았다.
@GetMapping("/test")
fun endpoint(
    @RequestParam name: String,
) {
    log.info("start")

    Thread.sleep(Random().nextInt(10000).toLong())

    log.info("Received request with name: {}", name)
    log.info("finished")
}
로그는 어떻게 찍힐까?
2025-06-05 12:07:18.599 [http-nio-8080-exec-5] INFO  com.example.demo.TestController - start
2025-06-05 12:07:19.665 [http-nio-8080-exec-6] INFO  com.example.demo.TestController - start
2025-06-05 12:07:20.312 [http-nio-8080-exec-6] INFO  com.example.demo.TestController - Received request with name: test2
2025-06-05 12:07:20.312 [http-nio-8080-exec-6] INFO  com.example.demo.TestController - finished
2025-06-05 12:07:27.751 [http-nio-8080-exec-5] INFO  com.example.demo.TestController - Received request with name: test
2025-06-05 12:07:27.754 [http-nio-8080-exec-5] INFO  com.example.demo.TestController - finished
동작한 스레드와 함께 로그가 찍혔다. 위의 로그는 두 가지 요청에 대한 로그인데, 만약 요청이 몰린다면? 아래와 같은 로그가 구성될 수 있다.
2025-06-05 12:07:18.599 [http-nio-8080-exec-5] INFO  com.example.demo.TestController - start
.
.
.
2025-06-05 12:07:19.665 [http-nio-8080-exec-5] INFO  com.example.demo.TestController - start
2025-06-05 12:07:20.312 [http-nio-8080-exec-5] INFO  com.example.demo.TestController - Received request with name: test
.
.
.
2025-06-05 12:07:20.312 [http-nio-8080-exec-5] INFO  com.example.demo.TestController - finished
2025-06-05 12:07:27.751 [http-nio-8080-exec-5] INFO  com.example.demo.TestController - Received request with name: test
2025-06-05 12:07:27.754 [http-nio-8080-exec-5] INFO  com.example.demo.TestController - finished
어떤 로그가 어떤 요청에 대한 로그인지 구별하기 훨씬 힘들어졌다. 이럴 경우 우리는 request에 대한 식별자가 필요하다.
MDC로 request_id 추가하기
MDC(Mapped Diagnostic Context)는 현재 실행중인 쓰레드에 메타데이터를 넣고 관리하는 공간이다. 그렇다면 이런 질문이 떠오른다. ThreadLocal과 뭐가 다르지? 내부를 들여다보면 의문증이 해결된다.
MDC
public class MDC {

    // 생략
    static MDCAdapter MDC_ADAPTER;

    // 생략

    public static void put(String key, String val) throws IllegalArgumentException {
        if (key == null) {
            throw new IllegalArgumentException("key parameter cannot be null");
        }
        if (getMDCAdapter() == null) {
            throw new IllegalStateException(MDC_APAPTER_CANNOT_BE_NULL_MESSAGE);
        }
        getMDCAdapter().put(key, val);
    }

    // 생략
}
MDC의 put 메서드를 살펴보면 MDCAdapter에 key와 value를 넣는 것을 볼 수 있다. MDCAdapter의 구현체는 BasicMDCAdapter, LogbackMDCAdapter, Log4jMDCAdapter, NOPMDCAdapter가 있는데, 필자는 logback을 활용하고 있으니 LogbackMDCAdapter를 살펴보겠다.
LogbackMDCAdapter
public class LogbackMDCAdapter implements MDCAdapter {

    final ThreadLocal<Map<String, String>> readWriteThreadLocalMap = new ThreadLocal();
    final ThreadLocal<Map<String, String>> readOnlyThreadLocalMap = new ThreadLocal();
    private final ThreadLocalMapOfStacks threadLocalMapOfDeques = new ThreadLocalMapOfStacks();

    public void put(String key, String val) throws IllegalArgumentException {
        if (key == null) {
            throw new IllegalArgumentException("key cannot be null");
        } else {
            Map<String, String> current = (Map)this.readWriteThreadLocalMap.get();
            if (current == null) {
                current = new HashMap();
                this.readWriteThreadLocalMap.set(current);
            }

            current.put(key, val);
            this.nullifyReadOnlyThreadLocalMap();
        }
    }

    public String get(String key) {
        Map<String, String> hashMap = (Map)this.readWriteThreadLocalMap.get();
        return hashMap != null && key != null ? (String)hashMap.get(key) : null;
    }

    . . .
}
필드를 먼저 보면, readWriteThreadLocalMap은 실제 데이터를 저장하는 ThreadLocal이고, readOnlyThreadLocalMap는 읽기 전용 복사본 ThreadLocal임을 알 수 있다. 이를 통해 MDC는 내부적으로 ThreadLocal을 활용하고 있음을 알 수 있다.
이후 put 메서드와 get 메서드를 보면 쓰기 전용 ThreadLocal에 대해 값을 넣어주거나 읽기 전용 ThreadLocal을 invalidate 처리하는 것을 볼 수 있다.
MDC를 활용한 로그에 request_id 남기기
자, 이제 로그에 request_id를 남겨보자. 이러한 작업은 DispatcherServlet 앞단에 있는 Filter에서 처리하면 수월하다. 코드는 다음과 같다.
@Component
@Order(Ordered.HIGHEST_PRECEDENCE)
class MDCLoggingFilter : Filter {

    override fun doFilter(
        servletRequest: ServletRequest?,
        servletResponse: ServletResponse?,
        filterChain: FilterChain
    ) {
        try {
            MDC.put("request_id", UUID.randomUUID().toString().replace("-", ""))

            filterChain.doFilter(servletRequest, servletResponse)
        } finally {
            MDC.clear()
        }
    }
}
MDCLoggingFilter의 우선순위를 가장 높게 설정해주고, MDC에 request_id와 value로 uuid를 넣어주었다. 여기서 포인트는 doFilter 메서드 다음에 MDC.clear()를 넣어줘야 한다. ThreadLocal을 사용 후 clear 해주지 않으면 메모리 누수가 발생할 수 있고, MDC의 경우엔 해당 스레드를 다른 요청이 사용할 때 데이터가 남아있을 수 있다.
이렇게 처리해주면 로그는 다음과 같이 수집된다.
2025-06-05 12:03:40.446 [1340b677-1c8b-48d7-84a6-998e746fdf77] [http-nio-8080-exec-3] INFO  com.example.demo.TestController - start
2025-06-05 12:03:41.951 [9f8fb7a2-249e-4ca3-bc54-d2bd51708884] [http-nio-8080-exec-5] INFO  com.example.demo.TestController - start
2025-06-05 12:03:42.587 [9f8fb7a2-249e-4ca3-bc54-d2bd51708884] [http-nio-8080-exec-5] INFO  com.example.demo.TestController - Received request with name: test2
2025-06-05 12:03:42.588 [9f8fb7a2-249e-4ca3-bc54-d2bd51708884] [http-nio-8080-exec-5] INFO  com.example.demo.TestController - finished
2025-06-05 12:03:49.631 [1340b677-1c8b-48d7-84a6-998e746fdf77] [http-nio-8080-exec-3] INFO  com.example.demo.TestController - Received request with name: test
2025-06-05 12:03:49.634 [1340b677-1c8b-48d7-84a6-998e746fdf77] [http-nio-8080-exec-3] INFO  com.example.demo.TestController - finished
이제 요청별로 로그를 모아볼 수 있다. Loki가 연동된 Grafana에서 검색하거나 터미널에서 다음과 같은 명령어로 검색 가능하다.
$ tail -f application.log | grep "9f8fb7a2-249e-4ca3-bc54-d2bd51708884"TaskDecorator로 Context 유지하기
2025-06-05 12:11:09.622 [f9b2e52c-7c95-4f54-bd4b-496da26ff0e6] [http-nio-8080-exec-3] INFO  com.example.demo.TestController - start
2025-06-05 12:11:09.623 [] [task-2] INFO  c.e.demo.ApplicationEventListener - Received event: test
2025-06-05 12:11:10.971 [8c821a3f-d926-42a0-82f0-45ac5045f82f] [http-nio-8080-exec-4] INFO  com.example.demo.TestController - start
2025-06-05 12:11:10.972 [] [task-3] INFO  c.e.demo.ApplicationEventListener - Received event: test2
2025-06-05 12:11:13.904 [] [task-2] INFO  c.e.demo.ApplicationEventListener - finished
2025-06-05 12:11:17.706 [] [task-3] INFO  c.e.demo.ApplicationEventListener - finished
하지만 아직 문제가 있다. 멀티스레드 환경에서 request_id가 유지되지 않기 때문이다. 이러한 문제는 Spring 4.3 이상부터 제공되는 TaskDecorator를 활용하면 간단하게 해결할 수 있다.
@FunctionalInterface
public interface TaskDecorator {

	/**
	 * Decorate the given {@code Runnable}, returning a potentially wrapped
	 * {@code Runnable} for actual execution, internally delegating to the
	 * original {@link Runnable#run()} implementation.
	 * @param runnable the original {@code Runnable}
	 * @return the decorated {@code Runnable}
	 */
	Runnable decorate(Runnable runnable);

}
TaskDecorator는 Spring의 TaskExecutor 또는 ThreadPoolTaskExecutor와 함께 비동기 작업 실행 시 스레드 실행 전후에 공통 작업을 수행할 수 있도록 도와주는 인터페이스다. 메서드만 봐도 Runnable을 파라미터로 받고, 다시 Runnable을 리턴하는 것을 확인할 수 있다. TaskDecorator의 구현체의 예시로는 SentryTaskDecorator가 있다.
이제 구현체를 만들어보자. 아래와 같이 간단하게 만들 수 있다.
class MDCCopyTaskDecorator : TaskDecorator {

    override fun decorate(runnable: Runnable): Runnable {
        val contextMap = MDC.getCopyOfContextMap()

        return Runnable {
            try {
                contextMap?.let { MDC.setContextMap(it) }
                runnable.run()
            } finally {
                MDC.clear()
            }
        }
    }
}
MDC를 copy 후 set 해주고, runnable을 실행시켜준다. 여기에도 마찬가지로 마지막에 MDC를 clear 해주었다. 이렇게 작성한 구현체를 ThreadPoolTaskExecutor 설정에 넣어주면 된다.
@EnableAsync
@Configuration
class AsyncConfig {

	// 생략

    @Bean
    fun asyncTaskExecutor(): Executor {
        val executor = ThreadPoolTaskExecutor()

        executor.corePoolSize = CORE_POOL_SIZE
        executor.maxPoolSize = MAX_POOL_SIZE
        executor.queueCapacity = QUEUE_CAPACITY
        executor.setThreadNamePrefix(THREAD_NAME_PREFIX)
        executor.setTaskDecorator(MDCCopyTaskDecorator())
        executor.initialize()

        return executor
    }
}
자, 이제 로그를 찍어보자.
2025-06-05 12:34:23.465 [f356a1fb-d441-47b5-9ba1-ce370de88791] [http-nio-8080-exec-7] INFO  com.example.demo.TestController - start
2025-06-05 12:34:23.466 [f356a1fb-d441-47b5-9ba1-ce370de88791] [async-task6] INFO  c.e.demo.ApplicationEventListener - Received event: test
2025-06-05 12:34:24.629 [6be2e450-39ca-49fa-9365-3603da737a4e] [http-nio-8080-exec-8] INFO  com.example.demo.TestController - start
2025-06-05 12:34:24.630 [6be2e450-39ca-49fa-9365-3603da737a4e] [async-task7] INFO  c.e.demo.ApplicationEventListener - Received event: test2
2025-06-05 12:34:25.000 [6be2e450-39ca-49fa-9365-3603da737a4e] [async-task7] INFO  c.e.demo.ApplicationEventListener - finished
2025-06-05 12:34:32.812 [f356a1fb-d441-47b5-9ba1-ce370de88791] [async-task6] INFO  c.e.demo.ApplicationEventListener - finished
위와 같이 잘 찍히는 것을 확인할 수 있다.
해당 레포지토리에 더 많은 이론 및 실습들을 정리하고 있습니다 !