리눅스버전, 윈도우 버전 둘다 만들어보았다. 리눅스는 WSL환경에서 테스트 해 보았다.
파워쉘(윈도우)의 경우만 보자면
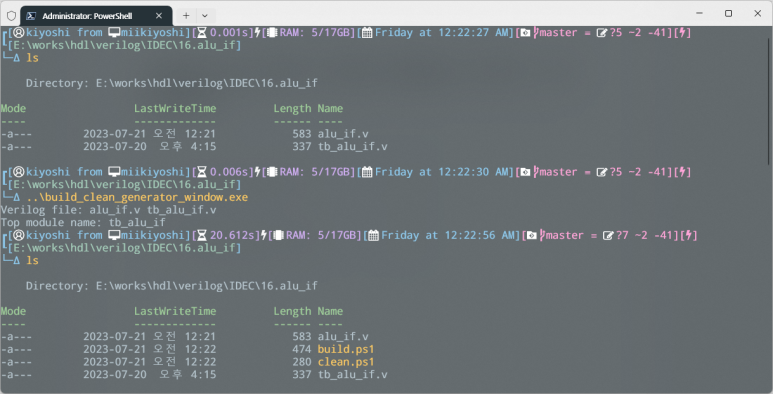
이렇게 build.ps1 그리고 clean.ps1 파일을 만들고
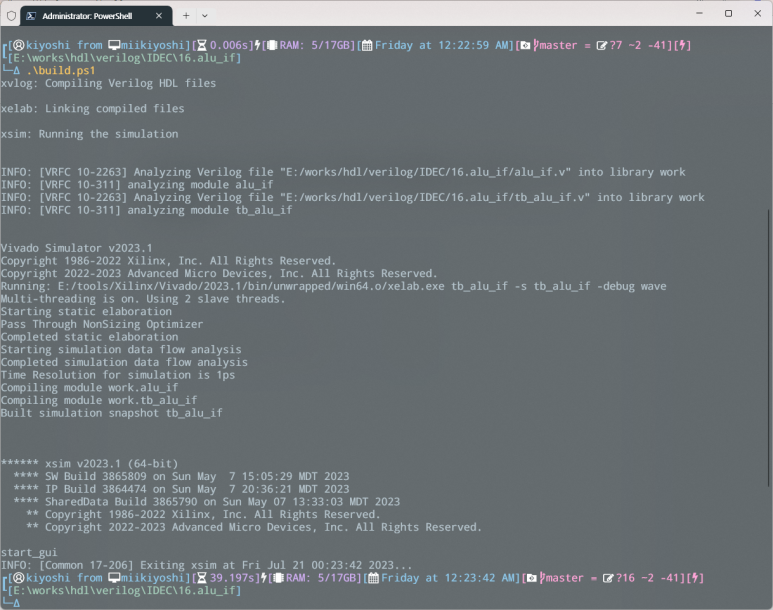
.\build.ps1해서 실행시키면 된다.
실행시켜서 파형 확인도 해본다음 끄고 디렉토리내 파일들을 확인해보면 쓰잘떼기 없는 파일들이 생긴걸 볼 수 있다.

.\clean.ps1해서 필요없는것들 전부 삭제해주면 된다.
// powershell
// mkvbuild.ps1

#include <iostream>
#include <fstream>
#include <string>

using namespace std;

int main(void)
{
  ofstream fout1("build.ps1"), fout2("clean.ps1");
  string xvlogParm, othParm;

  cout << "Verilog file: ";
  getline(cin, xvlogParm);
  cout << "Top module name: ";
  getline(cin, othParm);

  if (fout1.is_open()) {
    fout1 << "echo \"xvlog: Compiling Verilog HDL files\"" << endl;
    fout1 << "xvlog " << xvlogParm << " | Out-File debug.log" << endl;
    fout1 << "echo \"\"" << endl;
    fout1 << "echo \"xelab: Linking compiled files\"" << endl;
    fout1 << "xelab " << othParm << " -s " << othParm << " -debug wave | Out-File debug.log -Append" << endl;
    fout1 << "echo \"\"" << endl;
    fout1 << "echo \"xsim: Running the simulation\"" << endl;
    fout1 << "xsim " << othParm << " -wdb " << "simulate_xsim_" << othParm << ".wdb -gui | Out-File debug.log -Append" << endl;
    fout1 << "(Get-Content debug.log) -replace \“ECHO가 설정되어 있지 않습니다.\”, \“\” | Set-Content debug.log" << endl;
    fout1 << "Get-Content debug.log";
    fout1.close();
  }
  else {
    cout << "Unable to open file.\n";
  }

  if (fout2.is_open()) {
    fout2 << "Remove-Item *xe* -Recurse -Force\nRemove-Item *xs* -Recurse -Force\nRemove-Item *.wdb* -Recurse -Force\nRemove-Item *trace* -Recurse -Force\nRemove-Item *xv* -Recurse -Force\nRemove-Item *we* -Recurse -Force\nRemove-Item .Xil -Recurse -Force\nRemove-Item debug.log -Recurse -Force";
  }
  else {
    cout << "Unable to open file.\n";
  }

  return 0;
}
// bash
// mkvbuild.sh
#include <iostream>
#include <fstream>
#include <string>
#include <sys/stat.h>
using namespace std;
int main(void)
{
ofstream fout1("build"), fout2("clean");
string xvlogParm, othParm;
cout << "Verilog file: ";
getline(cin, xvlogParm);
cout << "Top module name: ";
getline(cin, othParm);
if (fout1.is_open()) {
fout1 << "echo \"xvlog: Compiling Verilog HDL files\"" << endl;
fout1 << "xvlog " << xvlogParm << endl;
fout1 << "echo" << endl;
fout1 << "echo \"xelab: Linking compiled files\"" << endl;
fout1 << "xelab " << othParm << " -s " << othParm << " -debug wave" << endl;
fout1 << "echo" << endl;
fout1 << "echo \"xsim: Running the simulation\"" << endl;
fout1 << "xsim " << othParm << " -wdb " << "simulate_xsim_" << othParm << ".wdb -gui" << endl;
fout1.close();
}
else {
cout << "Unable to open file.\n";
}
if (fout2.is_open()) {
fout2 << "rm -rf *xe* *xs* *.wdb* *trace* *xv* *we*";
}
else {
cout << "Unable to open file.\n";
}
chmod("build", 0755);
chmod("clean", 0755);
return 0;
}윈도우의 경우 프로필 설정 파일인 $profile에 alias를 등록해서 사용하면 매우 편리하다.
vscode로 $profile 수정
code $profile$profile에 추가할 내용
# Set-alias [단축어] [실행파일]

Set-alias mkvbuild C:\tools\mkvbuild\mkvbuild.ps1
추가하고 나면 . $profile를 입력한다
. $profile현재 경로에 build.ps1, clean.ps1 만들기
mkvbuild
공기정