[python] streamlit, pyaudio, speech_recognition, pyttsx3 로 간단한 대화형 챗봇 만들기

> 📌 대화형 챗봇 만들기
1. 화면 개발 -> streamlit
2. STT -> speech_recognition, pyaudio
3. TTS -> pyttsx3
👉 STT,TTS로 챗봇과 대화형으로 질문과 응답을 주고받는 챗봇을 만든다. 질문과 응답이 대화형으로 잘 주고 받아지는 것을 확인한 후에 ai 모델까지 연결해서 구현할 예정!
✨ 전체 코드
import streamlit as st
import speech_recognition as sr
import pyttsx3
def main():
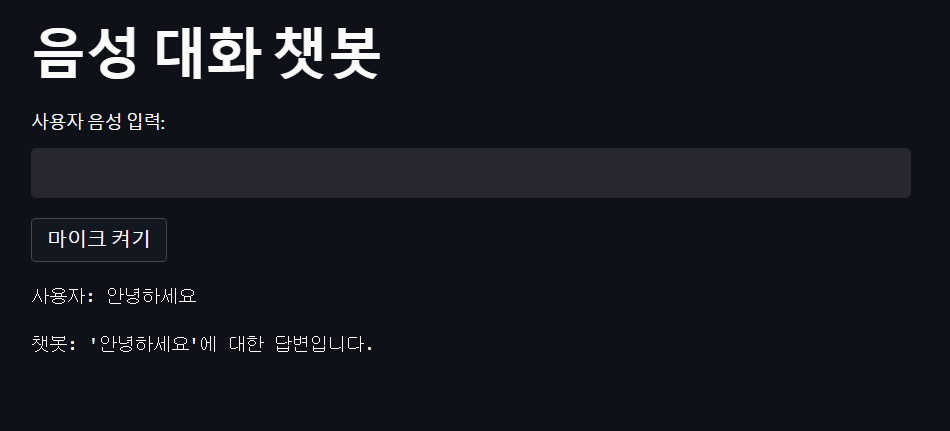
st.title("음성 대화 챗봇")
# 음성 입력을 위한 함수
def get_audio_input():
r = sr.Recognizer()
with sr.Microphone() as source:
audio = r.listen(source)
# 구글 웹 음성 API로 인식하기
try:
print("Google Speech Recognition thinks you said : " + r.recognize_google(audio, language='ko'))
return r.recognize_google(audio, language='ko')
except sr.UnknownValueError as e:
print("Google Speech Recognition could not understand audio".format(e))
return None
except sr.RequestError as e:
print("Could not request results from Google Speech Recognition service; {0}".format(e))
return None
# 챗봇 응답을 얻는 함수
def get_chatbot_response(user_input):
# 여기에서 실제로 챗봇의 응답 로직을 구현할 수 있습니다.
return f"챗봇: '{user_input}'에 대한 답변입니다."
user_input = st.text_input("사용자 음성 입력:")
# TTS
def text_to_speech(text):
engine = pyttsx3.init()
engine.say(text)
engine.runAndWait()
if st.button("마이크 켜기"):
user_input = get_audio_input()
if user_input is not None:
st.text(f"사용자: {user_input}")
chatbot_response = get_chatbot_response(user_input)
st.text(chatbot_response)
# TTS api
text_to_speech(chatbot_response)
if __name__ == "__main__":
main()
🌱 streamlit ?
Streamlit은 데이터 과학자와 엔지니어가 간단하고 빠르게 데이터 기반 웹 애플리케이션을 구축할 수 있도록 도와주는 Python 라이브러리 및 프레임워크입니다. Streamlit을 사용하면 사용자가 쉽게 대화형 웹 애플리케이션을 개발하고, 데이터 시각화 및 분석 결과를 효과적으로 공유할 수 있습니다.
- Streamlit의 주요 특징과 장점
- 쉽고 간편한 사용: Streamlit은 간단한 Python 스크립트로 대화형 웹 애플리케이션을 만들 수 있습니다. 별도의 HTML, CSS, 또는 JavaScript 코드를 작성할 필요가 없습니다.
- 데이터 시각화: 데이터를 쉽게 시각화할 수 있도록 다양한 차트 및 그래프를 지원합니다.
- 실시간 업데이트: 코드를 수정하고 저장하면 자동으로 웹 애플리케이션이 업데이트되어 실시간으로 변경 사항을 확인할 수 있습니다.
- 웹 애플리케이션 배포: Streamlit 애플리케이션을 간단히 공유하고 배포할 수 있습니다. 고급 배포 옵션도 제공됩니다.
- 대화형 위젯: 사용자 입력에 대한 반응형 위젯을 제공하여 사용자와의 상호작용을 간편하게 구현할 수 있습니다.
이번에 streamlit을 처음 알게되었는데.. 개발부터 배포까지 아주 간편하다...👍👍👍
streamlit 설치
pip install streamlitstreamlit을 사용한 간단한 챗봇 (대화형 x) 예제
import streamlit as st

def main():
    st.title("타이핑 챗봇")

    # 챗봇 응답을 얻는 함수
    def get_chatbot_response(user_input):
        # 여기에서 실제로 챗봇의 응답 로직을 구현할 수 있습니다.
        # 예를 들어, 간단하게 사용자 입력에 대한 답변을 생성할 수 있습니다.
        return f"챗봇: '{user_input}'에 대한 답변입니다."

    user_input = st.text_input("사용자 입력:")

    if st.button("대화하기"):
        chatbot_response = get_chatbot_response(user_input)
        st.text(chatbot_response)

if __name__ == "__main__":
    main()
streamlit 실행 명령어
streamlit run 파일명.py 
핸드폰과 pc가 같은 네트워크에 연결된 상태라면 핸드폰에서도 웹페이지에 접속이 가능햇다!
🌱 pyaudio 설치, 설치오류 해결한 과정 🥲
파이썬에서 마이크 기능을 사용하기 위해선 pyaudio가 필요하다.
pyaudio 설치
pip install pyaudio근데 이렇게 설치했더니 완료했다고는 나오지만 ... 막상 speech_recognition으로 마이크 기능을 사용하려고 하니 pyaudio가 없다는 오류가 나왔다.
pyaudio 설치 오류
아래는 오류 메세지
ModuleNotFoundError: No module named 'pyaudio'pyaudio 설치 오류 해결한 방법
https://www.lfd.uci.edu/~gohlke/pythonlibs/#pyaudio
위의 사이트에서 pyaudio 파일을 직접 다운로드 한 후 vscode에서 install 했다.
👇👇 참고한 블로그!!
https://kang-korea-life.tistory.com/28
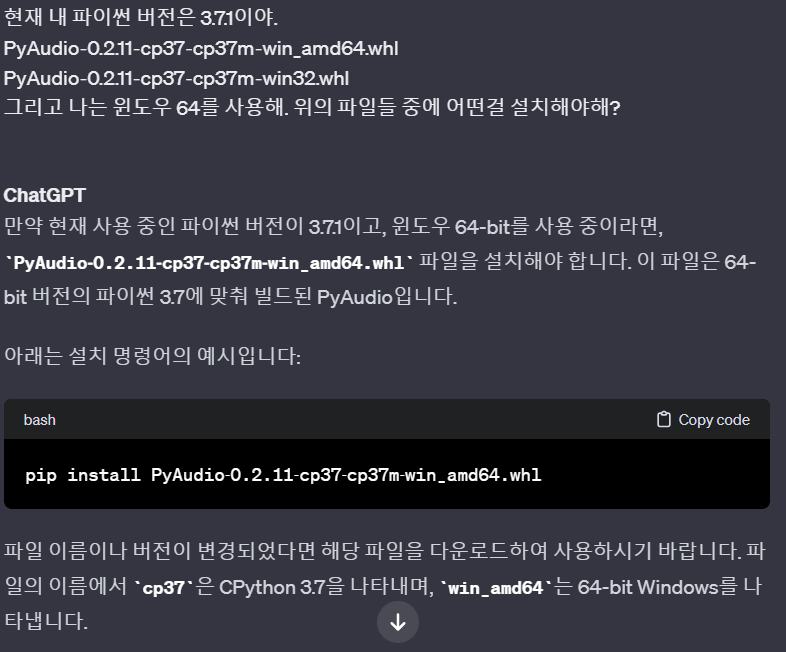
버전 헷갈릴때는 지피티에게 맞냐고 물어보자....
직접 설치하니 pyaudio관련 오류를 해결할 수 있었다 😍
🌱 speech_recognition으로 STT 구현
speech_recognition은 음성 인식을 위한 Python 라이브러리입니다. 이 라이브러리를 사용하면 Python 스크립트에서 음성 입력을 쉽게 처리하고 텍스트로 변환할 수 있습니다. speech_recognition 라이브러리는 다양한 음성 인식 엔진을 지원하며, 간단한 API를 통해 음성 입력을 처리할 수 있습니다.
speech_recognition에는 Sphinx, Google Web Speech API, Microsoft Bing Voice Recognition, IBM Speech to Text, Wit.ai 등 다양한 엔진을 사용할 수 있다.
그 중에서도 recognize_google() 함수를 통해 Google Web Speech API를 사용하여 음성을 텍스트로 변환하는 것이 가장 일반적이라고 한다. (구글이 사용이 간편하고, 무료로 제공되는 API 중 하나이기 때문)
speech_recognition 설치
pip install SpeechRecognitionspeech_recognition으로 구현한 간단한 STT 예제
아래는 speech_recognition을 사용하여 마이크로 입력받은 말을 텍스트로 출력하는 간단한 예제코드이다.
import speech_recognition as sr

# microphone에서 auido source를 생성합니다
r = sr.Recognizer()
with sr.Microphone() as source:
    print("Say something!")
    audio = r.listen(source)

# 구글 웹 음성 API로 인식하기
try:
    print("Google Speech Recognition thinks you said : " + r.recognize_google(audio, language='ko'))
except sr.UnknownValueError as e:
    print("Google Speech Recognition could not understand audio".format(e))
except sr.RequestError as e:
    print("Could not request results from Google Speech Recognition service; {0}".format(e))
🌱 pyttsx3 로 TTS 구현
챗봇이 내놓은 답변을 speech로 변환해서 음성을 출력시키는 부분을 구현하기 위해 pyttsx3를 사용했다.
pyttsx3외에도 gTTS (Google Text-to-Speech) 등으로도 TTS를 구현할 수 있다. 근데 찾아보니 text를 speech를 변환한 이후 별도의 mp3 파일을 저장하는 과정없이 바로 음성을 출력하기 위해서는 pyttsx3를 사용해야해서 사용했다.
pyttsx3 설치
pip install pyttsx3
pyttsx3로 간단하게 구현한 tts 예제
import pyttsx3

def text_to_speech(text):
    engine = pyttsx3.init()
    engine.say(text)
    engine.runAndWait()

if __name__ == "__main__":
    input_text = input("Enter the text to convert to speech: ")
    text_to_speech(input_text)