Spring Cloud로 개발하는 마이크로서비스 애플리케이션(MSA)
를 수강하면서 작성한 글입니다.
Intro
REST API를 이용해서 다른 서비스를 호출할 때는 다른 서비스 인스턴스가 있는 곳의 네트워크 정보를 알아야합니다. 그 정보는 IP주소와 포트 정보가 될 것입니다. 하지만 클라우드의 경우에 인스턴스는 동적으로 할당되기 때문에 IP주소와 포트정보가 바뀔 수 있고 오토스케일링 등 변화가 생길 때 네트워크 위치가 계속 바뀌게 됩니다.
따라서 클라이언트나 API 게이트웨이는 호출할 서비스를 찾는 매커니즘이 필요하고(서비스 등록, 검색) 이것을 서비스 디스커버리 라고 부릅니다.
이러한 로직을 구현하는 방법은
1. 클라이언트 사이드 디스커버리 패턴
2. 서버 사이드 디스커버리 패턴
2가지가 있습니다.
MSA의 서비스 디스커버리를 통해 자세한 내용을 알 수 있습니다.
이번 글에서 제가 구현하고자 하는 것은 Spring Cloud Netfilx Eureka이며 Eureka가 하는 일이 Service Discovery입니다.
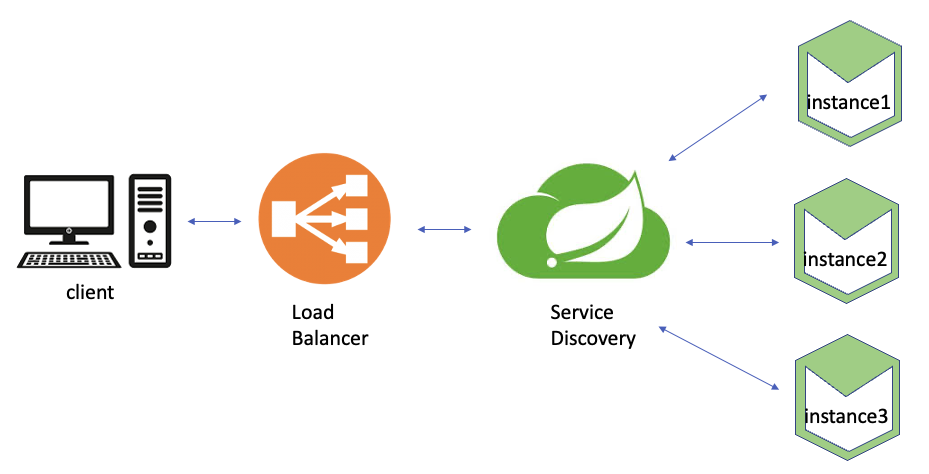
Service Discovery

Service Discovery는 위의 사진과 같이 KEY에 어떤 서비스인지, VALUE에는 해당 서비스가 어디에 위치하고 있는지 값이 적혀있다고 합니다.
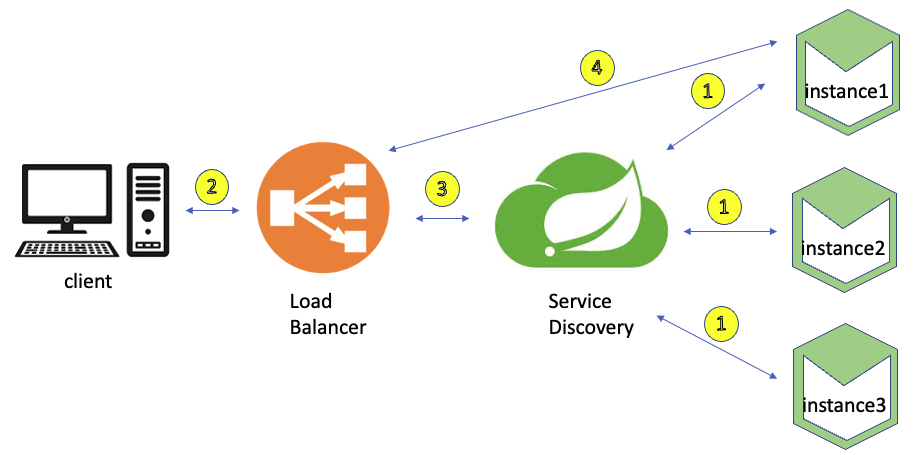
작동원리
- 각각의 서비스들은 Service Discovery에 서비스와 위치 정보를 등록합니다.
- 클라이언트는 Load Balancer 혹은 API Gateway를 통해 요청을 보냅니다.
- Load Balancer 혹은 API Gateway는 Service Discovery를 통해 맞는 서비스를 찾고 그에 대한 정보를 LoadBalaner 혹은 API Gateway에 다시 넘겨줍니다.
- Load Balancer 혹은 API Gateway는 받은 정보를 바탕으로 해당 서비스에 요청을 보냅니다.
Eureka Server 만들기
discoveryservice github 예제코드
build.gradle
...
ext {
    set('springCloudVersion', "2021.0.4")
}

dependencies {
    implementation 'org.springframework.cloud:spring-cloud-starter-netflix-eureka-server'
    testImplementation 'org.springframework.boot:spring-boot-starter-test'
}

dependencyManagement {
    imports {
        mavenBom "org.springframework.cloud:spring-cloud-dependencies:${springCloudVersion}"
    }
}
...
위와 같이 의존성을 추가해줍니다.
DiscoveryserviceApplication.java
@SpringBootApplication
@EnableEurekaServer
public class DiscoveryserviceApplication {

    public static void main(String[] args) {
        SpringApplication.run(DiscoveryserviceApplication.class, args);
    }
}
@EnableEurekaServer 어노테이션은 이 애플리케이션이 Eureka 서버임을 선언하는 것입니다.
application.yml
server:
  port: 8761 #포트번호 지정

spring:
  application:
    name: discoveryservice # 서비스 ID

eureka:
  client:
    register-with-eureka: false # default : true
    fetch-registry: false # default : true

# Eureka Libray가 포함된채로 서버가 기동이되면 Eureka Client로써 어딘가에 등록하는 작업을 수행하게됩니다.
# 여기서 true로 지정하게 되면 자신의 정보를 자신한테 등록하는 것이므로 의미가 없는 작업이므로 false로 지정 하였습니다.
그리고 실행을 하고 Eureka 에 들어가보면!

위와 같은 화면을 볼 수 있습니다.
서비스 등록하기
이제 서비스를 등록해보겠습니다.
새로운 프로젝트를 만들어보겠습니다.
project name : user-service
user-service github 예제코드
build.gradle
ext {
    set('springCloudVersion', "2021.0.4")
}

dependencies {
    implementation 'org.springframework.boot:spring-boot-starter-web'
    implementation 'org.springframework.cloud:spring-cloud-starter-netflix-eureka-client'
    compileOnly 'org.projectlombok:lombok'
    developmentOnly 'org.springframework.boot:spring-boot-devtools'
    annotationProcessor 'org.projectlombok:lombok'
    testImplementation 'org.springframework.boot:spring-boot-starter-test'
}

dependencyManagement {
    imports {
        mavenBom "org.springframework.cloud:spring-cloud-dependencies:${springCloudVersion}"
    }
}
위와 같이 의존성을 추가했습니다.
UserServiceApplication.java
@SpringBootApplication
@EnableDiscoveryClient
public class UserServiceApplication {

    public static void main(String[] args) {
        SpringApplication.run(UserServiceApplication.class, args);
    }

}
@EnableDiscoveryClient 어노테이션은 이 애플리케이션이 Eureka 서버의 클라이언트임을 선언하는 것입니다.
application.yml
server:
  port: 0 # 랜덤포트를 주기 위해

spring:
  application:
    name: user-service

eureka:
  instance:
    instance-id: ${spring.cloud.client.hostname}:${spring.application.instance_id:${random.value}}
  client:
    register-with-eureka: true
    fetch-registry: true
    service-url:
      defaultZone: http://127.0.0.1:8761/eureka
이제 다시 UserServiceApplication도 실행해보겠습니다.
앞서 작성했던 Eureka Application은 실행이 된 상태여야합니다.
Eureka 에 다시 들어가보겠습니다.

서비스가 하나 등록되어있습니다.
결론
Service Discovery의 역할을 하는 Eureka 애플리케이션을 만들어봤습니다. 다음 글에서는 API Gateway를 사용하여 아주 간단한 MSA를 만들어보겠습니다.
제가 잘못이해하고 있거나 잘못 작성한 부분이 있다면 지적, 비판, 피드백 뭐든 해주시면 감사하겠습니다!
