👋 이글에서는요

최근 프로젝트에 광고, 마케팅, 알림 등에서 이메일을 활용하면서 도입하게 되었던 AWS의 Simple Email Service에 대한 설명, 사용법과 Spring에서는 어떻게 사용해야하는지 복습, 설명하는 영상입니다.
📝 Amazon SES란 무엇일까?
사용자의 이메일 주소와 도메인을 사용해 이메일을 보내고 받기 위한 경제적이고 손쉬운 방법을 제공하는 이메일 플랫폼 입니다.
사전준비
AWS SES 링크
로그인 후 위의 링크에 들어간다. (서울 리전 기준으로 작성했습니다.)
SandBox 상태란 무엇일까?
우선 처음 Email 기능을 사용하려고 들어가면

다음과 같은 화면을 볼수 있다.
해석해보면
샌드박스 환경에서는 Amazon SES에서 제공하는 모든 기능을 사용할 수 있습니다. 그러나 특정 전송 제한 및 제한 사항이 적용됩니다. 샌드박스에서 나갈 준비가 되면 프로덕션 액세스 요청을 제출하세요.
이란 뜻이다.
SandBox 상태에서는 아주 제한된 사용만 가능하다.
1. 하루에 200개의 메일만 보낼 수 있다.
2. 등록된 사용자에 한에서만 주고 받는 것이 가능하다.
위 사진에서의 Request production access 버튼은 SandBox상태를 벗어나 Product 모드로 수행할 수 있는 방법을 제공하고 클릭하게 되면 아래와 같은 사진을 볼 수 있게된다.
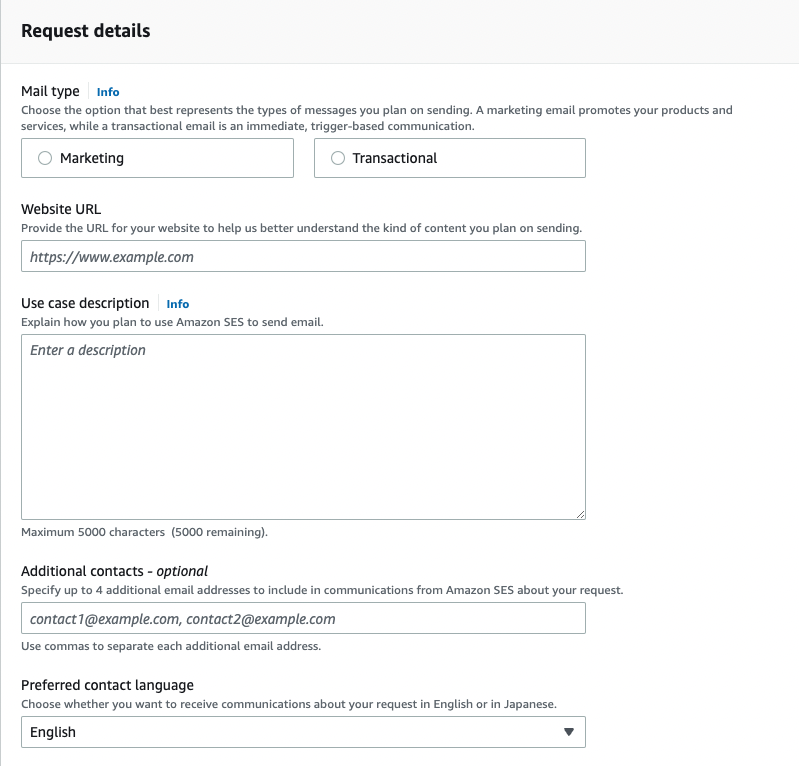
- mail type
- Marketing : 마케팅용으로 사용- Transactional : 특정 작업이 마치고 나면, 알림 등 으로 보내고자 할 때 Transactional 사용
- website URL
- 메일을 보내는 주체가 되는 서비스의 URL 기입(없다면 github 주소등을 넣어도 되는 듯 하다.) - Use case description
- 사용 상세 설명 작성(어떤 작업 후 하루에 몇개 정도의 메일을 보낼 것인지..등등) - Additional contract - optional
- 여러개의 메일을 기술
우선 이 글에서는 SandBox상태를 해제하지 않은 상태로 작성하겠다.
좌측의 Verified identities 탭을 클릭한 후 이메일을 2개정도 등록해보자.

버튼을 클릭하고 Email address 를 선택하면
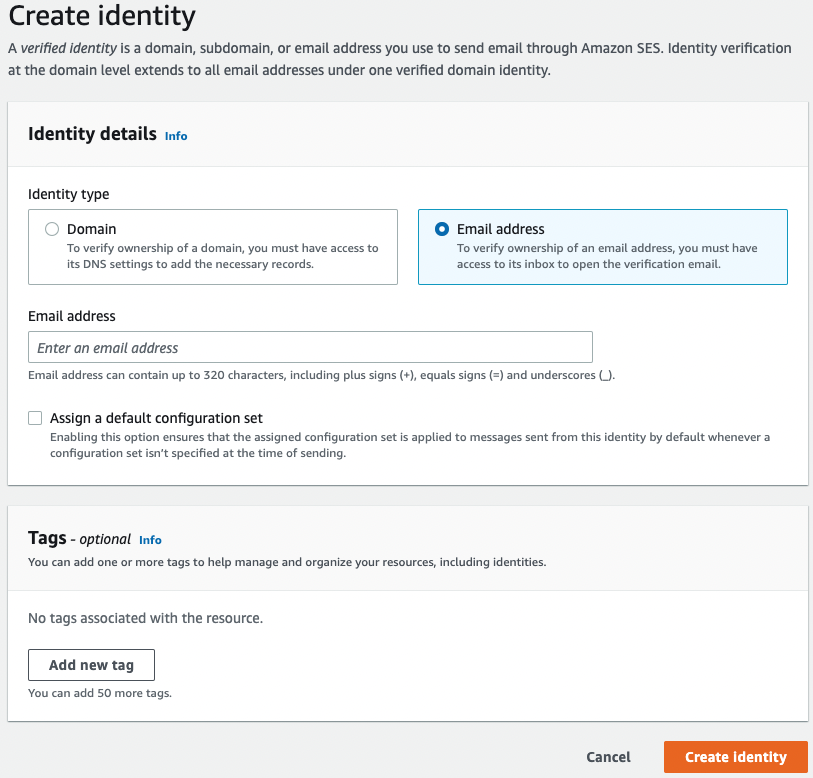
위와 같은 화면이 나오게 되고 이메일을 입력한 후에 Create identity를 클릭하면 해당 이메일로 메일이 오는데 그 때 링크를 클릭해주면 verified가 된다.
이메일을 클릭하고 들어간 후 테스트도 해볼 수 있다!
📋 이제 Spring Boot에서 SES를 사용해보자
우선 spring Boot의 라이브러리가 SES에 접근할 수 있도록 액세스 키를 발급받아야한다.
우측 상단에 내 계정을 선택한 후 보안자격증명 탭에 들어가서 액세스 키를 발급받을 수 있다.

기억할 자신 없으면 csv 파일로 받아두자. ID는 들어가서 항상 확인할 수 있지만 Secret access key 따로 메모해두거나 보관해두어야한다.
의존성을 추가하자
build.gradle
// mail
	implementation 'org.springframework.boot:spring-boot-starter-mail'
	implementation 'com.amazonaws:aws-java-sdk-ses:1.12.3'
yml 파일에 키 정보를 저장하자
위에서 발급받았던 키를 yml파일에 작성한다.
이렇게 관리하는 것은 안좋습니다ㅎㅎ 관리 법을 보시려면 아래 링크로 들어가주세요
Secret Manager를 통한 보안 프로퍼티 관리
application.yml
aws:
  ses:
    access-key: aaaa # 액세스 키 ID
    secret-key: bbbb # 보안 액세스 키
SES 설정 파일
AwsSesConfig.java
@Configuration
public class AwsSesConfig {

    @Value("${aws.ses.access-key}")
    private String accessKey;

    @Value("${aws.ses.secret-key}")
    private String secretKey;

    @Bean
    public AmazonSimpleEmailService amazonSimpleEmailService() {
        final BasicAWSCredentials basicAWSCredentials = new BasicAWSCredentials(accessKey, secretKey);
        final AWSStaticCredentialsProvider awsStaticCredentialsProvider = new AWSStaticCredentialsProvider(
                basicAWSCredentials);

        return AmazonSimpleEmailServiceClientBuilder.standard()
                .withCredentials(awsStaticCredentialsProvider)
                .withRegion("ap-northeast-2")
                .build();
    }

}
제목, 내용, 받는 사람, html 이메일 템플릿, 첨부파일 모두 보낼 수 있도록 구성하였습니다.
Mail Util
@Slf4j
@Component
@RequiredArgsConstructor
public class MailUtil {

    private final AmazonSimpleEmailService amazonSimpleEmailService;

    public static SendRawEmailRequest getSendRawEmailRequest(String title, String content, String receiver, String html, String fileRoot) throws MessagingException, IOException {

        // title : 메일 제목
        // content : 안에 내용
        // receiver : 받는 사람
        // html : 이메일 템플릿
        // fileRoot : 파일 경로

        Session session = Session.getDefaultInstance(new Properties());
        MimeMessage message = new MimeMessage(session);

        // Define mail title
        message.setSubject(title);

        // Define mail Sender
        message.setFrom("보내는 사람의 메일");

        // Define mail Receiver
        message.setRecipients(Message.RecipientType.TO, InternetAddress.parse(receiver));

        // Create a multipart/alternative child container.
        MimeMultipart msg_body = new MimeMultipart("alternative");

        // Create a wrapper for the HTML and text parts.
        MimeBodyPart wrap = new MimeBodyPart();

        // Define the text part.
        MimeBodyPart textPart = new MimeBodyPart();
        textPart.setContent(content, "text/plain; charset=UTF-8");

        // Define the HTML part.
        MimeBodyPart htmlPart = new MimeBodyPart();
        htmlPart.setContent(html, "text/html; charset=UTF-8");

        // Add the text and HTML parts to the child container.
        msg_body.addBodyPart(textPart);
        msg_body.addBodyPart(htmlPart);

        // Add the child container to the wrapper object.
        wrap.setContent(msg_body);

        // Create a multipart/mixed parent container.
        MimeMultipart msg = new MimeMultipart("mixed");

        // Add the parent container to the message.
        message.setContent(msg);

        // Add the multipart/alternative part to the message.
        msg.addBodyPart(wrap);

        // Define the attachment
        MimeBodyPart att = new MimeBodyPart();
        DataSource fds = new FileDataSource(fileRoot);
        att.setDataHandler(new DataHandler(fds));
        att.setFileName(fds.getName());

        // Add the attachment to the message.
        msg.addBodyPart(att);
        ByteArrayOutputStream outputStream = new ByteArrayOutputStream();
        message.writeTo(outputStream);
        RawMessage rawMessage = new RawMessage(ByteBuffer.wrap(outputStream.toByteArray()));
        return new SendRawEmailRequest(rawMessage);

    }

}
참고할 점은 html템플릿과 content를 함께 넘기면 둘중에 하나만 사용이 가능하다. 선택해서 사용하면 될 것 같다.
호출해보자.
service를 간단하게 하나 만들어서 호출해보았다.
@Slf4j
@Service
@RequiredArgsConstructor
public class AwsMailService{
    private final AmazonSimpleEmailService amazonSimpleEmailService;
    public void send(MailVO mailVO) {
        final String BODY_HTML = "<h1>내용입니당ㅎㅎㅎㅎ</h1>";
        final String ATTACHMENT = "/Users/changhwan/awsTest.xlsx";
        try {
            SendRawEmailRequest sendRawEmailRequest = MailUtil.getSendRawEmailRequest("제목입니당", "메세지입니당", "받는사람 이메일", BODY_HTML, ATTACHMENT);
            amazonSimpleEmailService.sendRawEmail(sendRawEmailRequest);
        }catch (Exception e){
            System.out.println("Email Failed");
            System.err.println("Error message: " + e.getMessage());
            e.printStackTrace();
        }
    }
}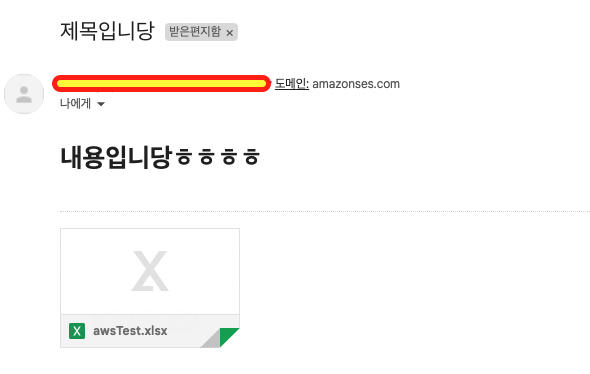
아주 잘 보내진다!!
하지만 위에서 언급했듯이 html 템플릿과 메세지를 모두 입력하면 html 템플릿이 우선순위를 가져서 메세지는 무시되는 것 같다.
다시 한번 언급하지만 SandBox 상태라면 보내는사람, 받는사람이 모두 등록되어 있어야한다.
Google도 메일 보내는 기능을 제공해준다.
하지만 우리의 프로젝트는 AWS의 다른 기능을 많이 사용하고 있기도 했고 요금이 부과되는 다른 관리포인트를 늘리고싶지않아서... AWS를 선택했다.
요금에 대해 궁금하시는 분들도 있을 것 같아서 요금 정보도 함께 남겨두겠다.
Amazon SES 요금

결론
메일은 광고, 마케팅, 알림 등 다양한 비즈니스에서 필수적으로 사용되고 있는 기능이다. 잘 활용해서 사용해보도록 해보자!
제가 잘못이해하고 있거나 잘못 작성한 부분이 있다면 지적, 비판, 피드백 뭐든 해주시면 감사하겠습니다!
참고 링크
https://docs.aws.amazon.com/ko_kr/ses/latest/dg/Welcome.html
https://devocean.sk.com/blog/techBoardDetail.do?ID=163345
https://velog.io/@jiyoon0605/AWS-SES-Spring-Boot%EC%97%90%EC%84%9C-%EC%82%AC%EC%9A%A9%ED%95%B4%EB%B3%B4%EA%B8%B0
https://12teamtoday.tistory.com/140
