
회사에서는 현재 전역 상태 관리 도구로 Zustand를 사용하고 있다. 프로젝트를 진행하다 보면 왜 여기서 store를 사용했지? 하는 의문을 가지게 되는 경우가 많다. 개인적으로 리액트 앱에서 전역 스토어가 필요한 경우가 극히 드물다고 생각한다.
Store 보다 Context API를 선호하는 이유
나는 대부분의 경우 Context API가 Zustand보다 적합하다고 생각한다. 이 글에서 말한 것 처럼 나는 Context API를 의존성 주입 도구라고 생각한다.
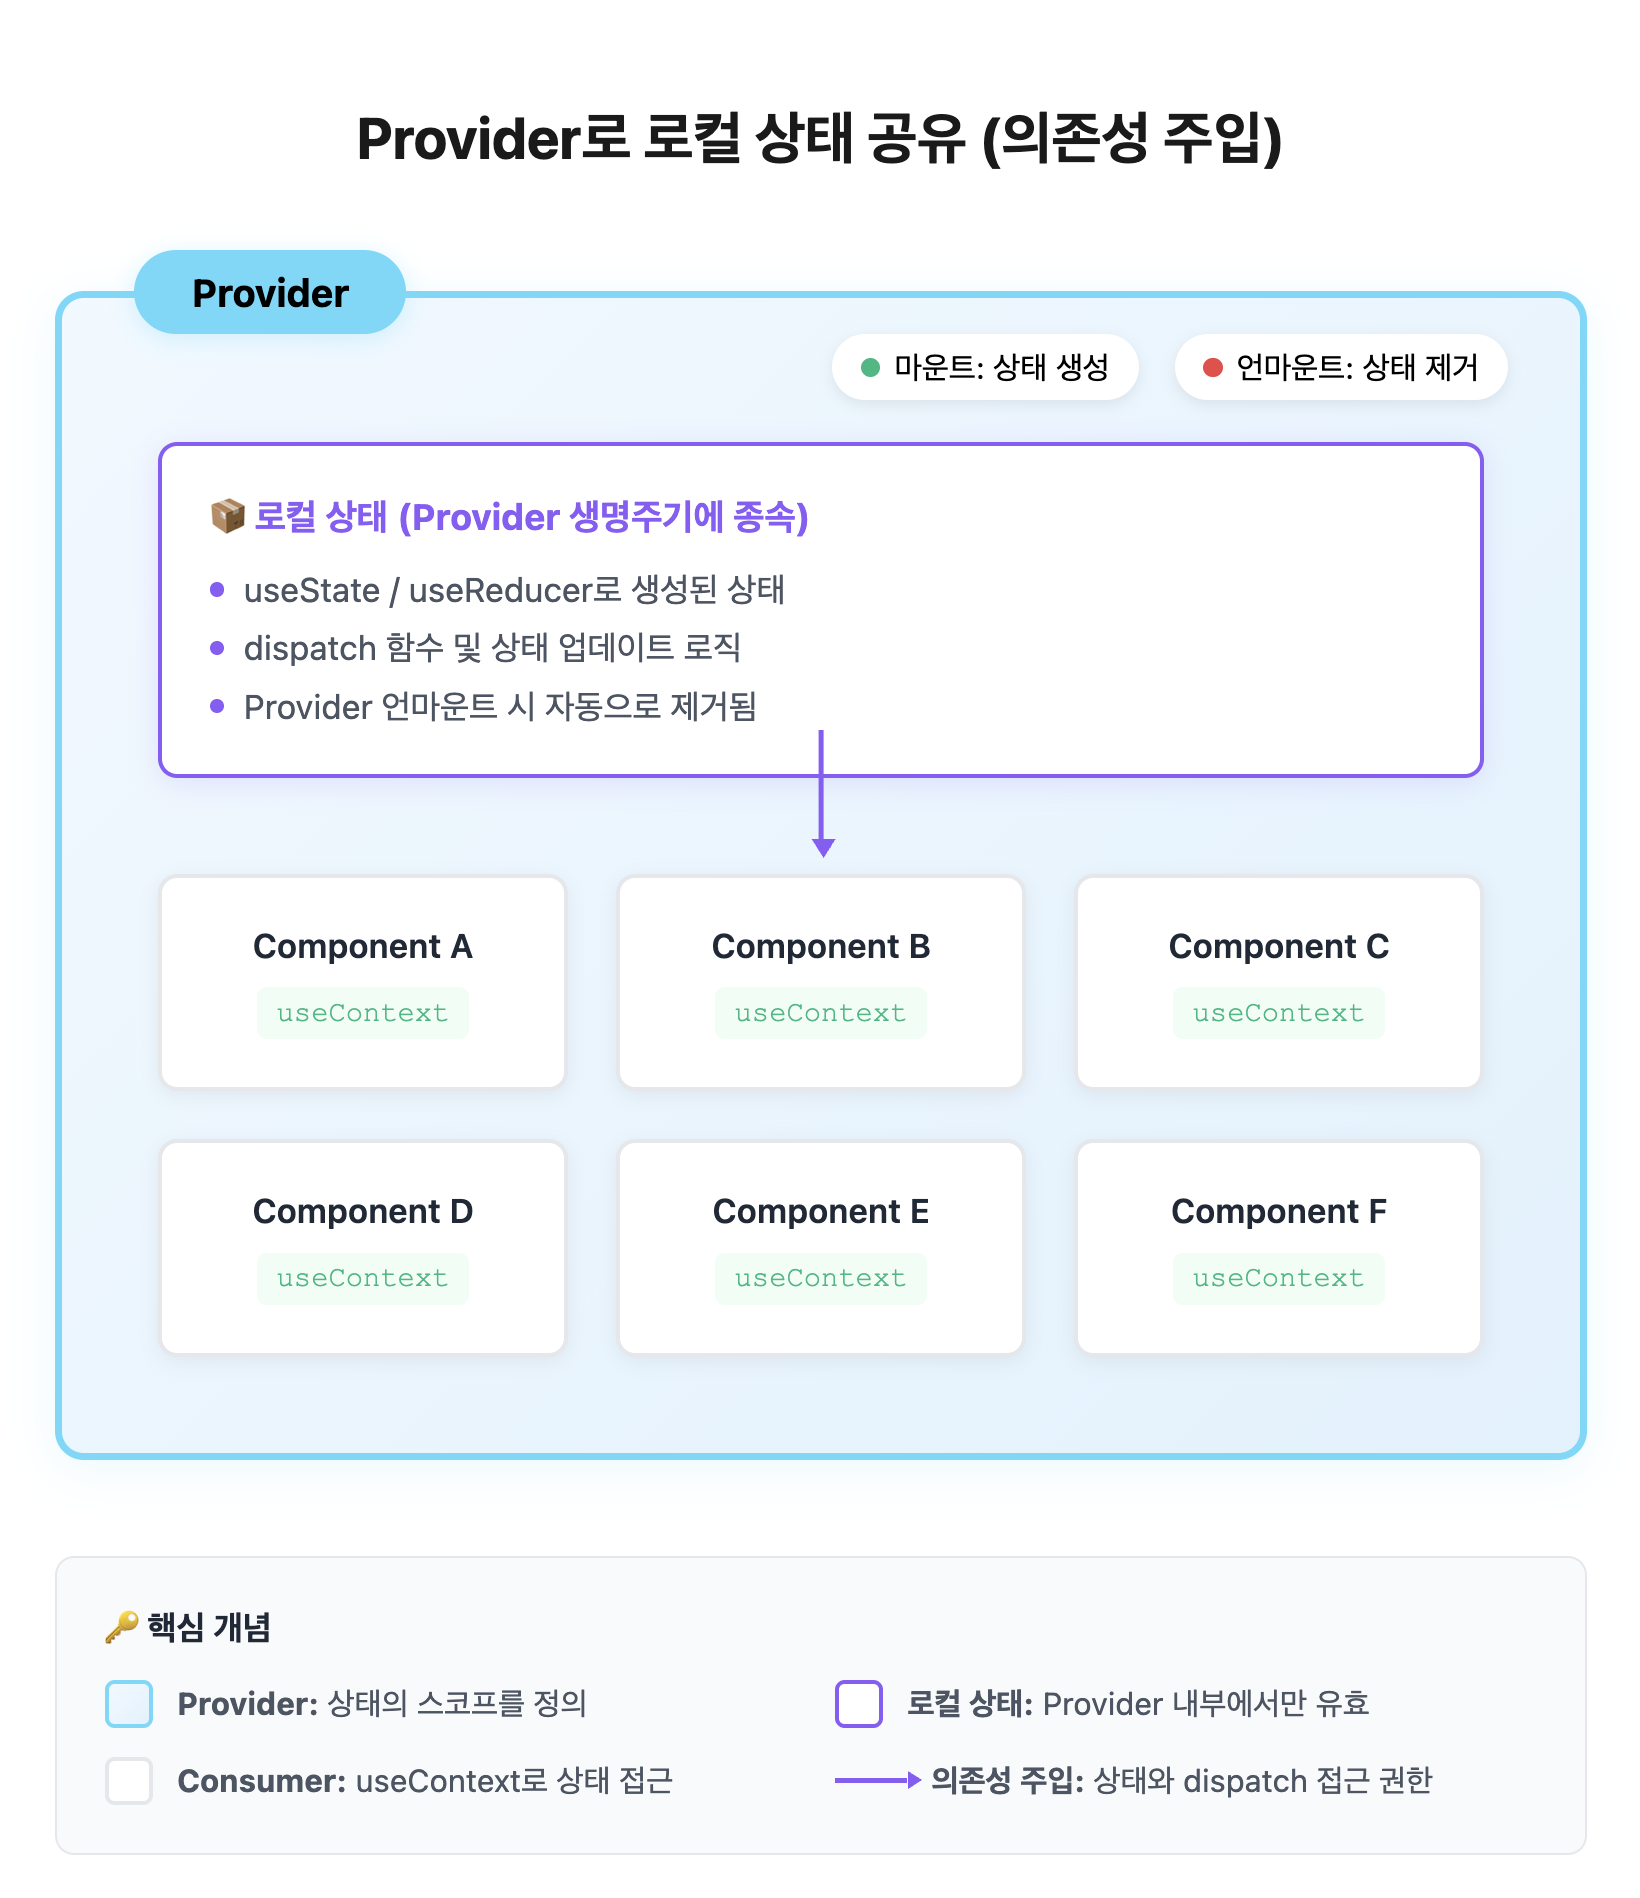
Context API를 사용해 만들고 공유하는 상태는 전역 상태를 만드는게 아닌, Provider에서 생성한 "지역 상태" 및 dispatch 함수에 접근할 수 있는 의존성을 주입한다.
그래서 Context API를 이용한 전역상태를 Provider의 마운트 시점에 생성되고 언마운트 시점에 제거되는 "지역 상태"를 읽고 쓸 수 있는 의존성을 주입하는것 이라고 생각한다.
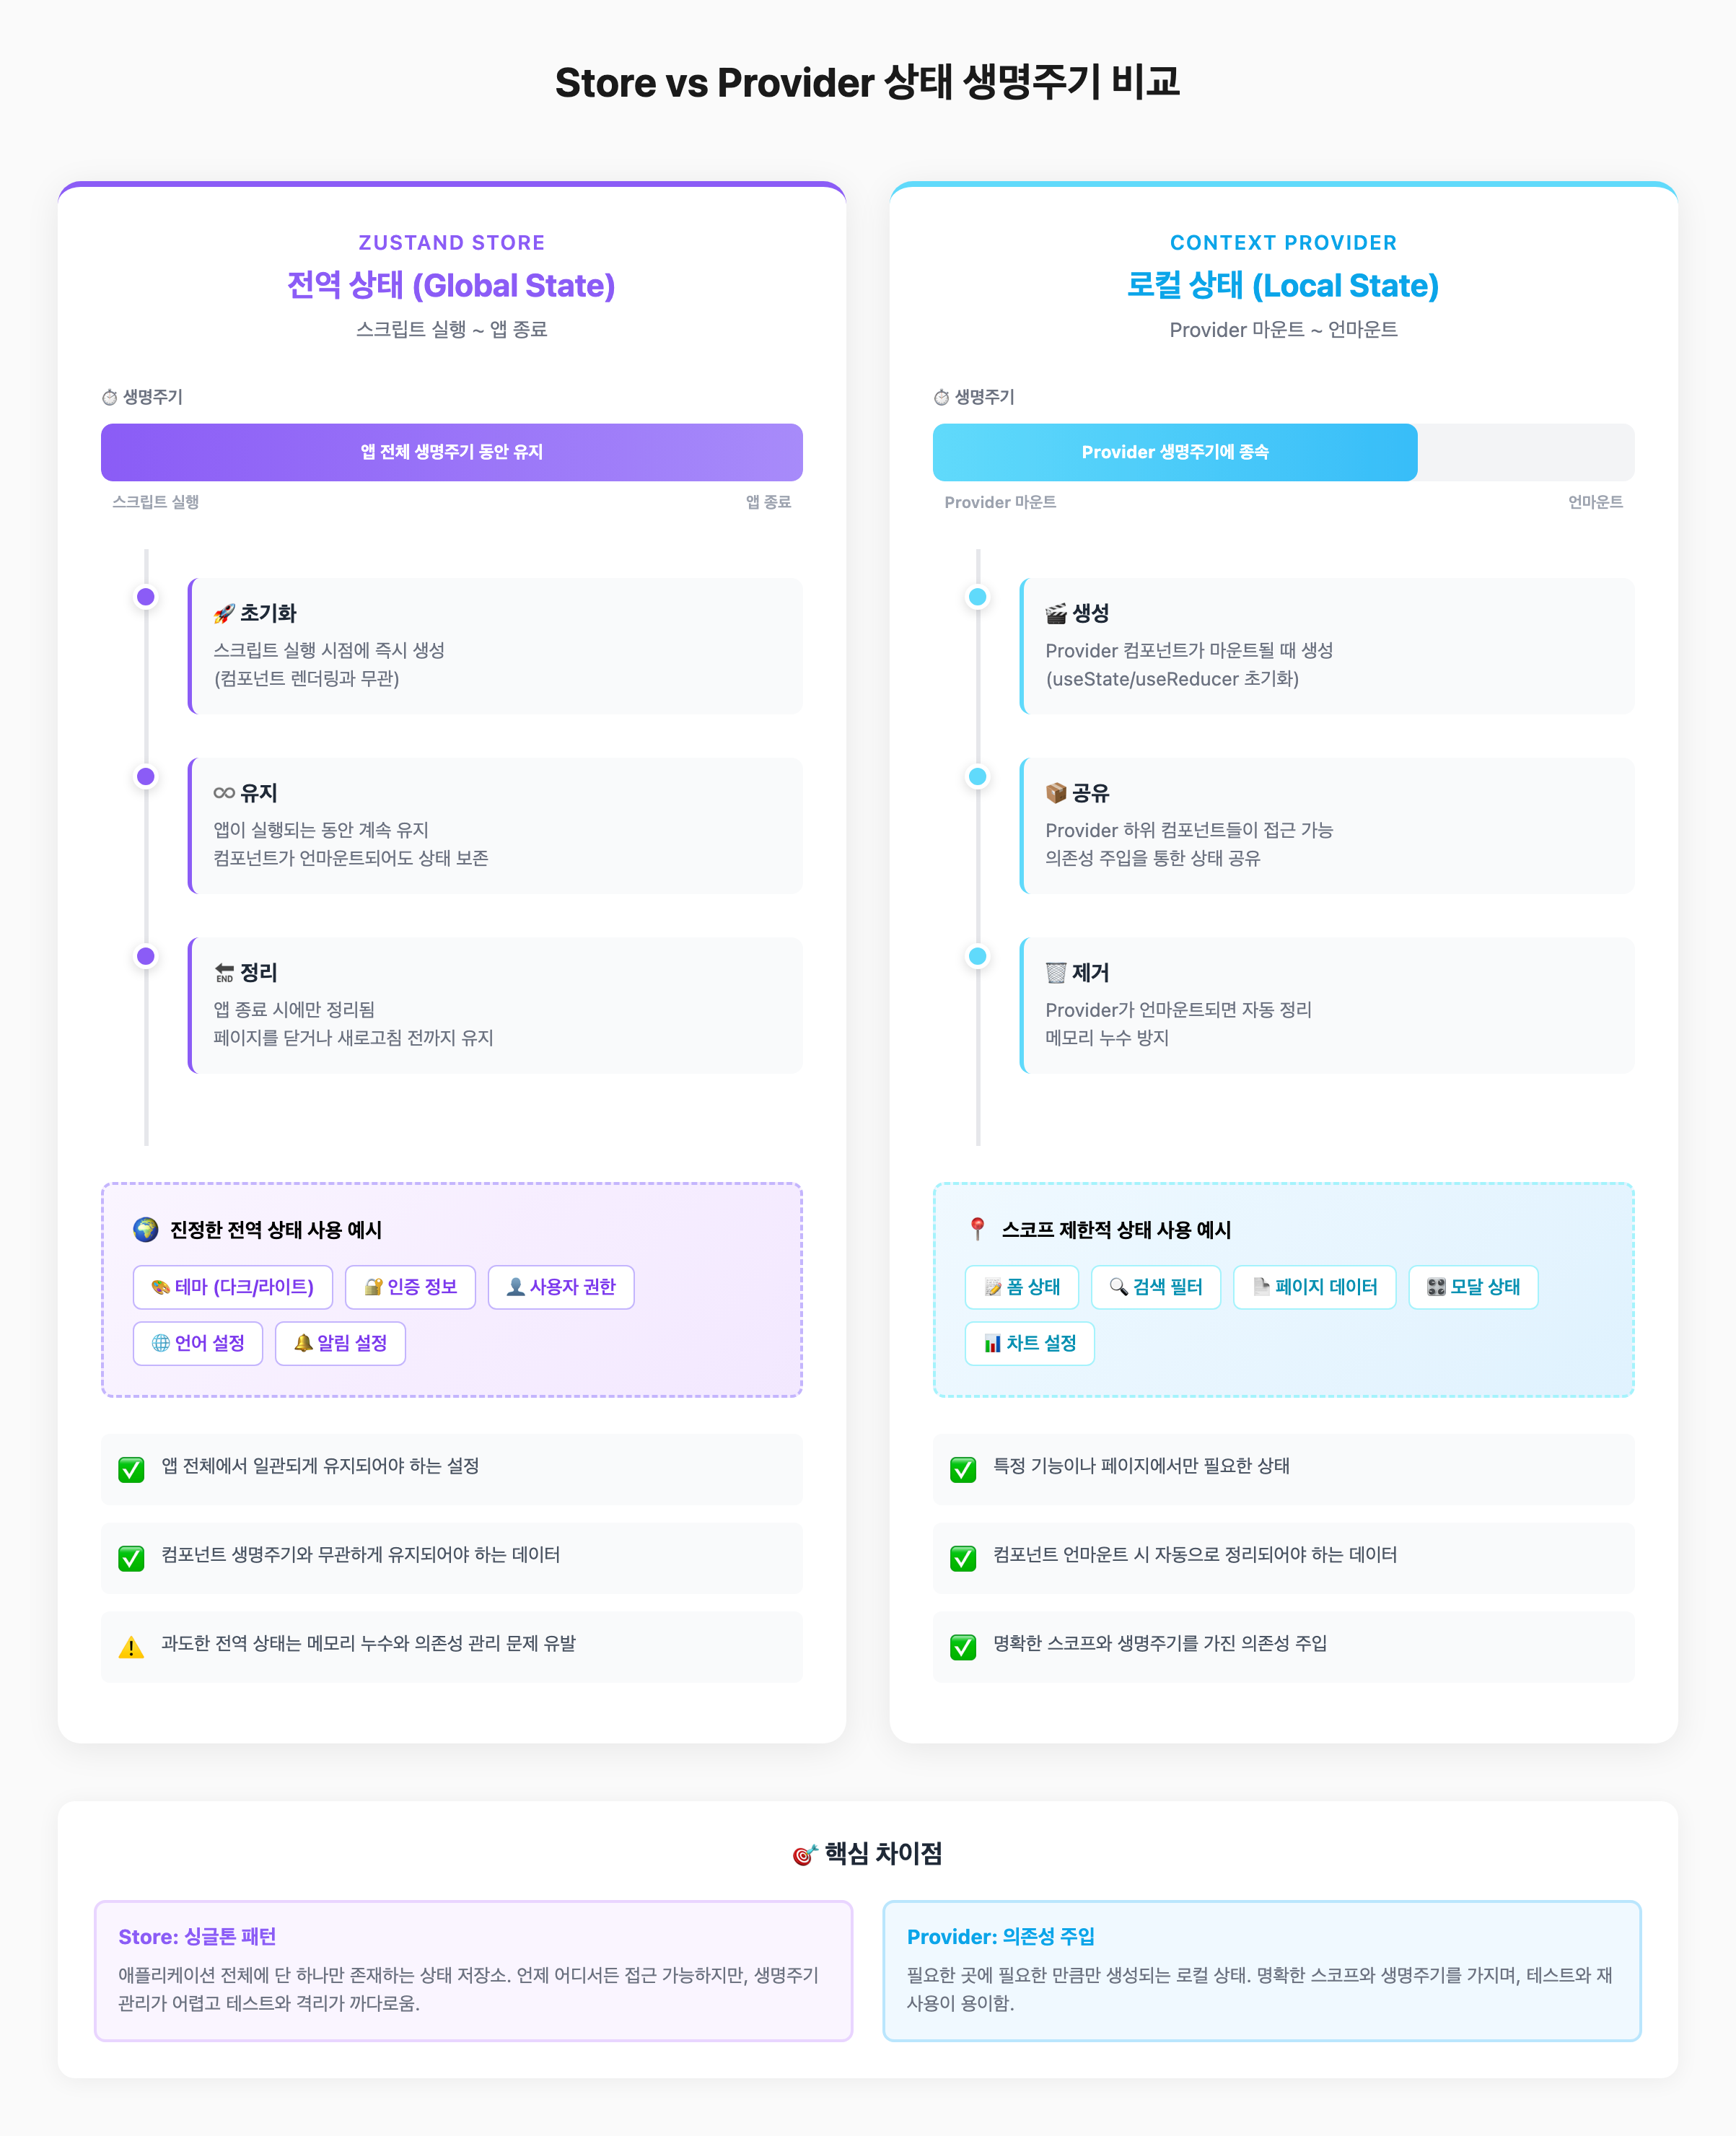
스토어는 모듈이 처음 import될 때 초기화 되고, 앱 종료 이전까지 정리되지 않는 "진짜 전역" 상태다. 개인적으론 이런 "진짜 전역" 상태가 뭐가 있을까... 하고 떠올려 보면 테마, 권한 정도 밖에 생각나지 않는거 같다. 물론 내가 경험이 부족해 그럴거라고 생각한다.
그럼에도 불구하고 스토어를 사용하게 되는 경우
그럼에도 불구하고 스토어를 사용하는 경우도 분명 있다. Context API를 사용하면 반드시 직면하는 불필요한 리렌더링 문제를 피하기 위해서다.
이론적으로는 Context를 아토믹하게 설계하면 해결 가능하지만, 실무에서는 상태 간 의존성이 복잡해서 쉽지 않다.
대시보드를 예제로 생각해보자. 실시간 모니터링 데이터와 사용자별 설정을 함께 관리하는 대시보드가 있다고 가정하자.
interface DashboardState {
  // 모니터링 데이터 (실시간으로 자주 업데이트)
  cpuUsage: number;
  memoryUsage: number;
  networkTraffic: number[];
  errorLogs: string[];
  activeUsers: number;
  lastUpdated: Date;

  // 사용자 설정 (초기 로드 후 가끔 변경)
  userId: string;
  dashboardLayout: 'grid' | 'list';
  preferences: {
    theme: 'light' | 'dark';
    refreshInterval: number;
  };
}

const DashboardContext = createContext<{
  state: DashboardState;
  updateCpuUsage: (value: number) => void;
  updateMemoryUsage: (value: number) => void;
  updatePreferences: (prefs: Preferences) => void;
  // ... 더 많은 update 함수들
}>(null);
위 같은 데이터를 Context API로 공유하게 되면 아래처럼 CPU 데이터에만 관심있는 컴포넌트도 컨텍스트를 구독했기 때문에 다른 데이터(메모리, 설정 등)가 변경되면 불필요하게 리렌더링 되게 된다.
function CpuWidget() {
  const { state } = useContext(DashboardContext);
  return <div>CPU: {state.cpuUsage}%</div>;
}

// memoryUsage가 변경되거나 preferences.theme이 변경되어도
// CpuWidget이 리렌더링된다
물론 이를 Context를 더 잘게 쪼개 해결할 수 있다.
interface CpuContextType { ... }
interface MemoryContextType { ... }
interface NetworkContextType { ... }
interface UserPreferencesContextType { ... }
// ... (총 8개 이상의 Context로 분리 필요)
하지만 이렇게 쪼개는 것은 실무에서 매우 번거롭고, 상태 간 의존성이 있을 경우 더 복잡해진다.
이런 경우 스토어를 사용한다면 훨씬 간단하게 상태를 다룰 수 있고, 선택적 구독으로 최적화할 수 있다.
// store.ts
interface DashboardStore {
  // 모니터링 데이터
  cpuUsage: number;
  memoryUsage: number;
  networkTraffic: number[];
  errorLogs: string[];
  activeUsers: number;
  lastUpdated: Date;

  // 사용자 설정
  userId: string;
  dashboardLayout: 'grid' | 'list';
  preferences: {
    theme: 'light' | 'dark';
    refreshInterval: number;
  };

  // 액션들
  updateCpuUsage: (value: number) => void;
  updateMemoryUsage: (value: number) => void;
  updatePreferences: (prefs: Partial<Preferences>) => void;
  initializeStore: (userId: string) => Promise<void>;
  // ... 더 많은 update 함수들
}

const useDashboardStore = create<DashboardStore>((set) => ({
  // 모니터링 데이터
  cpuUsage: 0,
  memoryUsage: 0,
  networkTraffic: [],
  errorLogs: [],
  activeUsers: 0,
  lastUpdated: new Date(),

  // 사용자 설정
  userId: '',
  dashboardLayout: 'grid',
  preferences: {
    theme: 'light',
    refreshInterval: 5000,
  },

  // 액션 구현
  updateCpuUsage: (value) => set({ cpuUsage: value }),
  updateMemoryUsage: (value) => set({ memoryUsage: value }),
  updatePreferences: (prefs) =>
    set((state) => ({ preferences: { ...state.preferences, ...prefs } })),

  initializeStore: async (userId: string) => {
    const userSettings = await fetchUserDashboardSettings(userId);
    set({
      userId,
      dashboardLayout: userSettings.layout,
      preferences: userSettings.preferences,
    });
  },
  // ... 나머지 update 함수들
}));

function CpuWidget() {
  // cpuUsage만 구독 → memoryUsage, preferences 변경 시 리렌더링 안됨
  const cpuUsage = useDashboardStore(state => state.cpuUsage);
  return <div>CPU: {cpuUsage}%</div>;
}

function SystemHealthWidget() {
  // cpuUsage와 memoryUsage만 구독
  const isHealthy = useDashboardStore(
    state => state.cpuUsage < 80 && state.memoryUsage < 80
  );
  return <div>Status: {isHealthy ? 'OK' : 'Warning'}</div>;
}

function ThemeToggle() {
  // theme만 구독 → 모니터링 데이터 변경 시 리렌더링 안됨
  const theme = useDashboardStore(state => state.preferences.theme);
  const updatePreferences = useDashboardStore(state => state.updatePreferences);

  return (
    <button onClick={() => updatePreferences({
      theme: theme === 'light' ? 'dark' : 'light'
    })}>
      Toggle Theme
    </button>
  );
}
이처럼 Zustand는 선택적 구독을 통해 필요한 상태만 선택할 수 있어, Context를 여러 개로 쪼개지 않아도 리렌더링을 효과적으로 방지할 수 있다.
스토어의 문제점
이처럼 스토어는 복잡한 상태를 관리할 때 발생하는 문제점을 해결할 수 있는 좋은 도구다. 다만 내가 생각하는 스토어의 큰 문제점이 3가지 정도 있다.
- 동적 초기화가 불가능하다.
- 1번 경우로 인해 "아무 의미 없는 값(Default)"을 기반으로 초기 렌더링이 발생한다.
- 스크립트 실행 시점에 생성되고 사라지지 않는, 리액트와 별개로 존재하는 "완전한" 전역 상태다. 어디서나 수정될 수 있고, Context API 처럼 내가 원하는 시점에 초기화 하고 제거할 수 없다.
하나하나 예시를 토대로 알아보자.
1. 동적 초기화가 불가능하다.
보통 리액트 앱에서 아래처럼 스토어를 생성한다.
const useDashboardStore = create<DashboardStore>((set) => ({
  userId: '',
  dashboardLayout: 'default',
  widgets: [],
  preferences: {
    theme: 'light',
    refreshInterval: 5000,
  },

  initializeStore: async (userId: string) => {
    const userSettings = await fetchUserDashboardSettings(userId);
    set({
      userId,
      dashboardLayout: userSettings.layout,
      widgets: userSettings.widgets,
      preferences: userSettings.preferences,
    });
  },
}));
이 스토어는 모듈 import 시점에 초기화된다. 따라서 userId 같은 런타임에 결정되는 값을 주입할 수 없고, 아래처럼 useEffect에서 별도로 초기화해야 한다.
function Dashboard({ userId }: { userId: string }) {
  const { initializeStore, widgets } = useDashboardStore();

  useEffect(() => {
    initializeStore(userId);
  }, [userId]);

  return <div>{/* 실제 대시보드 */}</div>;
}
이처럼 스토어에 초기값을 할당하기 위한 불필요한 리렌더링이 발생하게 된다. 하지만 내가 생각하는 진짜 큰 문제는 바로 "의미 없는 디폴트 값"을 가지고 렌더링 하게된다는 것이다.
2. "아무 의미 없는 값(Default)"을 기반으로 초기 렌더링이 발생한다.
대시보드 스토어 예시를 다시 보자.
const useDashboardStore = create<DashboardStore>((set) => ({
  // userId를 알 수 없어서 기본값으로 초기화해야 함
  userId: '', // 의미없는 기본값
  dashboardLayout: 'default', // 실제 사용자 설정과 다를 수 있음
  widgets: [], // 빈 배열로 시작
  preferences: {
    theme: 'light', // 사용자의 실제 테마 설정을 모름
    refreshInterval: 5000, // 임의의 기본값
  },

  initializeStore: async (userId: string) => {
    const userSettings = await fetchUserDashboardSettings(userId);
    set({
      userId,
      dashboardLayout: userSettings.layout,
      widgets: userSettings.widgets,
      preferences: userSettings.preferences,
    });
  },
}));
이처럼 그냥 아무 의미 없는 값을 가지고 초기 렌더링을 발생시켜야 한다.
실제 겪었던 버그
하위 컴포넌트에서userId로 API 요청을 보낼 때,
빈 문자열''이 전달되어400 Bad Request에러 발생
3. 스토어는 React 컴포넌트 생명주기와 무관하게 영구적으로 존재한다.
스토어는 리액트 컴포넌트 라이프사이클과 독립적으로 존재하는 "완전한" 전역 상태다. 이게 왜 문제일까?
앞서 본 useDashboardStore에는 사용자별 필터 설정도 포함되어 있다고 가정해보자.
const useDashboardStore = create<DashboardStore>((set) => ({
  // 모니터링 데이터
  cpuUsage: 0,
  memoryUsage: 0,
  networkTraffic: [],

  // 사용자 설정
  userId: '',
  preferences: { theme: 'light', refreshInterval: 5000 },

  // 필터 설정 (사용자가 대시보드에서 선택한 옵션들)
  filters: {
    dateRange: { start: new Date(), end: new Date() },
    selectedMetrics: [],
    viewMode: 'grid',
  },

  // 액션들
  updateFilters: (filters) => set({ filters }),
  resetFilters: () => set({
    filters: {
      dateRange: { start: new Date(), end: new Date() },
      selectedMetrics: [],
      viewMode: 'grid',
    }
  }),
  // ...
}));
이 스토어를 DashboardPage에서 사용할 때, 페이지 진입/이탈 시마다 수동으로 초기화해야 한다.
function DashboardPage({ dashboardId }: { dashboardId: string }) {
  const { filters, resetFilters } = useDashboardStore();

  useEffect(() => {
    resetFilters(); // 👈 진입 시 초기화

    return () => {
      resetFilters(); // 👈 이탈 시도 초기화 (깜빡하기 쉬움)
    };
  }, [dashboardId]);

  return (
    <div>
      <h1>Dashboard: {dashboardId}</h1>
      <DateRangePicker value={filters.dateRange} />
      <MetricSelector selected={filters.selectedMetrics} />
      <ViewModeToggle mode={filters.viewMode} />
      {/* 실제 대시보드 위젯들 */}
    </div>
  );
}
여기서만 초기화하면 될까? 아니다. 사용자가 다른 프로젝트로 전환하거나, 로그아웃할 때도 초기화해야 한다.
function ProjectSwitcher() {
  const handleProjectChange = (projectId: string) => {
    switchProject(projectId);

    // ⚠️ 개발자가 초기화를 깜빡했다면?
    // useDashboardStore.getState().resetFilters();
    // → 이전 프로젝트의 필터 설정이 그대로 적용됨
  };
}

function LogoutButton() {
  const handleLogout = () => {
    logout();

    // ⚠️ 여기서도 초기화를 빼먹으면?
    // useDashboardStore.getState().resetFilters();
    // → 다음 사용자가 로그인했을 때 이전 사용자의 설정이 보임
  };
}
실제 발생 가능한 버그 시나리오
- 사용자 A가 대시보드에서 필터 설정 (
dateRange: 2024-01-01 ~ 2024-12-31)- 로그아웃 시
resetFilters()호출 누락- 사용자 B가 로그인
- 사용자 A의 필터 설정이 그대로 보임
이처럼 전역 스토어는 개발자가 명시적으로 정리하지 않으면 영구적으로 남아있어, 여러 곳에서 초기화 로직을 빼먹기 쉽고 버그로 이어진다.
스토어 지역화가 해결해주는 문제
물론 initialized 플래그를 두거나 하위 컴포넌트에서 처리할 수도 있다. 하지만 나는 스토어를 Provider 마운트 시점에 초기화하고, 언마운트 시 자동으로 정리되게 만들고 싶었다.
스토어를 지역화하면 앞서 언급한 3가지 문제가 모두 해결된다:
동적 초기화 - Provider props로
userId,preferences등 런타임 데이터 주입
의미 있는 초기 렌더 - 더미 값 없이 실제 데이터로 첫 렌더링
자동 생명주기 관리 - Provider 언마운트 시 스토어도 함께 정리
스토어를 어떻게 지역화할 수 있는지 차근차근 살펴보자.
1. 스토어를 생성하는 팩토리 함수
interface DashboardStoreInitial {
  userId: string;
  preferences?: {
    theme: 'light' | 'dark';
    refreshInterval: number;
  };
  // 모니터링 데이터는 선택적
  cpuUsage?: number;
  memoryUsage?: number;
}

const createDashboardStore = (initialData: DashboardStoreInitial) => {
  return createStore<DashboardStore>((set) => ({
    // 모니터링 데이터
    cpuUsage: initialData.cpuUsage ?? 0,
    memoryUsage: initialData.memoryUsage ?? 0,
    networkTraffic: [],
    errorLogs: [],
    activeUsers: 0,
    lastUpdated: new Date(),

    // 사용자 설정 - 런타임 데이터로 초기화
    userId: initialData.userId, // ✅ 더미 값 없음
    dashboardLayout: 'grid',
    preferences: initialData.preferences ?? {
      theme: 'light',
      refreshInterval: 5000,
    },

    // 필터 설정
    filters: {
      dateRange: { start: new Date(), end: new Date() },
      selectedMetrics: [],
      viewMode: 'grid',
    },

    // 액션들
    updateCpuUsage: (value) => set({ cpuUsage: value }),
    updateMemoryUsage: (value) => set({ memoryUsage: value }),
    updatePreferences: (prefs) =>
      set((state) => ({ preferences: { ...state.preferences, ...prefs } })),
    resetFilters: () => set({
      filters: {
        dateRange: { start: new Date(), end: new Date() },
        selectedMetrics: [],
        viewMode: 'grid',
      }
    }),
    // ...
  }));
};
2. Provider에서 마운트 시점에 스토어 생성
const DashboardStoreContext = createContext<StoreApi<DashboardStore> | null>(null);

export function DashboardStoreProvider({
  children,
  userId,
  preferences,
}: {
  children: ReactNode;
  userId: string; // 런타임에 결정되는 값을 props로 받음
  preferences?: Preferences;
}) {
  // Provider 마운트 시점에 실제 데이터로 스토어 생성
  const storeRef = useRef<StoreApi<DashboardStore>>();

  if (!storeRef.current) {
    storeRef.current = createDashboardStore({ userId, preferences });
  }

  return (
    <DashboardStoreContext.Provider value={storeRef.current}>
      {children}
    </DashboardStoreContext.Provider>
  );
}

// Hook으로 스토어 사용
export const useDashboardStore = <T,>(
  selector: (state: DashboardStore) => T
): T => {
  const store = useContext(DashboardStoreContext);
  if (!store) throw new Error('DashboardStoreProvider not found');
  return useStore(store, selector);
};
3. Provider로 감싸서 사용
function App() {
  const { userId, preferences } = useAuth(); // 로그인한 사용자 정보

  return (
    <DashboardStoreProvider
      userId={userId} // 런타임 데이터 주입
      preferences={preferences}
    >
      <DashboardPage />
    </DashboardStoreProvider>
  );
}

function DashboardPage() {
  // 더미 값 없이 실제 userId로 첫 렌더링
  const userId = useDashboardStore(state => state.userId);
  const cpuUsage = useDashboardStore(state => state.cpuUsage);
  const updateCpuUsage = useDashboardStore(state => state.updateCpuUsage);

  // useEffect로 초기화할 필요 없음
  // cleanup에서 resetFilters 호출할 필요 없음 (Provider 언마운트 시 자동 정리)

  return (
    <div>
      <h1>Dashboard for {userId}</h1>
      <p>CPU: {cpuUsage}%</p>
      <button onClick={() => updateCpuUsage(Math.random() * 100)}>
        Update
      </button>
    </div>
  );
}
무엇이 달라졌나?
| 문제 | 전역 스토어 | 지역화된 스토어 |
|---|---|---|
| 초기화 | useEffect에서 initializeStore() 호출 필요 | Provider props로 즉시 초기화 |
| 첫 렌더링 | userId: '' 같은 더미 값 | 실제 userId 값 |
| 정리 | 여러 곳에서 resetFilters() 수동 호출 | Provider 언마운트 시 자동 정리 |
이렇게 스토어 팩토리 + Context 패턴으로 Context의 생명주기 관리와 Zustand의 선택적 구독 장점을 모두 가진 상태 관리를 할 수 있다.
그런데 문제는?
나는 대부분의 경우 이런 패턴으로 스토어를 사용한다. 다만 이게 무조건 좋다고 생각하지는 않는다. 다양한 문제점들이 있다고 생각한다. 내가 느낀 이 패턴의 가장 큰 문제는 보일러플레이트다. 매번 Context 생성, Provider 래핑, 커스텀 훅 작성... 반복 작업이 너무 많다.
최근 이 보일러 플레이트 문제를 해결하기 위한 작업을 진행했고, 마지막으로 이에 대한 내용을 공유하며 글을 마무리 하려 한다.
보일러플레이트 문제 해결하기
앞서 본 DashboardStore 패턴은 매번 Context, Provider, 커스텀 훅을 작성해야 해서 보일러플레이트가 많다. 이를 간단한 모니터링 스토어로 보면 이렇다.
변경 전
import { createContext, useContext, useRef } from 'react';
import { createStore, StoreApi, useStore } from 'zustand';

interface MonitoringState {
  cpuUsage: number;
  memoryUsage: number;
  updateCpuUsage: (value: number) => void;
  updateMemoryUsage: (value: number) => void;
}

const createMonitoringStore = (initial?: { cpuUsage?: number; memoryUsage?: number }) => {
  return createStore<MonitoringState>((set) => ({
    cpuUsage: initial?.cpuUsage ?? 0,
    memoryUsage: initial?.memoryUsage ?? 0,
    updateCpuUsage: (value) => set({ cpuUsage: value }),
    updateMemoryUsage: (value) => set({ memoryUsage: value }),
  }));
};

const MonitoringContext = createContext<StoreApi<MonitoringState> | null>(null);

interface MonitoringProviderProps {
  children: React.ReactNode;
  initialData?: { cpuUsage?: number; memoryUsage?: number };
}

export const MonitoringProvider = ({
  children,
  initialData
}: MonitoringProviderProps) => {
  const storeRef = useRef<StoreApi<MonitoringState>>();

  if (!storeRef.current) {
    storeRef.current = createMonitoringStore(initialData);
  }

  return (
    <MonitoringContext.Provider value={storeRef.current}>
      {children}
    </MonitoringContext.Provider>
  );
};

export const useMonitoring = <T,>(
  selector: (state: MonitoringState) => T
): T => {
  const store = useContext(MonitoringContext);
  if (!store) {
    throw new Error('Missing MonitoringContext.Provider in the tree');
  }
  return useStore(store, selector);
};
변경 후
import { createSimpleStore } from '@/shared/react/storeFactory';

interface MonitoringState {
  cpuUsage: number;
  memoryUsage: number;
  updateCpuUsage: (value: number) => void;
  updateMemoryUsage: (value: number) => void;
}

const monitoringStore = createSimpleStore<MonitoringState>(
  'Monitoring',
  (set, initialData) => ({
    cpuUsage: initialData?.cpuUsage ?? 0,
    memoryUsage: initialData?.memoryUsage ?? 0,
    updateCpuUsage: (value) => set({ cpuUsage: value }),
    updateMemoryUsage: (value) => set({ memoryUsage: value }),
  }),
);

export const MonitoringProvider = monitoringStore.Provider;
export const useMonitoring = monitoringStore.useStore;
70% 코드 감소 - 이제 누구나 쉽게 지역화된 스토어 패턴을 적용할 수 있다. createSimpleStore 유틸리티의 내부 구현은 별도 깃허브 레포에 작성해두었다.
결론
이 패턴을 얘기할 때 가장 많이 듣는 얘기는 굳이 그렇게 써야하나? 이다. 개인적으로 Context API를 가장 많이 사용한다. 다만 Context API가 아닌 스토어를 써야겠다는 생각이 드는 경우가 있다.
- 리렌더링 문제가 예상될 때
- 복잡한 상태를 가져 Context API를 잘게 설계하기 부담스러울 때
그럴때, 그러니까... 스토어를 써야한다고 판단될 때 그럴때 이러한 패턴을 사용한다. 이 패턴을 강조하는 가장 큰 이유는, 굳이 스토어를 쓸 필요가 없는데 사용되는 케이스를 너무 많이 봤기 때문이다.
이 스토어 사용으로 인한 사이드 이펙트가 버그를 발생 시키는 문제를 너무나도 많이 봤고, 대부분의 경우 스토어의 지역화로 해결되었다.
사실 이게 좋은 패턴인지 뭔지 잘 모르겠다. 다만 짧은 경험에서 이 패턴이 가져다주는 장점이 아직은 내게 너무 매력적이라 적극 활용하고 있다.
이 글을 읽어 보는 것도 왜 이 패턴을 굳이 쓰는지에 대해 이해하는데 도움이 될거라 생각한다.

잘 읽고갑니다 ^^ 좋네요