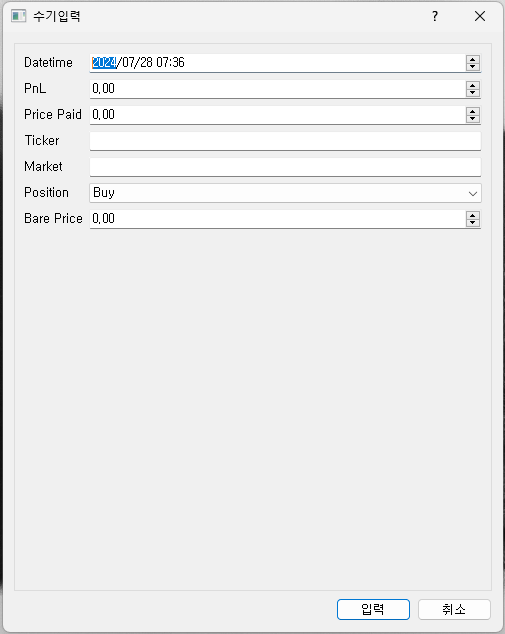
시스템 트레이딩을 할 때 UUID 기준으로 거래 내역을 개인 서버에 적재했었는데 가끔 손 매매를 하면서 데이터 정합성이 떨어졌기 때문에 내가 수기로 레코드를 입력해서 DB에 추가해야 했다. 하지만 이게 Compass라는 몽고DB GUI를 열어서 일일이 레코드를, 또 json 형식으로 추가하기가 번거로워서, 좀 더 빠르게 처리할 수 있도록 맞춤형 GUI를 짰다.
PyQT 라이브러리에는 일반적으로 QWidget 위에 QWidget을 붙이는 방식이 있고. 그게 아니라면 QMainWindow 인터페이스를 사용할 수도 있는데. 이번에는 QDialog를 주 레이아웃으로 사용하였다. 그리고 QDialog 클래스 밖에 정적 메소드 한 개로 이루어진 클래스 2개가 있는데. def를 사용하지 않은 이유는 class로 시각적인 줄을 맞추기 위해서였고. 또 한번씩만 호출할 것이기 때문이다.
from PyQt5.QtWidgets import *
from PyQt5.QtCore import *
from PyQt5.QtGui import *
import sys
from pymongo import MongoClient
import uuid
import time
import datetime


class getBalance:
    @staticmethod
    def getBalance():
    	# 몽고DB Connection 생성
        client = MongoClient('mongodb://localhost:27017/')
        # 데이터베이스 레퍼런싱
        local = client['local']
        # 콜렉션 레퍼런싱
        collection = local['performance']
        # balance 객체 생성
        balance = 0
        # limit() 사용하여 find one
        for i in collection.find().sort("datetime", -1).limit(1):
        	# 최종 값으로 balance 값 세팅
            balance = i['balance']
        # balance 값이 0이거나 조회된 레코드가 없는 경우
        if balance == 0:
        	# 구 콜렉션 레퍼런싱
            collection = local['history']
            # 동일 방식으로 최종 balance 확인
            for i in collection.find().sort("datetime", -1).limit(1):
                # balance 객체에 값 매핑
                balance = i['balance']
        # balance 객체 리턴
        return balance


class insertData:
    @staticmethod
    def insertData(localDict):
    	# 몽고DB Connection을 재생성하지만 더 복잡한 애플리케이션이었더라면 한개로 통일했을 듯
        client = MongoClient('mongodb://localhost:27017/')
        # 데이터베이스 레퍼런싱
        local = client['local']
        # 콜렉션 레퍼런싱
        collection = local['performance']
        # 매게변수로 받은 dict{} 삽입
        x = collection.insert_one(localDict)
        # inserted_id 메소드로 성공 여부 확인
        if x.inserted_id != "":
            return True
        else:
            return False


class App(QDialog):
    def __init__(self):
    	# QDialog 인스턴스 생성
        super(App, self).__init__()
        # 윈도우 크기 세팅
        self.setGeometry(600, 400, 500, 600)
        # 윈도우 제목 세팅
        self.setWindowTitle("수기입력")
        # 나중에 만들 QFormLayout에 예쁜 테두리를 그리기 위해 GroupBox 생성
        self.formGroupBox = QGroupBox()
        # Double 타입의 input 필드 생성
        self.pnl = QDoubleSpinBox()
        # 최대 값 세팅
        self.pnl.setMaximum(999999.99)
        # 최소 값 세팅
        self.pnl.setMinimum(-999999.99)
        # Double 타입의 input 필드 한 개 더 생성
        self.pricePaid = QDoubleSpinBox()
        # 최대 값만 정수로 세팅하여 음수 입력 불가함
        self.pricePaid.setMaximum(9999999.99)
        # Double 타입의 input 필드 한 개 더 생성
        self.barePrice = QDoubleSpinBox()
        # 최대 값만 정수로 세팅하여 음수 입력 불가함
        self.barePrice.setMaximum(99999999.99)
        # Text 타입의 input 필드 생성
        self.market = QLineEdit()
        # Select 타입의 필드 생성
        self.position = QComboBox()
        # Options 세팅
        self.position.addItems(["Buy", "Sell"])
        # Date/Time 타입의 필드 생성
        self.datetime = QDateTimeEdit()
        # Date/Time의 string 형식 세팅
        self.datetime.setDisplayFormat("yyyy/MM/dd HH:mm")
        # 디폴트 값은 QDateTime 클래스 메소드로 현 시각 불러와서 세팅함
        self.datetime.setDateTime(QDateTime.currentDateTime())
        # Text 타입의 input 필드 한 개 더 생성
        self.ticker = QLineEdit()
        # Form을 생성하기 위한 메소드 호출
        self.createForm()
        # QDialog 용 ButtonBox 생성
        self.buttonBox = QDialogButtonBox()
        # Ok 버튼에 문구 세팅하여 ButtonBox에 추가
        self.buttonBox.addButton(QDialogButtonBox.Ok).setText("입력")
        # Cancel 버튼에 문구 세팅하여 ButtonBox에 추가
        self.buttonBox.addButton(QDialogButtonBox.Cancel).setText("취소")
        # Ok 콜백 엑션 붙이기
        self.buttonBox.accepted.connect(self.getInfo)
        # Cancel 콜백 엑션 붙이기
        self.buttonBox.rejected.connect(self.reject)
        # Top Down 레이아웃 생성
        mainLayout = QVBoxLayout()
        # 레이아웃에 GroupBox 추가
        mainLayout.addWidget(self.formGroupBox)
        # 레이아웃에 ButtonBox 추가
        mainLayout.addWidget(self.buttonBox)
        # QDialog에 레이아웃 할당
        self.setLayout(mainLayout)

    def createForm(self):
    	# QFormLayout 인스턴스 생성
        layout = QFormLayout()
        # Datetime 행 추가
        layout.addRow(QLabel("Datetime"), self.datetime)
        # PnL 행 추가
        layout.addRow(QLabel("PnL"), self.pnl)
        # Price Paid 행 추가
        layout.addRow(QLabel("Price Paid"), self.pricePaid)
        # Ticker 행 추가
        layout.addRow(QLabel("Ticker"), self.ticker)
        # Market 행 추가
        layout.addRow(QLabel("Market"), self.market)
        # Position 행 추가
        layout.addRow(QLabel("Position"), self.position)
        # Bare Price 행 추가
        layout.addRow(QLabel("Bare Price"), self.barePrice)
        # GroupBox에 레이아웃 할당
        self.formGroupBox.setLayout(layout)

    def getInfo(self):
    	# Datetime 행 값을 QDateTimeEdit의 dateTime 메소드로 불러옴
        dt = self.datetime.dateTime()
        # PnL 행 값을 QDoubleSpinBox의 value 메소드로 불러옴
        tradePnl = self.pnl.value()
        # Ticker 행 값을 QLineEdit의 text 메소드로 불러옴
        underlyingAsset = self.ticker.text()
        # Position 행 값을 QComboBox의 currentText() 메소드로 불러옴
        action = self.position.currentText()
        # Bare Price 행 값을 QDoubleSpinBox의 value 메소드로 불러옴
        barePrice = self.barePrice.value()
        # Price Paid 행 값을 QDoubleSpinBox의 value 메소드로 불러옴
        pricePaid = self.pricePaid.value()
        # Market 행 값을 QLineEdit의 text 메소드로 불러옴
        market = self.market.text()
        # 입력 유효성 확인
        if dt != "" and tradePnl != "" and underlyingAsset != "" and action != "" and barePrice != "" and pricePaid != "" and market != "":
        	# action (Buy (0) / Sell (1)) 변수 값이 매수지만 수익이 나왔을 경우
            if tradePnl > 0 and action == 0:
            	# 메소드 호출
                self.checkField()
            # 값이 정상일 경우
            else:
            	# Hard String 변수 생성
                productType = "Classic U"
                # getBalance() 메소드 호출
                balance = getBalance().getBalance()
                # consumption 변수 생성
                consumption = round(pricePaid / float(balance), 2) * 100
                # currentAction 변수 생성 (기존 0/1에서 1/-1로 변환)
                if action == 0:
                    currentAction = 1
                else:
                    currentAction = -1
                # PyQT용 일시에서 datetime 모듈용 일시로 변환
                d = dt.date()
                t = dt.time()
                py_datetime = datetime.datetime(
                    d.year(),
                    d.month(),
                    d.day(),
                    t.hour(),
                    t.minute(),
                    t.second(),
                    t.msec() * 1000
                )
                # 몽고DB에 입력할 json 생성
                localDict = {}
                localDict['datetime'] = py_datetime
                localDict['tradePnl'] = tradePnl
                localDict['underlyingAsset'] = underlyingAsset
                localDict['action'] = currentAction
                localDict['productType'] = productType
                localDict['balance'] = balance
                # 단순 수수료 계산
                if currentAction == 1:
                    localDict['totalPrice'] = float(barePrice) * 1.0005
                else:
                    localDict['totalPrice'] = float(barePrice) * 0.9995
                localDict['barePrice'] = barePrice
                localDict['consumption'] = consumption
                localDict['market'] = market
                # 커스텀 _id 생성
                localDict['_id'] = str(uuid.uuid1()) + str(time.time()).replace(".", "-")
                # insertData() 호출 후 alertResult() 메소드 호출
                self.alertResult(insertData.insertData(localDict))

    def reject(self):
    	# 취소 버튼 클릭하면 프로그램 종료
        exit()

    def alertResult(self, result):
    	# MessageBox 객체 생성
        dlg = QMessageBox(self)
        # MessageBox로 띄워질 새로운 윈도우 창의 이름 세팅
        dlg.setWindowTitle("결과")
        # 윈도우 창 사이즈 세팅
        dlg.resize(QSize(500, 100))
        # 성공적으로 insert된 경우
        if result:
        	# MessageBox 문구 세팅
            dlg.setText("성공적으로 저장되었습니다")
        # 실패가 뜬 경우
        else:
        	# MessageBox 문구 세팅
            dlg.setText("실패했습니다")
        # MessageBox에 PushButton랑 onClick 추가
        dlg.addButton(QPushButton('확인'), QMessageBox.YesRole)
        # MessageBox에 아이콘 세팅 (logging 처럼 Info, Error 등 아이콘 가능)
        dlg.setIcon(QMessageBox.Information)
        # exec() 메소드로 창 띄우기
        dlg.exec()

    def checkField(self):
    	# MessageBox 객체 생성
        dlg = QMessageBox(self)
        # 윈도우 제목 세팅
        dlg.setWindowTitle("처리불가")
        # 윈도우 크기 세팅
        dlg.resize(QSize(500, 100))
        # 윈도우 문구 세팅
        dlg.setText("내용을 확인해주세요")
        # 윈도우에 PushButton이랑 onClick 추가
        dlg.addButton(QPushButton('확인'), QMessageBox.YesRole)
        # MessageBox에 아이콘 세팅
        dlg.setIcon(QMessageBox.Information)
        # exec() 메소드로 창 띄우기
        dlg.exec()


if __name__ == "__main__":
    app = QApplication(sys.argv)
    App = App()
    App.show()
    sys.exit(app.exec_())
초보자를 위한 프로그래밍 정리