재사용성, 확장 가능성, 간단한 API 등 여러 요소를 고려해서 개발하고싶을 때 어떤 패턴을 적용해보는게 좋을까.
Inversion of Control(IoC): 사용자에게 주어지는 유연성와 제어의 정도
Implementation complexity: 사용자와 개발자 모두에 대해 그 패턴을 사용하는 난이도
다음과 같은 요소를 고려해 패턴들을 비교할 수 있다.
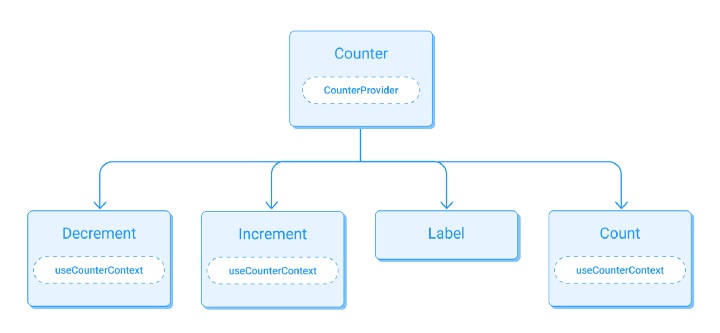
1. Compound Component Pattern
- props drilling을 피하고 관심사를 분리하고자하는 패턴
example github
import React from "react";
import { Counter } from "./Counter";

function Usage() {
  const handleChangeCounter = (count) => {
    console.log("count", count);
  };

  return (
    <Counter onChange={handleChangeCounter}>
      <Counter.Decrement icon="minus" />
      <Counter.Label>Counter</Counter.Label>
      <Counter.Count max={10} />
      <Counter.Increment icon="plus" />
    </Counter>
  );
}

export { Usage };
장점
1) API의 낮은 복잡도 : 하나의 parent 컴포넌트에 props를 주는 것이 아니라 각각의 컴포넌트에 props를 부여함으로써 복잡성을 줄인다.
2) 유연한 마크업 구조 : 예제를 바탕으로 생각해보면 Label이 Decrement 앞으로 가든지, Label이 Increment 뒤로 가든지 유연하게 대처할 수 있다.
3) 관심사의 분리 : context를 사용해 데이터를 공유하고 children에서 각 데이터를 처리함으로써 관심사가 분리
단점
1) 너무 높은 UI 자유도 : 높은 UI 자유도는 예상치못한 사용자의 행동을 유발할 수 있다.
2) 무거운 JSX : 하나의 컴포넌트에 Props로 전달할 수 있는 사항을 여러 서브컴포넌트에 나누어서 전달하기때문에 JSX의 열이 늘어날 수 있다.
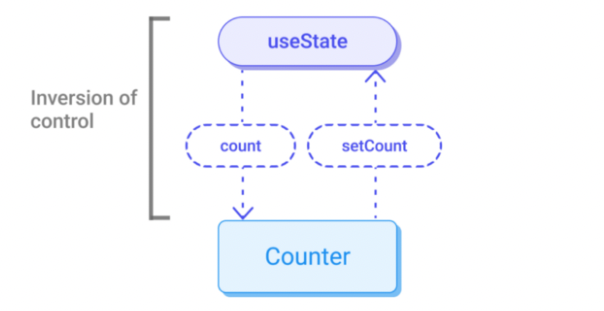
2. Control Props Pattern
- component의 상태를 제어할 수 있는 컴포넌트, Controlled Component를 사용하는 패턴
- 외부 상태를 SSOT(Single Source of Truth)로 사용해 커스텀 로직을 삽입할 수 있도록 함
example github
import React, { useState } from "react";
import { Counter } from "./Counter";

function Usage() {
  const [count, setCount] = useState(0);

  const handleChangeCounter = (newCount) => {
    setCount(newCount);
  };
  return (
    <Counter value={count} onChange={handleChangeCounter}>
      <Counter.Decrement icon={"minus"} />
      <Counter.Label>Counter</Counter.Label>
      <Counter.Count max={10} />
      <Counter.Increment icon={"plus"} />
    </Counter>
  );
}

export { Usage };
장점
1) 많은 통제권 : 외부에 상태를 두어 직접적으로 컴포넌트를 컨트롤할 수 있다.
단점
1) 복잡성 : JSX, useState, handleChange를 모두 구현해야하기 때문에 복잡할 수 있다.
3. Custom Hook Pattern
- 메인 로직이 custom hook으로 들어가고 state와 handler같은 내부 로직을 포함해 유저에게 많은 통제권을 부여하는 패턴
example github
import React from "react";
import styled from "styled-components";
import { Counter } from "./Counter";
import { useCounter } from "./useCounter";

function Usage() {
  const { count, handleIncrement, handleDecrement } = useCounter(0);
  const MAX_COUNT = 10;

  const handleClickIncrement = () => {
    //Put your custom logic
    if (count < MAX_COUNT) {
      handleIncrement();
    }
  };

  return (
    <>
      <Counter value={count}>
        <Counter.Decrement
          icon={"minus"}
          onClick={handleDecrement}
          disabled={count === 0}
        />
        <Counter.Label>Counter</Counter.Label>
        <Counter.Count />
        <Counter.Increment
          icon={"plus"}
          onClick={handleClickIncrement}
          disabled={count === MAX_COUNT}
        />
      </Counter>
      <StyledContainer>
        <button onClick={handleClickIncrement} disabled={count === MAX_COUNT}>
          Custom increment btn 1
        </button>
      </StyledContainer>
    </>
  );
}

export { Usage };
장점
1) 더 많은 제어권 : hook과 JSX 사이에 원하는 로직을 넣을 수 있다. (handleClickIncrement)

단점
1) 복잡성 : 데이터 로직과 렌더링 부분이 분리되어 해당 부분 연결이 필요하고 복잡해진다.
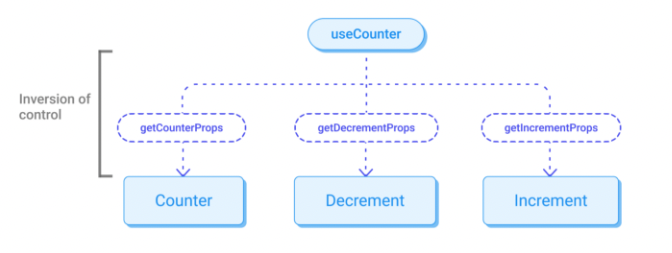
4. Props Getters Pattern
- Custom hook pattern의 복잡도를 낮춘 패턴
- 그냥 props가 아니라 props getters 목록을 사용
example github
import React from "react";
import { Counter } from "./Counter";
import { useCounter } from "./useCounter";

const MAX_COUNT = 10;

function Usage() {
  const {
    count,
    getCounterProps,
    getIncrementProps,
    getDecrementProps
  } = useCounter({
    initial: 0,
    max: MAX_COUNT
  });

  const handleBtn1Clicked = () => {
    console.log("btn 1 clicked");
  };

  return (
    <>
      <Counter {...getCounterProps()}>
        <Counter.Decrement icon={"minus"} {...getDecrementProps()} />
        <Counter.Label>Counter</Counter.Label>
        <Counter.Count />
        <Counter.Increment icon={"plus"} {...getIncrementProps()} />
      </Counter>
      <button {...getIncrementProps({ onClick: handleBtn1Clicked })}>
        Custom increment btn 1
      </button>
      <button {...getIncrementProps({ disabled: count > MAX_COUNT - 2 })}>
        Custom increment btn 2
      </button>
    </>
  );
}

export { Usage };
장점
1) 간단한 사용 : 복잡성이 줄어들고 getter를 적절한 JSX 요소에 사용하면 된다.
2) 유연성 : 원한다면 props를 오버로드 가능하다. (...getIncrementProps({ disabled: count > MAX_COUNT - 2 }))
단점
1) 잘 보이지 않음 : getter를 사용한 추상화로 인해 컴포넌트가 사용하기 쉬워지지만 더 보기 어려워진다.
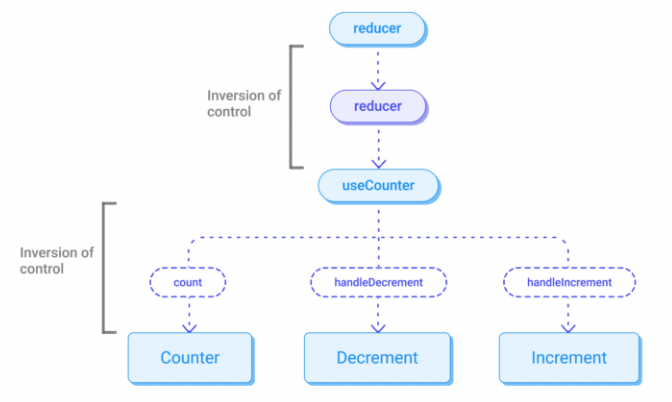
5. State Reducer Pattern
- IoC에서 최고의 패턴으로 컴포넌트를 내부적으로 제어할 수 있는 방식을 제공하는 패턴
- Custom Hook Pattern과 유사하지만 reducer 개념이 도입
example github
import React from "react";
import styled from "styled-components";
import { Counter } from "./Counter";
import { useCounter } from "./useCounter";

const MAX_COUNT = 10;
function Usage() {
  const reducer = (state, action) => {
    switch (action.type) {
      case "decrement":
        return {
          count: Math.max(0, state.count - 2) //The decrement delta was changed for 2 (Default is 1)
        };
      default:
        return useCounter.reducer(state, action);
    }
  };

  const { count, handleDecrement, handleIncrement } = useCounter(
    { initial: 0, max: 10 },
    reducer
  );

  return (
    <>
      <Counter value={count}>
        <Counter.Decrement icon={"minus"} onClick={handleDecrement} />
        <Counter.Label>Counter</Counter.Label>
        <Counter.Count />
        <Counter.Increment icon={"plus"} onClick={handleIncrement} />
      </Counter>
      <StyledContainer>
        <button onClick={handleIncrement} disabled={count === MAX_COUNT}>
          Custom increment btn 1
        </button>
      </StyledContainer>
    </>
  );
}


export { Usage };
장점
1) 많은 통제권 : state reducer를 사용해 통제권을 넘겨주게 됨으로써 모든 내부 action을 외부에서 접근 가능하고 오버라이드 가능하다.
단점
1) 복잡성 : 가장 복잡한 패턴이다.
2) 잘 보이지 않음 : 컴포넌트 내부 로직에 대한 이해가 필요하다.
6. Presentational and Container Component Pattern
- 데이터 처리 부분과 UI 부분을 분리하는 패턴
Container에서는 데이터를 처리하고Presenter에게 전달
import React from "react";
import CommentList from "./CommentList";

class CommentListContainer extends React.Component {
  constructor() {
    super();
    this.state = { comments: [] };
  }

  componentDidMount() {
    fetch("/my-comments.json")
      .then(res => res.json())
      .then(comments => this.setState({ comments }));
  }

  render() {
    return <CommentList comments={this.state.comments} />;
  }
}
장점
1) 관심사의 분리 : 데이터 로직과 UI 스타일링을 분리 가능
2) 재사용성 : 하나의 Presenter를 여러 Container를 사용해 재사용 가능
3) 마크업 작업의 편리성 : Layout만 추출해 하나의 마크업을 적용 가능
단점
1) 로직의 재사용 불가 : Presenter로 view는 재사용할 수 있지만 로직은 재사용이 어렵다
7. Atomic Design Pattern
- 디자인 요소들을 나누고 이 요소들이 조합되는 과정을 통해 구성하는 패턴
Atoms: 본인 자체의 스타일만 가지고 다른 곳에 영향을 미치는 스타일은 포함되지 않는다. (button, input 등)Molecules: Atoms가 모여 만들어지는 하나의 구성 요소이다. (input + button 등)Organisms: 서로 동일하거나 다른Molecules로 구성될 수 있는 요소이다. (검색바 등)Templates: 유기체를 모아 템플릿으로 생성한 것으로 스타일링에 집중한 요소이다.Pages: 실제 페이지 (상태관리가 이루어짐)
장점
1) UI의 재사용성 : 요소가 작게 쪼개져있어 재사용이 유리하다.
단점
1) 초기 설계 비용 : 여러 단위 요소로 나뉘어져야 하기 때문에 프로젝트를 파악하고 구조를 설계하는데 시간이 오래 걸린다.
2) props drilling : 잘게 쪼개질수록 상태를 낮은 단위로 내려주는 props drilling이 발생할 수 있다.
참고자료
https://javascript.plainenglish.io/5-advanced-react-patterns-a6b7624267a6
https://velog.io/@dnr6054/유용한-리액트-패턴-5가지
https://velog.io/@holim0/React-Design-Pattern