
개발자로 취업하기 위해서 복습하는 겸 많이들 한다고 하시길래 한번 끄적여 봅니다...
LinkedList
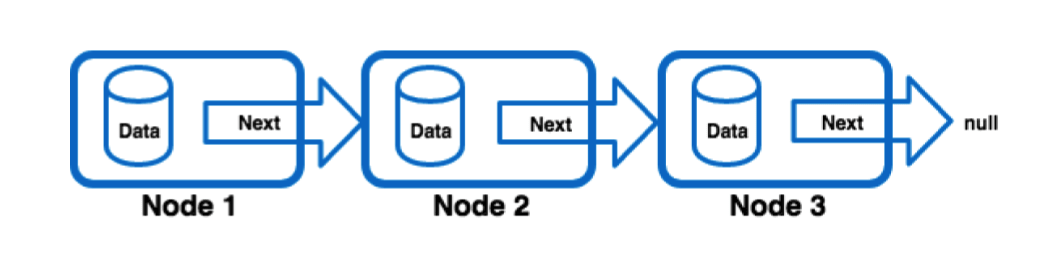
연결리스트(LinkedList)는 이렇게 한방향으로 흘러가는 구조로 생겼다. 노드 라는 객체는 data와 next로 구성되어있어서 위 그림과 같은 구조라고 볼 수 있겠다. 연결리스트는 논리적이고 물리적인 순서가 같아서 원소의 위치에 대한 접근성이 쉽다는 장점이 있고, 단점으로는 삽입, 삭제 연산 후에 원소들을 이동시키는 추가적인 작업과 시간이 필요하다는 것이다.
LinkedList 자바스크립트 구현
1. 객체생성, 출력함수
노드객체와 LinkedList객체를 만들어주었다.
// Node(): data와 point를 가지고 있는 객체
function Node(data) {
  this.data = data;
  this.next = null;
}

// LinkedList(): head와 length를 가지고 있는 객체
function LinkedList() {
  this.head = null;
  this.length = 0;
}

// size(): 연결 리스트 내 노드 개수 확인
LinkedList.prototype.size = function () {
  return this.length;
};

// isEmpty(): 객체 내 노드 존재 여부 파악
LinkedList.prototype.isEmpty = function () {
  return this.length === 0;
};

// printNode(): 노드 출력
LinkedList.prototype.printNode = function () {
  for (let node = this.head; node != null; node = node.next) {
    process.stdout.write(`${node.data} -> `);
  }
  console.log("null");
};
2. append()
리스트의 맨 끝에 데이터를 추가한다.
// append(): 연결 리스트 가장 끝에 노드 추가
LinkedList.prototype.append = function (value) {
  let node = new Node(value),
    current = this.head;

  if (this.head === null) {
    this.head = node;
      // head에 데이터가 없으면 노드를 저장한다.
  } else {
    while (current.next != null) {
      current = current.next;
    }
    current.next = node;
  }// 그렇지 않다면 next가 null인 노드를 찾고 그 노드 뒤에 새로운 노드를 저장한다.

  this.length++;
};
3. insert()
해당 위치에 데이터를 삽입한다.
// insert(): position 위치에 노드 추가
LinkedList.prototype.insert = function (value, position = 0) {
  if (position < 0 || position > this.length) {
    return false;
  }

  let node = new Node(value),
    current = this.head,
    index = 0,
    prev;

  if (position === 0) {
    node.next = current;
    this.head = node;
  } else {
    while (index++ < position) {
      prev = current;
      current = current.next;
    }

    node.next = current;
    prev.next = node;
  }

  this.length++;

  return true;
};
4. remove();
데이터를 삭제한다.
// remove(): value 데이터를 찾아 노드 삭제
LinkedList.prototype.remove = function (value) {
  let current = this.head,
    prev = current;

  while (current.data != value && current.next != null) {
    prev = current;
    current = current.next;
  }

  if (current.data != value) {
    return null;
  }

  if (current === this.head) {
    this.head = current.next;
  } else {
    prev.next = current.next;
  }

  this.length--;

  return current.data;
};
5. removeAt()
해당 위치에 있는 데이터를 삭제한다.
// removeAt(): position 위치 노드 삭제
LinkedList.prototype.removeAt = function (position = 0) {
  if (position < 0 || position >= this.length) {
    return null;
  }

  let current = this.head,
    index = 0,
    prev;

  if (position === 0) {
    this.head = current.next;
  } else {
    while (index++ < position) {
      prev = current;
      current = current.next;
    }

    prev.next = current.next;
  }

  this.length--;

  return current.data;
};
6. indexOf()
해당 데이터의 인덱스를 반환한다. 존재하지 않을 경우 결과 값은 -1이다.
// indexOf(): value 값을 갖는 노드 위치 반환
LinkedList.prototype.indexOf = function (value) {
  let current = this.head,
    index = 0;

  while (current != null) {
    if (current.data === value) {
      return index;
    }

    index++;
    current = current.next;
  }

  return -1;
};
그냥 해보자 안되더라도 해보자 끝까지 해보자