https://velog.io/@ks0689/nginx1
여기 글에 적어놨던 대로 이번엔 방법이나 코드를 적을려고 한다.
Docker(도커)
위에 아키텍쳐를 보면 모든 SW를 각각 도커 컨테이너 안에 넣어서 독립시켜 놨다.
근데... 나도 이걸 만들면서 의문인게 Nginx를 사용하면서 왜 도커에 넣었지?? 라는 생각이 엄청 들었다...
(일단 무작정 따라하고 이유는 나중에 찾아본....)
Docker(도커)
컨테이너 기반 가상화 플랫폼으로, 응용 프로그램과 그 종속성을 격리된 환경인 컨테이너로 패키징하여 실행하는 기술!
컨테이너: 하나의 격리된 공간 (가상화)
도커는 각 프로그램마다 독립된 공간을 가지기 때문에 장점이 여러가지다.
1. 환경 설정
현재 내 서버에 마인크래프트 서버를 한개 돌리고 있다. 이 친구는 JDK-21 부터 요구한다.
근데... 내 Spring Boot는 JDK-17에서 개발되어서 17에 최적화가 되어 있다.
그래서 리눅스 자체에는 21이 설치되어 있고, Spring이 있는 컨테이너에는 17이 설치되어 있다.
이건 내가 말하고 싶은 느낌을 예시를 보여준거다.
보통 개발환경하고 실제 배포되는 환경은 다를 수 있다. 그런 이유 때문에 독립시켜 놓는게 좋다.
이러면 만약 한 컨테이너에서 에러가 날 경우, 다른 컨테이너에는 에러가 발생하지 않는다는 장점도 있다.
2. 편리한 배포
도커 컨테이너는 이미지로 패키징되어 배포된다.
(그 사진 확장 이미지 말고.....)
그래서 배포가 매우 간단해진다.
물론 에러가 발생할 경우, 롤백도 간단해진다.
최종적으로 정리해보자면
개발을 편리하게 하기 위한 도구다.
개발을 여러명이서 협업할 경우, 각자 다른 OS나 라이브러리 버전 등등 그걸 매번 바꿔주긴 힘들다.
그래서 프로젝트마다 컨테이너를 독립적으로 만들어 주면, 그에 맞는 환경설정을 하면 된다.
근데 저러면 컨테이너를 총 4개나 만들어야돼...? 너무 번거로운데 ㅠㅠㅠㅠㅠ
도커 컴포즈 (Docker Compose)
그래서! 난 Docker Compose(도커 컴포즈) 라는 것을 사용했다.
간단하게 말해서, 여러개의 컨테이너를 정의하고 실행하기 위한 도구다.
하나의 docker-compose.yml 파일로 여러개의 컨테이너를 관리하고, 컨테이너 간의 네트워크 & 종속성을 설정하는데 사용된다.
위에 아키텍쳐를 보면 난 총 4개의 컨테이너를 생성해야 된다.
# docker-compose.yml

version: '3.8'

services:
  mariadb:
    image: mariadb
    container_name: "컨테이너 이름"
    restart: always
    ports:
      - "3306:3306"
    volumes:
      - mariadb_data:/var/lib/mysql
    networks:
      - A_network

  redis:
    image: redis
    container_name: "컨테이너 이름"
    restart: always
    ports:
      - "6379:6379"
    volumes:
      - redis_data:/data
    networks:
      - A_network

  spring:
    build:
      context: .
      dockerfile: Dockerfile
    container_name: "컨테이너 이름"
    restart: always
    ports:
      - "8080:8080"
    depends_on:
      - mariadb
      - redis
    networks:
      - A_network

  nginx:
    container_name: "컨테이너 이름"
    image: nginx:latest
    restart: always
    volumes:
      - "각종 경로들"
    ports:
      - "80:80"
      - "443:443"
    depends_on:
      - spring
    networks:
      - A_network

networks:
  A_network:
    driver: bridge

volumes:
  mariadb_data:
  redis_data:
간단하게만 설명하자면
Mariadb
- 내부 3306, 외부 3306 포트로 포트포워딩
- /var/lib/mysql에 데이터를 저장, 혹여나 컨테이너가 꺼져도 저장되게
Redis
- 내부 6379, 외부 6379 포트로 포트포워딩
- /data에 데이터를 저장 (? 얜 저장 할 필요가 없는데...)
Spring
- 내부 8080, 외부 8080 포트로 포트포워딩 (외부 포트를 열어둔 이유는 나중에)
- Mariadb와 Redis가 정상 실행되면 이 컨테이너도 생성 및 실행
Nginx
- 내부 80(http), 443(https)을 각각 외부 80(http), 443(https) 포트로 포트포워딩
- Spring 컨테이너가 정상 실행되면 이 컨테이너도 생성 및 실행
- Volumes에 외부에 있던 리엑트 빌드파일 등을 가져옴
하면 이렇게 구성이 된다.

자 이렇게 하고... MariaDB Root 계정 비빌번호 변경, 외부접속 허용 등등 본인 입맛대로 설정하는건 알아서!
HTTPS(SSL) 적용하기
자 리눅스 기준으로 설명하겠다.
- nginx 설치 (위에 도커대로 했으면 도커 컨테이너 안에서 해야댐)
# apt update
$ sudo apt-get update

# Nginx 설치
$ sudo apt install nginx

# Nginx 실행
$ sudo service nginx start
그럼 nginx가 설치 및 실행이 된다.
우린 CertBot라는 것을 이용해야 된다.
CertBot은 Let’s Encrypt 인증서를 사용하여 HTTPS를 적용할 수 있게 하는 오픈 소스툴이다.
- CertBot 설치
# CertBot 설치 (최신 리눅스)
$ apt-get install python3-certbot-nginx

# CertBot 설치 (구형 리눅스)
$ apt-get install python-certbot-nginx- 설치된 certbot을 이용하여 도메인에 대한 SSL 인증서를 발급
# SSL 인증서를 발급
$ certbot --nginx -d example.com -d www.example.com- example.com에 본인 도메인 적으면 된다.
- -d "도메인" 하면 도메인을 추가할 수 있다
- 저거 하면 뭐 이메일 입력하라고 나온다. 이메일 입력하면 된다.
- 그리고 약관 동의까지 하면 된다.
- 그럼 이리 나온다.
Congratulations! You have successfully enabled https://example.com and https://www.example.com

-------------------------------------------------------------------------------------
IMPORTANT NOTES:

Congratulations! Your certificate and chain have been saved at:
/etc/letsencrypt/live/example.com/fullchain.pem
Your key file has been saved at:
/etc/letsencrypt/live/example.com//privkey.pem
Your cert will expire on 2024-09-23.주의!: Let’s Encrypt 인증서는 90일 후에 만료...
그럼 "내 도메인 이름".conf 파일이 하나 생긴다.
그걸 내가 따로 수정했다. 우리 서버에 맞게...
server {
    listen 80;
    server_name www.have-bin.com;

    location / {
        return 301 https://$host$request_uri;
    }

    # Optional: Add other configurations as needed
    # access_log /var/log/nginx/access.log;
    # error_log /var/log/nginx/error.log;
}

server {
    listen 443 ssl;
    listen [::]:443 ssl;
    server_name "서버 도메인";

    ssl_certificate /etc/letsencrypt/live/"서버 도메인"/fullchain.pem;
    ssl_certificate_key /etc/letsencrypt/live/"서버 도메인"/privkey.pem;

    include /etc/letsencrypt/options-ssl-nginx.conf;
    ssl_dhparam /etc/letsencrypt/ssl-dhparams.pem;

    # React app configuration
        try_files $uri /index.html;
    }

    # Proxy requests to the Spring application
    location /api {
        proxy_pass http://spring:8080;
        proxy_set_header Host $host;
        proxy_set_header X-Real-IP $remote_addr;
        proxy_set_header X-Forwarded-For $proxy_add_x_forwarded_for;
        proxy_set_header X-Forwarded-Proto $scheme;
    }
}
짤라서 설명하겠다.
server {
listen 80;
server_name www.have-bin.com;
location / {
return 301 https://$host$request_uri;
}
# Optional: Add other configurations as needed
# access_log /var/log/nginx/access.log;
# error_log /var/log/nginx/error.log;
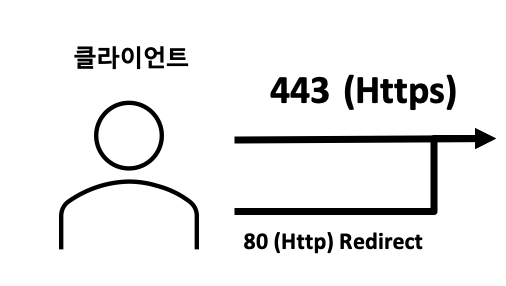
}80으로 들어오는 클라이언트를 https로 Redirect한다.
server {
    listen 443 ssl;
    listen [::]:443 ssl;
    server_name "서버 도메인";

    ssl_certificate /etc/letsencrypt/live/"서버 도메인"/fullchain.pem;
    ssl_certificate_key /etc/letsencrypt/live/"서버 도메인"/privkey.pem;

    include /etc/letsencrypt/options-ssl-nginx.conf;
    ssl_dhparam /etc/letsencrypt/ssl-dhparams.pem;

    # React app configuration
        try_files $uri /index.html;
    }

    # Proxy requests to the Spring application
    location /api {
        proxy_pass http://spring:8080;
        proxy_set_header Host $host;
        proxy_set_header X-Real-IP $remote_addr;
        proxy_set_header X-Forwarded-For $proxy_add_x_forwarded_for;
        proxy_set_header X-Forwarded-Proto $scheme;
    }
}- 443으로 들어오면 React build 파일 안에 index.html을 보여준다.
- 내도메인/api를 입력하면 Spring 서버로 접속한다.
(이거 조심해야 된다.... Spring의 api 주소들 앞에 api을 붙여야만 접속이 되도록 해야된다.)
server:
  servlet:
    context-path: /api
이거 application.yml에 추가해야 된다.
이거 안해서 삽질 두시간했다...;;;
그리고 저건 전에 글에서 설명드렸던 것처럼, 내도메인/api로 내가 직접 접속은 안된다.
Proxy request 설정이 되어 있어서 저 내부에서만 접속이 가능하다.
자 이게 conf.d 폴더 안에 있어야된다.
난 도커 안에 컨테이너에서 설정중이니, 도커 기준으로 말하면
conf.d fastcgi_params mime.types modules nginx.conf scgi_params uwsgi_params/etc/nginx 안에 폴더나 파일이 이렇게 있다.
저 conf.d 안에 "내 도메인 이름".conf 파일이 있어야 된다.
                      '$status $body_bytes_sent "$http_referer" '
                      '"$http_user_agent" "$http_x_forwarded_for"';

    access_log  /var/log/nginx/access.log  main;

    sendfile        on;
    #tcp_nopush     on;

    keepalive_timeout  65;

    #gzip  on;

    include /etc/nginx/conf.d/*.conf;
}
이게 nginx.conf 맨 밑에 일부분인데, 저 conf.d 폴더 안에 conf 형식의 파일들을 전부 다 import 하게 된다.
그럼 짜잔
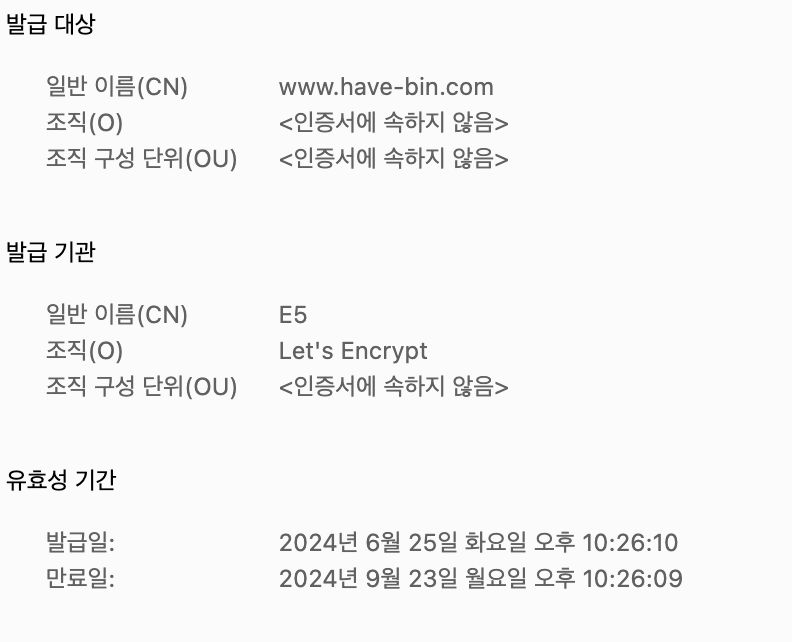
이렇게 인증이 된다
그냥 돈 많으면 aws에서 https 인증 받으세요....ㅠㅠㅠㅠㅠ