졸업작품을 만들던 어느날 나는 드래그 드랍과 아이템이 드래그되는 도중에 화면이 스크롤되는 것을 구현해달라는 요청을 들었다. 해본적은 없지만, 재밌어 보였다.
내가 직접하기 전까지...
그나마 다행인 점은 많이들 구현하는 내용이기에 자료는 많았다. 구현은 끝났지만, 공부할 겸 다시 코드를 들여다보며 복습하기로 결심했다.
사실 복습하면서 새롭게 알게 된 내용도 있어서 블로그 글로 탄생하게 되었다. 신기하게 여기는 것만 적는 습관을 버려야 하는데 쉽지가 않다.
ItemTouchHelper
ItemTouchHelper 클래스를 한마디로 정의하자면 RecyclerView 내의 Item의 단순 클릭을 넘어서는 액션(드래그 앤 드랍, 스와이프 등)을 구현할 수 있도록 제공되는 클래스이다.
구체적으로 예시를 들자면, 가끔 햄버그 아이콘을 꾹 누르면 아이템이 떼어져서 움직일 수 있게 되거나 리스트 아이템 중 하나를 옆으로 슬라이드했더니 삭제 아이콘이 생기거나 삭제되었다 같은 이벤트를 구현하는데에 사용된다.
심지어는 드래그 앤 드랍 도중에 아이템을 화면 상단에 가져다대면 자연스럽게 위로 스크롤이 되는 것도 이것으로 구현할 수 있다.
import androidx.recyclerview.widget.ItemTouchHelper
import androidx.recyclerview.widget.RecyclerView


class TestItemTouchHelperCallback () :  ItemTouchHelper.Callback(){
    override fun getMovementFlags(
        recyclerView: RecyclerView,
        viewHolder: RecyclerView.ViewHolder
    ): Int {
        TODO("Not yet implemented")
    }

    override fun onMove(
        recyclerView: RecyclerView,
        viewHolder: RecyclerView.ViewHolder,
        target: RecyclerView.ViewHolder
    ): Boolean {
        TODO("Not yet implemented")
    }

    override fun onSwiped(viewHolder: RecyclerView.ViewHolder, direction: Int) {
        TODO("Not yet implemented")
    }
}
ItemTouchHelper는 Callback이라는 추상 하위 클래스를 만들어서 상속되어야 하는데 내 추측은 이러하다.
ItemTouchHelper 클래스를 안드로이드 스튜디오에서 살펴보면,onTouchEvent부터 사용자가 아이템을 누를 때의 아이템의 view의 움직임 등이 구현되어 있다. 드래그 앤 드랍이나 스와이프로 작동해야 하는 기능은 앱마다 다를 것이다. 스와이프가 아이템 삭제인 곳이 있고 스와이프가 더보기 메뉴 호출인 경우도 있다.
하지만, 스와이프가 되어 일어나는 뷰의 변화, 즉 옆으로 밀리는 효과는 어느 때나 똑같이 작동해야 할 것이다. 즉, 그러한 기본적인 기능을 ItemTouchHelper에 모아두고 Callback에서는 개발자가 커스텀할 수 있는 부분을 선별하여 둔 것이 아닐까.
이러한 분리는 불필요한 요소까지 확장에 있어서 고려하지 않도록 배려한 구조가 아닐까 싶다.
아직도 ItemTouchHelper 코드를 자세히 본 것은 아니지만, 지금은 그렇게 생각할려고 한다.
getMovementFlags
대충 감을 잡았으니 ItemTouchHelper.Callback()를 상속했을 때 반드시 구현해야 하는 세 가지 메소드에 대해서 알아야 한다.
getMovementFlages의 메소드를 Callback 클래스 내부에서 찾아내면 이런 글을 발견할 수 있다.
/*
Should return a composite flag which defines the enabled move directions in each state (idle, swiping, dragging).
Instead of composing this flag manually, you can use makeMovementFlags(int, int) or makeFlag(int, int).
This flag is composed of 3 sets of 8 bits, where first 8 bits are for IDLE state, next 8 bits are for SWIPE state and third 8 bits are for DRAG state. Each 8 bit sections can be constructed by simply OR'ing direction flags defined in ItemTouchHelper.
For example, if you want it to allow swiping LEFT and RIGHT but only allow starting to swipe by swiping RIGHT, you can return:
       makeFlag(ACTION_STATE_IDLE, RIGHT) | makeFlag(ACTION_STATE_SWIPE, LEFT | RIGHT);

This means, allow right movement while IDLE and allow right and left movement while swiping.
Params:
recyclerView – The RecyclerView to which ItemTouchHelper is attached. viewHolder – The ViewHolder for which the movement information is necessary.
Returns:
flags specifying which movements are allowed on this ViewHolder.
See Also:
makeMovementFlags(int, int), makeFlag(int, int)
*/

public abstract int getMovementFlags(@NonNull RecyclerView recyclerView,
                @NonNull ViewHolder viewHolder);
한마디로 정의하자면, 이 ItemTouchHelper.Callback()를 상속하는 TouchHelper에서 어떤 방향의 움직임을 어떤 상태에서 허용할 것인가에 대한 정보를 설정해야 한다는 뜻이다.
방향은
1. UP
2. DOWN
3. LEFT
4. RIGHT
가 존재한다.
상태로는
1. IDLE : 대기 상태
2. SWIPE : 스와이프 상태
3. DRAG : 드래그 상태
가 존재한다.
체감상 IDLE은 항상 허용 같은 느낌이고 SWIPE는 내가 아이템을 하나 선택해서 드래그나 스와이프 할때에만 활성화되는 기능을 SWIPEsk DRAG 플래그를 이용해서 구현하는 듯 싶었다.
만약, 위의 코드 속 주석을 잘 읽어보았다면, 이러한 의문이 들 수 있다.
makeMovementFlags랑 makeFlag는 뭐지
그것에 대한 정답은 위의 코드의 바로 위에 존재한다.
/* Convenience method to create movement flags.
For instance, if you want to let your items be drag & dropped vertically and swiped left to be dismissed, you can call this method with: makeMovementFlags(UP | DOWN, LEFT);
Params:
dragFlags – The directions in which the item can be dragged. swipeFlags – The directions in which the item can be swiped.
Returns:
Returns an integer composed of the given drag and swipe flags. */

public static int makeMovementFlags(int dragFlags, int swipeFlags) {
            return makeFlag(ACTION_STATE_IDLE, swipeFlags | dragFlags)
                    | makeFlag(ACTION_STATE_SWIPE, swipeFlags)
                    | makeFlag(ACTION_STATE_DRAG, dragFlags);
        }

/* Shifts the given direction flags to the offset of the given action state.
Params:
actionState – The action state you want to get flags in. Should be one of ACTION_STATE_IDLE, ACTION_STATE_SWIPE or ACTION_STATE_DRAG. directions – The direction flags. Can be composed from UP, DOWN, RIGHT, LEFT START and END.
Returns:
And integer that represents the given directions in the provided actionState. */

@SuppressWarnings("WeakerAccess")
        public static int makeFlag(int actionState, int directions) {
            return directions << (actionState * DIRECTION_FLAG_COUNT);
        }
한마디로 정의하자면 모든 상태에서 구현하고 싶다면, makeMovementFlags를 사용하게 되고 하나의 상태에서 적용되는 이벤트를 구현하게 될때는 makeFlag를 사용하게 된다.
그렇다. makeMovementFlags는 or 연산자를 개발자가 직접 하지 않도록 하기 위해 존재하는 메소드이다.
다시 getMovementFlags로 돌아오면,
override fun getMovementFlags(recyclerView: RecyclerView, viewHolder: RecyclerView.ViewHolder): Int {
        val dragFlags = ItemTouchHelper.UP | ItemTouchHelper.DOWN
        return makeMovementFlags(dragFlags, ItemTouchHelper.ACTION_STATE_IDLE)
    }
혹은
override fun getMovementFlags(recyclerView: RecyclerView, viewHolder: RecyclerView.ViewHolder): Int {
        return makeMovementFlags(ItemTouchHelper.UP | ItemTouchHelper.DOWN, ItemTouchHelper.LEFT)
    }
이라는 방식으로 작성하면 될 것 같다.
onMove
그렇다면 onMove 메소드는 도대체 정체가 무엇일까. 답은 언제나 늘 그렇듯 코드에 담겨있다.
/**
         * Called when ItemTouchHelper wants to move the dragged item from its old position to
         * the new position.
         * <p>
         * If this method returns true, ItemTouchHelper assumes {@code viewHolder} has been moved
         * to the adapter position of {@code target} ViewHolder
         * ({@link ViewHolder#getAdapterPosition()
         * ViewHolder#getAdapterPosition()}).
         * <p>
         * If you don't support drag & drop, this method will never be called.
         *
         * @param recyclerView The RecyclerView to which ItemTouchHelper is attached to.
         * @param viewHolder   The ViewHolder which is being dragged by the user.
         * @param target       The ViewHolder over which the currently active item is being
         *                     dragged.
         * @return True if the {@code viewHolder} has been moved to the adapter position of
         * {@code target}.
         * @see #onMoved(RecyclerView, ViewHolder, int, ViewHolder, int, int, int)
         */
        public abstract boolean onMove(@NonNull RecyclerView recyclerView,
                @NonNull ViewHolder viewHolder, @NonNull ViewHolder target);
코드에 적힌 주석을 읽어보면 해당 메소드는 아이템이 어떤 위치에서 특정 위치로 이동되었을 때 해당 메소드가 실행된다(called)고 적혀있다. 또한, 해당 함수는 Boolean 형태의 return 값이 필요한데 주석에서는 해당 메소드의 return 값이 true일 때 onMoved라는 메소드가 실행된다고 말한다.
참고로 onMoved의 메소드는 아래와 같다.
        /**
         * Called when {@link #onMove(RecyclerView, ViewHolder, ViewHolder)} returns true.
         * <p>
         * ItemTouchHelper does not create an extra Bitmap or View while dragging, instead, it
         * modifies the existing View. Because of this reason, it is important that the View is
         * still part of the layout after it is moved. This may not work as intended when swapped
         * Views are close to RecyclerView bounds or there are gaps between them (e.g. other Views
         * which were not eligible for dropping over).
         * <p>
         * This method is responsible to give necessary hint to the LayoutManager so that it will
         * keep the View in visible area. For example, for LinearLayoutManager, this is as simple
         * as calling {@link LinearLayoutManager#scrollToPositionWithOffset(int, int)}.
         *
         * Default implementation calls {@link RecyclerView#scrollToPosition(int)} if the View's
         * new position is likely to be out of bounds.
         * <p>
         * It is important to ensure the ViewHolder will stay visible as otherwise, it might be
         * removed by the LayoutManager if the move causes the View to go out of bounds. In that
         * case, drag will end prematurely.
         *
         * @param recyclerView The RecyclerView controlled by the ItemTouchHelper.
         * @param viewHolder   The ViewHolder under user's control.
         * @param fromPos      The previous adapter position of the dragged item (before it was
         *                     moved).
         * @param target       The ViewHolder on which the currently active item has been dropped.
         * @param toPos        The new adapter position of the dragged item.
         * @param x            The updated left value of the dragged View after drag translations
         *                     are applied. This value does not include margins added by
         *                     {@link RecyclerView.ItemDecoration}s.
         * @param y            The updated top value of the dragged View after drag translations
         *                     are applied. This value does not include margins added by
         *                     {@link RecyclerView.ItemDecoration}s.
         */
        public void onMoved(@NonNull final RecyclerView recyclerView,
                @NonNull final ViewHolder viewHolder, int fromPos, @NonNull final ViewHolder target,
                int toPos, int x, int y) {
            final RecyclerView.LayoutManager layoutManager = recyclerView.getLayoutManager();
            if (layoutManager instanceof ViewDropHandler) {
                ((ViewDropHandler) layoutManager).prepareForDrop(viewHolder.itemView,
                        target.itemView, x, y);
                return;
            }

            // if layout manager cannot handle it, do some guesswork
            if (layoutManager.canScrollHorizontally()) {
                final int minLeft = layoutManager.getDecoratedLeft(target.itemView);
                if (minLeft <= recyclerView.getPaddingLeft()) {
                    recyclerView.scrollToPosition(toPos);
                }
                final int maxRight = layoutManager.getDecoratedRight(target.itemView);
                if (maxRight >= recyclerView.getWidth() - recyclerView.getPaddingRight()) {
                    recyclerView.scrollToPosition(toPos);
                }
            }

            if (layoutManager.canScrollVertically()) {
                final int minTop = layoutManager.getDecoratedTop(target.itemView);
                if (minTop <= recyclerView.getPaddingTop()) {
                    recyclerView.scrollToPosition(toPos);
                }
                final int maxBottom = layoutManager.getDecoratedBottom(target.itemView);
                if (maxBottom >= recyclerView.getHeight() - recyclerView.getPaddingBottom()) {
                    recyclerView.scrollToPosition(toPos);
                }
            }
        }
onMoved 메소드를 정확하게 이해하진 못했지만, 아이템을 드랍할 때에 대한 기본적인 움직임을 구현한 코드같다.
한마디로 onMove 메소드는 해당 아이템의 이동이 허락되는 조건을 설정하는 메소드인 것이다. 아주 희귀한 경우이겠지만, 위치가 고정되어야 하는 아이템과 위치를 바꿀 수 있는 아이템이 있을 때 onMove 메소드에서 조건문으로 위치를 고정시켜야 하는 아이템을 구분하게 할 수 있을 거 같다.
onSwiped
이쯤 되면 onMove와 onMoved의 사례로 눈치챘을거라고 생각한다. onSwiped 메소드는 드래그앤드랍으로 스와이프가 이뤄졌을 때에 호출되는 메소드이다.
        /**
         * Called when a ViewHolder is swiped by the user.
         * <p>
         * If you are returning relative directions ({@link #START} , {@link #END}) from the
         * {@link #getMovementFlags(RecyclerView, ViewHolder)} method, this method
         * will also use relative directions. Otherwise, it will use absolute directions.
         * <p>
         * If you don't support swiping, this method will never be called.
         * <p>
         * ItemTouchHelper will keep a reference to the View until it is detached from
         * RecyclerView.
         * As soon as it is detached, ItemTouchHelper will call
         * {@link #clearView(RecyclerView, ViewHolder)}.
         *
         * @param viewHolder The ViewHolder which has been swiped by the user.
         * @param direction  The direction to which the ViewHolder is swiped. It is one of
         *                   {@link #UP}, {@link #DOWN},
         *                   {@link #LEFT} or {@link #RIGHT}. If your
         *                   {@link #getMovementFlags(RecyclerView, ViewHolder)}
         *                   method
         *                   returned relative flags instead of {@link #LEFT} / {@link #RIGHT};
         *                   `direction` will be relative as well. ({@link #START} or {@link
         *                   #END}).
         */
        public abstract void onSwiped(@NonNull ViewHolder viewHolder, int direction);
부가적으로 해당 코드를 다시 읽다가 발견한 내용이 있다. 해당 코드를 작성한 개발자들의 전체적인 설명이 담긴 주석은 ItemTouchHelper 클래스의 Callback이라는 내부 추상 클래스의 주석으로 적혀있었다.
/**
This class is the contract between ItemTouchHelper and your application. It lets you control
which touch behaviors are enabled per each ViewHolder and also receive callbacks when user
performs these actions.
To control which actions user can take on each view, you should override
{@link #getMovementFlags(RecyclerView, ViewHolder)} and return appropriate set
of direction flags. ({@link #LEFT}, {@link #RIGHT}, {@link #START}, {@link #END},
{@link #UP}, {@link #DOWN}). You can use
{@link #makeMovementFlags(int, int)} to easily construct it. Alternatively, you can use
{@link SimpleCallback}.
If user drags an item, ItemTouchHelper will call
{@link Callback#onMove(RecyclerView, ViewHolder, ViewHolder)
onMove(recyclerView, dragged, target)}.
Upon receiving this callback, you should move the item from the old position
({@code dragged.getAdapterPosition()}) to new position ({@code target.getAdapterPosition()})
in your adapter and also call {@link RecyclerView.Adapter#notifyItemMoved(int, int)}.
To control where a View can be dropped, you can override
{@link #canDropOver(RecyclerView, ViewHolder, ViewHolder)}. When a
dragging View overlaps multiple other views, Callback chooses the closest View with which
dragged View might have changed positions. Although this approach works for many use cases,
if you have a custom LayoutManager, you can override
{@link #chooseDropTarget(ViewHolder, java.util.List, int, int)} to select a
custom drop target.
When a View is swiped, ItemTouchHelper animates it until it goes out of bounds, then calls
{@link #onSwiped(ViewHolder, int)}. At this point, you should update your
adapter (e.g. remove the item) and call related Adapter#notify event.
*/
이 본문 내용을 번역하면 내용은 다음과 같다.
/**
- 이 클래스는 ItemTouchHelper와 애플리케이션 간의 계약입니다. 이를 통해 각 ViewHolder에서 활성화되는 터치 동작을 제어할 수 있으며, 사용자가 이러한 작업을 수행할 때 콜백을 수신할 수 있습니다.
- 각 뷰에서 사용자가 수행할 수 있는 작업을 제어하려면
- {@link #getMovementFlags(RecyclerView, ViewHolder)}를 재정의하고 적절한 방향 플래그 집합을 반환해야 합니다.
- ({@link #LEFT}, {@link #RIGHT}, {@link #START}, {@link #END},
- {@link #UP}, {@link #DOWN}).
- {@link #makeMovementFlags(int, int)}를 사용하여 쉽게 구성할 수 있습니다. 또는
- {@link SimpleCallback}을 사용할 수 있습니다.
- 사용자가 항목을 끌면 ItemTouchHelper가
- {@link Callback#onMove(RecyclerView, ViewHolder, ViewHolder)
- onMove(recyclerView, dragged, target)}를 호출합니다.
- 이 콜백을 받으면 어댑터에서 이전 위치({@code dragged.getAdapterPosition()})에서 새 위치({@code target.getAdapterPosition()})로 항목을 이동해야 하며
- {@link RecyclerView.Adapter#notifyItemMoved(int, int)}도 호출해야 합니다.
- View를 놓을 수 있는 위치를 제어하려면
- {@link #canDropOver(RecyclerView, ViewHolder, ViewHolder)}를 재정의할 수 있습니다.
- 드래그하는 View가 여러 다른 View와 겹치는 경우 Callback은
- 드래그한 View가 위치를 변경했을 수 있는 가장 가까운 View를 선택합니다. 이 접근 방식은 많은 사용 사례에 효과적이지만,
- 사용자 지정 LayoutManager가 있는 경우
- {@link #chooseDropTarget(ViewHolder, java.util.List, int, int)}를 재정의하여
- 사용자 지정 놓기 대상을 선택할 수 있습니다.
- View가 스와이프되면 ItemTouchHelper는 범위를 벗어날 때까지 애니메이션을 적용한 다음
- {@link #onSwiped(ViewHolder, int)}를 호출합니다. 이 시점에서 어댑터를 업데이트해야 합니다.
- (예: 항목 제거) 및 관련 Adapter#notify 이벤트를 호출합니다.
*/
첫문장만 읽어도 감이 올거라 생각한다. 모든 내용은 결국 이곳에 간략하게 요약되어 있었다.
onMove에서 예측한 아이템의 놓을 수 있는 위치 제어는 canDropOver라는 메소드를 오버라이드해서 지정하는 것이 좋다고 말하고 있다.
또한 onSwaped에서는 Adapter에서 실행해야 하는 과정을 처리하면 된다는 말이 적혀있다. 예를 들면, 오른쪽으로 아이템을 스와이프했을 때 아이템이 삭제되는 과정을 onSwaped 안에서 실행하면 되는 거 같다. 혹은 스와이프로 아이템이 추가된다거나, 아이템이 회전을 한다거나 아무튼 단순한 드래그앤 드랍, 스와이프 같은 이미 구현된 움직임을 제외한 추가적인 구현이 필요할 때 구체화 시켜야 하는 메소드가 onSwap인 듯하다.
사실 이게 이 글을 내가 블로그에 작성하게 된 이유다. 졸업 작품을 만들 당시에는 onSwaped가 아니라 onSelectedChanged에서 adapter에서 해줘야하는 아이템 순서 바꾸기를 처리했다.
onSelectedChange는 드래그 앤 드랍 그러니까, 드래그이든 스와이프이든 모든 과정이 끝났을 때 마무리 과정으로 불려지는 메소드이다. 순서상 onSwaped보다 앞인 거 같다. (왠지 틀릴 거 같지만, 일단 지금은 그렇다고 이해하고 있다.)
그래서 어떻게 해결했는가.
지금까지 ItemTouchHelper에 대한 기본적인 내용을 살펴봤다. 드래그와 스와이프 이후의 동작에 대한 구현은 대략적인 감은 오지만, 드래그 도중에 동작은 어떻게 구현해야 할까. 그것에 대한 답은 아직 등장하지 않았다.
코드를 바라보던 마감일 1주 정도 남은 나도 그런 심정이었다.
ItemTouchHelper의 코드는 몇줄인 줄 아는가. 2480줄이다. 이전에 살펴봤던 AppCompatActivity보다 줄이 더 길었다. 다 읽고 이해하다간 졸업작품 데모 발표 시기에 못 맞출 듯 싶었다. 앱과 앱 디자인은 나 혼자서 맡았고 개발해야 하는 핵심 기능은 아직도 3개 정도가 남았고 졸업작품 전시회는 3개월이 남았는데 테스트나 할 시간이 남을까.
그래서 나는 익숙함에 기대기로 했다.
onChildDraw
내가 생각하는 안드로이드에서 뭐든 구현할 수 있다는 것을 암시하는 키워드는 Draw같다. 개인적으로 안드로이드의 메소드들의 코드를 뜯어본 적이 많았다. 그리고 Draw라는 키워드가 적힌 메소드는 대체로 화면에 뷰를 만들때, 화면에서 뷰에 변화가 일어나서 다시 그릴 때, 혹은 있던 뷰를 원하는 모습으로 다시 만들 때 등등 화면에 변화가 일어나면 무조건적으로 호출되는 메소드였다. 이런 메소드의 특징으로는 늘 Canvar 클래스가 함께한다는 것. (물론 틀릴 수 있다.)
그러니까 시간적 한계에 압박을 느낀 내가 한 선택은 뷰가 그려질 때, 재활용 될 때를 노려서 현재 아이템의 위치를 확인하고 위치의 y좌표가 0에 너무 가까울 때 혹은 휴대폰 화면의 길이에 가까운 y좌표를 아이템이 갖고 있다면 커스텀 ItemTouchHelper의 매개변수로 있는 ScrollView를 해당 방향으로 스크롤되도록 하는 것이었다.
이 무슨 성능 저하라고 생각한다. 하지만, 이 생각으로 나는 해당 기능을 구현해냈고 백엔드 팀에서 마감일을 앞두고 몰려서 완성되는 기능들을 앱에 연결할 수 있었다. 내가 하고 싶었던 건 됐으니 괜찮지 않을까! 그렇게 넘긴 것이다.
override fun onChildDraw(
        c: Canvas,
        recyclerView: RecyclerView,
        viewHolder: RecyclerView.ViewHolder,
        dX: Float,
        dY: Float,
        actionState: Int,
        isCurrentlyActive: Boolean
    ) {
        super.onChildDraw(c, recyclerView, viewHolder, dX, dY, actionState, isCurrentlyActive)

  		//아이템의 위치 정보 가져오기
        val location = IntArray(2)
        val itemView = viewHolder.itemView
        itemView.getLocationOnScreen(location)
        val itemY = location[1]

  		//화면의 길이 정보 가져오기
        val displayMetrics = recyclerView.context.resources.displayMetrics
        val screenHeight = displayMetrics.heightPixels

        // NestedScrollView의 스크롤 처리
        if (itemY < 300) {
            // 상단에 도달했을 때 위로 스크롤
            nestedScrollView.smoothScrollBy(0, -20)
        } else if (itemY > screenHeight - 300) {
            // 하단에 도달했을 때 아래로 스크롤
            nestedScrollView.smoothScrollBy(0, 20)
        }
    }
당시에 내가 완성한 코드다. 코드를 겨우 완성하고 작동했을 때 되게 기뻐했던 걸로 기억하는데 여기에 로그 생성하면 드래그시에 그 로그가 화면을 점령하는 걸 볼 수 있었다.
더 나은 방법은 없을까
이게 바로 이 글을 작성하게 된 두 번째 이유다. 비록 그 졸업 작품 데모 준비와 전시회 끝까지 기회 동안 리눅스 버전 안드로이드 스튜디오는 더 이상하게 변했지만 해볼 생각이다.
체감상 자잘한 오류가 두 배다. 이제 리눅스 2년차인 거 같은데 다시 윈도우로 돌아가야 하나 심각하고 고민 중이다. 업데이트 하자마자 구글에게 보내고 싶은 메일 내용을 정리했던 거 같은데 어디로 갔는지 모르겠다.
일단 내가 한 일은 다시 ItemTouchHelper를 읽는 것이었다. 그리고 진짜로 스크롤링만을 위한 메소드가 존재했었다.
interpolateOutOfBoundsScroll
뷰가 attach된 RecyclerView를 기준으로 경계에서 벗어난 정도에 따라서 RecyclerView를 스크롤할 수 있는 메소드라는 설명이 적혀있다.
/**
       * Called by the ItemTouchHelper when user is dragging a view out of bounds.
       * <p>
       * You can override this method to decide how much RecyclerView should scroll in response
       * to this action. Default implementation calculates a value based on the amount of View
       * out of bounds and the time it spent there. The longer user keeps the View out of bounds,
       * the faster the list will scroll. Similarly, the larger portion of the View is out of
       * bounds, the faster the RecyclerView will scroll.
       *
       * @param recyclerView        The RecyclerView instance to which ItemTouchHelper is
       *                            attached to.
       * @param viewSize            The total size of the View in scroll direction, excluding
       *                            item decorations.
       * @param viewSizeOutOfBounds The total size of the View that is out of bounds. This value
       *                            is negative if the View is dragged towards left or top edge.
       * @param totalSize           The total size of RecyclerView in the scroll direction.
       * @param msSinceStartScroll  The time passed since View is kept out of bounds.
       * @return The amount that RecyclerView should scroll. Keep in mind that this value will
       * be passed to {@link RecyclerView#scrollBy(int, int)} method.
       */
      @SuppressWarnings("WeakerAccess")
      public int interpolateOutOfBoundsScroll(@NonNull RecyclerView recyclerView,
              int viewSize, int viewSizeOutOfBounds,
              int totalSize, long msSinceStartScroll) {
          final int maxScroll = getMaxDragScroll(recyclerView);
          final int absOutOfBounds = Math.abs(viewSizeOutOfBounds);
          final int direction = (int) Math.signum(viewSizeOutOfBounds);
          // might be negative if other direction
          float outOfBoundsRatio = Math.min(1f, 1f * absOutOfBounds / viewSize);
          final int cappedScroll = (int) (direction * maxScroll
                  * sDragViewScrollCapInterpolator.getInterpolation(outOfBoundsRatio));
          final float timeRatio;
          if (msSinceStartScroll > DRAG_SCROLL_ACCELERATION_LIMIT_TIME_MS) {
              timeRatio = 1f;
          } else {
              timeRatio = (float) msSinceStartScroll / DRAG_SCROLL_ACCELERATION_LIMIT_TIME_MS;
          }
          final int value = (int) (cappedScroll * sDragScrollInterpolator
                  .getInterpolation(timeRatio));
          if (value == 0) {
              return viewSizeOutOfBounds > 0 ? 1 : -1;
          }
          return value;
      }
  }
즉, recyclerView의 스크롤을 다룰 수 있다는 건데. 사실인지 확인할 필요가 있었다.
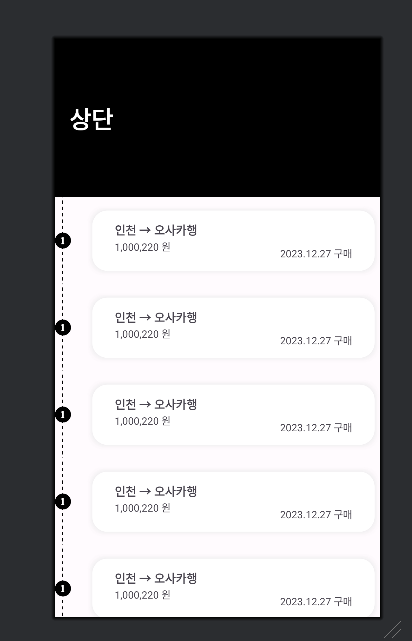
일단 테스트를 위해서 나는 간단하게 뷰를 만들어냈다. 사실 졸업작품에서 사용했던 리사이클러뷰를 복붙한 결과이지만, 그렇게 어려운 형태는 아니다. 사실 급하게 복붙하느랴 해당 뷰와 짝꿍이던 가이드라인은 전부 빼버렸다. padding으로 수평 간격을 설정하기에는 뷰가 살짝 짤리는 형상이 꽤 심하게 일어난다. 이유는 모르지만, 이것도 나중에 알아볼 생각이다.
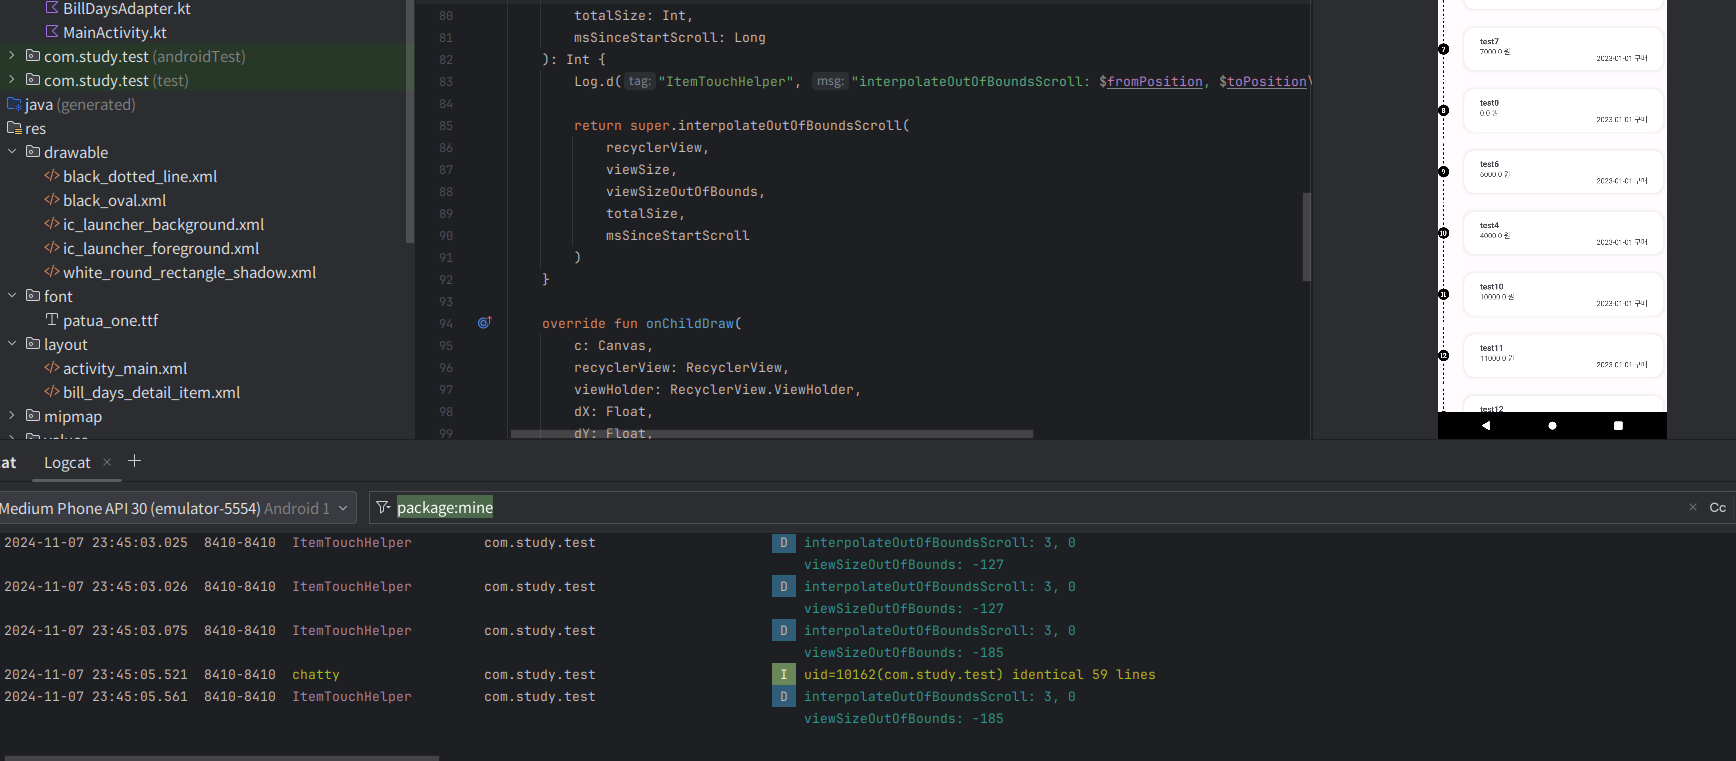
일단, 첫 결과는 장렬하게 실패했다. 이유는 간단했다. 오버라이드한 메소드에 대한 로그부터 볼려고 했지만, 로그조차도 안 나타났던 것이다.
override fun interpolateOutOfBoundsScroll(
      recyclerView: RecyclerView,
      viewSize: Int,
      viewSizeOutOfBounds: Int,
      totalSize: Int,
      msSinceStartScroll: Long
  ): Int {
      Log.d("ItemTouchHelper", "interpolateOutOfBoundsScroll: $fromPosition, $toPosition\nviewSizeOutOfBounds: $viewSizeOutOfBounds")

      return super.interpolateOutOfBoundsScroll(
          recyclerView,
          viewSize,
          viewSizeOutOfBounds,
          totalSize,
          msSinceStartScroll
      )
  }
그래서 확인을 위해서 이전에 작성한 onChildDraw의 주석처리를 제외해봤더니 갑자기 로그가 찍히기 시작했다.
도대체 두 메소드에 무슨 상관관계가 있어서 작동하는 걸까. 답을 찾기 위해서 열심히 코드를 봤지만, 알 수 없었다. 하지만, 내 추측으로는 onChildDraw를 통해서만 interpolateOutBoundScroll이 작동하는 거 아닐까 싶다.
그렇지만, 저 로그를 끝으로 또 다시 interpolateOutBoundScroll은 응답이 없었다. 그리고 정답은 정말 쉬웠는데 interpolateOutBoundScroll은 attach된 recyclerView의 크기를 기준으로 경계를 구분한다는 것이었다. 그러니까, RecyclerView의 경계에만 반응하는 것이다. 화면이 절대 기준이 아니었다. 화면을 넘어가는 RecyclerView는 interpolateOutBoundScroll이 반응을 하지 않는다.
그렇다. 내가 만든 nestedScrollView 안에 든 아주 긴 recyclerView는 이 메소드를 이용하기에 아주아주 부적합한 형태였던 것이다. 여기서 도달한 결론이 있었는데 어쩌면 졸업작품 때는 onChildDraw로 스크롤 기능을 구현했던 것이 맞았던 걸지도 모르겠다는 결론이었다. RecyclerView말고 NestedScroll이 스크롤 되게 하는 건 어떻게든 변경할 수 있겠지만, 졸업작품에서 사용한 RecyclerView는 내 기억상 computing 문제로 recyclerView가 아닌 nestedScroll이 움직이도록 만들었고 그 과정에서 RecyclerView는 스크롤 기능을 잠근채 아주 긴 형태를 가지고 있었다.
그리고 이번 테스트에서 해당 Computing 문제가 발생해 일단 RecyclerView만 화면에 가득찬 형태로 다시 도전하게 되었다.
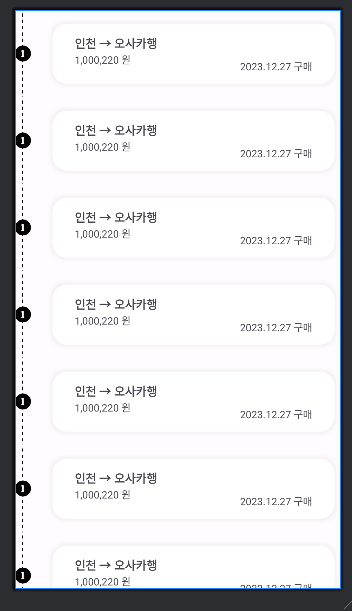
그리고 드디어 스크롤에 성공했다. 아까 전과 달리 interpolateOutBoundScroll은 onChildDraw가 필요없었다. 아마도 아까는 부적합한 형태의 뷰였기 때문에 예상치 못한 오류가 발생했거나 우연히 그 때 RecyclerView의 경계에 뷰를 드래그했던 걸지도 모른다.
설명대로 RecyclerView는 경계에 있는 시간에 따라서 스크롤 되는 속도가 가속된다. 내가 onChildDraw로 만든 스크롤보다 매끄럽다. 이미 있는 코드를 활용하고 싶으면 RecyclerView는 길게 만들지 말라는 교훈을 얻었다.