개요
보통 리액트 프로젝트를 진행할때 CRA(Create React App)를 사용하여 쉽게 개발 환경을 구축할 수 있다. CRA를 사용하면 Babel, Webpcak 등 설정하기 귀찮은 내용들을 해결해주는 편한 툴이다.
나 또한 항상 당연하듯이 CRA로 리액트 프로젝트 개발을 시작했다. 그러던 중 CRA에 대한 궁금증이 생겨 CRA 없이 리액트 개발 환경을 구축하는 방법에 대해 정리해보았다.
폴더 생성 및 초기화
프로젝트 파일을 생성하고 package.json 파일 초기화
mkdir cra
cd cra
npm init -y
mkdir src dist public- src : react 작업을 위한 폴더
- dist : 번들링 결과물의 폴더
- public: 정적 파일을 위한 폴더
public 폴더에 루트 <div>를 만든다.
cd public
touch index.html
<!DOCTYPE html>
<html lang="en">
<head>
<meta charset="UTF-8" />
<meta name="viewport" content="width=device-width, initial-scale=1.0" />
<title>CRA 없이 리액트 개발 환경 구축</title>
</head>
<body>
<div id="root"></div>
</body>
</html>리액트 컴포넌트를 렌더링할 index.js 파일을 생성
cd src
touch index.js
리액트 설치
리액트의 핵심 패키지들을 설치
- react : 리액트 코어
- react-dom : 리액트와 DOM를 연결
npm install react react-dom바벨 설치
리액트에서는 ES6와 JSX를 사용한다. 브라우저 호환성을 위해 ES6 => ES5, JSX => js로 트랜스파일링을 해주는 바벨을 설치해야한다.
npm install @babel/core @babel/preset-react @babel/preset-env -D- @babel/core : 바벨의 코어
- @babel/preset-react : 리액트 JSX를 트랜스파일링
- @babel/preset-env : ES6코드를 ES5로 트랜스파일링
설정
루트 경로에서 babel.config.js 파일을 생성하고 프리셋들을 설정
module.exports = {
  presets: ['@babel/preset-react', '@babel/preset-env'],
};
웹팩
webpack
모듈 번들러인 웹팩의 핵심 패키지들을 설치한다.
npm install webpack webpack-cli webpack-dev-server -D- webpack : 웹팩의 코어
- webpack-cli : 웹팩을 커맨드라인에서 사용
- webpack-dev-server : 웹팩을 메모리 상에 빌드하여 개발 서버를 구동
로더
웹팩 번들링에 필요한 로더를 설치한다.
npm install babel-loader style-loader css-loader file-loader -D- babel-loader : JSX 및 ES6+ 문법을 트랜스파일링
- style-loader : 변환된 CSS 파일을
<style>태그로 감싸서 삽입 - css-loader : CSS 파일을 자바스크립트가 이해할 수 있도록 변환
- file-loader : 이미지 및 폰트 등의 파일 로딩
플러그인
웹팩 번들링 후 적용할 플러그인 설치
npm install html-webpack-plugin clean-webpack-plugin -D- html-webpack-plugin : HTML 파일에 번들링된 자바스크립트 파일을 삽입해주고 번들링된 결과가 저장되는 폴더에 옮김.
- clean-webpack-plugin : 번들링을 할 때마다 이전 번들링 결과를 제거.
- mini-css-extract-plugin : css 파일로 변환해주는 플러그인.
웹팩 설정
루트 경로에 webpack.config.js 파일 생성
-
mode : devlopment(개발용), production(배포용), none 3가지 모드가 있습니다.
-
entry : 웹팩을 실행할 대상 파일
module.exports = {
  mode: 'development',
  entry: './src/index.js'  resolve: {
    extensions: ['.js', '.jsx'],
  },
};- output : 웹팩의 결과물에 대한 정보를 입력하는 속성
const path = require('path');

module.exports = {
  entry: './src/index.js',
  output: {
    path: path.resolve(__dirname, './dist'), // 결과물 경로
    filename: 'bundle.js', // 결과물 파일명
  },
};- resolve : 웹팩이 모듈을 처리하는 방식을 설정하는 속성으로 확장자를 생략해도 인식하게 만든다.
  resolve: {
    extensions: ['.js', '.jsx'],
},- devtool : source-map을 설정하는 부분으로 에러가 발생했을 때 번들링된 파일에서 어느 부분에 에러가 났는지를 쉽게 확인할 수 있게 해주는 도구
devtool: 'eval-cheap-source-map',- devServer : webpack-dev-server의 옵션 설정
overlay: 에러 발생 시 브라우저에 내용을 띄울지 설정
hot: 모듈의 변화만 자동으로 로드하는 HMR(Hot Module Replacement) 기능 활성화 설정
writeToDisk: 메모리 뿐만 아니라 파일도 만들것인지 설정
  devServer: {
    port: 5500,
    overlay: true,
    hot: true,
    writeToDisk: true,
},- modules, rules : 모듈에 적용할 로더들과 그 옵션들을 설정
test: 어떤 파일에 적용할지 확장자 작성
exclude: 로더에서 제외할 파일 설정
loader: 적용할 로더가 1개라면 loader로 설정
use: 적용할 로더가 2개 이상이면 use 배열로 설정
  module: {
    rules: [
      {
        test: /\.(js|jsx)$/,
        exclude: '/node_modules/',
        loader: 'babel-loader',
      },
      {
        test: /\.css$/,
        // use: ['style-loader', 'css-loader'],
        use: [MiniCssExtractPlugin.loader, 'css-loader'],
      },
      {
        test: /\.(jpeg|jpg)$/,
        loader: 'file-loader',
        options: {
          name: '[name].[ext]',
        },
      },
    ],
},- 플러그인 적용
설치했던 플러그인을 불러와 설정해줍니다.
html-webpack=plugin의template는 번들링 파일을 주입하고 번들링 폴더로 복사할 대상 HTML 파일을 명시하는 옵션입니다.
const htmlWebpackPlugin = require('html-webpack-plugin');
const cleanWebpackPlugin = require('clean-webpack-plugin');
const MiniCssExtractPlugin = require('mini-css-extract-plugin');

...

  plugins: [
    new CleanWebpackPlugin(),
    new HtmlWebpackPlugin({
      template: './public/index.html',
    }),
    new MiniCssExtractPlugin({ filename: 'app.css' }),
],- package.json script 작성
--progress옵션은 번들링 진행 상태를 보여줍니다.
  "scripts": {
    "dev": "webpack-dev-server --progress & open http://localhost:5000/",
    "build": "webpack --pregress"
  },
리액트 컴포넌트 생성
cd src
touch App.css App.jsx- App.jsx
import React from 'react';
import './App.css';

const App = () => {
  return <div className='container' />;
};

export default App;
- App.css
.container {
  width: 500px;
  height: 200px;
  margin: 0 auto;
  background-image: url(../public/bg.jpg) center no-repeat;
  background-size: cover;
}- root의 index.js
import React from 'react';
import ReactDom from 'react-dom';
import App from './src/App';

ReactDom.render(<App />, document.getElementById('root'));
실행
package.json에 등록한 scripts 명령어로 실행
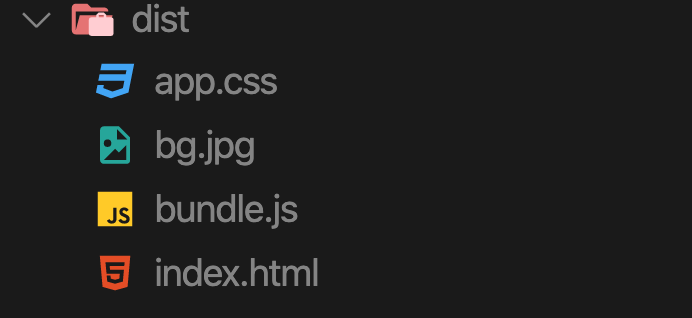
npm run dev 실행 결과 dist폴더에 아래 이미지와 같이 파일들이 생성되었다.

로그를 통해서 실행되는 것을 확인할 수 있다.

정리
최근 webpack에 대해서 공부하다가 CRA 없이 리액트 개발 환경 구축을 해보았습니다. 기초적인 부분만 살펴보았는데도 이해가 안되는 부분이 있어 2~3번 반복해보니 이제야 정리가 된 것 같습니다.
3개의 댓글
I'm so happy with Payvantage. I needed a new phone but was concerned about my credit. Their no-credit approval process was super fast and easy. I got the latest Android phone without any stress, and the payment plan is very manageable. Highly recommend!https://mypayvantage.com/
Secret Gardens really understands the local environment. The landscape architect Sydney used native plants that are both water-wise and gorgeous year-round.
https://www.secretgardens.com.au/


@drive mad, 너무 좋은 포스트 잘 읽었습니다. 감사합니다!