기본 개념
용어 정리
쉽게 설명하는 블록체인 : 블록체인 용어 정리 | 뱅크샐러드
개념 정리
참고 영상
https://www.youtube.com/watch?v=3lrAaCWUSWs
https://www.youtube.com/watch?v=Ca7Meu4z-F4
https://www.youtube.com/watch?v=kl5pkhbqz3k
개발 과정
1. Blockchain 생성
블록체인을 담기 위한 빈 리스트를 생성하는 constructor 와 transactions 을 담은 constructor 가 있는 class Blockchain(object) 을 만든다.
class Blockchain(object):
    def __init__(self):
        self.chain = []
        self.current_transactions = []

    def new_block(self):
        # Creates a new Block and adds it to the chain
        pass

    def new_transaction(self):
        # Adds a new transaction to the list of transactions
        pass

    @staticmethod
    def hash(block):
        # Hashes a Block
        pass

    @property
    def last_block(self):
        # Returns the last Block in the chain
        pass
class Blockchain 은 위에서 볼 수 있는 것과 같이 체인을 관리한다. transaction 과 새 블록을 추가하는 메소드가 추가될 예정이다.
Block 이란
각각의 block 은 index, timestamp, list of transactions, proof, 그리고 hash of the previous block 으로 구성된다. 이를 코드로 나타내면 아래 예시와 같다.
block = {
    'index': 1,
    'timestamp': 1506057125.900785,
    'transactions': [
        {
            'sender': "8527147fe1f5426f9dd545de4b27ee00",
            'recipient': "a77f5cdfa2934df3954a5c7c7da5df1f",
            'amount': 5,
        }
    ],
    'proof': 324984774000,
    'previous_hash': "2cf24dba5fb0a30e26e83b2ac5b9e29e1b161e5c1fa7425e73043362938b9824"
}
Transaction 추가
new_transaction() 메소드를 코드로 나타내면 아래와 같다. 해당 메소드는 transaction 을 리스트에 추가하고, 이것이 추가되는 block 의 intex 를 return 하여 mine 한다.
class Blockchain(object):
    ...

    def new_transaction(self, sender, recipient, amount):
        """
        Creates a new transaction to go into the next mined Block
        :param sender: <str> Address of the Sender
        :param recipient: <str> Address of the Recipient
        :param amount: <int> Amount
        :return: <int> The index of the Block that will hold this transaction
        """

        self.current_transactions.append({
            'sender': sender,
            'recipient': recipient,
            'amount': amount,
        })

        return self.last_block['index'] + 1
Block 생성
블록체인이 인스턴스화되면 prodecesso가 없는 genesis 블록으로 시드해야 한다. 이를 위해 genesis block 을 constructor 에 생성한다. 추가로 new_block(), new_transaction(), hash() 메소드를 구현한다.
import hashlib
import json
from time import time

class Blockchain(object):
    def __init__(self):
        self.current_transactions = []
        self.chain = []

        # Create the genesis block
        self.new_block(previous_hash=1, proof=100)

    def new_block(self, proof, previous_hash=None):
        """
        Create a new Block in the Blockchain
        :param proof: <int> The proof given by the Proof of Work algorithm
        :param previous_hash: (Optional) <str> Hash of previous Block
        :return: <dict> New Block
        """

        block = {
            'index': len(self.chain) + 1,
            'timestamp': time(),
            'transactions': self.current_transactions,
            'proof': proof,
            'previous_hash': previous_hash or self.hash(self.chain[-1]),
        }

        # Reset the current list of transactions
        self.current_transactions = []

        self.chain.append(block)
        return block

    def new_transaction(self, sender, recipient, amount):
        """
        Creates a new transaction to go into the next mined Block
        :param sender: <str> Address of the Sender
        :param recipient: <str> Address of the Recipient
        :param amount: <int> Amount
        :return: <int> The index of the Block that will hold this transaction
        """
        self.current_transactions.append({
            'sender': sender,
            'recipient': recipient,
            'amount': amount,
        })

        return self.last_block['index'] + 1

    @property
    def last_block(self):
        return self.chain[-1]

    @staticmethod
    def hash(block):
        """
        Creates a SHA-256 hash of a Block
        :param block: <dict> Block
        :return: <str>
        """

        # We must make sure that the Dictionary is Ordered, or we'll have inconsistent hashes
        block_string = json.dumps(block, sort_keys=True).encode()
        return hashlib.sha256(block_string).hexdigest()
PoW 적용
Proof of Work(PoW) 란?
A Proof of Work algorithm (PoW) is how new Blocks are created or mined on the blockchain. The goal of PoW is to discover a number which solves a problem. The number must be difficult to find but easy to verify—computationally speaking—by anyone on the network. This is the core idea behind Proof of Work.
We’ll look at a very simple example to help this sink in.
Let’s decide that the hash of some integerxmultiplied by anotherymust end in0. So,hash(x * y) = ac23dc...0. And for this simplified example, let’s fixx = 5. Implementing this in Python:from hashlib import sha256x = 5 y = 0 # We don't know what y should be yet...while sha256(f'{x*y}'.encode()).hexdigest()[-1] != "0": y += 1print(f'The solution is y = {y}')The solution here is
y = 21. Since, the produced hash ends in0:hash(5 * 21) = 1253e9373e...5e3600155e860In Bitcoin, the Proof of Work algorithm is called Hashcash. And it’s not too different from our basic example above. It’s the algorithm that miners race to solve in order to create a new block. In general, the difficulty is determined by the number of characters searched for in a string. The miners are then rewarded for their solution by receiving a coin—in a transaction.
The network is able to easily verify their solution.
블록체인에 알고리즘을 적용하여 hashing 이 될 수 있도록 하자.
아래의 코드에서는 앞의 블록의 해액으로 해시할 때 선행 0이 4개인 해시가 생성되는 숫자 p를 구한다.
import hashlib
import json

from time import time
from uuid import uuid4

class Blockchain(object):
    ...

    def proof_of_work(self, last_proof):
        """
        Simple Proof of Work Algorithm:
         - Find a number p' such that hash(pp') contains leading 4 zeroes, where p is the previous p'
         - p is the previous proof, and p' is the new proof
        :param last_proof: <int>
        :return: <int>
        """

        proof = 0
        while self.valid_proof(last_proof, proof) is False:
            proof += 1

        return proof

    @staticmethod
    def valid_proof(last_proof, proof):
        """
        Validates the Proof: Does hash(last_proof, proof) contain 4 leading zeroes?
        :param last_proof: <int> Previous Proof
        :param proof: <int> Current Proof
        :return: <bool> True if correct, False if not.
        """

        guess = f'{last_proof}{proof}'.encode()
        guess_hash = hashlib.sha256(guess).hexdigest()
        return guess_hash[:4] == "0000"
2. API 로 만들기
micro-framework 인 Flask 프레임워크를 사용해서 HTTP 요청을 사용하는 웹에 blockchain 을 적용할 수 있도록 해보자. Flask 는 python funtions 에 endpoint 를 mapping 하기 쉽다는 장점도 있다.
💡 **Flask Docs** [https://flask.palletsprojects.com/en/0.12.x/quickstart/#a-minimal-application](https://flask.palletsprojects.com/en/0.12.x/quickstart/#a-minimal-application)세 가지 메소드를 만들어야 한다.
/transactions/new: block 에 새로운 transaction 을 생성/mine: 서버에 새로운 block 을 mine 하도록 요청/chain: blockchin 전체를 return
Flask 설정
single node 의 서버를 blockchain network 에 담기 위한 boilerplate 를 만들어보자.
import hashlib
import json
from textwrap import dedent
from time import time
from uuid import uuid4

from flask import Flask

class Blockchain(object):
    ...

# Instantiate our Node
app = Flask(__name__)

# Generate a globally unique address for this node
node_identifier = str(uuid4()).replace('-', '')

# Instantiate the Blockchain
blockchain = Blockchain()

@app.route('/mine', methods=['GET'])
def mine():
    return "We'll mine a new Block"

@app.route('/transactions/new', methods=['POST'])
def new_transaction():
    return "We'll add a new transaction"

@app.route('/chain', methods=['GET'])
def full_chain():
    response = {
        'chain': blockchain.chain,
        'length': len(blockchain.chain),
    }
    return jsonify(response), 200

if __name__ == '__main__':
    app.run(host='0.0.0.0', port=5000)
위 코드의 상세설명은 아래와 같다.
- Line 15: Instantiates our Node. Read more about Flask here.
- Line 18: Create a random name for our node.
- Line 21: Instantiate our
Blockchainclass. - Line 24–26: Create the
/mineendpoint, which is aGETrequest. - Line 28–30: Create the
/transactions/newendpoint, which is aPOSTrequest, since we’ll be sending data to it. - Line 32–38: Create the
/chainendpoint, which returns the full Blockchain. - Line 40–41: Runs the server on port 5000.
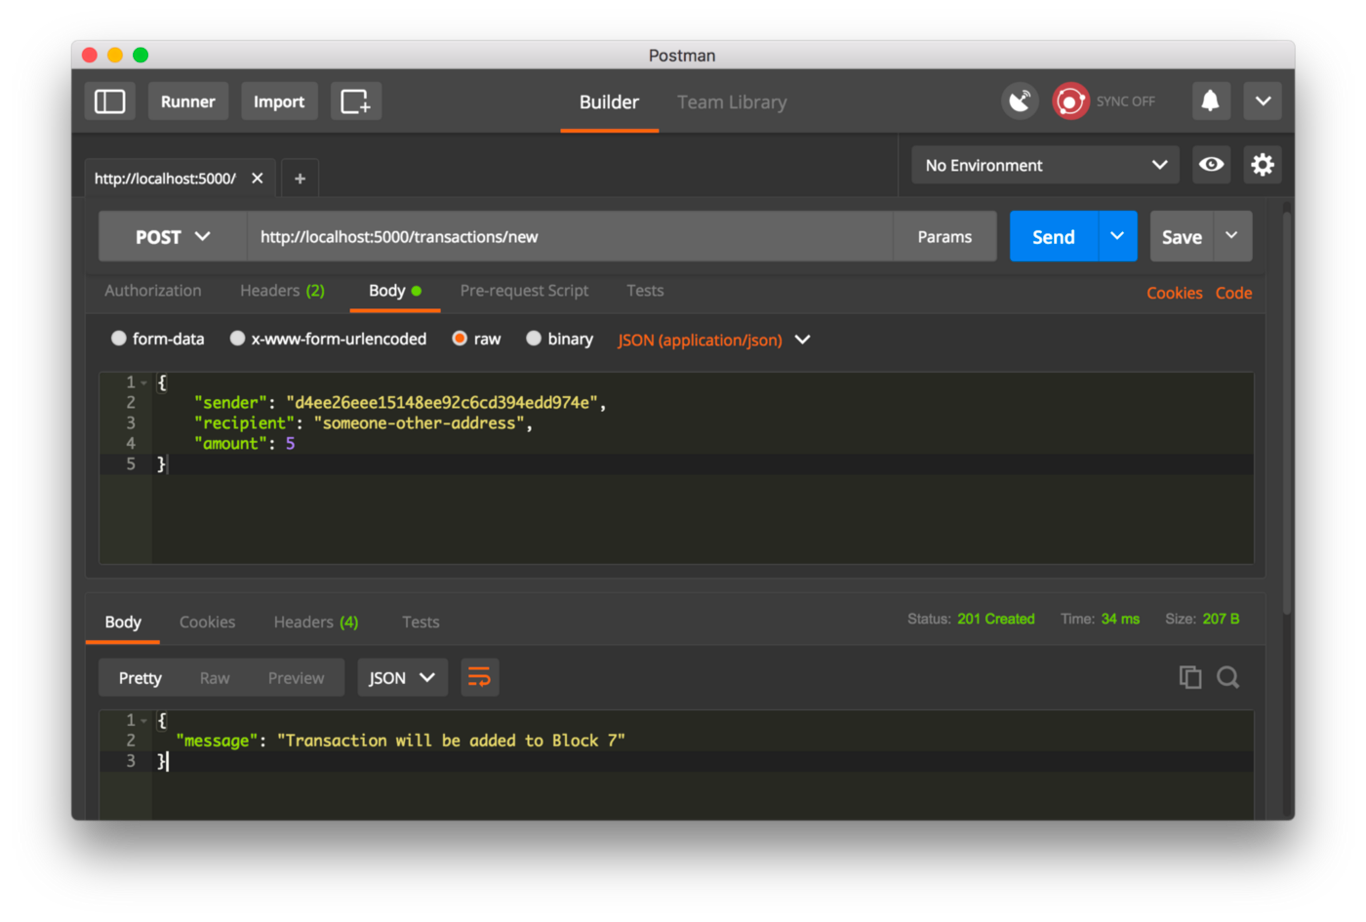
Transaction Endpoint 지정
아래는 transaction 요청 내용이다. user 가 server 에 보내는 내용인 것이다.
{
 "sender": "my address",
 "recipient": "someone else's address",
 "amount": 5
}
transaction 을 추가하는 함수를 코드에 작성해보자.
import hashlib
import json
from textwrap import dedent
from time import time
from uuid import uuid4
from flask import Flask, jsonify, request
...
@app.route('/transactions/new', methods=['POST'])
def new_transaction():
values = request.get_json()
# Check that the required fields are in the POST'ed data
required = ['sender', 'recipient', 'amount']
if not all(k in values for k in required):
return 'Missing values', 400
# Create a new Transaction
index = blockchain.new_transaction(values['sender'], values['recipient'], values['amount'])
response = {'message': f'Transaction will be added to Block {index}'}
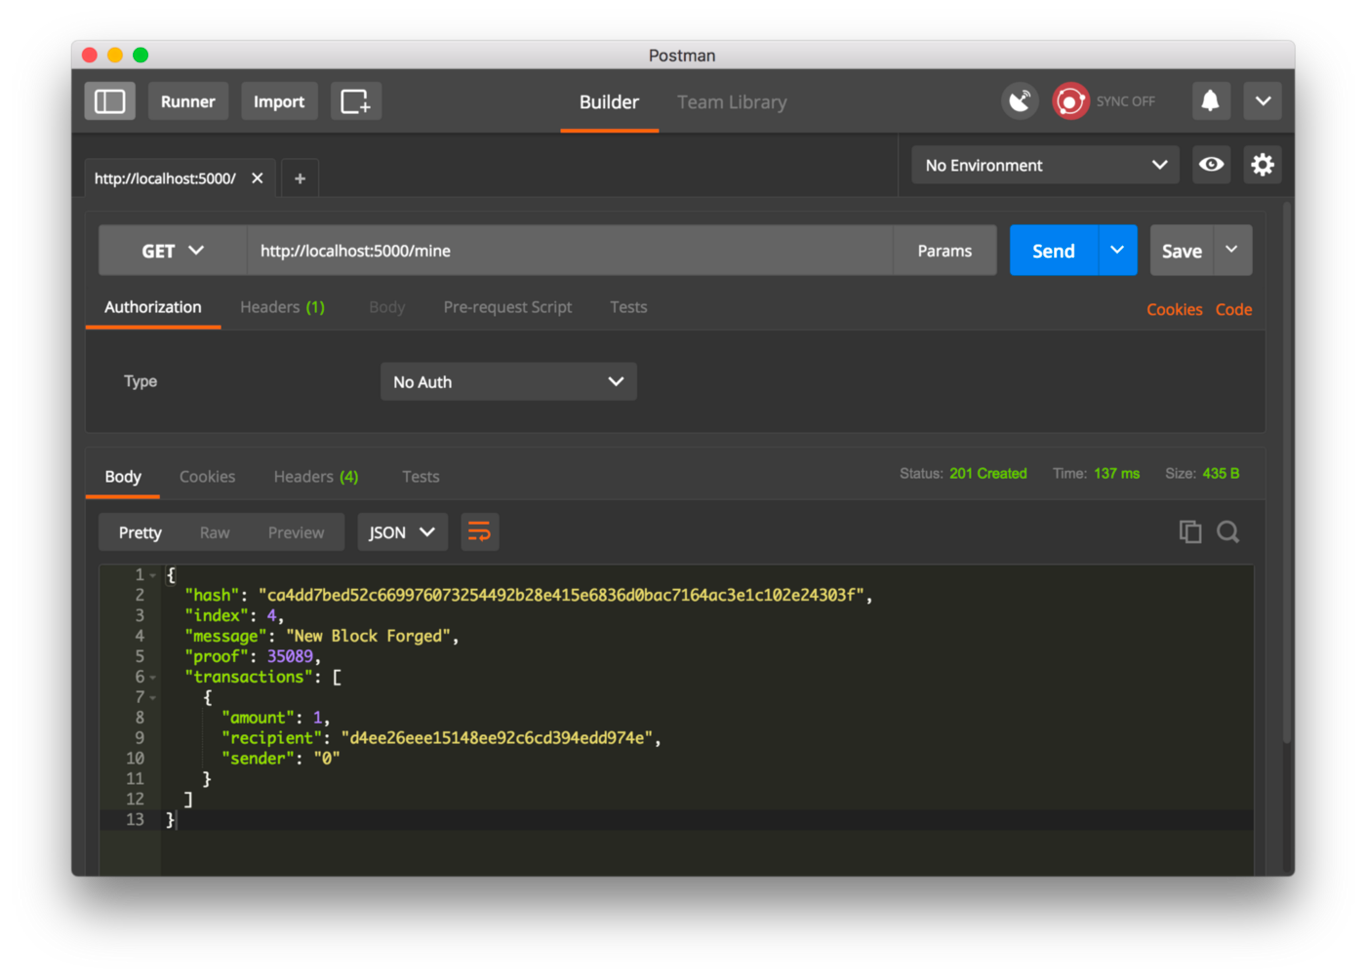
return jsonify(response), 201Mining Endpoint 지정
mining endpoint 는 세 가지 역할을 수행한다.
- PoW 연산
- miner 한테 transaction 추가를 통한 1 coin 부여
- 새로운 블록을 체인에 추가하여 가공
이것을 코드로 나타내면 아래와 같다.
import hashlib
import json

from time import time
from uuid import uuid4

from flask import Flask, jsonify, request

...

@app.route('/mine', methods=['GET'])
def mine():
    # We run the proof of work algorithm to get the next proof...
    last_block = blockchain.last_block
    last_proof = last_block['proof']
    proof = blockchain.proof_of_work(last_proof)

    # We must receive a reward for finding the proof.
    # The sender is "0" to signify that this node has mined a new coin.
    blockchain.new_transaction(
        sender="0",
        recipient=node_identifier,
        amount=1,
    )

    # Forge the new Block by adding it to the chain
    previous_hash = blockchain.hash(last_block)
    block = blockchain.new_block(proof, previous_hash)

    response = {
        'message': "New Block Forged",
        'index': block['index'],
        'transactions': block['transactions'],
        'proof': block['proof'],
        'previous_hash': block['previous_hash'],
    }
    return jsonify(response), 200
채굴된 block 의 수신자는 노드의 주소이다. 이를 통해 server 는 과정 1에서 정의한 다양한 method 들과 상호작용하며 블록체인의 역할을 수행하게 되는 것이다.
Blockchain Interaction 방법
API 가 제대로 작동하는지 확인해보자!
cmd 입력 후 아래와 같은 결과가 출력되면 server 가 제대로 작동됨을 알 수 있다.
$ python blockchain.py

* Running on http://127.0.0.1:5000/ (Press CTRL+C to quit)
Postman 에서 block mining 이 되는지 확인하기 위해 request를 GET 해보자.
- request: http://localhost:5000/mine
새로운 transactions 을 생성하기 위해 request 를 POST 해보자.