안드로이드 같은경우 액티비티에서 프래그먼트끼리 이동을 구현 하려면 새롭게 프래그먼트를 넣어주거나 해당 프래그먼트에 따라 여러 동작들을 추가할수도 있으며 리스트로 바뀌는 프래그먼트를 등록하여 관리하기도 합니다. 이는 모든 동작을 일일이 처리를 등록하여 더욱 꼼꼼하게 만들수 있으나 해당과정은 매우 복잡해질수 있습니다.
이를위해 android jetpack에서는 Navigation이라는 라이브러리를 통하여 프레그먼트의 이동과 관련된 액션을 쉽게 구현할수 있습니다.
장점 및 특징
Navigation은 다양한 이점과 기능을 제공합니다.
Animations and transitions: 애니메이션 및 전환에 대한 표준화된 리소스를 제공합니다.
Deep linking: 사용자를 목적지로 직접 연결하는 딥링크를 구현하고 처리합니다.
UI patterns: 최소한의 추가 작업으로 탐색 창, 하단 탐색 등의 패턴을 지원합니다.
Type safety: 대상 간에 데이터를 탐색하고 전달할 때 유형 안전성을 제공하는 Safe Args Gradle 플러그인이 포함되어 있습니다 .
ViewModel 지원: 탐색 그래프로 범위를 지정하여 ViewModel그래프 대상 간에 UI 관련 데이터를 공유할 수 있습니다.
Fragment transactions: 조각 트랜잭션을 완벽하게 지원하고 처리합니다.
Back and up: 기본적으로 백업 및 위로 작업을 올바르게 처리합니다.
안드로이드 공식문서에 따르면 Navigation은 이러한 장점과 특징이 있다고 합니다.
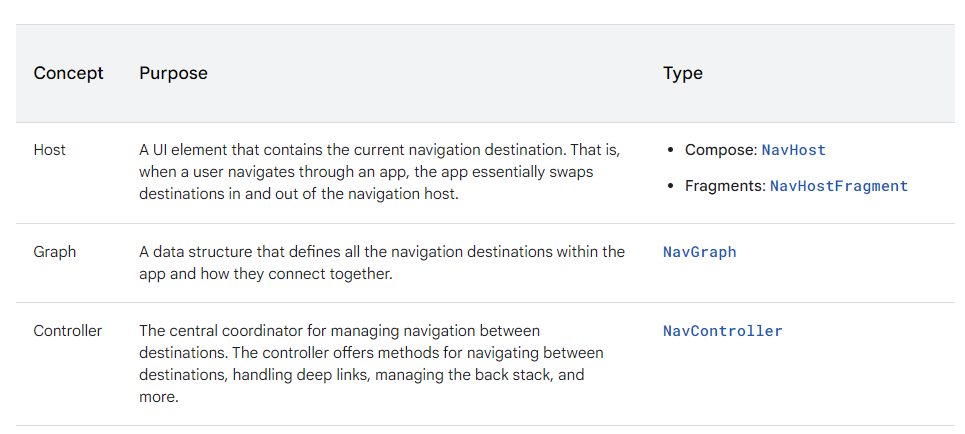
Navigation에는 세 가지 구성 요소 Host, Graph, Controller가 있습니다.
Host
UI 즉 프래그먼트가 바뀌어지는 그릇을 의미합니다.
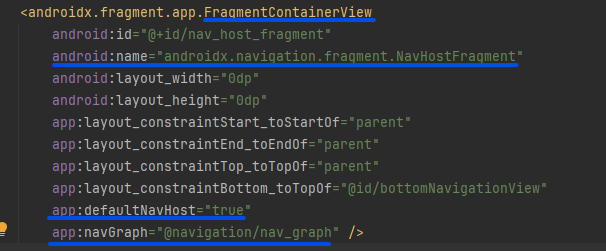
프래그먼트에서는 NavHostFragment를 이용하여 Host를 구현할수있습니다. 구현시에는 android:name="androidx.navigation.fragment.NavHostFragment" 및 app:defaultNavHost="true"는 시스템 뒤로 버튼을 NavHostFragment에 연결합니다. app:navGraph를 이용하여 NavHostFragment를 네비게이션 그래프와 연결합니다.
Graph
앱 내의 모든 네비게이션 대상과 연결 방법을 정의하는 데이터 구조입니다.
떤 목적지들이 있는지, 이동 중 어떤 액션을 취할 것인지, 어떤 데이터를 넘겨줄 것인지에 대한 정보가 담겨져 있습니다.
비쥬얼 에디터를 제공하기 때문에 XML로 작성할수있으며 코드로도 해당 그래프를 구현 할수있습니다.
// Retrieve the NavController.
val navController = findNavController(R.id.nav_host_fragment)

// Add the graph to the NavController with `createGraph()`.
navController.graph = navController.createGraph(
    startDestination = "profile"
) {
    // Associate each destination with one of the route constants.
    fragment<ProfileFragment>("profile") {
        label = "Profile"
    }

    fragment<FriendsListFragment>("friendsList") {
        label = "Friends List"
    }

    // Add other fragment destinations similarly.
}
Controller
모든 NavHost 가 개별적으로 가지고 있는 구성 요소인 컨트롤러는 대상 간 네비게이션, 딥 링크 처리, 백 스택 관리 등의 작업을 위한 메서드를 제공합니다.
프래그먼트에서는 이런식으로 호스트로부터 컨틀롤러를 받아올수 있습니다.
구현
구현을 하면서 네비게이션을 좀더 알아가 봅시다.
build.gradle
dependencies {
  def nav_version = "2.7.7" // 최신버전

  // Kotlin
  implementation "androidx.navigation:navigation-fragment-ktx:$nav_version"
  implementation "androidx.navigation:navigation-ui-ktx:$nav_version"
}
앱에서 jetpack navigation을 사용할수 있도록 등록해줍니다.
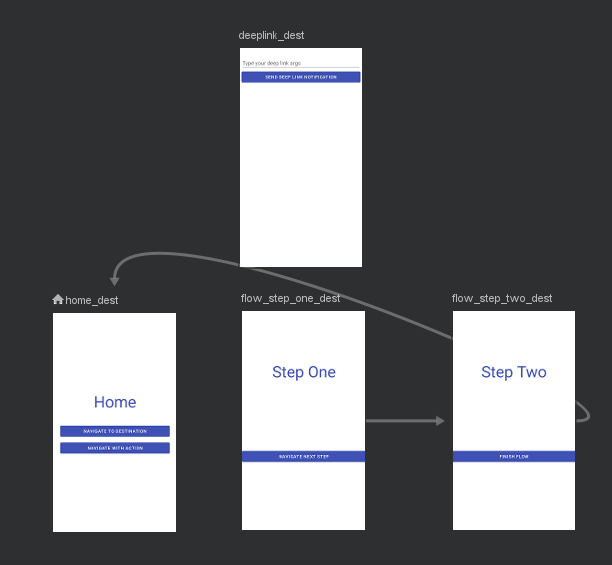
res/navigation/mobile_navigation.xml
<?xml version="1.0" encoding="utf-8"?>
<navigation xmlns:android="http://schemas.android.com/apk/res/android"
xmlns:app="http://schemas.android.com/apk/res-auto"
xmlns:tools="http://schemas.android.com/tools"
app:startDestination="@+id/home_dest">
<fragment
android:id="@+id/home_dest"
android:name="com.example.android.codelabs.navigation.HomeFragment"
android:label="@string/home"
tools:layout="@layout/home_fragment">
</fragment>
<fragment
android:id="@+id/flow_step_one_dest"
android:name="com.example.android.codelabs.navigation.FlowStepFragment"
tools:layout="@layout/flow_step_one_fragment">
<argument
android:name="flowStepNumber"
app:argType="integer"
android:defaultValue="1"/>
<action
android:id="@+id/next_action"
app:destination="@+id/flow_step_two_dest">
</action>
</fragment>
<fragment
android:id="@+id/flow_step_two_dest"
android:name="com.example.android.codelabs.navigation.FlowStepFragment"
tools:layout="@layout/flow_step_two_fragment">
<argument
android:name="flowStepNumber"
app:argType="integer"
android:defaultValue="2"/>
<action
android:id="@+id/next_action"
app:popUpTo="@id/home_dest">
</action>
</fragment>
<fragment
android:id="@+id/deeplink_dest"
android:name="com.example.android.codelabs.navigation.DeepLinkFragment"
android:label="@string/deeplink"
tools:layout="@layout/deeplink_fragment">
<argument
android:name="myarg"
android:defaultValue="Android!"/>
</fragment>
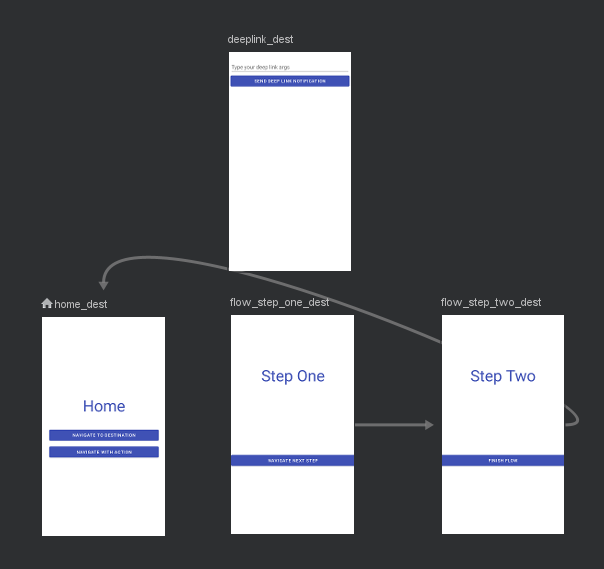
</navigation>비쥬얼 에디터나 xml을 이용하여 Navigation graph를 만듭니다.
해당 그래프를 만들때 프래그먼트의 이동(Action)이나 넘규줄 데이터(argument)등을 지정할수 있습니다.
res/layout/activity_main.xml
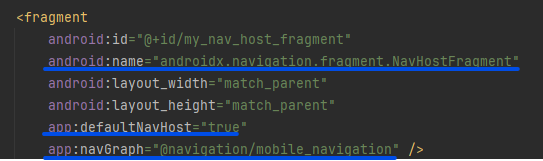
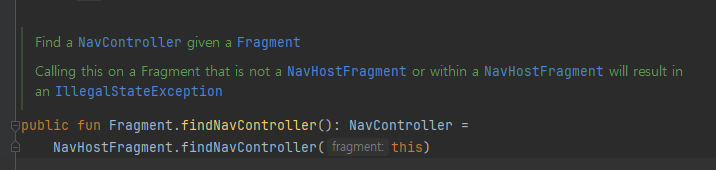
액티비티나 프래그먼트에 fragment를 사용할수 있도록 호스트를 등록합니다.
일렇게 등록을 하게되면 NavHostFragment 자체나 NavHostFragment를 상위 요소로 보유하는 뷰나 프래그먼트에서
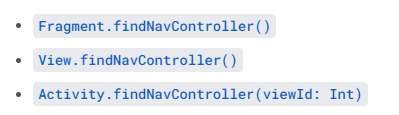
위 함수들을 이용하여 컨트롤러에 접근을 할수있습니다.
navigate
navigate 함수는 컨트롤러를 이용하여 호스트의 화면을 바꾸는 동작을 말합니다.
// id 이용
findNavController().navigate(R.id.action_homeFragment_to_writeArticleFragment)
위코드처럼 resId이용하여 호출할수도 있으며
val options = navOptions {
	anim {
		enter = R.anim.slide_in_right
		exit = R.anim.slide_out_left
		popEnter = R.anim.slide_in_left
		popExit = R.anim.slide_out_right
	}
}
// id 이용
findNavController().navigate(R.id.action_homeFragment_to_writeArticleFragment,null,options)
이런식으로 옵션을 추가할수도 있는데 이경우 에니메이션같은 경우 xml에서 설정할수있습니다.
 val bundle = Bundle().apply {
	putString("key", "value")
}
findNavController().navigate(R.id.action_homeFragment_to_writeArticleFragment, bundle)

//---- writeArticleFragment
val str : String? = arguments?.getString("amount")
데이터또한 graph에 argument tag를 추가한다면 값을 번들에 넣어 넘길수도 있습니다.
safeArgs
안드로이드의 Jetpack Navigation 라이브러리에서 제공하는 기능 중 하나로, 컴파일 타임에 안전하게 전달되는 인자를 사용하여 네비게이션을 관리할 수 있도록 도와줍니다. SafeArgs를 사용하면, 프래그먼트 간의 데이터를 전달할 때 프로그래밍 오류를 줄이고, 타입 안정성을 보장할 수 있습니다.
val action = HomeFragmentDirections.actionHomeFragmentToWriteArticleFragment()
findNavController().navigate(action)
//option 추가
val options = navOptions {
	anim {
		enter = R.anim.slide_in_right
		exit = R.anim.slide_out_left
		popEnter = R.anim.slide_in_left
		popExit = R.anim.slide_out_right
	}
}
findNavController().navigate(action,options)
//argument 전달
findNavController().navigate(HomeFragmentDirections.actionHomeFragmentToArticleFragment(articleId = it.articleId.orEmpty()))
//수신
private val args: ArticleFragmentArgs by navArgs()
val articleId = args.articleId
NavigationUI
NavigationUI를 사용하여 Toolbar, CollapsingToolbarLayout, ActionBar, DrawerLayout, BottomNavigationView등의 UI들의 Action을 직접 구현하지 않고, 간단하게 연결하여 사용이 가능합니다.
activity_main.xml
<com.google.android.material.bottomnavigation.BottomNavigationView
                android:id="@+id/nav_view"
                android:layout_width="wrap_content"
                android:layout_height="wrap_content"
                app:menu="@menu/bottom_nav_menu"/>
bottom_nav_menu.xml
<menu xmlns:android="http://schemas.android.com/apk/res/android">
    <item
        android:id="@id/home_dest"
        android:icon="@drawable/ic_home"
        android:title="@string/home" />
    <item
        android:id="@id/deeplink_dest"
        android:icon="@drawable/ic_android"
        android:title="@string/deeplink" />
</menu>
이때 메뉴의 각 id가 navGraph에 설정한 id가 같아야합니다.
MainActivity.kt
binding.navView.setupWithNavController(navController)AppBarConfiguration
Tab의 경우나, BottomNavigation등의 경우는 각 탭들 모두 최상단의 Destination이기 때문에,이를 지원하기 위해 Top-Level-Destination을 정의할 수 있습니다.
var appBarConfiguration: AppBarConfiguration

appBarConfiguration = AppBarConfiguration(
  setOf(R.id.home_dest, R.id.deeplink_dest)
)
setupActionBarWithNavController(host.navController, appBarConfiguration)
DeepLink
Explicit Deep Linking - 명시적 딥링크
val args = Bundle()
args.putString("itemId", itemId)
val pendingIntent = NavDeepLinkBuilder(context)
  .setGraph(R.navigation.mobile_navigation)
  .setDestination(R.id.detailFragment)
  .setArguments(args)
  .createPendingIntent()
remoteViews.setOnClickPendingIntent(R.id.deep_link_button, pendingIntent)
Implicit Deep Linking - 암시적 딥링크
mobile_navigation.xml
<fragment
    android:id="@+id/deeplink_dest"
    android:name="com.example.android.codelabs.navigation.DeepLinkFragment"
    android:label="@string/deeplink"
    tools:layout="@layout/deeplink_fragment">

    <argument
        android:name="myarg"
        android:defaultValue="Android!"/>

    <deepLink app:uri="www.example.com/{myarg}" />
</fragment>
AndroidManifest.xml
<activity android:name=".MainActivity">
    <intent-filter>
        <action android:name="android.intent.action.MAIN" />
        <category android:name="android.intent.category.DEFAULT" />
        <category android:name="android.intent.category.LAUNCHER" />
    </intent-filter>

    <nav-graph android:value="@navigation/mobile_navigation" />
</activity>
reference
https://developer.android.com/guide/navigation
https://developer.android.com/codelabs/android-navigation?index=..%2F..%2Findex&hl=ko#0
https://velog.io/@hoyaho/Jetpack-Navigation-Component
https://hik-coding.tistory.com/148
https://namjackson.tistory.com/28