REST API 문서화와 Spring REST Docs 적용기
미니 프로젝트를 진행하면서 REST API 명세서 작성의 중요성을 느꼈습니다. 여러 가지 도구를 조사한 결과, 신뢰성 높은 문서를 작성하기 위해 Spring REST Docs와 Postman을 사용하기로 결정했습니다. 프로젝트에서 REST Docs를 통해 API와 실제 코드의 일치성을 확보하고, Postman을 통해 실시간으로 테스트하고 팀원들과 공유할 수 있도록 했습니다.
API 문서화 도구 비교
| 기능 | Spring REST Docs | Swagger (OpenAPI) | Postman |
|---|---|---|---|
| API 문서 생성 방식 | 테스트 코드 기반 | 명세서 기반 (OpenAPI) | API 요청 및 응답 기반 |
| 실시간 테스트 지원 | X | O (Swagger UI) | O (Postman 워크스페이스) |
| 설정 복잡도 | 높음 | 중간 | 낮음 |
| 정적 문서화 및 배포 | O | O | 제한적 |
| 협업 기능 | 제한적 | O | O |
| 클라이언트 코드 생성 | X | O | 제한적 |
| 테스트 시뮬레이션 | X | 제한적 | O |
| 추천 사용 사례 | 실제 API와 일치 필요 | 실시간 문서화 필요 | 테스트 기반 문서 필요 |
Spring REST Docs 설정
기본 환경
- Spring Boot: 3.3.5
- JUnit: 5.10.5
- MockMvc
- AsciiDoc
MockMvc vs SpringBootTest
문서화 시에는 서비스 계층을 Mocking하는 것이 일반적입니다.
- MockMvc:
@WebMvcTest로 Controller Layer만 테스트하여 빠르게 테스트를 진행할 수 있습니다. - SpringBootTest: 통합 테스트에 유리하나, 전체 컨텍스트를 로드하기 때문에 속도가 느립니다.
Spring REST Docs 문서화에는 MockMvc를 사용하는 것이 속도 면에서 더 유리하다고 판단했습니다.
build.gradle 설정
ext {
    set('snippetsDir', file("build/generated-snippets"))
}

dependencies {
    testImplementation 'org.springframework.boot:spring-boot-starter-test'
    testImplementation 'org.springframework.restdocs:spring-restdocs-mockmvc'
    testRuntimeOnly 'org.junit.platform:junit-platform-launcher'
}

tasks.named('asciidoctor') {
    inputs.dir snippetsDir
    dependsOn test
}

bootJar {
    dependsOn asciidoctor
    from("${asciidoctor.outputDir}") {
        into 'static/docs'
    }
}
설정 설명
-
ext 블록의
snippetsDir:snippetsDir는 REST Docs 스니펫이 생성될 디렉토리를 지정하는 전역 변수로 설정되었습니다.build/generated-snippets디렉토리를 스니펫 저장 경로로 지정하여,test태스크가 실행될 때 생성된 API 스니펫 파일들이 이 경로에 저장됩니다.
-
tasks.named('asciidoctor'):asciidoctor태스크는index.adoc파일을 기반으로 HTML 문서를 생성합니다.inputs.dir snippetsDir:asciidoctor태스크가 REST Docs의 스니펫 디렉토리(snippetsDir)를inputs.dir로 지정하여, 테스트 코드에서 생성된 스니펫 파일을 참조하도록 합니다.dependsOn test:asciidoctor태스크가test태스크 이후에 실행되도록 설정하여,test태스크에서 생성된 스니펫 파일을 참고할 수 있게 합니다.
-
bootJar태스크:bootJar는 Spring Boot 애플리케이션을 실행 가능한 JAR 파일로 패키징하는 태스크입니다.dependsOn asciidoctor:bootJar태스크가 실행될 때asciidoctor태스크가 먼저 실행되도록 설정합니다.from("${asciidoctor.outputDir}"):asciidoctor태스크의 출력 디렉토리(기본적으로build/docs/asciidoc)에 생성된 HTML 문서를bootJar에 포함합니다.into 'static/docs': JAR 파일 내의static/docs폴더에 Asciidoctor로 생성된 문서 파일을 포함하여, 애플리케이션이 배포된 후/docs경로로 정적 문서에 접근할 수 있도록 설정합니다.
이 설정을 통해 test 태스크에서 REST Docs 스니펫이 생성되고, asciidoctor 태스크는 해당 스니펫을 포함하여 HTML 문서를 생성하게 됩니다. 최종적으로 bootJar 태스크에서 HTML 문서를 static/docs 경로에 포함하여 JAR 파일로 배포할 수 있습니다.
ApiDocumentUtils 설정
REST API 요청과 응답을 예쁘게 출력하고, 문서의 기본 URI를 설정하기 위해 ApiDocumentUtils를 정의하였습니다.
public interface ApiDocumentUtils {

    static OperationRequestPreprocessor getDocumentRequest() {
        return preprocessRequest(
                modifyUris()
                    .scheme("https")
                    .host("docs.api.com")
                    .removePort(),
                prettyPrint()); // (1)
    }

    static OperationResponsePreprocessor getDocumentResponse() {
        return preprocessResponse(prettyPrint()); // (2)
    }
}
(1) 문서 상의 기본 URI를 http://localhost:8080 에서 https://docs.api.com 으로 변경하여, 실제 배포 환경을 반영한 URI로 문서화합니다.
(2) prettyPrint()를 사용해 요청과 응답을 보기 좋은 형식으로 출력하여, 문서의 가독성을 높입니다.
실제 테스트 코드 예제
@WebMvcTest(controllers = OrderRestController.class)
@AutoConfigureRestDocs(uriScheme = "https", uriHost = "docs.api.com")
public class OrderRestControllerTest {
@Autowired
private MockMvc mockMvc;
@MockBean
private OrderService orderService;
@Autowired
private ObjectMapper objectMapper;
@Test
@DisplayName("주문 생성 테스트")
public void createOrderTest() throws Exception {
// given
OrderItemRequestDto.Create orderItem1 = OrderItemRequestDto.Create.builder()
.menuId(UUID.randomUUID())
.quantity(3)
.build();
OrderItemRequestDto.Create orderItem2 = OrderItemRequestDto.Create.builder()
.menuId(UUID.randomUUID())
.quantity(2)
.build();
List<OrderItemRequestDto.Create> orderItems = List.of(orderItem1, orderItem2);
OrderRequestDto.Create orderRequestDto = OrderRequestDto.Create.builder()
.orderItemRequestDtos(orderItems)
.orderType("online")
.deliveryAddress("노원구 섬밭로52")
.deliveryRequest("문 앞에 놓아주세요")
.restaurantId(UUID.randomUUID())
.build();
MessageResponseDto responseDto = new MessageResponseDto("Order" + SuccessMessage.CREATE.getMessage());
doNothing().when(orderService).createOrder(Mockito.any(OrderRequestDto.Create.class), Mockito.any());
// when / then
mockMvc.perform(post("/api/order")
.contentType(MediaType.APPLICATION_JSON)
.content(objectMapper.writeValueAsString(orderRequestDto)))
.andExpect(status().isCreated())
.andExpect(jsonPath("$.message").value(responseDto.getMessage())) // 응답 메시지 검증
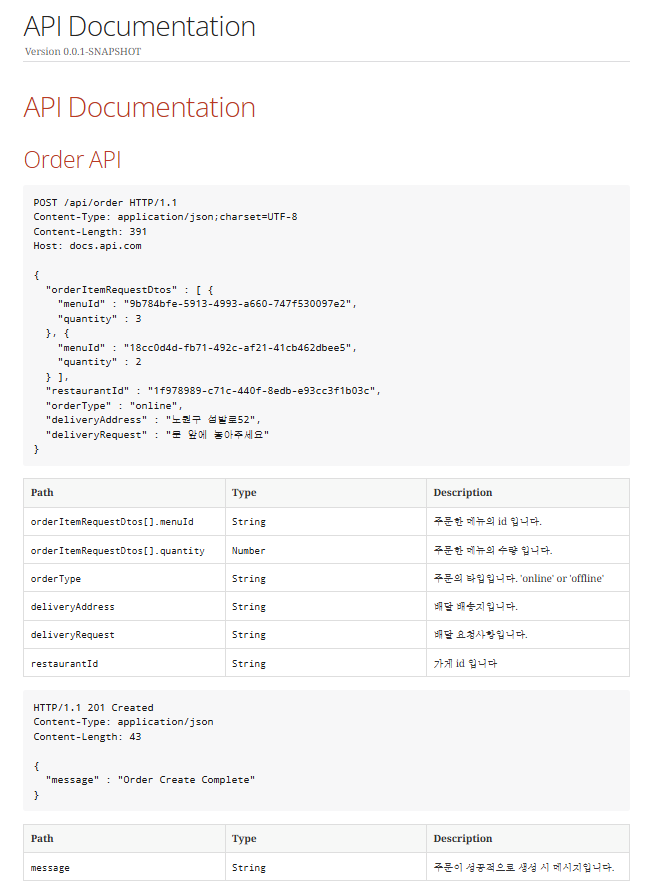
.andDo(document("create-order",
ApiDocumentUtils.getDocumentRequest(),
ApiDocumentUtils.getDocumentResponse(),
requestFields(
fieldWithPath("orderItemRequestDtos[].menuId").description("주문한 메뉴의 id 입니다."),
fieldWithPath("orderItemRequestDtos[].quantity").description("주문한 메뉴의 수량 입니다."),
fieldWithPath("orderType").description("주문의 타입입니다. 'online' or 'offline'"),
fieldWithPath("deliveryAddress").description("배달 배송지입니다."),
fieldWithPath("deliveryRequest").description("배달 요청사항입니다."),
fieldWithPath("restaurantId").description("가게 id 입니다")
),
responseFields(
fieldWithPath("message").description("주문이 성공적으로 생성 시 메시지입니다.")
)
));
}
}주요 어노테이션 설명
- @WebMvcTest:
OrderRestController에 대한 웹 레이어 테스트를 수행하며, Spring MVC의MockMvc객체를 사용하여 컨트롤러의 테스트 환경을 설정합니다. - @AutoConfigureRestDocs: REST Docs 설정을 자동으로 적용하며, 문서에서
https://docs.api.com을 기본 URL로 사용하도록 설정합니다.
MockMvc 및 기타 의존성 설정
- MockMvc: REST API 요청을 시뮬레이션하고 응답을 검증하기 위해 주입받습니다.
- @MockBean(OrderService):
OrderService를 MockBean으로 주입하여 실제 구현 대신 Mock 객체를 사용합니다. 이를 통해 비즈니스 로직을 모킹하고 컨트롤러 레이어만 테스트할 수 있습니다. - ObjectMapper: JSON 직렬화 및 역직렬화를 위해
ObjectMapper를 주입받아, DTO를 JSON으로 변환하거나 JSON을 객체로 변환하는 데 사용됩니다.
테스트 코드 세부 설명
- @Test: 테스트 메서드임을 나타내며, JUnit에서 테스트 메서드로 인식합니다.
- @DisplayName: 테스트의 목적을 명확히 설명하는 이름을 부여하여 가독성을 높입니다.
테스트 준비 단계
- 첫 번째 주문 항목인
OrderItemRequestDto.Create객체를 생성하고,menuId와quantity를 설정합니다. - 두 번째 주문 항목을 생성하여
menuId와quantity를 설정합니다. orderItem1과orderItem2를 포함한 주문 항목 목록을 생성합니다.- 주문 요청을 위한
OrderRequestDto.Create객체를 생성하여 주문 항목 목록, 주문 타입, 배송지, 요청 사항, 가게 ID 등을 설정합니다. Order객체를 생성하여 총 가격, 사용자, 가게 정보를 설정합니다. 사용자와 가게 정보는 Mock 객체로 생성합니다.- 주문 성공 메시지를 담은
MessageResponseDto객체를 생성합니다. OrderService의createOrder메서드를 모킹하여, 호출되었을 때 아무 작업도 하지 않도록 설정합니다.
요청 및 검증 단계
MockMvc를 통해POST요청을/api/order경로로 전송합니다.- 요청 본문을
orderRequestDto의 JSON 문자열로 설정하고,Content-Type을 JSON으로 지정합니다.
- 요청 본문을
- 요청 결과로 상태 코드가
201 (CREATED)인지 검증합니다. - 응답 JSON에서
message필드의 값이responseDto.getMessage()와 같은지 확인합니다.
문서화 단계
- REST Docs로 API 문서를 자동 생성하며, 문서 스니펫을
"create-order"경로로 저장합니다. getDocumentRequest()와getDocumentResponse()를 사용해 요청과 응답에 대한 전처리 설정을 적용합니다.- 요청 본문 필드 설명
- 각 필드의 JSON 경로와 설명을 설정하여 REST Docs 스니펫으로 저장합니다.
- 예시:
orderItemRequestDtos[].menuId: 주문한 메뉴의 ID입니다.orderItemRequestDtos[].quantity: 주문한 메뉴의 수량입니다.orderType: 주문의 타입입니다.'online'또는'offline'.deliveryAddress: 배달 배송지입니다.deliveryRequest: 배달 요청 사항입니다.restaurantId: 가게의 ID입니다.
- 응답 본문 필드 설명
message필드가 주문 생성 성공 시 반환되는 메시지임을 설명하며, REST Docs 스니펫으로 저장합니다.
문서화 결과
위와 같이 설정 후, ./gradlew test와 ./gradlew asciidoctor를 실행하면 다음과 같이 REST Docs에서 생성된 HTML 문서를 확인할 수 있습니다.

이 과정을 통해 REST Docs가 생성한 문서가 API와 실제 코드가 일치하도록 보장할 수 있었습니다.