Thread를 구현하는 방법
Thread를 구현하는 방법에는 Thread클래스를 상속받는 방법과 Runnable 인터페이스를 구현하는 방법이 있다.
- Thread를 상속받는 방법
public class MyThread extends Thread{
    @Override
    public void run() {
        // 구현 내용
    }
}- Runnable를 구현하는 방법
public class MyThread implements Runnable{

    @Override
    public void run() {
      // 구현 내용
    }
}
Thread 클래스를 상속받으면 다른 클래스를 상속받을 수 없기 때문에, Runnable 인터페이스를 구현하는 방법이 일반적이다.
또한 쓰레드를 통해 작업하고자 하는 내용을 run()의 body에 채워주면 된다.
Runnable interface
Runnable interface는 run() 추상 메서드
로 구성된 함수형 인터페이스이다.
@FunctionalInterface
public interface Runnable {

    public abstract void run();
}
Thread class
Thread 클래스도 Runnable interface를 구현하여 만든 클래스이다.
public class Thread implements Runnable {
    /* What will be run. */
    private Runnable target;

    @Override
    public void run() {
        if (target != null) {
            target.run();
        }
    }
 }
여기서 주의할 점이 있는데,
Thread 클래스의 생성자는 Runnable interface를 인자로 받는다.
public class MyThread extends Thread {
    public static void main(String[] args) {
        Thread1 threadClass = new Thread1();
        Thread runnableThread = new Thread(new Runnable2());

        threadClass.start();
        runnableThread.start();
    }
}

class Thread1 extends Thread {

    @Override
    public void run() {
        System.out.println("Thread 클래스를 구현한 쓰레드");
    }
}

class Runnable2 implements Runnable {

    @Override
    public void run() {
        System.out.println("Runnable interface를 구현한 Runnnable 클래스");
    }
}
Runnable interface를 구현한 Runnnable 클래스
Thread 클래스를 구현한 쓰레드따라서 Thread의 생성자로 Runnable interface의 구현체를 전달해주어야 한다,
즉, Runnable interface 자체만으로 쓰레드를 실행시키지는 못 한다.
Runnable interface는 run() 추상 메서드를 가지고 새로운 Thread는 생성하지 않은채, 기존의 Thread에서 어떤 일을 수행할지만 결정하는 것이다.
쓰레드 실행하기
위 코드에서 보면 thread를 생성할 때 쓰레드에서 할 일을 정의한 run()메서드를 호출하는 것이 아니라 run()메서드를 호출하는 것이 의문이다.
start()
호출 스택(thread)을 생성한 후 run()을 호출해서, 생성된 호출스택의 첫 번째로 run()이 저장된다.
따라서 start()를 이용해야 멀티쓰레드로 병렬 처리가 가능하다.
public class Test {
    public static void main(String[] args) {
        Thread[] threads = new Thread[5];
        System.out.println("thread name : " + Thread.currentThread().getName());

        for(int i=0;i<threads.length;i++){
            threads[i]=new Thread(()-> System.out.println("thread name : " + Thread.currentThread().getName()));
            threads[i].start();
        }
    }
}
코드 설명
Thread의 생성자로 Runnable interface의 구현체를 lambda로 넘겨주었다.
thread name : main
thread name : Thread-0
thread name : Thread-1
thread name : Thread-2
thread name : Thread-3
thread name : Thread-4
결과 해석
실행 결과를 보면 각 쓰레드를 생성하여 각 호출 스택(thread)에서 Runnable interface의 run을 실행한 것을 알 수 있다.
-> 즉, 멀티쓰레드로 동작했다.
start로 Thread는 단 한번만 실행시킬 수 있다.
start()메서드를 실행할 떄 threadStatue를 확인한다.(new Thread일 때 0의 값을 가진다.)
- 새로운 스레드가 아닐 경우(0이 아닌 경우) : IllegalThreadStateException()예외 발생
- 새로운 Thread(0인 경우) : 쓰레드 실행
public class Thread implements Runnable {
    public synchronized void start() {
        /**
         * This method is not invoked for the main method thread or "system"
         * group threads created/set up by the VM. Any new functionality added
         * to this method in the future may have to also be added to the VM.
         *
         * A zero status value corresponds to state "NEW".
         */
        if (threadStatus != 0)
            throw new IllegalThreadStateException();
  	//생략
    }
}
멀티쓰레드와 멀티태스킹
- 멀티쓰레드 : 하나의 프로세스 안에 여러 쓰레드가 동시에 작업을 수행
- 멀티태스킹 : 여러 개의 프로세스가 동시에 작업을 수행
run()
이미 생성된 호출스택(thread)를 그대로 사용해서 run메서드를 실행한다.
따라서 새로운 스레드가 생성되지 않고 병렬처리할 수 없다.
public class Test {
    public static void main(String[] args) {
        Thread[] threads = new Thread[5];
        System.out.println("thread name : " + Thread.currentThread().getName());

        for(int i=0;i<threads.length;i++){
            threads[i]=new Thread(()-> System.out.println("thread name : " + Thread.currentThread().getName()));
            threads[i].run();
        }
    }
}
thread name : main
thread name : main
thread name : main
thread name : main
thread name : main
thread name : main결과 해석
실행 결과를 보면 main 쓰레드에서 Runnable interface의 run을 실행한 것을 알 수 있다.
-> 즉, 싱글쓰레드로 동작했다.
start와 run의 차이점
| start | run |
|---|---|
| 호출스택(thread)를 생성하고 run()메서드를 실행한다.-> 멀티쓰레드 | thread가 할 일을 정의한 run()메서드만 실행한다. -> 싱글쓰레드 |
| 한 객체에서 두 번이상 수행하면 에러 발생 | 호출 수에 관계없이 실행 가능 |
public class MyThread extends Thread {
    public static void main(String[] args) {
        System.out.println("main thread : "+Thread.currentThread().getName());
        Thread1 threadClass = new Thread1();
        Thread runnableThread = new Thread(new Runnable2());

        threadClass.run();
        threadClass.start();
        threadClass.run();
        runnableThread.start();
    }
}

class Thread1 extends Thread {
    @Override
    public void run() {
        System.out.println("Thread 상속하여 만든 클래스 : "+Thread.currentThread().getName());
    }
}

class Runnable2 implements Runnable {

    @Override
    public void run() {
        System.out.println("Runnable 구현하여 만든 클래스 : "+Thread.currentThread().getName());
    }
}
main thread : main
Thread 상속하여 만든 클래스 : main
Thread 상속하여 만든 클래스 : main
Thread 상속하여 만든 클래스 : Thread-0
Runnable 구현하여 만든 클래스 : Thread-1main thread에서 run()메서드를 실행하였을 때 추가적인 thread를 실행하지 않고 main thread에서 실행시키는 것을 확인할 수 있다.
즉, run()메서드를 이용해 thread를 실행하면 Thread를 실행시킨 호출 스택(thread)에서 thread를 실행시킨다.
main thread
지금까지 우리는 기본적으로 main thread를 사용하고 있었다.
프로그램을 실행하면 기본적으로 하나의 thread를 생성하고, 그 쓰레드가 main 메서드를 호출해서 작업이 수행되도록 하는 것이다.
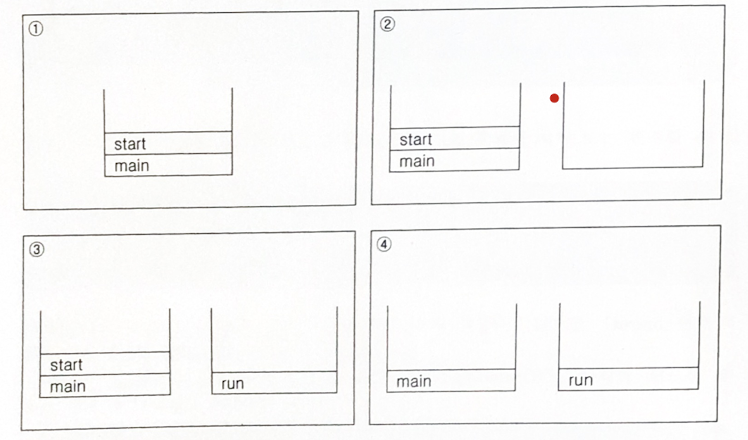
1. 프로그램 시작으로 main thread(호출 스택)이 생성되었다. 이 main thread는 main 메서드를 호출해 작업을 수행한다. -> 이때 새로운 thread를 생성하는 start 메서드를 수행한다.
2. start 메서드는 새로운 thread(호출 스택)을 생성한다.
3. 새로운 thread에 run()메서드를 호출하고 작업을 수행한다.
4. thread가 2개이므로 스케줄러가 정한 순서에 의해 작업을 수행한다.
- 단일스레드 -> call stack의 상단에 위치하면 실행중인 메서드
- 멀티스레드 -> call stack의 상단에 위치하더라도 대기상태일 수 있다.
- 이후 run() 수행이 종료된 call stack이 비워지면서 call stack은 사라진다.
main method가 작업 완료하면 main call stack은 사라질까?
- 단일스레드 : main method가 작업을 완료하면 main call stack이 사라지면서 프로그램이 종료되었다.
- 멀티스레드 : main method가 작업을 완료하더라도 다른 thread가 작업을 마치지 않은 상태라면 프로그램이 종료되지 않는다.
-> 이때 그러면 main call stack은 삭제되었지만 프로그램이 종료가 안 되는 것일까?
thread는 사용자 쓰레드와 데몬 쓰레드로 나뉜다.
Demon Thread
일반 thread를 돕는 보조적인 역할을 수행하는 thread로 일반 thread가 종료되면 demon thread도 종료된다.
Demon thread 설정방법
setDeamon()을 통해서 thread를 deamon thread 또는 사용자 thread로 지정한다.
- true : deamon thread
- false : user thread
public class Thread implements Runnable {
	public final void setDaemon(boolean on) {
        checkAccess();
        if (isAlive()) {
            throw new IllegalThreadStateException();
        }
        daemon = on;
    }
}
Demon thread 사용예시
자동저장 , 백그라운드 작업
public class ThreadTest implements Runnable {
    static boolean autoSave= false;

    public static void main(String[] args) {
        Thread thread = new Thread(new ThreadTest());
        //데몬쓰레드로 설정하기
        thread.setDaemon(true);
        thread.start();

        for(int i=0;i<10;i++){
            try{
                Thread.sleep(1000);
            }catch (InterruptedException e){
                e.printStackTrace();
            }
            System.out.println(i);
            if(i==5){
                autoSave=true;
                System.out.println("auto save할 수 있도록 합니다");
            }
        }
        System.out.println("프로그램을 종료합니다");
    }

    @Override
    public void run() {
        while (true){
            try{
                //3초마다 자동저장
                Thread.sleep(1000);
            }catch (InterruptedException e){
                e.printStackTrace();
            }

            if(autoSave){
                autoSave();
            }
        }
    }

    private void autoSave() {
        System.out.println("작업 파일이 자동저장되었습니다");
    }
}
결과를 보면 user thread가 종료되면 deamon thread도 종료되는 것을 알 수 있다.
0
1
2
3
4
5
auto save할 수 있도록 합니다
6
작업 파일이 자동저장되었습니다
작업 파일이 자동저장되었습니다
7
작업 파일이 자동저장되었습니다
8
작업 파일이 자동저장되었습니다
9
프로그램을 종료합니다