1. 컴퓨터 비전
-
파이썬을 쓰는 이유: 배열 처리에 유리
-
numpy: 다차원 배열을 위한 표준 모듈
OpenCV는 영상을 numpy.ndarray로 표현
-
VScode에 OpenCV 설치(해당 폴더로 이동 후, cmd shell에서)
python -m pip install opencv-python- 이벤트 처리 함수
- 이벤트: 프로그램에 의해 감지되고 처리될 수 있는 동작이나 사건
- 이벤트 처리 위해, 콜백 함수 사용
윈도우 제어
- 영상 처리: 2차원 행렬에 대한 연산, 전체 영상에 대한 변화 인지 어렵
- OpenCV에서는 윈도우가 활성화된 상태에서만 마우스, 키보드 이벤트 감지
ex) move_window.py
import numpy as np
import cv2

image = np.zeros((200, 400), np.uint8)
image[:] = 200                                  # 흰색 바탕

title1, title2 = 'Position1', 'Position2'		# 윈도우 이름
cv2.namedWindow(title1, cv2.WINDOW_AUTOSIZE)
cv2.namedWindow(title2)
cv2.moveWindow(title1, 150, 150)                # 윈도우 이동
cv2.moveWindow(title2, 400, 50)

cv2.imshow(title1, image)                       # 행렬 원소를 영상으로 표시
cv2.imshow(title2, image)
cv2.waitKey(0)                                  # 키 이벤트(key event) 대기
cv2.destroyAllWindows()-
행렬 크기 변경 없이도 윈도우 크기 변경이 가능한데, 이건 실제 행렬이 변경되는 것은 아니다.
-
마우스 이벤트 제어
ex) event_mouse.py
import numpy as np
import cv2
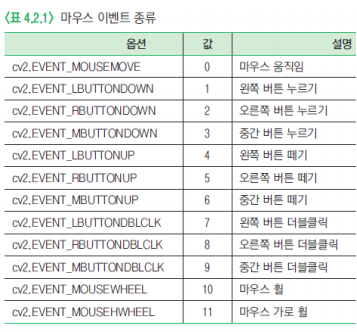
def onMouse(event, x, y, flags, param): # 콜백 함수 – 이벤트 내용 출력
if event == cv2.:
print("마우스 왼쪽 버튼 누르기")
elif event == cv2.:
print("마우스 오른쪽 버튼 누르기")
elif event == cv2.:
print("마우스 오른쪽 버튼 떼기")
elif event == cv2.:
print("마우스 왼쪽 버튼 더블클릭")
image = np.full((200, 300), 255, np.uint8) #
title1, title2 = "Mouse Event1", "Mouse Event2" #
cv2.imshow(title1, image) # 영상 보기
cv2.imshow(title2, image)
# 마우스 콜백 함수
cv2.waitKey(0) #
cv2.destroyAllWindows() # - 트랙바(trackbar): 일정한 범위에서 특정한 값을 선택할 때 사용하는 스크롤바 or 슬라이더바
import numpy as np
import cv2

def onChange(value):												# 트랙바 콜백 함수
    global image, title

    add_value = value - int(image[0][0])
    print("추가 화소값:", add_value)
    image = image + add_value
    cv2.imshow(title, image)


image = np.zeros((300, 500), np.uint8)           	# 영상 생성

title = 'Trackbar Event'
cv2.imshow(title, image)

cv2.createTrackbar('Brightness', title, image[0][0], 255, onChange)	# 트랙바 콜백 함수 등록
cv2.waitKey(0)
cv2.destroyWindow(title)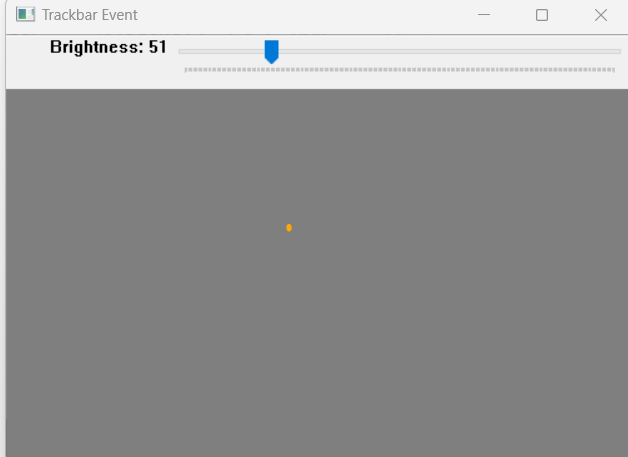
- 그리기 함수
- 얼굴 검출 알고리즘 적용 경우: 전체 영상 위에 검출한 얼굴 영역을 사각형 or 원으로 표시- 차선 확인 목적 직선 검출 알고리즘 적용 경우: 도로 영상 위에 선으로 표시
import numpy as np
import cv2

blue, green, red = (255, 0, 0), (0, 255, 0), (0, 0, 255)
image = np.zeros((400, 600, 3), np.uint8)
image[:] = (255, 255, 255)

pt1, pt2 = (50, 50), (250, 150)
pt3, pt4 = (400, 150), (500,  50)
roi = 50, 200, 200, 100

# 직선 그리기
cv2.line(image, pt1, pt2, red)
cv2.line(image, pt3, pt4, green, 3, cv2.LINE_AA)

# 사각형 그리기
cv2.rectangle(image, pt1, pt2, blue, 3, cv2.LINE_4)
cv2.rectangle(image, roi, red, 3, cv2.LINE_8)
cv2.rectangle(image, (400, 200, 100, 100), green, cv2.FILLED)  # 내부 채움

cv2.imshow('Line & Rectangle', image)
cv2.waitKey(0)
cv2.destroyAllWindows() 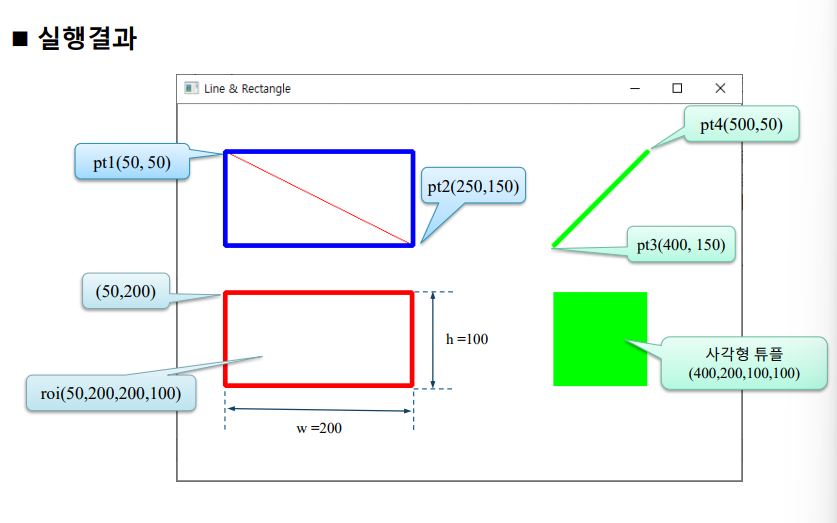
- 글자 쓰기
- cv2.putText(): 행렬의 특정 위치에 원하는 글자를 써서 영상으로 표시하고 싶을 때 사용
import numpy as np
import cv2

olive, violet, brown = (128, 128, 0), (221, 160, 221), (42, 42, 165)
pt1, pt2 = (50, 200), (50, 260)                         # 문자열 위치 좌표

image = np.zeros((300, 500, 3), np.uint8)
image.fill(255)

cv2.putText(image, 'SIMPLEX', (50, 50), cv2.FONT_HERSHEY_SIMPLEX, 2, brown)
cv2.putText(image, 'DUPLEX', (50, 130), cv2.FONT_HERSHEY_DUPLEX, 3, olive)
cv2.putText(image, 'TRIPLEX', pt1, cv2.FONT_HERSHEY_TRIPLEX, 2, violet)
fontFace = cv2.FONT_HERSHEY_PLAIN | cv2. FONT_ITALIC         #
cv2.putText(image, 'ITALIC', pt2, fontFace, 4, violet)

cv2.imshow("Put Text", image)
cv2.waitKey(0) # 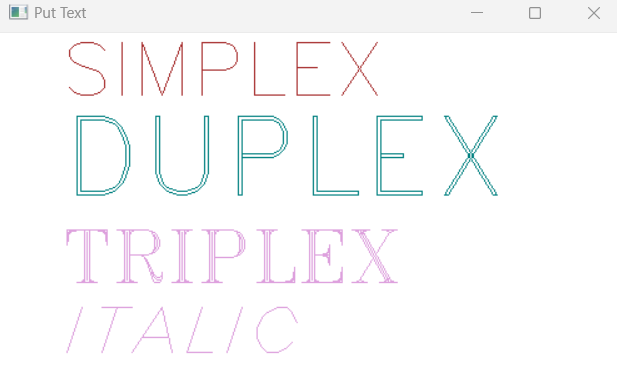
-
시작 좌표: 첫 번째 글자의 맨 아래(아래부터 시작)
-
원 그리기
import numpy as np
import cv2

orange, blue, cyan = (0, 165, 255), (255, 0, 0), (255, 255, 0)
white, black = (255, 255, 255), (0, 0, 0)
image = np.full((300, 500, 3), white, np.uint8)

center = (image.shape[1]//2, image.shape[0]//2)
pt1, pt2 = (300, 50), (100, 220)
shade = (pt2[0] + 2, pt2[1] + 2)               #그림자 좌표

cv2.circle(image, center, 100, blue)
cv2.circle(image, pt1, 50, orange, 2)
cv2.circle(image, pt2, 70, cyan, -1)

font = cv2.FONT_HERSHEY_COMPLEX;
cv2.putText(image, "center_blue", center, font, 1.0, blue)
cv2.putText(image, "pt1_orange", pt1, font, 0.8, orange)
cv2.putText(image, 'pt2_cyan', shade, font, 1.2, black, 2)
cv2.putText(image, "pt2_cyan",   pt2, font, 1.2, cyan , 1)

title = "Draw circles"
cv2.namedWindow(title)
cv2.imshow(title, image)
cv2.waitKey(0)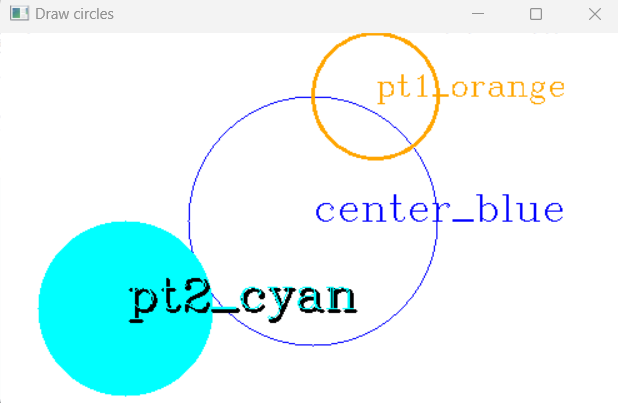
- 타원 그리기
import numpy as np
import cv2

orange, blue, white = (0, 165, 255), (255, 0, 0), (255,255,255) # 색상 지정
image = np.full((300, 700, 3), white, np.uint8)

pt1, pt2 = (180, 150), (550, 150)                       # 타원 중심점
size = (120, 60)                                        # 타원 크기 - 반지름 값임

cv2.circle(image, pt1, 1, 0, 2)                         # 타원의 중심점(2화소 원) 표시
cv2.circle(image, pt2, 1, 0, 2)

cv2.ellipse(image, pt1, size, 0, 0, 360, blue, 1)
cv2.ellipse(image, pt2, size, 90, 0, 360, blue, 1)
cv2.ellipse(image, pt1, size, 0, 30, 270, orange, 4)
cv2.ellipse(image, pt2, size, 90, -45, 90, orange, 4)


cv2.imshow("Draw Eclipse & Arc", image)
cv2.waitKey()                                           # 키입력 대기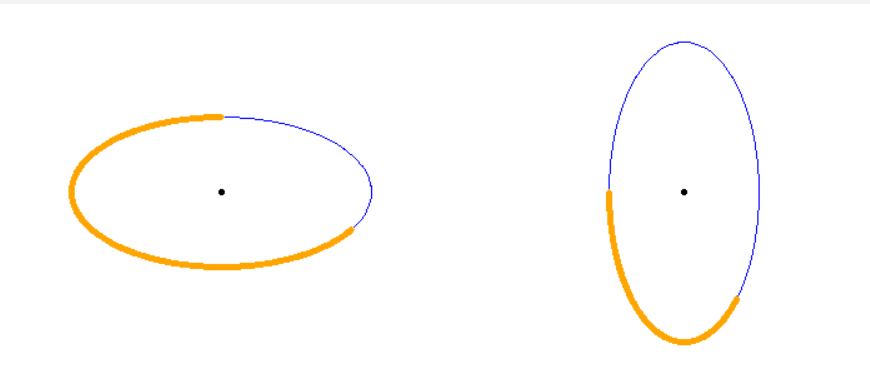
- 영상 파일 처리: 2차원 데이터에 대한 행렬 연산
- 화소(픽셀): 8비트 그레이 레벨 영상 데이터의 밝기 정도
- 영상 처리 과정: 영상 파일을 읽어서 행렬에 저장, 처리된 결과 행렬을 영상 파일로 저장
import cv2

def print_matInfo(name, image):
    if image.dtype == 'uint8':     mat_type = "CV_8U"
    elif image.dtype == 'int8':    mat_type = "CV_8S"
    elif image.dtype == 'uint16':  mat_type = "CV_16U"
    elif image.dtype == 'int16':   mat_type = "CV_16S"
    elif image.dtype == 'float32': mat_type = "CV_32F"
    elif image.dtype == 'float64': mat_type = "CV_64F"
    nchannel = 3 if image.ndim == 3 else 1

    ## depth, channel 출력
    print("%12s: depth(%s), channels(%s) -> mat_type(%sC%d)"
          % (name, image.dtype, nchannel, mat_type,  nchannel))

title1, title2 = "gray2gray", "gray2color"      # 윈도우 이름
gray2gray  = cv2.imread("chap04/chap04/images/read_gray.jpg", cv2.IMREAD_GRAYSCALE)
gray2color = cv2.imread("chap04/chap04/images/read_gray.jpg", cv2.IMREAD_COLOR)

if (gray2gray is None or gray2color is None) :
    raise Exception("영상파일 읽기 에러")

# 행렬 내 한 화소 값 표시
print("행렬 좌표 (100, 100) 화소값")
print("%s %s" % (title1, gray2gray[100, 100]))
print("%s %s\n" % (title2, gray2color[100, 100]))

print_matInfo(title1, gray2gray)
print_matInfo(title2, gray2color)

cv2.imshow(title1, gray2gray)
cv2.imshow(title2, gray2color)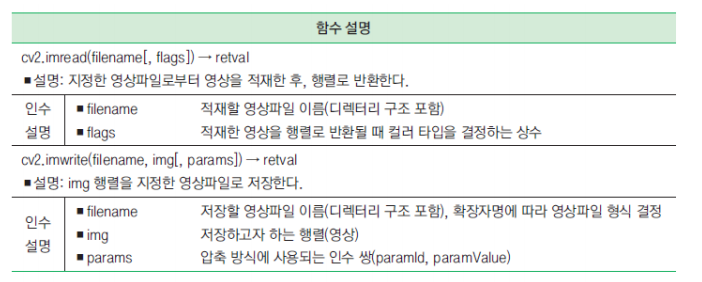
cv2.waitKey(0)- 행렬 -> 영상파일
- cv2.imwrite() 함수: 행렬을 영상 파일을 저장
import cv2

image = cv2.imread("chap04/chap04/images/read_color.jpg", cv2.IMREAD_COLOR)
if image is None: raise Exception("영상 파일 읽기 에러")

params_jpg = (cv2.IMWRITE_JPEG_QUALITY, 10 )        #
params_png = [cv2.IMWRITE_PNG_COMPRESSION, 9]

## 행렬을 영상 파일로 저장
cv2.imwrite("images/write_test1.jpg", image )       #
cv2.imwrite("images/write_test2.jpg",image, params_jpg ) #
cv2.imwrite("images/write_test3.png",image ,params_png )
cv2.imwrite("iamges/write_test4.bmp", image)         #
print("저장 완료")-
비디오 처리
- OpenCV: 동영상 처리할 수 있는 클래스 제공
-
카메라에서 프레임 읽기
import cv2

def put_string(frame, text, pt, value, color=(120, 200, 90)):             # 문자열 출력 함수 - 그림자 효과
    text += str(value)
    shade = (pt[0] + 2, pt[1] + 2)
    font = cv2.FONT_HERSHEY_SIMPLEX
    cv2.putText(frame, text, shade, font, 0.7, (0, 0, 0), 2)  # 그림자 효과
    cv2.putText(frame, text, pt, font, 0.7, (120, 200, 90), 2)  # 글자 적기

capture = cv2.VideoCapture(0)  # 0번 카메라 연결
if capture.isOpened() == False:
    raise Exception("카메라 연결 안됨")

# 카메라 속성 획득 및 출력
print("너비 %d" % capture.get(cv2.CAP_PROP_FRAME_WIDTH))
print("높이 %d" % capture.get(cv2.CAP_PROP_FRAME_HEIGHT))
print("노출 %d" % capture.get(cv2.CAP_PROP_EXPOSURE))
print("밝기 %d" % capture.get(cv2.CAP_PROP_BRIGHTNESS))

while True:  # 무한 반복
    ret, frame = capture.read()
    if not ret: break
    if cv2.waitKey(30) >= 0: break

    exposure = capture.get(cv2.CAP_PROP_EXPOSURE)
    put_string(frame, 'EXPOS: ',(10, 40), exposure)


    title = "View Frame from Camera"
    cv2.imshow(title, frame)  # 윈도우에 영상 띄우기
capture.release()- 카메라에서 프레임 읽기
import cv2
from Common.utils import put_string

capture = cv2.VideoCapture("chap04/chap04/images/move_file.avi")		# 동영상 파일 개방
if not capture.isOpened(): raise Exception("동영상 파일 개방 안됨")		# 예외 처리

frame_rate = capture.get(cv2.CAP_PROP_FPS)           		# 초당 프레임 수
delay = int(1000 / frame_rate)                         		# 지연 시간
frame_cnt = 0                                       		# 현재 프레임 번호

while True:
	ret, frame = capture.read()
	if not ret or cv2.waitKey(delay) >= 0: break

	blue, green, red = cv2.split(frame)
	frame_cnt += 1

	if 100 <= frame_cnt < 200: cv2.add(blue, 100, blue)
	elif 200 <= frame_cnt < 300: cv2.add(green, 100, green)
	elif 300 <= frame_cnt < 400: cv2.add(red, 100, red)


	frame = cv2.merge( [blue, green, red] )                 # 단일채널 영상 합성
	put_string(frame, "frame_cnt : ", (20, 320), frame_cnt)
	cv2.imshow("Read Video File", frame)

capture.release()
2. 연습문제
1. PC 카메라를 통해 받아온 프레임에 다음의 영상처리를 수행하고, 결과 영상을 윈도우에 표시하는 프로그램을 작성하시오
▪ (200, 100)좌표에서 100X200 크기의 관심 영역 지정
▪ 관심 영역에서 녹색 성분을 50만큼 증가
▪ 관심 영역의 테두리를 두께 3의 빨간색으로 표시
import cv2
capture = cv2.VideoCapture(0)  # 0번    카메라    연결
if capture.isOpened() == False: raise Exception("카메라 연결  안됨")

fps = 45 # 프레임 수
delay = round(1000/ fps) # 프레임 간 지연시간
size  = (640, 480)
# fourcc = cv2.VideoWriter_fourcc(*'DIVX')

while True:
    ret, frame = capture.read()  # 카메라 영상
    if not ret: break
    x, y, w, h = (200,100, 100,200)
    cv2.rectangle(frame, (x,y,w,h) , (0,0,255), 3 )

    blue, green, red = cv2.split(frame)
    tmp = green[y:y+h, x:x+w]
    cv2.add(tmp, 50, tmp)

    frame = cv2.merge([blue, green, red])
    if cv2.waitKey(delay) >= 0: break
    cv2.imshow("ex16", frame)  # 윈도우에 영상 띄우기

capture.release()
2. 다음의 마우스 이벤트 제어 프로그램을 작성하시오
▪ 마우스 오른쪽 버튼 클릭 시 원(클릭 좌표에서 반지름 20화소)을 그린다
▪ 마우스 왼쪽 버튼 클릭 시 사각형(크기 30 x 30)을 그린다.
• 트랙바를 추가해서 선의 굵기를 1~10 픽셀로 조절한다.
• 트랙바를 추가해서 원의 반지름을 1~ 50픽셀로 조절한다.
import numpy as np
import cv2
def Click_Mouse(event, x, y, flags, param):
global title, image
pt = (x, y)
if event == cv2.EVENT_RBUTTONDOWN:
cv2.circle(image, pt, 20, 100, thickness)
cv2.imshow(title, image)
elif event == cv2.EVENT_LBUTTONDOWN:
pt2 = (pt[0]+30, pt[1]+30)
cv2.rectangle(image, pt, pt2, 100, thickness)
cv2.imshow(title, image)
def Track_Bar(value):
global thickness
thickness = value
image = np.ones((300, 300), np.uint8) * 255
title = "ex3"
thinkness = 2
cv2.imshow(title, image)
cv2.setMouseCallback(title, Click_Mouse)
cv2.createTrackbar("thinkness", title, thinkness, 10, Track_Bar) # 트랙바 콜백 함수 등록
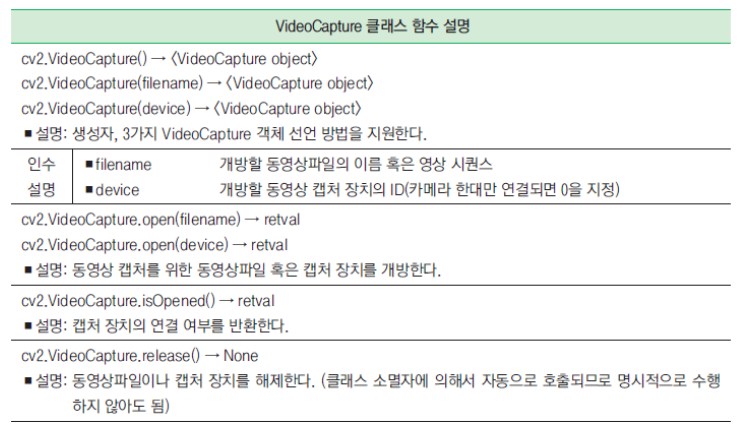
cv2.waitKey(0)3. 색상 공 탐지 및 인식 알고리즘 만들기
1. 데이터 생성
▪ 이미지 저작도구 (그림판)이나 OpenCV를 이용하여 빨간색, 파란색, 녹색의 원을 5개 이상
만들어 본다
▪ 영상의 크기는 640 * 480 으로 함
2. 객체 탐지 및 인식
▪ 1번에서 생성된 원을 탐지 및 인식함
▪ 탐지된 원에는 사각형 박스를 씌워주고, 글자 출력하여 색상 정보를 글자로 알려준다
import numpy as np
import cv2
import random

white = (255,255,255)
blue = (255,0,0)
green = (0,255,0)
red = (0,0,255)
purple = (255, 0, 255)

colors_dict = { (255, 0, 0) : "Blue",
               (0, 255, 0) : "Green",
               (0, 0, 255) : "Red" }

# 데이터 생성

image = np.full((480, 640, 3), white, np.uint8)
cv2.circle( image , (200,180) , 5, blue , random.randint( 20,100 ) , 3 )
cv2.circle( image , (100,370) , 5, green , random.randint( 20,100 ) , 3 )
cv2.circle( image , (50,250) , 5, red , random.randint( 20,100 ) , 3 )
cv2.circle( image , (420,120) , 5, blue , random.randint( 20,100 ) , 3 )
cv2.circle( image , (300,300) , 5, green , random.randint( 20,100 ) , 3 )

# 원 탐지

gray = cv2.cvtColor( image, cv2.COLOR_BGR2GRAY)
gray = cv2.medianBlur(gray, 5)
rows = gray.shape[0]
circles = cv2.HoughCircles(gray, cv2.HOUGH_GRADIENT, 1, rows / 8, param1=100, param2=10, minRadius=0, maxRadius=100)

print(circles)

if circles is not None:
        circles = np.uint16(np.around(circles))
        for i in circles[0, :]:
            center = (i[0], i[1])
            radius = i[2]
            cv2.rectangle(image, (center[0]-radius , center[1]-radius, radius*2, radius*2) , purple, 3)
            color = tuple( image[center[1],center[0]] )
            colorstr = colors_dict[color]
            cv2.putText(image, colorstr,  (center[0]-radius , center[1]-radius) , 5 , 1, blue , 1 , 3 )


cv2.imshow( "ball", image)
cv2.waitKey(0)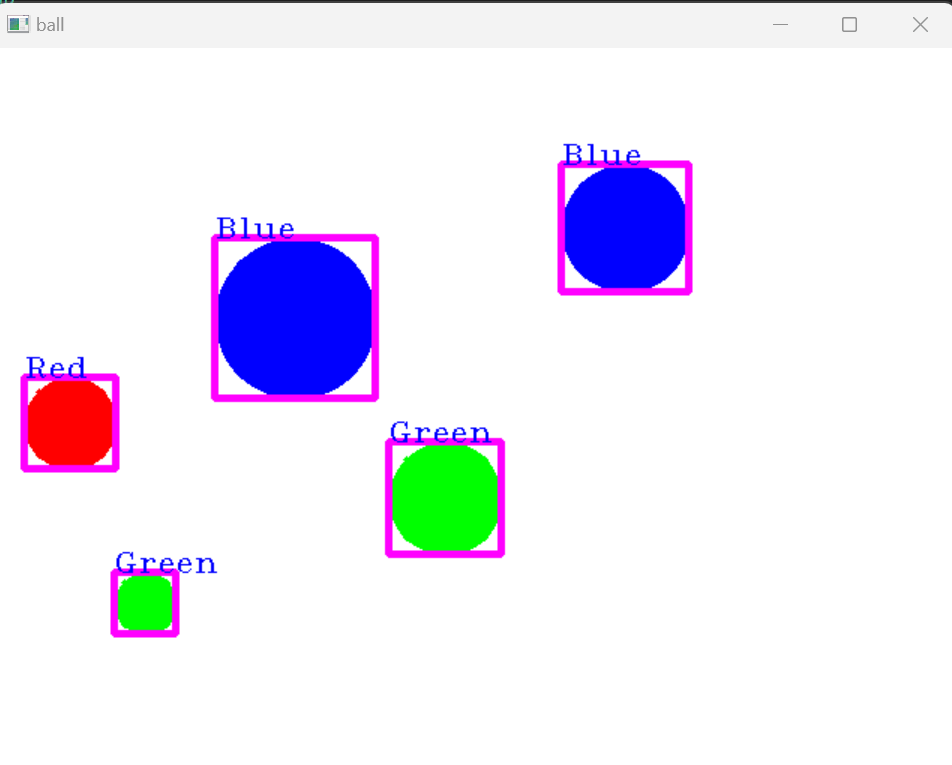
<HoughCircles 함수>
- cv2.HoughCircles(image, method, dp, minDist, circles=None, param1=None, param2=None, minRadius=None, maxRadius=None) -> circles
- image: 입력 영상. (에지 영상이 아닌 일반 영상)
- method: OpenCV 4.2 이하에서는 cv2.HOUGH_GRADIENT만 지정 가능
- dp: 입력 영상과 축적 배열의 크기 비율. 1이면 동일 크기. 2이면 축적 배열의 가로, 세로 크기가 입력 영상의 반.
- minDist: 검출된 원 중심점들의 최소 거리
- circles: (cx, cy, r) 정보를 담은 numpy.ndarray. shape=(1, N, 3), dtype=np.float32
- param1: Canny 에지 검출기의 높은 임계값
- param2: 축적 배열에서 원 검출을 위한 임계값
- minRadius, maxRadius: 검출할 원의 최소, 최대 반지름
3. OpenCV 기본행렬 연산
1. 사칙연산
- Saturation 연산: 한계 값정하고, 그 값을 벗어나면 모두 특정값으로 계산
- Modulo 연산: a와 b는 n으로 나눈 나머지 값이 같다
2. 논리(비트) 연산 함수
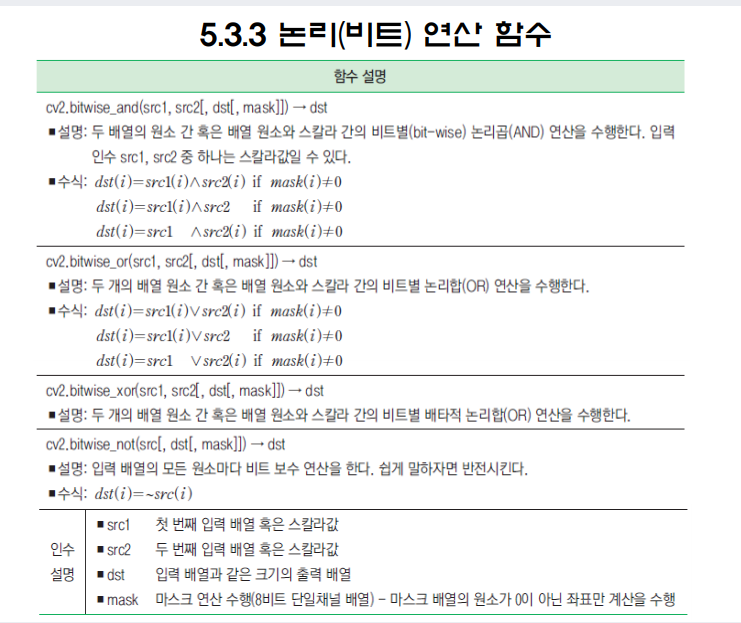
import numpy as np, cv2

image1 = np.zeros((300, 300), np.uint8)     		# 300행, 300열 검은색 영상 생성
image2 = image1.copy()

h,w = image1.shape[:2]
cx, cy = w//2, h//2
cv2.circle(image1, (cx, cy), 100, 255, -1)
cv2.rectangle(image2, (0, 0, cx, h), 255, -1)

image3 = cv2.bitwise_or(image1, image2)
image4 = cv2.bitwise_and(image1, image2)
image5 = cv2.bitwise_xor(image1, image2)
image6 = cv2.bitwise_not(image1)


cv2.imshow("image1", image1);			cv2.imshow("image2", image2)
cv2.imshow("bitwise_or", image3);		cv2.imshow("bitwise_and", image4)
cv2.imshow("bitwise_xor", image5);	cv2.imshow("bitwise_not", image6)
cv2.waitKey(0)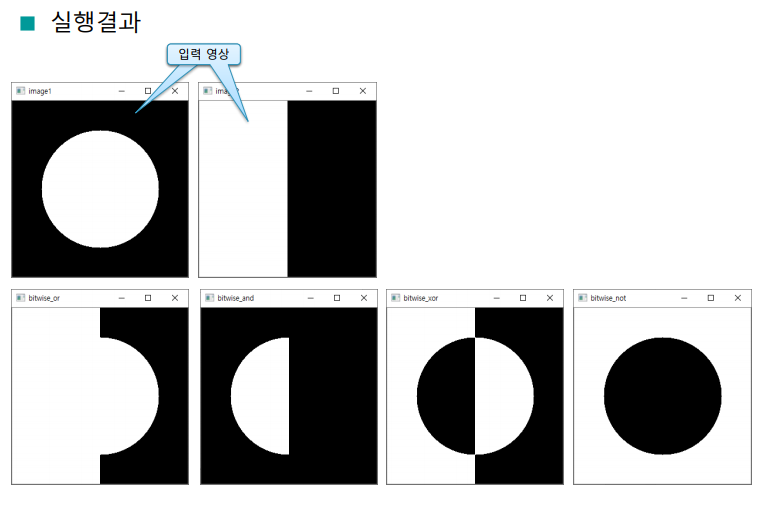
3. 원소의 최솟값과 최댓갔
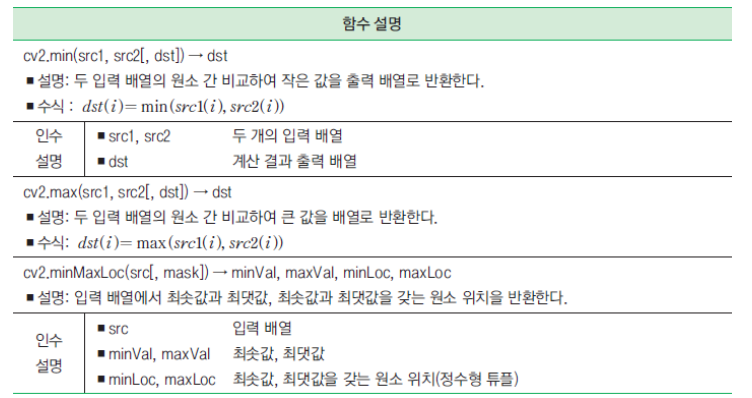
import numpy as np, cv2

image = cv2.imread("C:/Open CV/chap05/images/minMax.jpg", cv2.IMREAD_GRAYSCALE)
if image is None: raise Exception("영상 파일 읽기 오류 발생")

min_val, max_val, _, _ = cv2.minMaxLoc(image)

ratio = 255 / (max_val - min_val)
dst = np.round((image - min_val) * ratio).astype('uint8')
min_dst, max_dst, _, _ = cv2.minMaxLoc(dst)


print("원본 영상 최솟값= %d , 최댓값= %d" % (min_val, max_val))
print("수정 영상 최솟값= %d , 최댓값= %d" % (min_dst, max_dst))
cv2.imshow("image", image)
cv2.imshow("dst"  , dst)
cv2.waitKey(0)