
Data Fetching (Pre-rendering)
-
페이지가 랜더링 되기 전에(Pre-rendering단계에서) 데이터 패칭을 해야하는 경우
-
기존 리액트에서는 페이지가 첫 랜더링되고 (이 때 data는 보통 [ ]로 비어있는 상태), useEffect가 실행되면서 안의 data-fetching 로직이 실행되고 받은 data를 state에 담게 되는데, 이 때 state가 변했으므로 두번째 랜더링이 진행된다.
-
하지만 next.js에 의해 Pre-rendering 된 HTML 페이지는 두번째 랜더링을 기다리지 않는다. 즉, 데이터 패칭을 기다려주지 않는다. 이를 해결하기 위해서는 next.js의 데이터 패칭 방식 (getInitialProps, getStaticProps, getStaticPath, getServerSideProps)을 이용해 첫 렌더에 데이터가 패칭될 수 있도록 처리를 해주어야 한다.
-
모든 페이지에 공통적인 데이터 패칭이 필요하다면 _app.js에서 미리 데이터 패칭을 해주면 되고, 페이지마다 다른 데이터가 필요하다면 페이지마다 데이터 패칭을 해주면 된다.
전역적 데이터 패칭
모든 페이지에 공통적인 데이터 패칭이 필요한 경우, 즉 전역적으로 데이터패칭을 해야한다면 getInitialProps를 사용해야한다.
// pages/_app.js

import { NextPageContext } from 'next'

function MyApp({ Component, pageProps }) {
  return (
    <>
      <AppLayout>
        <Component {...pageProps} />
      </AppLayout>
    </>
  );
}

MyApp.getInitialProps = async (context:NextPageContext) => {
  const { ctx, Component } = context;
  let pageProps = {};

  if (Component.getInitialProps) {
    pageProps = await Component.getInitialProps(ctx);
  }

  return { pageProps };
};
페이지 별로 데이터 패칭
사실 페이지 별로 데이터 패칭하는 것도 getInitialProps로 가능하다. 그러나 그것이 정적데이터인지, 페이지 요청마다 렌더되는 데이터인지에 따라 그 방식을 분리한 것이 getStaticProps / getStaticPath / getServerSideProps 으로 나누어지게 되었다.
Next.js의 pre-rendering 에는 두가지 형태가 있다.
- Static Generation (Recommended): HTML이 빌드 될 때 생성되고, 만들어진 HTML은 매 request마다 재사용된다. getStaticProps ****(혹은 필요한 경우 getStaticPath)를 사용한다.
- Server-Side Rendering: HTML이 매 request마다 생성된다. Server-Side Rendering은 Static Generation 보다 느리기 때문에, 꼭 필요한 경우에만 사용하는 것이 좋다. getServerSideProps를 사용한다.
getStaticProps: 정적데이터인 경우 사용하고, 빌드 프로세스 중에 실행된다.
// pages/blog.js

function Blog({ posts }) {
  return (
    <ul>
      {posts.map((post) => (
        <li>{post.title}</li>
      ))}
    </ul>
  )
}

export async function getStaticProps() {
  const res = await fetch('https://.../posts')
  const posts = await res.json()

  return {
    props: {
      posts,
    },
		revalidate: 3600  //3600초마다 다시 빌드(데이터가 가끔 바뀔때 유용함)
  }
}

export default BloggetStaticPaths: 동적라우팅 + getStaticProps
- 페이지가 동적 라우팅을 쓰고 있고, getStaticProps를 쓰는 경우, getStaticPaths을 통해 빌드 타임 때 정적으로 렌더링할 경로를 설정해야한다.
// pages/posts/[id].js

function Post({ post }) {
   return (
    <ul>
      {posts.map((post) => (
        <li>{post.title}</li>
      ))}
    </ul>
  )
}

export const getStaticPaths = async () => {
  const res = await fetch('https://.../posts')
  const posts = await res.json()
  const paths = posts.map((post) => ({
    params: { id: post.id },
  }))

  // { fallback: false } 는 다른 routes들은 404임을 의미
  // true이면 만들어지지 않은 것도 추후 요청이 들어오면 만들어 줄 거라는 뜻
  return { paths, fallback: false }
}

export const getStaticProps = async ({ params }) => {
  const res = await fetch(`https://.../posts/${params.id}`)
  const post = await res.json()

  return { props: { post } }
}

export default PostgetServerSideProps: 빌드 프로세스 중에 실행되지 않고, 매 페이지 요청마다 데이터를 서버로부터 가져온다.
// pages/page.js

function Page({ data }) {
  console.log(data)
}


export const getServerSideProps = async (context) => {

  const res = await fetch(`https://.../data`)
  const data = await res.json()

  return { props: { data: data } }
}

export default Page
공식 홈페이지에는 getServerSideProps는 꼭 필요한 경우에만 사용하는 것을 권장하고 있다.
File-based Routing
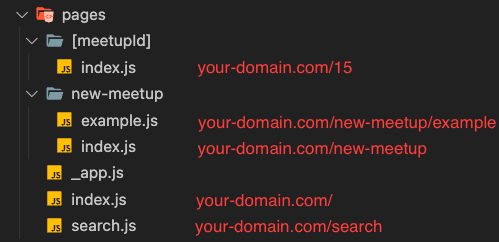
- Next.js 에는 pages 폴더 아래에 있는 파일을 토대로 자동으로 Routing 해주는 기능이 내장되어있다.
- 동적 라우팅의 경우 [ ]를 활용하여 사용가능하다.
Fullstack Framework
Next.js 는 개발자가 React 프로젝트에 백엔드 api를 추가하기 쉽게 해준다. 데이터를 불러오거나, 데이터를 저장하거나, 인증/인가 과정 등이 React 프로젝트에 추가될 수 있다. (Node.js 문법이 쓰인다)
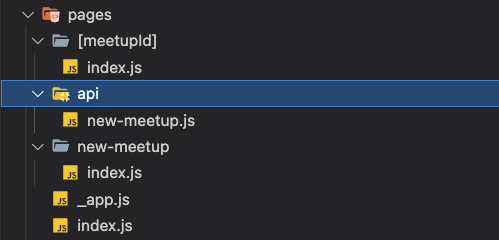
pages 폴더 아래에 api 폴더를 추가하고 api경로에 해당하는 이름의 파일을 생성해주면 된다.
// api/new-meetup.js

import { MongoClient } from 'mongodb';

async function handler(req, res) {
  if (req.method === 'POST') {
    const data = req.body;

    const client = await MongoClient.connect();
    const db = client.db();
    const meetupsCollection = db.collection('meetups');

    const result = await meetupsCollection.insertOne(data);
    console.log(result);

    client.close();

    res.status(201).json({ message: 'Meetup inserted!' });
  }
}

export default handler;
위와 같이 몽고db에 접근해서 데이터를 저장하는 로직을 짤 수 있다.
// new-meetup/index.js


import { useRouter } from 'next/router';
import NewMeetupForm from '../../components/meetups/NewMeetupForm';

function NewMeetupPage() {
  const router = useRouter();

  const addMeetupHandler = async (enteredMeetupData) => {
    const response = await fetch('/api/new-meetup', {
      method: 'POST',
      body: JSON.stringify(enteredMeetupData),
      headers: {
        'Content-Type': 'application/json'
      }
    });

    const data = await response.json();
    console.log(data);

    router.push('/');
  }

  return (
    <NewMeetupForm onAddMeetup={addMeetupHandler} />
  )
}

export default NewMeetupPage;
위와 같이 fetch 함수 안에 경로를 api폴더 아래에 있는 파일을 지정해줄 수 있다.
기타
Nexst.js는 Image 태그를 제공한다. 사용하고자 하는 이미지 파일의 url 도메인을 next.config.js 에 등록을 해줘야 이미지주소를 사용할 수 있다.
// next.config.js

const nextConfig = {
  reactStrictMode: true,
  images: {
    domains: ['yt3.ggpht.com', 'i.ytimg.com']
  }
}

module.exports = nextConfig
useRouter를 사용할 수 있다.
// [newsId].js
// our-domain.com/news/[newsId]
import { useRouter } from 'next/router';
function DetailPage() {
const router = useRouter();
console.log('router: ', router);
const newsId = router.query.newsId;
console.log('newsId: ', newsId);
const onClinckHandler = () => {
router.push('/')
}
return <button onClick={onClickHandler}>The Detail Page</button>
}
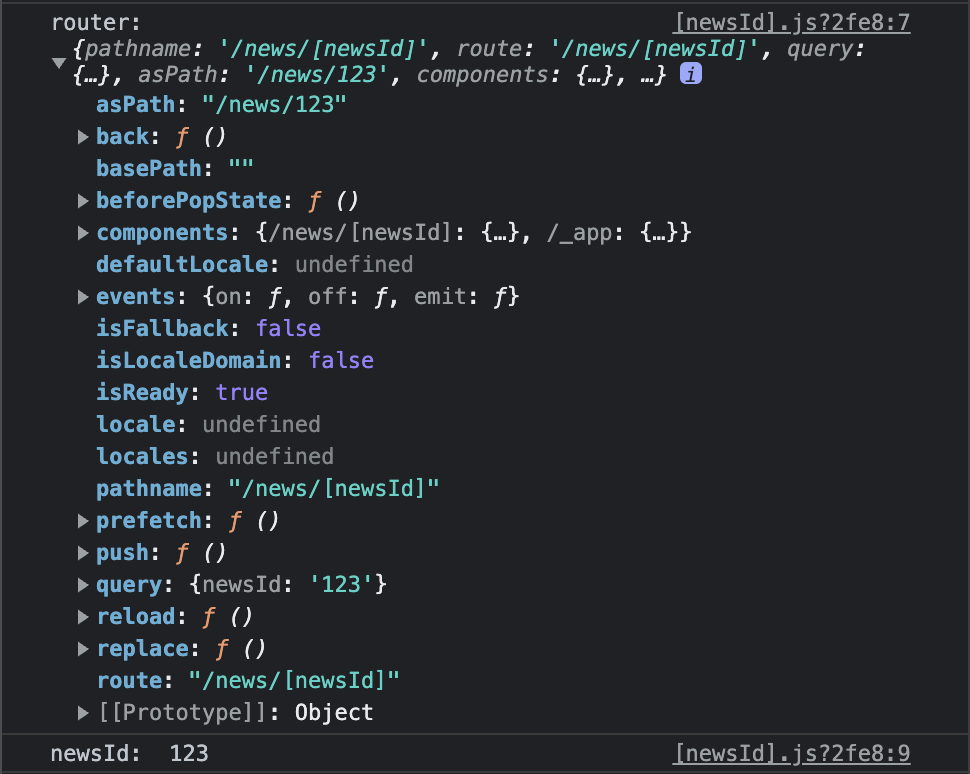
export default DetailPage;our-domain.com/news/123 으로 들어가면 콘솔창은 아래와 같다.
context.params
- getStaticProps / getServerSideProps 함수 안에서는 useRouter나 useQuery같은 훅을 사용할 수 없다.
- getStaticProps / getServerSideProps 함수 안에서 데이터 패칭을 할 때 id 값이 필요한 경우가 있는데, 이럴때는 context를 인자로 받아서 params로 받아올 수 있다.
import MeetupDetail from '../../components/meetups/MeetupDetail';

function MeetupDetails() {
  return (
    <MeetupDetail />
  )
}

export async function getStaticPaths() {
  return {
    fallback: false,
    paths: [
      {
        params: {
          meetupId: "m1",
        }
      },
      {
        params: {
          meetupId: "m2",
        }
      }
    ]
  }
}

export async function getStaticProps(context) {
  console.log('PARAMS: ', context.params);

  const meetupId = context.params.meetupId;

  return {
    props: {
      meetupData
    }
  }
}

export default MeetupDetails;
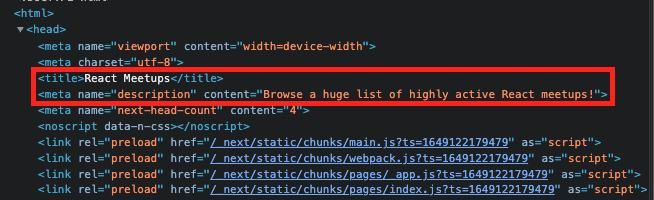
Head 태그를 사용해서 메타데이터 추가하기
// pages/index.js

import Head from 'next/head';
import MeetupList from '../components/meetups/MeetupList';
import { Fragment } from 'react';

function HomePage(props) {
  return (
    <Fragment>
      <Head>
        <title>React Meetups</title>
				<meta
          name='description'
          content='Browse a huge list of highly active React meetups!'
        />
      </Head>
      <MeetupList meetups={props.meetups} />
    </Fragment>
  )
}
각페이지의 index.js 에서 태그 안에 원하는 내용을 추가할 수 있다. (SEO에 좋음)
Next.js 에서 Apollo Graphql 사용하기
기존방식: useQuery를 활용
import React from 'react'
import Image from 'next/image';
import VideoCard from './components/videoCard';
import { useQuery, gql } from '@apollo/client';
import styles from './channel.module.css';

const GET_DATA = gql`
  query channel_channelInfo(
    $id: String
    $userId: String
  ) {
    channel_channelInfo(
      id: $id
      userId: $userId
    ) {
      title
      description
      banner
    }
  }
`;

export default function Channel() {
  const { error, loading, data} = useQuery(GET_DATA, {
		variables: {
			id: 'abcdefg',
			userId: 'Chaster'
		}
	})

  if(loading) return <p>Loading...</p>
  if(error) return <p>Error...</p>

  const channelData = data.channel_channelInfo;

  return (
    <div>
      <Image
		src={channelData.banner}
		alt='alt'
		height={270}
		width={1500}
       />
      <h2 className={styles.title}>{channelData.title}</h2>
      <p className={styles.desc}>{channelData.description}</p>
      <VideoCard videos={channelData.video}/>
    </div>
  )
}
Next.js 에서 Apollo로 데이터 받아오기
- graphqlClient를 따로 별도의 파일로 분리한다. (기존방식은 app.js에서 선언하고 apolloProvider에 넣어줌)
// graphqlClient.js

import { ApolloClient, InMemoryCache } from '@apollo/client';

export const graphqlClient = new ApolloClient({
  uri: 'https://api.dev.vling.net/graphql',
  cache: new InMemoryCache()
});
import React from 'react'
import Image from 'next/image';
import VideoCard from './components/videoCard';
import { gql } from '@apollo/client';
import { graphqlClient } from './graphqlClient';
import styles from './channel.module.css';
const GET_DATA = gql`
query channel_channelInfo(
$id: String
$userId: String
) {
channel_channelInfo(
id: $id
userId: $userId
) {
title
description
banner
}
}
`;
export default function Channel({ data }) {
const channelData = data.channel_channelInfo;
return (
<div>
<Image
src={channelData.banner}
alt='alt'
height={270}
width={1500}
/>
<h2 className={styles.title}>{channelData.title}</h2>
<p className={styles.desc}>{channelData.description}</p>
<VideoCard videos={channelData.video} />
</div>
)
}
export const getStaticProps = async () => {
const { data } = await graphqlClient.query({
query: GET_DATA,
variables: {
id: 'abcdefg',
userId: 'Chaster'
}
});
return {
props: {
data
}
};
}references
https://nextjs.org/docs
https://velog.io/@devstone/Next.js-100-활용하기-feat.-initialProps-webpack-storybook