CH12. grid
1) grid 개요
- 웹페이지를 위한 이차원 레이아웃 시스템
(flex는 일차원)
- 콘텐츠의 행과 열 배치할 수 있음
guttersorgaps: 각 행과 열 사이 공백
table vs grid
- 형태는 같으나 grid는 레이아웃에 사용
- table은 데이터에 관한 작업을 수행할 때 사용 (table을 레이아웃으로 사욯하면 X)
2) Container
display
- 외부와 내부에 대해서 한 번에 작성할 수 있음
- EX) 내부는 grid, 외부는 inline으로 적용하고 싶을 때
display: inline-grid;
grid-template-rows
- 행의 개수와 크기 지정 (height)
grid-template-columns
- 열의 개수와 크기 지정 (width)
grid-template-columns: 80px 80px 30px;
/* 몇 개의 item이 있든, 한 행에는 3개의 item이 존재
	각 행의 첫 번째는 80px, 두 번째는 70px, 세 번째는 30px*/
grid-template-rows: 100px 20px;
/* 첫 번째 행의 모든 아이템의 높이는 100px, 두 번째 행의 모든 아이템 높이는 20px */Nfr: 컨테이너의 넓이 중 차지하는 비율 (1fr 2fr 👉 1: 2의 비율)- 설정하지 않은 값은 content 크기에 맞춤
- 만약 동일한 크기를 반복할 경우
repeat(횟수, 크기)로 작성 가능
grid-template-rows: repeat(4, 100px)
/* 4개의 행에 대하여 모두 100px로 설정 */
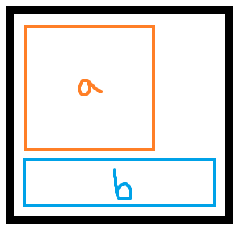
grid-template-areas
- 여러 개의 셀을 동시에 작성할 수 있음
- ⚠ 반드시 형태가 사각형이어야 함
.container{
	grid-template-areas:
		'a a .'
		'a a .'
		'b b b';
	/* . 은 빈 공간 */
}
.itemA{ grid-area: a }
.itemB{ grid-area: b }

row-gap
- 각 행 간의 거리
row-gap: 10px;
/* 각 행 사이가 10px씩 생김 */
column-gap
- 각 열 간의 거리
gap
- 두 개를 차례대로 작성하여 한 번에 사용할 수 있음
gap: 10px 20px;
/* row column */
grid-auto-rows
- template를 넘치는 item이 생길 때, 추가된 행의 높이를 지정해줌
- template에 명시적으로 작성하지 못했어도 암시적으로 높이를 갖게 됨
grid-auto-rows: 100px;grid-auto-columns
- 지정해둔 column의 너비가 명시적으로 정해지지 않았을 경우 사용
grid-auto-flow
- grid 축의 방향을 설정
- 기본값: row
grid-auto-flow: column;
/* grid 방향을 세로로 변경
	한 열을 먼저 채운 후, 다음 열로 넘어감 */
grid-auto-flow: row dense;
/* dense: 여백없이 아래서 item을 끌어와 빈 공간을 채움
	item마다 크기를 다르게 지정했을 경우 사용 */
grid (shorthand)
- 외재적(명시적) 속성, 내재적(암시적) 속성
/를 기준으로 앞 부분은 row, 뒷 부분은 column에 대해 작성- 명시적인 속성과 암시적인 속성을 row와 column 위치에 선택해서 작성할 수 있음
grid: 1fr 2fr / 1fr 1fr 1fr;
/* grid-template-rows columns */
grid: auto-flow / 200px;
/* grid-auto-flow template-column */
justify-content
- 선행 조건: grid 내부에 item들이 모두 들어가고 여백이 남을 때
flex의 justify-content와 동일- 주축을 기준으로 item들을 어떻게 정렬할지에 대한 속성
justify-content: flex-start;
/* 주축이 시작되는 위치부터 정렬 - 왼쪽 정렬처럼 보임(주축에 따라 달라지기 때문에 정렬과 같은 값은 아님 !) */
/* justify-content를 설정할 때는, flex-direction을 함께 작성해야 보다 정확한 설정이 됨 */
justify-content: flex-end;
/* 주축이 끝나는 위치부터 정렬 - 오른쪽 정렬처럼 보임 */
justify-content: center;
/* 가운데 정렬 */

justify-content: space-between;
/* 화면 크기에 따라 item끼리의 여백이 동일하게 늘어남 */
justify-content: space-around;
/* 화면 크기에 따라 item의 양 옆으로 동일한 여백을 줌 */
/* 간격을 계산할 때, between은 item사이의 여백, around는 item 양 옆에 여백 */
align-content
- 교차축을 기준으로 item들을 어떻게 정렬할지에 대한 속성
align-content: start;
/* 교차축의 시작 부분이 맨 위 */
align-content: end;
/* 교차축의 끝 부분이 맨 위 */
align-content: center;
/* 교차축의 가운데 부분이 맨 위 */

align-content: space-between;
/* item 간이 아닌 items 간의 간격이 동일하게 늘어남 */
align-content: space-around;
/* item의 양옆 간격이 아닌 items의 상하 간격이 동일하게 늘어남 */
justify-items
- 하나의 item에 대해 주축 기준으로 정렬
- template의 본인 자리에서 item의 여백이 생길 때의 정렬
하나의 틀에 대한 정렬 방법
justify-items: stretch;
/* 기본값: template에 맞춰서 영역 모두 차지 */
justify-items: start;
/* content영역만큼만 차지하게 됨, 왼쪽 상단에 위치 */
justify-items: end;
/* content영역만큼만 차지하게 됨, 오른쪽 상단에 위치 */
justify-items: center;
/* content영역만큼만 차지하게 됨, 가운데 상단에 위치 */justify-self: start;
/* 특정 item에 대해서만 속성 지정 */align-items
- 하나의 item에 대해 교차축 기준으로 정렬
- 본인 template 크기 중 item을 어디에 위치하게 할 건지 결정
justify-items: stretch;
/* 기본값: template에 맞춰서 영역 모두 차지 */
justify-items: start;
/* content영역만큼만 차지하게 됨, 왼쪽 하단에 위치 */
justify-items: end;
/* content영역만큼만 차지하게 됨, 오른쪽 하단에 위치 */
justify-items: center;
/* content영역만큼만 차지하게 됨, 가운데 하단에 위치 */
3) Item
grid-row
- grid-row-start / grid-row-end 의 shorthand
- 기본값: 1x1 차지
- row의
start부터end전까지 들어감
grid-row: 1 / 4;
/* grid의 1부터 3번 행까지 차지
	음수로 작성한다면 -1이 맨 마지막 행 */
grid-row: 2 / span 3;
/* 2행부터 3칸 차지 */
grid-column
- grid-column-start / grid-column-end 의 shorthand
grid-area
- 두 가지 형태로 사용 가능
- grid-template-areas를 사용할 때 이름을 붙여줌
- grid-row-start, grid-column-start, grid-row-end, grid-column-end 값을 한번에 설정 가능
/* 1번 */
.container{
	grid-template-areas:
		'a a .'
		'a a .'
		'b b b';
}
.itemA{ grid-area: a }
.itemB{ grid-area: b }

---
/* 2번 */
.itemC{
	grid-area: row-start / column-start / row-end / column-end;
}
order
- 개별 item들에게 순서를 정해줌
- 기본값: 0 (정수값 사용 가능)
- 오름차순으로 정렬
z-index
- 앞쪽으로 정렬할 수 있는 속성
- grid의 item을 명시적으로 설정하여 겹치는 부분이 생겼을 때 쌓이는 순서 설정
4) Grid 단위
⚠ 속성 X 속성값 O
fr : 비율을 설정해서 나눌 때 사용
절대 길이와 함께 사용 가능(절대 길이를 제외한 나머지의 비율 고려)
min-content : 가장 긴 단어를 기준으로 너비 맞춤
max-content : 최대한 한 줄에 작성할 수 있는 너비 맞춤
auto-fill : 개수를 지정하지 않고, 공간에 맞춰 들어가는 개수가 달라지게 됨
display: grid;
grid-template-columns: repeat(auto-fill, 100px);
grid-auto-rows: 50px;
/* 너비가 100px인 각 item들을 container 크기에 맞춰 배치
	container 크기에 따라 한 행의 열 개수가 달라짐 */

---
display: grid;
grid-template-columns: repeat(auto-fill, minmax(100px, 1fr));
				/* 100px이 들어갈 수 있다면 추가, 아닐 경우 나머지의 너비를 1fr로 지정 */
grid-auto-rows: 50px;
auto-fit : 모든 아이템을 배치하고도 여백이 생길 경우
display: grid;
grid-template-columns: repeat(auto-fit, 100px);
grid-auto-rows: 50px;
/* item을 아래에서 더 끌어올 수 없는 경우, 행의 너비를 꽉 채움(100px 이상으로 늘어남) */
⚠ auto-fill vs auto-fit
- 기본적으로는 들어갈 수 있는 크기에 맞춰 유동적으로 개수 조절 가능
- 남는 공간이 생겼을 때
- auto-fill: 공간 비워둠
- auto-fit: 공간 채워서 item늘어남
.png)
