개인프로젝트 겸 포트폴리오로 시작하게된 프로젝트
쓰는 스택은 이렇다
Backend : SpringBoot
jpa,querydsl,kafka,thymeleaf,prometheus
Frontend : React
redux, router,
현재 가장 힘들었던 부분은 스프링 시큐리티 적용이다.
OAuth2.0을 이용한 로그인 및 회원 가입시 Jwt를 이용하여 로그인을 할 생각이였는데, 이게 생각보다 되게 어렵다.
일단 가장 먼저 구글OAuth만 적용시켰다.
기본 흐름은 이렇다
JWT 일반 로그인
프론트에서 로그인 요청 -> 백앤드 "http://localhost:8080/auth/login" 컨트롤러로 요청이 들어감 -> authentication객체를 생성해서(이때 토큰 생성) -> securityContextHolder(인증된 객체 저장하는곳) 에 저장 시키고, responsentity로 json형식으로 반환 -> 토큰을 다시 프론트가 받고 이 토큰을 local.storage에 저장 시킨다(나중에 쿠키로 변경해볼까 생각중, refresh토큰을 사용하기 위함) -> 이 토큰을 바탕으로 권한이 생기고, private route로 지정해 놓은 프론트 컴포넌트에 접근할 수 있도록 한다.
JWT OAuth 로그인
// Oauth의 경우에는 조금 다르다. OAuth는 제3인증자가 토큰을 발급해 주는 것임으로
프론트 요청을 여기로 보낸다 http://localhost:8080/oauth2/authorize/google?redirect_uri=http://localhost:3000/oauth2/redirec -> 백앤드 spring security config에 .oauth2Login().authorizationEndpoint().baseUri("/oauth2/authorize") 가 위 url을 캐치해서 .redirectionEndpoint().baseUri("/oauth2/callback/**") 로 바탕으로 redirect url를 보내준다. 이 주소는 내가 구글 플랫폼에서 승인된 redirect uri에 작성한
http://localhost:8080/oauth2/callback/google 이 주소이다. 또한 이 주소는
yml 파일에도 똑같이 작성되어 있어야 한다. default값은 {baseUrl}/login/oauth2/code/{registrationId} 로 설정되어 있다. 어찌되었든 yml파일에 작성된 부분과 구글 플랫폼에 작성된 부분이 일치해야한다는 것이다. 일반적으로 baseurl은 localhost:8080, registrationId는 구글 카카오 등의 idprovider값이다.
여하튼 링크를 통해 접속하게되면 우리는 구글 계정 인증 창에 들어오게된다.
이러한 url이 호출되고 여기서 우리의 구글 계정으로 인증을 실시한다.
여기서 로그인을 실시하게되면 우리의 google 계정 정보가 리디렉션 url로 전송하된다.
이때 우리가 로그인 서공하면 우리가 적은
http://localhost:8080/oauth2/callback/google
로 리다이렉트 하게되고(작성한 리다이렉트 주소) 이때 code라는매개변수를 같이하나더 추가해준다.
http://localhost:8080/oauth2/callback/google?code=코드정보
그리고 우리는 이 주소를 파싱해서 구글 계정 정보에 접근할 수 있는 엑세스 토큰을 얻게되고
이 코드 정보를 다시 https://accounts.google.com/o/oauth2/token url에 post요청 한다.
이때 필요한 정보가 클라이언트 ID와 클라이언트 비밀번호인데 이는 우리가 구글 플랫폼에가입할때 구글에서 제공해주는 파라미터이며,
정리하면
https://www.googleapis.com/oauth2/token
POST Body 정보: code=코드정보, client_id=클라이언트-아이디, client_secret=클라이언트-비밀번호, redirect_uri=http://localhost:8080/oauth2/callback/google
이런식으로 post 요청이 들어가게된다.
그러면 이 엑세스 토큰을 바탕으로 내 서버에 구글 oauth접속한 유저의 정보를 갖고 올 수 있다.
여기서 모두 Dto로 로그인 요청, 응답 처리했다. 도메인 그대로 쓰게되면 에러가 잡히거나 하나 변경시키면 모두 변경되어서 코드가 꼬일 수 있기 때문이다
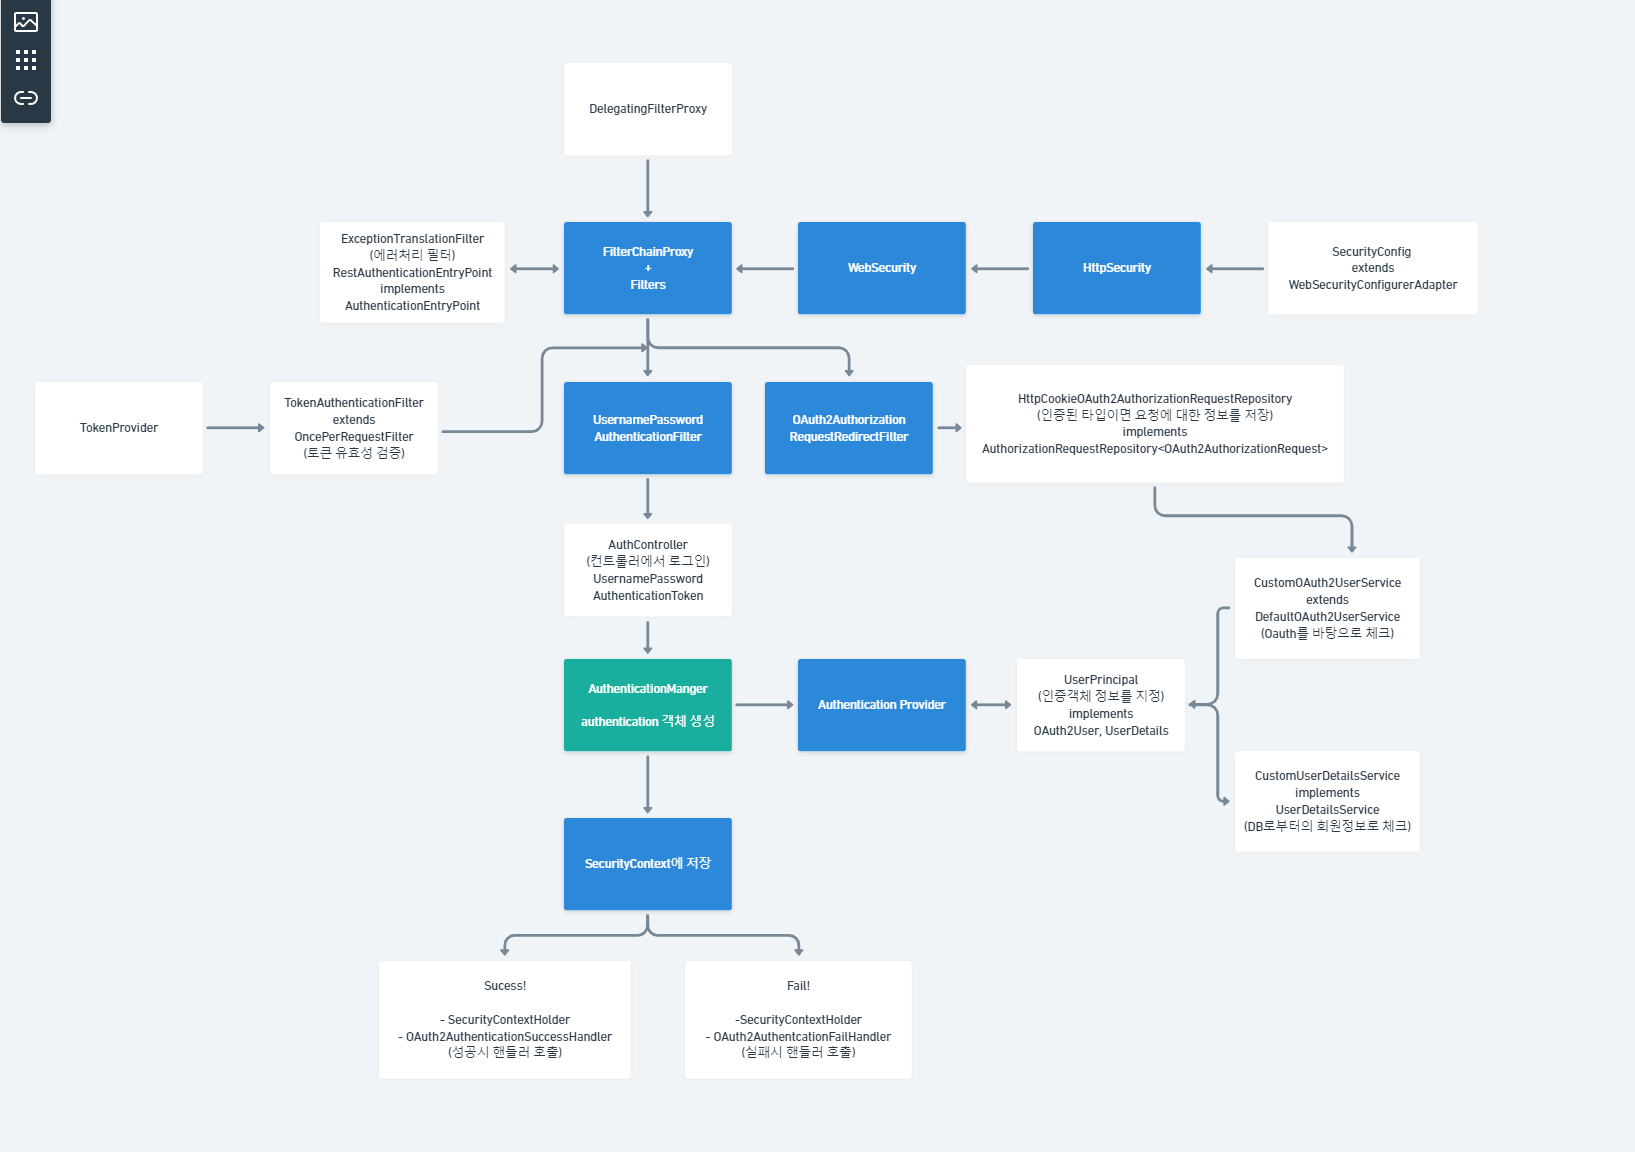
전체적인 로직은 이렇다
참고한 사이트는
https://www.callicoder.com/spring-boot-security-oauth2-social-login-part-2/
스프링 시큐리티의 필터체인 중 가장 먼저 통과되는 것이 usernamepassword authentication filter인데, 이 부분에 토큰 검증 필터를 추가 시킴으로서 jwt 보낼시 이 필터를 통해 인증된 사람임을 알 수 있다는 것이다. 또한 securitycontextholder의 경우
SecurityContextHolder.getContext().setAuthentication(loginUser);이런식으로 인증된유저 정보를 받아 올수 있는데, 그 이유는 securitycontextHolder가 인증된 객체만을 담는 곳이기 때문이다.
또한 인증객체 정보지정을 위해 UserPrincipal에서 Oauth2User와 UserDetails를 구현하여 oauth2 로그인 일반 사용자 로그인의 사용지 인증 정보를 구현하였다.
토큰의 경우
{

AuthUser : Bearer +  toekn

}
이러한 형식으로 주고 받으며, 처음에는 yml파일에 작성한 tokensecret으로 인코딩 하였으나, JJWT parse dont fail if SigningKey is slightly different
라는 에러로 인해 해결방법을 찾다가 다음과 같은 해결 방안을 찾게되었다.
https://stackoverflow.com/questions/52623326/jjwt-parse-dont-fail-if-signingkey-is-slightly-different
또한 커스텀 어노테이션을 사용하여서 프론트에서 백앤드로 요청을 보낼때 이 유저가 인증된 객체인지를 확인하였다.
또한 CORS에러를 위해 WebMvcConfig implements WebMvcConfigurer로 CORS처리를 하였으며,
CORS란
CORS란 요청이 들어간 주소와 응답받는 주소가 다른 경우 즉 localhost:3000 에서 localhost:8080요청을 보내면 서로 다른 출처간 데이터가 오고 가는 것임으로 브라우저에서 서로다른 주소간에 데이터 전달을 인식하고 이를 제어하는 것
이슈 처리
1.
프론트에서 로그인이 잘못 됬을 경우 자동으로 oauth로그인을 호출하는데, 이는 securityconfig에서
.exceptionHandling().authenticationEntryPoint(new AuthEntrypoint()) 를 추가하여서
에러 발생시 에러 처리해주도록 하여 완료 하였다. authenticationEntrypoint는 인증과정 실패나 인증헤더를 보내지 않는 경우 401라는 응답 메세지를 리턴해주는 로직이다.
 @Override
   protected void configure(HttpSecurity http) throws Exception {
       http
               .cors()
               .and()
               .sessionManagement().sessionCreationPolicy(SessionCreationPolicy.STATELESS)
               .and()
               .csrf().disable()
               .formLogin().disable()
               .httpBasic().disable()
               .exceptionHandling().authenticationEntryPoint(new AuthEntrypoint())
               .and()
               .authorizeRequests().antMatchers("/","/error","/favicon.ico", "/**/*.png",
                       "/**/*.gif",
                       "/**/*.svg",
                       "/**/*.jpg",
                       "/**/*.html",
                       "/**/*.css",
                       "/**/*.js").permitAll()
               .antMatchers("/auth/**","/oauth2/**").permitAll()
               .anyRequest().authenticated()
               .and()
               .oauth2Login().authorizationEndpoint().baseUri("/oauth2/authorize") //front에서 인증 요청uri
               .authorizationRequestRepository(cookieRepository())
               .and()
               .redirectionEndpoint().baseUri("/oauth2/callback/**")//구글 승인된 redirection , http://localhost:8080/oauth2/callback/google., yml에 작성
               .and()
               .userInfoEndpoint().userService(customOAuth2UserService)
               .and()
               .successHandler(oAuth2AuthenticationSuccessHandler)
               .failureHandler(oAuth2AuthenticationFailureHandler);
2.
프론트에서 OAuth로그인을 위해
axios.post( http://localhost:8080/oauth2/authorize/google?redirect_uri=http://localhost:3000/oauth2/redirect)
형식으로 요청을 보냈으나 CORS에러가 발생 -> 백앤드에서 처리 해줬으나 반응이 없어 알아보니 axios나 fetch가 아닌 단순 a href로 연결 시켜주어야됨
<a href={GOOGLE_AUTH_URL}>{linkText}</a>3.
redirect시 프론트 localhost:3000/oauth2/auth로 받길 원했으나 localhost:8080으로 리다이렉트
백엔드 security.config에 .successhandler를 만들고 successhandlerclass를 만들어서 성공시 redirect시켜주는 로직 추가
@Override
  public void onAuthenticationSuccess(HttpServletRequest request, HttpServletResponse response, Authentication authentication) throws IOException, ServletException {
      String targetUri = determineTargetUrl(request, response, authentication);


      getRedirectStrategy().sendRedirect(request, response, targetUri);
  }

  protected String determineTargetUrl(HttpServletRequest request, HttpServletResponse response, Authentication authentication) {

      String targetUri = "http://localhost:3000/oauth2/redirect?";
      String token = tokenProvider.createToken(authentication);
      return UriComponentsBuilder.fromUriString(targetUri).queryParam("token", token).build().toUriString();
  }
4.
리액트 권한 라우팅 처리
처음에 _hoc(higher order component)개념을 사용하여 처리하려고 하였으나 실패,
인증 라우팅 컴포넌틀 만들어서 처리
import React from "react";
import { Route, Redirect } from "react-router-dom";
import isLogin from './isLogin'

const AuthRoute = ({ component: Component, needAuth, ...rest }) => (
 <Route
   {...rest}
   render={(props) =>
     isLogin() && needAuth ? ( //토큰여부 확인, needAuth true,false로 처리
       <Component {...props} />
     ) : (
       <Redirect
         to={{
           pathname: "/login",
         }}
       />
     )
   }
 />
);

export default AuthRoute;
앞으로 예정
1. react reduxtoolkit기반으로 로그인및 유저 상태관리 처리 리펙토링
2. querydsl기반으로 쿼리 처리
3. kafka 로 메세지 처리
4. prometheus, grafana로 모니터링 연동
5. jenkins으로 자동 배포 처리
6. aws로 빌드
7. refresh token발급 및 쿠키사용으로 처리(현재는 localstorage에 저장)
8. 된다면 Three.js구현(관리자 페이지)
