프로젝트 하면서 경량화된 버전으로 token을 사용한 로그인을 구현함과 동시에 기록을 남기고자 작성하게 되었다.
폴더구조
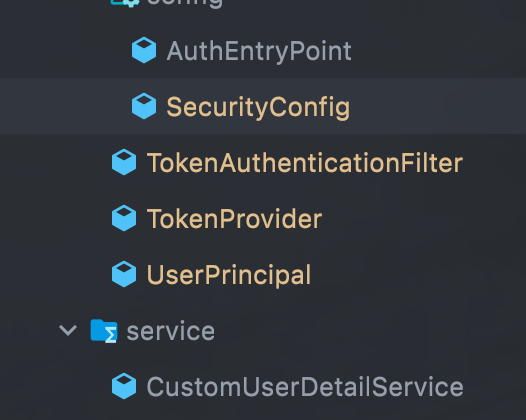
클래스 설명(위에서부터)
-
AuthEntryPoint : 요청이 들어올시, 인증해더를 보내지 않는 경우 401(unauthoriazed) 응답 처리를 해주는 부분 -> AuthenticationEntryPoint를 구현한다
-
SecurityConfig: security환경설정을 진행할 수 있다.(권한설정, 필터 추가 등등) -> WebSecurityConfigurerAdapter 를 상속받아 오버라이드한다
-
TokenAuthenticationFilter: 토큰을 파싱하여, 유저정보를 갖고오고 토큰이 유효할 경우 그 유저에게 권한을 부여하는 클래스 -> OncePerRequestFilter를 상속하여 오버라이드한다
-
TokenProivder : JWT 토큰을 생성, 파싱, 유효성 검사를 위한클래스
-
UserPrincipal : 인증된 유저를 저장하는 인터페이스이다 -> UserDetails를 구현한다
-
CustomUserDetailService : 인증된이 저장된 유저를 불러오는 인터페이스 -> UserDetailsService를 구현한다.
Application.class
@SpringBootApplication
public class CommunityApplication {

	public static void main(String[] args) {
		SpringApplication.run(CommunityApplication.class, args);
	}

	@Bean
	public PasswordEncoder passwordEncoder() {
		return PasswordEncoderFactories.createDelegatingPasswordEncoder();
	}

}
나같은 경우 passwordEncoder를 실행시 빈으로 등록시키도록 실행클래스에 빈 주입하였다. PasswordEncoderFactories에는 다양한 인코더를 제공해주는데, 여기서 암호화에 필요한 BCryptPasswordEncoder를 사용하여 인코딩 할것이다
Controller.class
@RestController
@RequestMapping("/PLEA-STREET/user")
@RequiredArgsConstructor
@Slf4j
public class UserController {

	private final UserService userService;

	//회원가입 처리
	@PostMapping("/signup")
	public ResponseEntity<?> SignUp(@RequestBody SignUpDto signUpDto) {
		userService.handleSignUp(signUpDto);
		return new ResponseEntity<>(HttpStatus.CREATED);
	}

	//로그인 처리
	@GetMapping("/signin")
	public ResponseEntity<?> SignIn(@RequestBody RequestSignInDto requestSignInDto) {
		String token = userService.handleLogin(requestSignInDto);
		log.info(token);
		return ResponseEntity.ok(new ResponseSignInDto(token));
	}
}
위의 두 컨트롤러는 인증이 안된 상태여도 접속할 수 있도록 securityconfig.class에 해당 url을 따로 지정해놓았다.
회원가입의 경우, dto로 데이터 전달 받은후, 생성되었다는 status값만 반환하도록 작성
로그인의 경우, 입력값으로 id, password를 받고, 반환 값으로 토큰을 반환
DTO
@Data
@AllArgsConstructor
@NoArgsConstructor(access = AccessLevel.PROTECTED)
public class RequestSignInDto {

	private String userId;

	private String userPwd;
}

@Data
@NoArgsConstructor(access = AccessLevel.PROTECTED)
public class ResponseSignInDto {

	private String accessToken;
	private String tokenType = "Bearer ";

	public ResponseSignInDto(String accessToken) {
		this.accessToken = accessToken;
	}
}

@Data
@AllArgsConstructor
@NoArgsConstructor(access = AccessLevel.PROTECTED)
public class SignUpDto {

	private String userId;

	private String userPwd;

	private String userName;

	private String userPhone;


}
위에서부터, 로그인시 controller에서 받는 dto, 로그인 완료후 controller에서 반환하는 dto, 마지막은 회원가입시 controller에서 받는 dto 타입이다.
Service.class
@Service
@Slf4j
@RequiredArgsConstructor
public class UserService {

	private final UserRepo userRepo;
	private final TokenProvider tokenProvider;
	private final PasswordEncoder passwordEncoder;


	//로그인시 토큰값 반환
	public String handleLogin(RequestSignInDto requestSignInDto) {
		User user = userRepo.findByUserId(requestSignInDto.getUserId()).orElseThrow(() -> new UsernameNotFoundException("가입되어 있는 유저가 아닙니다"));
		if(!passwordEncoder.matches(requestSignInDto.getUserPwd(), user.getUserPwd())) {
			throw new UsernameNotFoundException("비밀번호가 잘못 되었습니다.");
		}
		return tokenProvider.createToken(String.valueOf(requestSignInDto.getUserId()));
	}

	//회원가입
	public void handleSignUp(SignUpDto signUpDto) {
		userExistCheck(signUpDto.getUserId());
		userRepo.save(
			User.createUser(
				signUpDto.getUserId(),
				passwordEncoder.encode(signUpDto.getUserPwd()),
				signUpDto.getUserName(),
				signUpDto.getUserPhone()
			)
		);
	}

	public void userExistCheck(String toCheckUserId){
		if(userRepo.findByUserId(toCheckUserId).isPresent()) throw new UserAlreadyExistException("동일아이디가 존재합니다");
	}
}- 로그인 로직
json 형태로 id, password 전달 -> repository에서 해당 유저검색 ->
있으면 user객체에 담음 -> 갖고온 password를 암호화하여서 비교(bcryptpassword는 복호화가 불가함으로 새로갖고온 비밀번호를 암호화하여 비교해야한다) -> 틀리면 에러 발생, 맞다면, 토큰을 생성하여 controller단으로 반환
- 회원가입 로직
json 형태로 유저 정보를 받음 -> 아이디로 유저가이미 존재하지는 확인, 있다면 에러 발생, 없다면 repository에 저장
Security 부분
AuthEntryPoint.class
public class AuthEntryPoint implements AuthenticationEntryPoint {
	@Override
	public void commence(HttpServletRequest request, HttpServletResponse response,
		AuthenticationException authException) throws IOException, ServletException {
		response.sendError(HttpServletResponse.SC_UNAUTHORIZED, authException.getLocalizedMessage());
	}
이미 설명했듯이 미인증시 에러를 발생시키는 부분이다.
SecurityConfig.class
@Configuration
@EnableWebSecurity
@RequiredArgsConstructor
@EnableGlobalMethodSecurity(
	securedEnabled = true,
	jsr250Enabled = true,
	prePostEnabled = true
)
public class SecurityConfig extends WebSecurityConfigurerAdapter {


	private final CustomUserDetailService customUserDetailService;


	@Bean
	public TokenAuthenticationFilter tokenAuthenticationFilter(){
		return new TokenAuthenticationFilter();
	}

	@Override
	protected void configure(AuthenticationManagerBuilder auth) throws Exception {
		auth.userDetailsService(customUserDetailService);
	}


	@Override
	protected void configure(HttpSecurity http) throws Exception {
		http
				.cors()
			.and()
				.sessionManagement().sessionCreationPolicy(SessionCreationPolicy.STATELESS)
			.and()
				.csrf().disable()
				.formLogin().disable()
				.httpBasic().disable()
				.exceptionHandling().authenticationEntryPoint(new AuthEntryPoint())
			.and()
				.authorizeRequests()
					.antMatchers("/","/error","/favicon.ico", "/**/*.png", "/**/*.gif",
						"/**/*.svg",
						"/**/*.jpg",
						"/**/*.html",
						"/**/*.css",
						"/**/*.js").permitAll()
				.antMatchers("/PLEA-STREET/user/**").permitAll()
				.anyRequest().authenticated();

		http.addFilterBefore(tokenAuthenticationFilter(), UsernamePasswordAuthenticationFilter.class);
	}
}
@EnableWebSecurity어노테이션을 붙임으로서 securityfilterchain에 자동으로 포함시킨다 (스프링 시큐리티는 필터 -> 필터 ->...를 통과하면서 인증을 하기 때문)
두번째 Configure부분은 내가 어떤 클래스를 해당 인증 과정에 등록시킬지를 지정하는 부분이다.
세번째 Configurer부분은 시큐리티에 적용시킬 규칙을 작성하는 부분이다.
.authorizeRequests().antMatchers(......).pertmitAll()의 부분은 ......에 해당하는 url, jpg, css 등의 파일들은 권한이 없어도 허용하겠다는 규칙을 추가한것이며, 로그인과 회원가입을 위해 해당 컨트롤러가 작성된 url 도 인증없이 접속 가능하도록 추가 등록 해놓았다.
그 외에는 .anyRequest().authenticated()를 통해 모두 인증이 완료된 유저만 접근하도록 지정해놓았다.
그리고 마지막에 addFilterBefore(tokenAuthenticationFilter(), UsernamePasswordAuthenticationFilter.class)부분은
UsernamePasswordAuthenticationFilter라는 내가만든 커스텀 필터를 UsernamePasswordAuthenticationFilter 보다 먼저 등록시켜 놓겠다는 뜻이다.
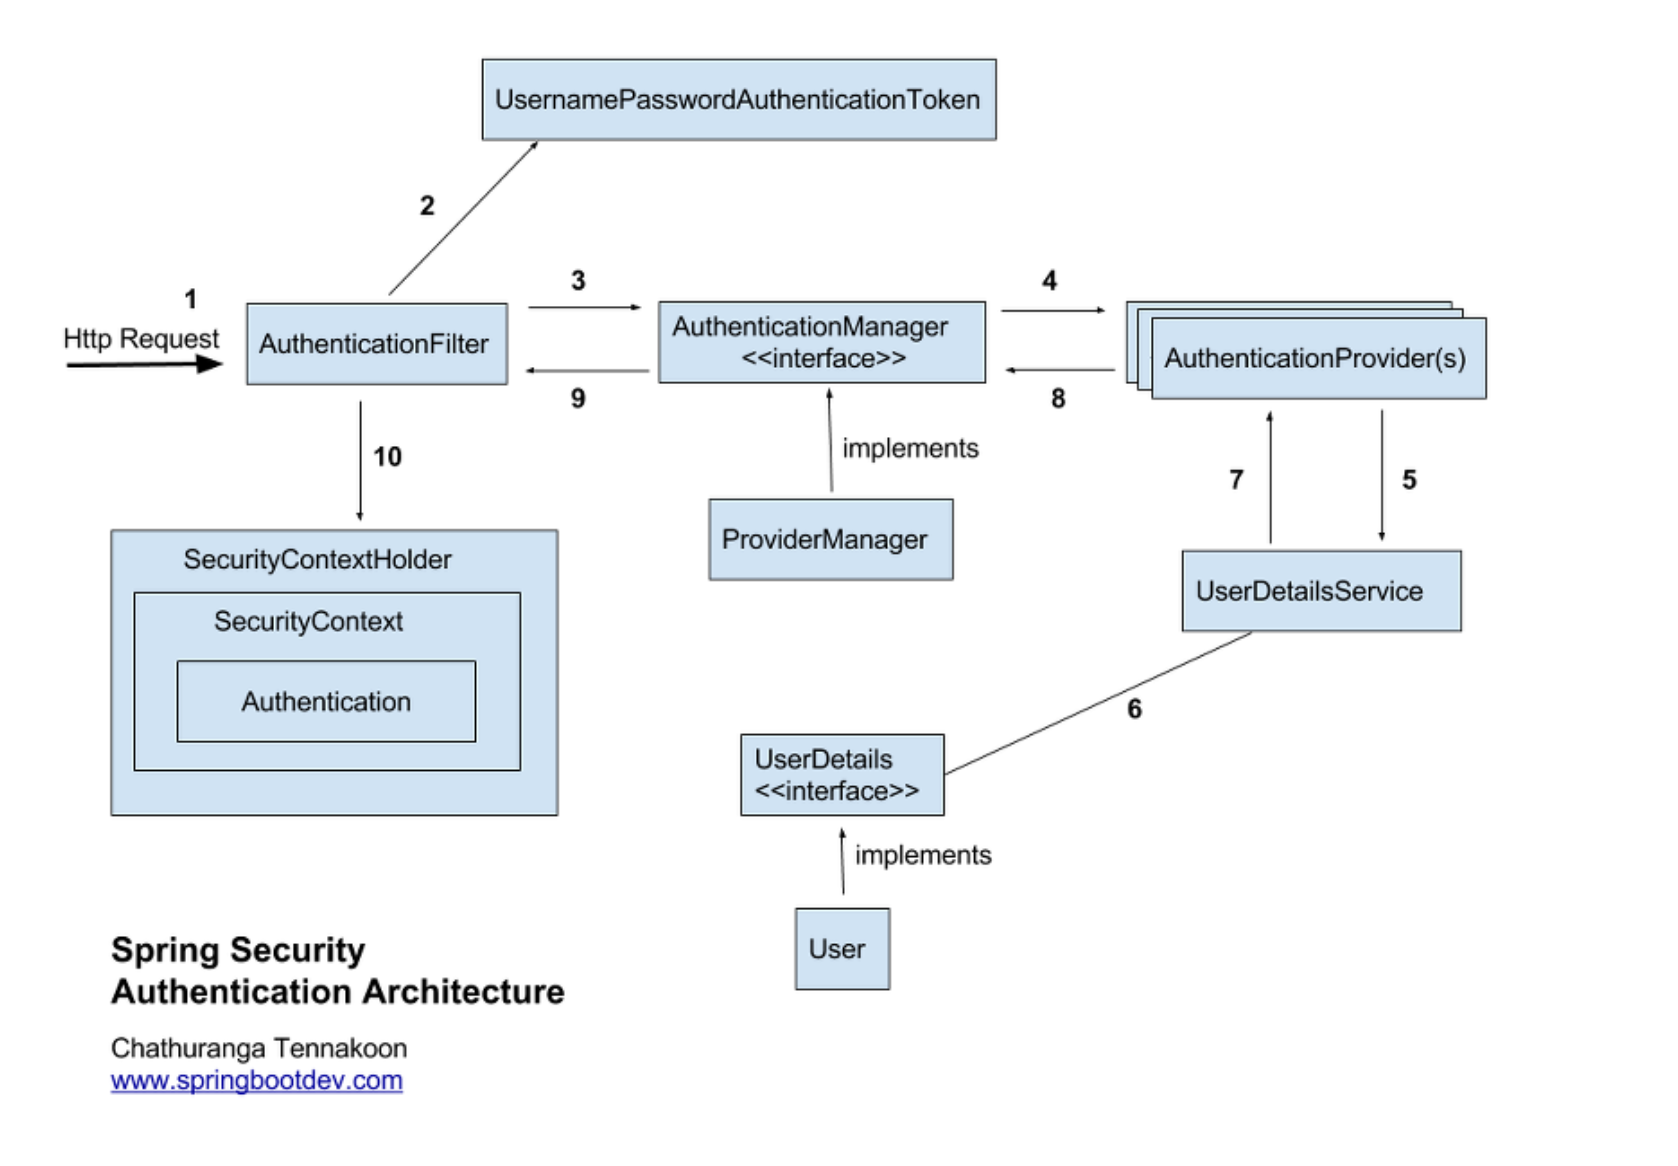
위의 그림은 form 기반 로그인 인증 방식이다
UsernamePasswordAuthenticationFilter는 그림에서 AuthenticationFilter의 역할을 수행한다.
나의 경우 jwt를 이용한 로그인 기반임으로 UsernamePasswordAuthenticationFilter보다 앞에 token인증관련된 로직을 적용시켜서, 인증 완료후 해당 객체에 권한을 부여해 주어야 한다.
따라서 먼저 적용되도록 필터를 등록 시켜 놓았다.
TokenAuthenticationFilter.class
public class TokenAuthenticationFilter extends OncePerRequestFilter {

	@Autowired
	private TokenProvider tokenProvider;

	@Autowired
	private CustomUserDetailService customUserDetailService;


	private String getToken(HttpServletRequest request) {
		String token = request.getHeader("Authorization");
		if (StringUtils.hasText(token) && token.startsWith("Bearer ")){
			return token.substring(7, token.length());
		}
		return null;
	}


	@Override
	protected void doFilterInternal(HttpServletRequest request, HttpServletResponse response,
		FilterChain filterChain) throws ServletException, IOException {

		String jwt = getToken(request);

		if(StringUtils.hasText(jwt) && tokenProvider.validToken(jwt)){
			//여기서 토큰으로부터 유저아이디를 갖고옴
			String userId = tokenProvider.getUserIdFromToken(jwt);

			UserDetails userDetails = customUserDetailService.loadUserByUsername(userId);

			UsernamePasswordAuthenticationToken auth = new UsernamePasswordAuthenticationToken(userDetails, null,
				userDetails.getAuthorities());

			SecurityContextHolder.getContext().setAuthentication(auth);
		}
		filterChain.doFilter(request, response);
	}
}
이 클래스가 바로 위에서 설명했던 usernamepasswordAuthenticationFilter보다 먼저 토큰을 바탕으로 유저를 등록시키는 클래스이다. OncePerRequestFilter는 요청당 한번만 일어나도록 하는 추상클래스이다.
이 클래스에서는 토큰을 갖고와서 토큰이 맞으면 해당 유저 정보를 등록 시키고, 인증된 유저정보를 바탕으로 시큐리티에서 사용하는 토큰을 생성하고 등록 시킨다.
여기서 토큰의 형태는
{
	Authorization : Bearer +토큰
}
형태로 들어오게 될 것임으로 앞의 띄어쓰기 포함 7자를 잘라주고 순수 토큰만 비교하게끔 작성하였다.
TokenProvider.class
@Service
@Slf4j
@RequiredArgsConstructor
public class TokenProvider {


	@Value("app.jwt.secret")
	private String secret;

	private long TOKEN_EXPIRY_DUR = 864000000;

	public String createToken(String loginUser) {
		Claims claims = Jwts.claims().setSubject(loginUser);

		Date now = new Date();
		Date expiryDate = new Date(now.getTime() + TOKEN_EXPIRY_DUR);


		return Jwts.builder()
			.setClaims(claims)
			.setIssuedAt(now)
			.setExpiration(expiryDate)
			.signWith(SignatureAlgorithm.HS512, secret)
			.compact();
	}

	public String getUserIdFromToken(String token) {

		try {
			return Jwts.parser()
				.setSigningKey(secret)
				.parseClaimsJws(token)
				.getBody()
				.getSubject();

		} catch (ExpiredJwtException ex) {
			log.info("token Expired");
			return ex.getClaims().getSubject();
		}
	}

	public boolean validToken(String token) {
		try{
			Jwts.parser().setSigningKey(secret).parseClaimsJws(token);
			return true;
		} catch (JwtException ex) {
			ex.printStackTrace();
		}
		return false;
	}
}
이 부분은 토큰을 생성, 토큰으로부터 유저아이디 갖고오기, 유효한 토큰인지 확인하기의 메소드가 포함되어있다.
UserPrincipal.class
public class UserPrincipal implements UserDetails {

	private String userId;
	private String userPwd;

	public UserPrincipal(String userId, String userPwd) {
		this.userId = userId;
		this.userPwd= userPwd;
	}

	public static UserPrincipal create(User user) {
		return new UserPrincipal(
			user.getUserId(),
			user.getUserPwd()
		);
	}

	@Override
	public Collection<? extends GrantedAuthority> getAuthorities() {
		return null;
	}

	@Override
	public String getPassword() {
		return userPwd;
	}

	@Override
	public String getUsername() {
		return userId;
	}

	@Override
	public boolean isAccountNonExpired() {
		return true;
	}

	@Override
	public boolean isAccountNonLocked() {
		return true;
	}

	@Override
	public boolean isCredentialsNonExpired() {
		return true;
	}

	@Override
	public boolean isEnabled() {
		return true;
	}
}
스프링 시큐리티가 인증된 유저를 담는 클래스이다. UserDetails를 구현하여 커스텀하게 작성할 수 있다.