프로젝트 overview
- The student evaluated should simply explain to you:
(평가 대상 학생은 다음과 같이 간단하게 설명해야 한다.) - The basic function of its virtual machine.
(가상 머신의 작동 방식)
가상머신
-
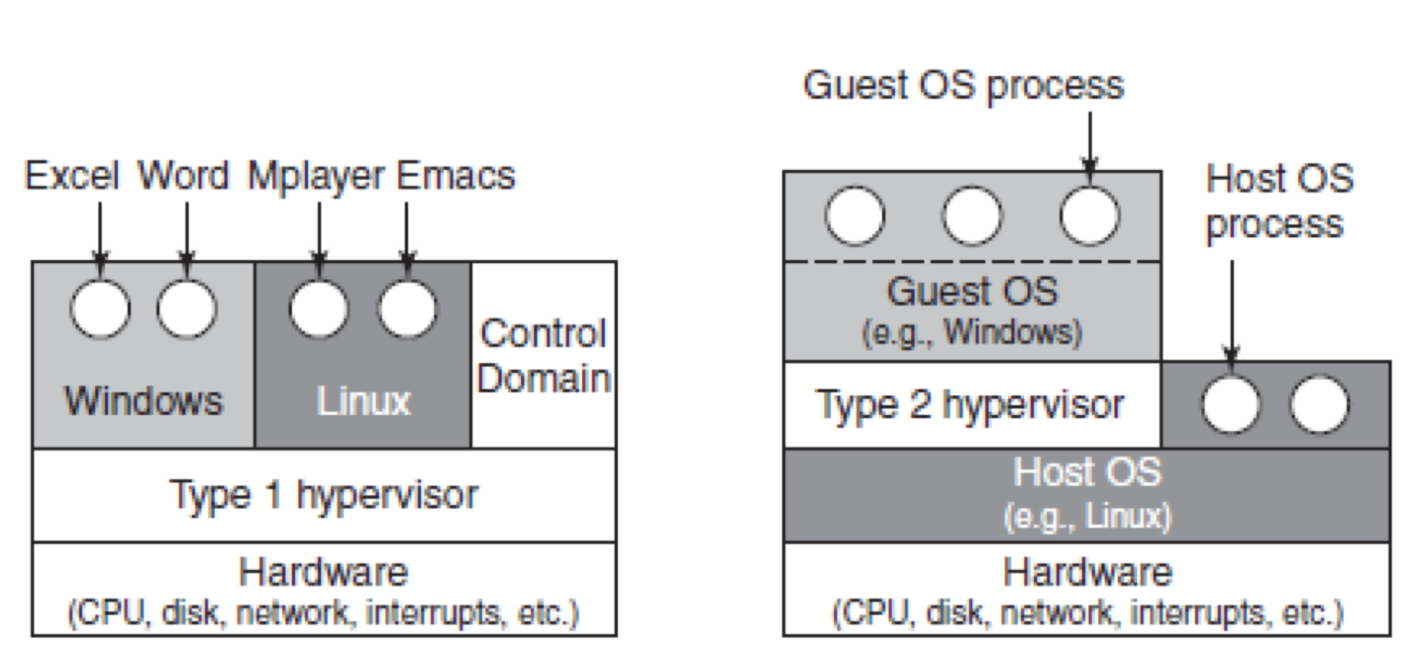
가상머신이란 특정 물리적 컴퓨터 위에 물리자원을 가상화한 컴퓨터 환경을 구축하여 어떤 운영체제라도 설치할 수 있게하는 소프트웨어를 말한다. 하나의 물리적 자원 위에 다수의 운영체제를 설치하는 식으로 서버용 컴퓨터를 보다 효율적으로 사용하기 위해 주로 사용한다. VM외에 Docker로 대표되는 컨테이너라는 개념도 있다.
-
가상머신을 설치하기 앞서 하이퍼바이저(Hypervisor) 라는 개념을 알아야 한다. 하이퍼바이저는 실제 물리자원을 가상화 하고 이를 가상머신이 사용할 수 있도록 중간에서 매개체 역할을 하는 소프트웨어이다.
- 하이퍼바이저는 하드웨어를 직접 제어할 수 있기 때문에 가상의 하드웨어를 제공할 뿐만 아니라, VM내에서 다양한 기능들을 수행한다.
- The basic differences between Centos and Debain.
(CentOS와 데비안 사이에서 기본적인 차이.)
Debain vs Centos
- virtual box를 설치했다면 서버용 운영체제를 선택해야한다.
- Centos = 기업용으로 주로 사용하며 RHEL(Red Hat Enterprise Linux)를 그대로 가져옴. Redhat체험판 느낌으로 업데이트가 느리고, 개인이 다루기 어려움.
- Debain = 개인용으로 centos보다 다루기 쉬움.
- His choice of operating system.
(운영 체제 선택) -> Debain - The interest of virutal machines.
(가상 머신의 목적) - If the evaluated student chose CentOS, he should explain to you what SELinux and DNF are.
(만약 평가 학생 CentOS을 선택했다면 그는 너 SELinux과 DNF이 무엇인지 설명해야 한다.) - If the evaluated student has chosen Debian he will
need to explain the difference between aptitude and apt and what APPArmor is.
(만약 평가 학생 데비안을 택했다면 그는 aptitude와 apt의 차이점과 APPArmor이 무엇인지를 설명할 필요가 있을 것이다.)
apt vs aptitude
- apt
- apt(advanced packaging tool) 은 데비안 사용에 필요한 각종 소프트웨어 프로그램을 설치하기 위해 필요한 cli용 패키지 관리 툴이다. 무료 오픈소스이면서 low level 이지만 자유도가 높다. 프로그램 충돌이 발생할경우 충돌 패키지 자동제거는 -auto-remove 등의 추가 옵션이 필요하다. 또한 다른 고수준 패키지매니저에 의해 사용될 수 있다.
- aptitude
- apt보다 기능이 더 많고, 편리한 high level 패키지 매니저이다. 사용자 인터페이스를 추가해 대화형으로 패키지를 검색하고 설치 및 제거를 할 수 있다. 사용하지 않는 패키지를 자동적으로 제거해주거나 설치, 제거, 업데이트 과정에서 충돌이 있을 경우엔 다른 대안도 함께 제시해준다.
- 기본적으로 깔려있는 apt를 사용한다.
AppArmor
AppArmor(Application Armor) 은 시스템 관리자가 프로그램 프로필 별로 프로그램 보안을 세팅할 수 있게 해주는 리눅스 커널 보안 모듈이다.
Mandatory Access Control(MAC)로 관리자가 특정 프로그램에 대한 네트워크, 소켓, 입출력 등에 대한 접근을 제한할 수 있도록 한다.
프로필들은 네트워크 엑세스, raw 소켓 엑세스 그리고 파일의 읽기, 쓰기, 실행 같은 능력을 허용할 수 있다. AppArmor은 강제적 접근 통제 (MAC)을 제공하면서 전통적인 유닉스 임의적 접근 통제 (DAC) 모델을 지원한다.
DAC(Discretionary Access Control)은 임의 접근 통제로 시스템 객체에서 접근을 사용자나 그룹의 신분을 기준으로 제한하는 방법이다.
Simple setup
- Ensure that the machine does not have a graphical environment at launch.
(시작 시 컴퓨터에 그래픽 환경이 없는지 확인합니다.)
A password will be requested before attempting to connect to this machine.
(이 시스템에 연결을 시도하기 전에 암호를 요청합니다.)
Finally, connect with a user with the help of the student evaluated.
(마지막으로, 평가 대상 학생의 도움을 받아 사용자와 연결합니다.)
This user must not be root.
(이 사용자는 루트가 아니어야 합니다.)
Pay attention to the password chosen, it must follow the rules imposed in the subject.
(선택한 비밀번호에 주의하십시오. 주제에 부과된 규칙을 따라야 합니다.) - Check that the UFW service is started with the help of the evaluator.
(평가자의 도움을 받아 UFW 서비스가 시작되는지 확인합니다.)
sudo ufw status verbose- Check that the SSH service is started with the help of the evaluator
(평가자의 도움을 받아 SSH 서비스가 시작되었는지 확인합니다.)
systemctl status ssh- Check that the chosen operation system is Debian or Centos with the help of the reviewer.
(평가자의 도움을 받아 선택한 운영 체제가 Debian 또는 CentOS인지 확인합니다.)
hostnamectlUser
The subject requests that a user with the login of the evaluated student is present on the virtual machine. Check that it has been added and that it belongs to the "sudo" and "user42" groups.
(대상은 평가되는 학생의 로그인을 가진 사용자가 가상 머신에 존재하도록 요청합니다. 추가되었고 "sudo" 및 "user42" 그룹에 속하는지 확인합니다.)
id <username>Make sure the rules imposed in the subject concerning the password policy have been put in place by following the following steps.
(다음 단계에 따라 비밀번호 정책과 관련하여 주제에 부과된 규칙이 적용되었는지 확인 하십시오.)
sudo vi /etc/pam.d/common-password
retry=3 : 암호입력 3회까지
minlen=10 : 암호 최소 길이는 10
difok=7 : 기존 패스워드와 달라야 하는 문자수는 7
ucredit=-1 : 대문자 한 개 이상
lcredit=-1 : 소문자 한 개 이상
dcredit=-1 : 숫자 한 개 이상
reject_username: username이 그대로 뒤집혀서 새 패스워드에 들어있는지 검사하고, 들어있다면 거부
enforce_for_root : root 사용자가 패스워드를 바꾸려고 한느 경우에도 위의 조건을 적용
First, create a new user. Assign it a password of your choice, respecting the subject ruels. The evaluated student must now explain to you how he was able to set up the rules requested in the subject on their virtual machine.
(저 새 사용자를 만듭니다. 주제 규칙을 준수하여 선택한 암호를 할당하십시오. 평가 중인 학생은 이제 가상 머신에서 주제에서 요청한 규칙을 어떻게 설정할 수 있었는지 설명해야 합니다.)
adduser [username]Normally there should be one or two modified files. If there is any problem, the evaluation stops here.
(일반적으로 하나 또는 두 개의 수정된 파일이 있어야 합니다. 문제가 있으면 여기에서 평가를 중지합니다.)
- Now that you have a new user, ask the student being evaluated to create a group named "evaluating" in front of you and assign it to this user. Finally, check that this user belongs to the "evaluating" group.
(이제 새 사용자가 생겼으므로 평가 중인 학생에게 "evaluating"이라는 그룹을 만들고 이 사용자에게 할당하도록 요청합니다. 마지막으로 이 사용자가 "evaluating"그룹에 속하는지 확인합니다. )
sudo groupadd [evaluating] : evaluating이라는 그룹 추가
sudo usermod -aG evaluating [username] : username을 eval에 할당

usermod -aG sudo,user42 <username>
-> 그룹에 유저를 추가해주는 명령어, 그룹이 여러개인 경우 공백없이 콤마로 구분한다.

usermod -g user42 <username> 명령어를 통해 user42그룹이 primary group이 되도록 한다..

G 옵션 :
gid 그룹들을 제외하고 명령어에 나열된 그룹만 추가가 되며, ㅁ여령어에 나열되어 있지 않지만 유저가 속해있는 그룹은 전부 탈퇴된다.

a 옵션:
G옵션에서만 함께 쓰일 수 있고, G옵션만 붙었을 때와 달리, 유저가 속해있지만 명령어에 나열되어있지 않은 그룹에 관하여 탈퇴처리 되지 않는다.

id <username>을 통해 해당 user가 어떤 그룹에 속해있는지 확인 가능하다.-
Finally, ask the student evaluated to explain the advantages of this password policy, as well as the adcantages and disadvantages of its implementation. Of course, answering that it is because the subject asks for it does not count.
(마지막으로 평가를 받는 학생에게 이 암호 정책의 장점과 구현의 장점과 단점을 설명하도록 요청합니다. 물론 피험자가 요구하기 때문이라고 답하는 것은 포함하지 않는다.)
-> password 정책의 장점 말하기
-> password 정책을 이행하는데 있어 장단점 말하기 -
비밀번호 정책으로 인하여 강력한 비밀번호를 생성해야 하므로 보안성은 높아졌지만, 30일 주기로 매번 다른 비밀번호를 생성해야 하는 불편함이 생김
Hostname and partitions
- Check that the hostname of the machine is correctly formatted as follows: login42 (login of the student evaluated).
(시스템의 호스트 이름이 login42(학생의 로그인 평가)와 같이 올바른 형식인지 확인합니다.)
hostnamectl- Modify this hostname by replacing the login with yours, then restart the machine.
(로그인을 귀하의 것으로 바꾸어 이 호스트 이름을 수정한 다음 시스템을 다시 시작하십시오.)
hostnamectl set-hostname <hostname>If on restart, the hostname has not been updated, the evaluation stops here.
(다시 시작할 때 호스트 이름이 업데이트되지 않은 경우 평가는 여기서 중지됩니다.)
-
You can now restore the machine to the original hostname.
(이제 시스템을 원래 호스트 이름으로 복원할 수 있습니다.) -
Ask the student evaluated how to view the partitions for this for this virtual machine.
(평가 중인 학생에게 이 가상 머신의 파티션을 보는 방법을 묻습니다.)
lsblk- Compare the output with the example given in the subject. Please note: if the student evaluated makes the bonuses, it will be necessary to refer to the bonus example.
(출력물을 주제에 주어진 예와 비교하십시오. 참고: 평가된 학생이 보너스를 받는 경우 보너스 예를 참조해야 합니다.)
- /root: 최상위 마운트 파티션. 최상위 디렉토리로 비교적 크기가 작은 /bin, /etc를 포함
- /swap: 스왑 파티션으로 가상 메모리로 사용되는 파티션. 실제 물리적인 램이 부족할 때 대신 사용됨. /root와 함께 반드시 필요한 파티션
- /home: 사용자 계정 파티션으로 사용자 계정이 위치함. 웹 호스팅 시 해당 파티션 용량을 가능한 크게 설정해야함.
This part is an opportunity to discuss the scores! The student being evaluated should give you a brief explanation of how LVM works and what it is all about.
(이 부분은 점수를 토론할 수 있는 기회입니다! 평가를 받는 학생은 LVM이 어떻게 작동하고 무엇에 관한 것인지에 대해 간략하게 설명해야 합니다.)
LVM이란
LVM (Logical Volume Manager)은 리눅스의 저장 공간을 효율적이고 유연하게 관리하기 위한 커널의 한 부분이다.
LVM vs 일반적인 disk partitioning
LVM이 아닌 기존 방식의 경우, 하드디스크를 파티셔닝한 후 OS영역에 마운트 하여 read/write작업을 수행한다.
이 경우 저장 공간의 크기가 고정되어서 증설/축소가 어렵다.
이를 보완하기 위한 방법으로 LVM을 구성할 수 있다.
LVM은 파티션 대신에 volume이라는 단위로 저장 장치를 다룬다.
스토리지의 확장, 변경에 유연하며, 크기를 변경할 때 기존 데이터의 이전이 필요없다.
LVM 사용의 장점
- 유연한 용량 조절
- 크기 조절이 가능한 storage pool
- 편의에 따른 장치 이름 설정
- disk striping, mirror volume등을 제공
LVM 관련 용어 및 구성
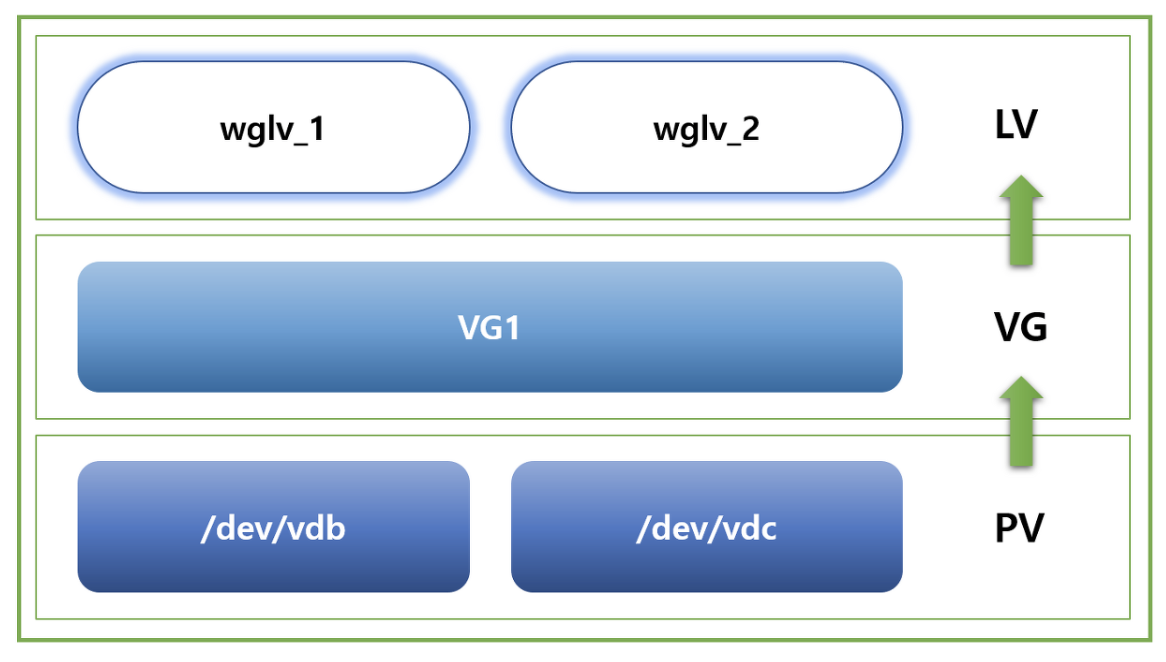
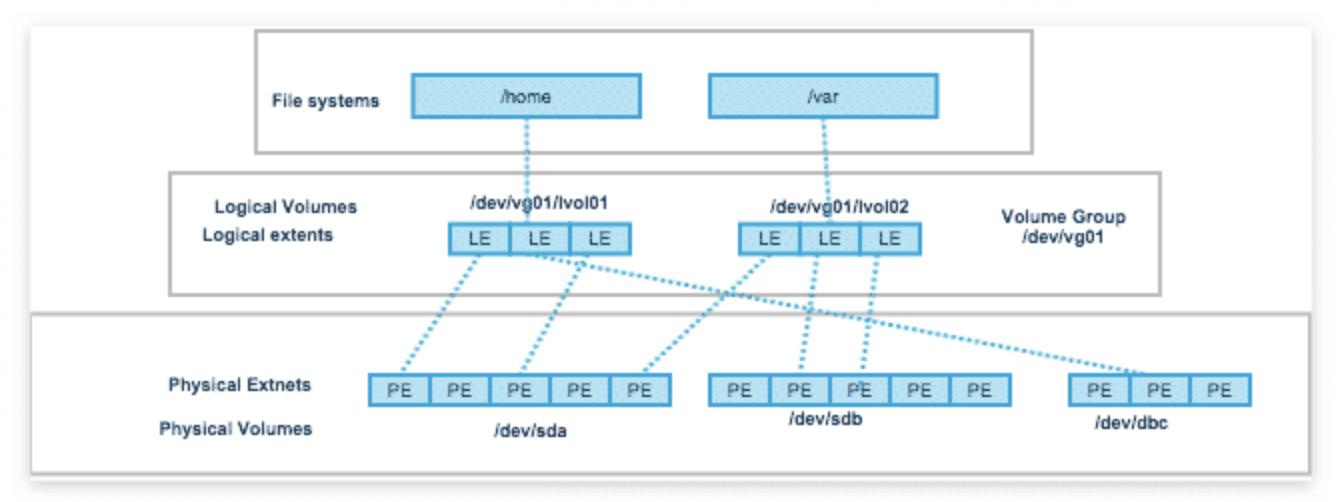
물리적 볼륨 / PV (Physical Volume)
- 실제 디스크 장치를 분할한 파티션된 상태를 의미한다.
- PV는 일정한 크기의 PE들로 구성된다.
물리적 확장 / PE (Physical Extent) - PV를 구성하는 일정한 크기의 Block
- 보통 1PE는 4MB에 해당한다.
- PE와 LE는 1:1 대응한다.
볼륨 그룹 / VG (Volume Group) - PV들이 모여서 생성되는 단위이다
- 사용자는 VG를 원하는 대로 쪼개서 LV로 만들게 된다.
논리적 볼륨 / LV (Logical Volume) - 사용자가 최종적으로 사용하는 단위로, VG에서 필요한 크기로 할당받아 LV를 생성한다
참조
https://greencloud33.tistory.com/41
Sudo
- Check that the "sudo" program is properly installed on virtual machine.
(가상 시스템에 "sudo" 프로그램이 제대로 설치되어 있는지 확인합니다.)
dpkg -l sudo- The evaluated student should now show assigning your new user to the "sudo" group.
(평가 중인 학생은 이제 "sudo" 그룹에 새 사용자를 할당하는 것으로 표시되어야 합니다.)
sudo usermod -aG sudo <새로운 사용자 명>- The subject imposes strict rules for sudo. The evaluated student must first explain the value and operation of sudo using examples of their choice.
(주제는 sudo에 대해 엄격한 규칙을 부과합니다. 평가 대상은 먼저 선택한 예를 사용하여 sudo의 가치와 작동을 설명해야 합니다.)
In a second step, it must show you the implementation of the rules imposed by the subject.
(두 번째 단계에서는 주제에 의해 부과된 규칙의 구현을 보여주어야 합니다.)
sudo visudo- Defaults authfail_message=”원하는 에러메세지” #권한 획득 실패 시 출력(sudo 인증 실패시)
- Defaults badpass_message=”원하는 에러메세지” #sudo인증에서 비밀번호 틀리면 출력
- Defaults log_input #sudo명령어 실행 시 입력된 명령어 log로 저장
- Defaults log_output #sudo명령어 실행 시 출력 결과를 log로 저장
- Defaults requiretty #sudo명령어 실행 시 tty 강제
- Defaults iolog_dir=”/var/log/sudo/” #sudo log 저장 디렉토리 설정
- Defaults passwd_tries=3 #sudo실행 횟수를 지정. default가 3
- Verify that the "/var/log/sudo/" folder exists and has at least one file. Check the contests of the files in this folder, You should see a history of the comands used with sudo.
(/var/log/sudo/" 폴더가 존재하고 하나 이상의 파일이 있는지 확인합니다. 이 폴더에 있는 파일의 내용을 확인하십시오. sudo에서 사용된 명령의 기록을 볼 수 있습니다.)
sudo vim /var/log/sudo/Finally, try to run a command via sudo. See if the file in the "/var/log/sudo/" folder have been updated.
(마지막으로 sudo를 통해 명령을 실행해 보십시오.
"/var/log/sudo/" 폴더의 파일이 업데이트되었는지 확인합니다.)
UFW
- Check that the "UFW" program is properly installed on the virtual machine.
(가상 시스템에 "UFW" 프로그램이 제대로 설치되어 있는지 확인합니다.
sudo ufw status verbose- Check that it is working properly.
(제대로 작동하는지 확인합니다.)
aduo aa-status : 상태확인
sudo aa-enabled : 활성화 여부 확인- The evaluated student being evaluated should explain to you basically what UFW is and the value of using it.
(평가 대상 학생은 기본적으로 UFW가 무엇이며 UFW를 사용하는 가치를 설명해야 합니다.)
-> UFW란 무엇인가
UFW란 무엇인가
- 방화벽은 네트워크의 통로를 단일화하여 내부 정보망을 보호학 위한 시스템이다. 외부망과 내부망을 분리하여 접근 제어를 한다.
- 이중 iptables는 리눅스 상에서 방화벽을 설정하는 도구로서 커널 2.4 이전 버전에서 사용되던 ipchains를 대신하는 방화벽 도구이다. iptables는 커널상에서의 netfilter 패킷 필터링 기능을 사용자 공간에서 제어하는 수준으로 사용할 수 있다.
- 패킷 필터링이란 패킷의 해더를 보고 전체 패킷을 필터링할지 결정하는 것을 말한다. 일반적으로 패킷은 헤더와 데이터를 가진다.
- UFW(Uncomplicated Firewall)는 iptables의 설정 도구로서 복잡하지 않은 방화벽을 의미한다. iptables가 설정과 관리가 복잡해 UFW가 나오게 됐다.
- List the active rules in UFW. A rule must exist for port 4242.
(UFW의 활성 규칙을 나열합니다. 포트 4242에 대한 규칙이 있어야 합니다.)
sudo ufw status numbered- Add a new rule to open port 8080. Check that this one has been added by listing the active rules.
(포트 8080을 여는 데 새 규칙을 추가합니다. 활성 규칙을 나열하여 이 규칙이 추가되었는지 확인합니다.)
sudo vim /etc/ssh/sshd_config -> Port 8080추가
sudo ufw allow 8080
sudo ufw status numbered- Finally, delete this new rule with the help of the student evaluated.
(마지막으로 평가된 학생의 도움을 받아 이 새 규칙을 삭제합니다.)
sudo ufw delete 8080
sudo ufw status numbered
SSH
- Check that the SSH service is properly installed on the virtual machine.
(SSH 서비스가 가상 시스템에 올바르게 설치되어 있는지 확인합니다.)
apt search openssh-server
systemctl status ssh- Check that it is working properly.
(제대로 작동하는지 확인합니다.)
-> 새로운 사용자로 terminal에서 접근하기
- The evaluated student must be able to explain to you basically what SSH is and the value of using it.
(평가 중인 학생은 SSH가 기본적으로 무엇이며 SSH를 사용하는 가치를 설명할 수 있어야 합니다.)
SSH란?
SSH(Secure Shell)은 원격으로 public network를 통해 호스트 컴퓨터와 통신을 할 때 보안을 위해 사용되는 프로토콜이다. 기존의 텔넷(telnet) 이 취약했기에 암호화 기능을 추가한 보안 프로토콜이다. 개인키-공개키 쌍의 비대칭키 방식을 사용한다. 쉘로 원격접속하기 때문에 기본적으로 CLI로 실행하며 기본 포트는 22번이다.
- Verify that the SSH service only uses port 4242.
(SSH 서비스가 포트 4242만 사용하는지 확인합니다.)
-> 4242포트 말고 다른 포트로 진입되는지 확인
- The student evaluated should help you use SSH in order to log in with the newly created user.
(평가된 학생은 새로 생성된 사용자로 로그인하기 위해 SSH를 사용하는 것을 도와야 합니다.)
ssh <username>@127.0.0.1 -p [portnum]To do this, you can use a key or a simple password.
(이렇게 하려면 키 또는 간단한 암호를 사용할 수 있습니다.)
It will depend on the student being evaluated.
(그것은 평가받는 학생에 따라 달라질 것이다.)
Of course, you have to make sure that you cannot use SSH with the "root" user as stated in the subject.
(물론 제목에 명시된 "root" 사용자와 SSH를 함께 사용할 수 없는지 확인해야 합니다.)
-> root로 터미널에 연결되는지 확인
ssh root@127.0.0.1 -p [port num]Script monitoring
The student evaluated should explain to you simply:
(평가된 학생은 다음과 같이 간단히 설명해야 합니다.)
- the operation of its script by displaying its code.
(코드를 표시하여 스크립트의 작업입니다.)
#!/bin/bash

printf "#Architecture: "
 uname -a

printf "#CPU physical : "
 nproc --all

printf "#vCPU : "
 cat /proc/cpuinfo | grep processor | wc -l

printf "#Memory Usage: "
 free -m | grep Mem |awk '{printf"%d/%dMB (%.2f%%)\n", $3, $2, $3/$2 * 100}'

printf "#Disk Usage: "
df -a -BM | grep /dev/map | awk '{sum+=$3}END{print sum}' | tr -d '\n'
printf "/"
df -a -BM | grep /dev/map | awk '{sum+=$4}END{print sum}' | tr -d '\n'
printf "MB ("
df -a -BM | grep /dev/map | awk '{sum1+=$3 ; sum2+=$4 }END{printf "%d", sum1 / sum2 * 100}' | tr -d '\n'
printf "%%)\n"

printf "#CPU load: "
mpstat | grep all | awk '{printf "%.2f%%\n", 100-$13}'

printf "#Last boot: "
who -b | awk '{printf $3" "$4"\n"}'

printf "#LVM use: "
if [ "$(lsblk | grep lvm | wc -l)" -gt 0 ] ; then printf "yes\n" ; else printf "no\n" ; fi

printf "#Connections TCP : "
ss | grep -i tcp | wc -l | tr -d '\n'
printf " ESTABLISHED\n"

printf "#User log: "
who | wc -l

printf "#Network: IP "
hostname -I | tr -d '\n'
printf "("
ip link show | awk '$1 == "link/ether" {print $2}' | sed '2, $d' | tr -d '\n'
printf ")\n"

printf "#Sudo : "
journalctl _COMM=sudo | wc -l | tr -d '\n'
printf " cmd\n"

exit 0- uname: 시스템 정보 출력 명령어
- uname -a: 커널이름, 네트워크 호스트명, 커널 릴리즈 정보, 커널 버전, 시스템의 하드웨어 타입(아키텍처), 운영체제 이름을 출력한다.
- nproc -all: 설치된 모든 코어/프로세스 수 출력
- /proc/cpuinfo: CPU 정보가 담겨있는 파일
- cat /proc/cpuinfo | grep processor | wc -l: CPU 정보가 담겨있는 파일 중 프로세스만 찾아 개수를 출력
- free: 시스템 메모리 사용 현황 출력 명령어
- free -m: 메가파이트 단위로 시스템 메모리 사용 현황 출력 명령어
- df: 파일 시스템 디스크 공간의 사용량을 출력하는 명령어
- -a: 0블록의 파일시스템을 포함해 모든 파일시스템을 출력하는 옵션
- -B: 지정한 크기(SIZE)를 블록단위로 정하여 표시하는 옵션
- -BM: 크기를 1M으로 블록 단위를 정해 용량을 표시
- mpstat: 사용가능한 CPU와 Core 별 사용량을 출력하는 명령어
- who: 호스트에 로그인한 사용자 정보 출력
- b: 마지막 시스템 부팅 시간을 출력하는 옵션
- ss: 소켓 상태를 조회할 수 있는 유틸리티로 netstat와 비슷한 역할을 수행
- hostname: 시스템 이름을 확인하고 설정하는 명령어
- -I: 호스트의 IP주소를 출력하는 옵션
- journalctl: systemd의 서비스 로그를 확인
- What is "cron."
("크론"이란 무엇입니까?)
cron을 사용하는 이유
- 주어진 일정에 따라 특정 셀 명령어들을 실행해야 할 때 사용
cron은 무엇인가
- 유닉스 계열 컴퓨터 운영체제의 시간 기반 잡 스케줄러이다. 소프트웨어 환경을 설정하고 관리하는 사람들은 작업을 고정된 시간, 날짜 간격에 주기적으로 실행할 수 있도록 스케줄링하기 위해 cron을 사용한다.
- How the evaluated student set up her script so that it runs every 10 minutes when the server starts up.
(평가된 학생이 서버가 시작될 때 10분마다 실행되도록 스크립트를 설정한 방법입니다.)
Once the correct functioning of the script has been verified, the student evaluated should ensure that this script runs every 30s.
(스크립트의 올바른 기능이 확인되면 평가 대상 학생은 이 스크립트가 1분마다 실행되는지 확인해야 합니다.)
sduo crontab -e

*/10 * * * * /root/monitoring.sh | wall

초단위 컨트롤시 sleep[]; command
-> */1 * * * * sleep 30; /root/monitoring.sh | wall
You can run whatever you want to make sure the script stop running when the server starts up, but without modifying the script.
(스크립트를 수정하지 않고 서버가 시작될 때 스크립트 실행을 중지하도록 원하는 대로 실행할 수 있습니다.)
service cron stop : Pause
service cron restart : Restart
service cron status : Check

머신 껐다 켜야함
To check this point, you will have to restart the server one last time.
(이 점을 확인하려면 서버를 마지막으로 다시 시작해야 합니다.)
At startup, it will be necessary to check that the script still exists in the same place, that its rights have remained unchanged, and that it has not been modified.
(시작할 때 스크립트가 동일한 위치에 여전히 존재하는지, 해당 권한이 변경되지 않았는지, 수정되지 않았는지 확인해야 합니다.)