스나이퍼팩토리 플러터 2주차 주간평가
키오스크 앱 기반 작성
1. 키오스크 앱 기반 요구사항
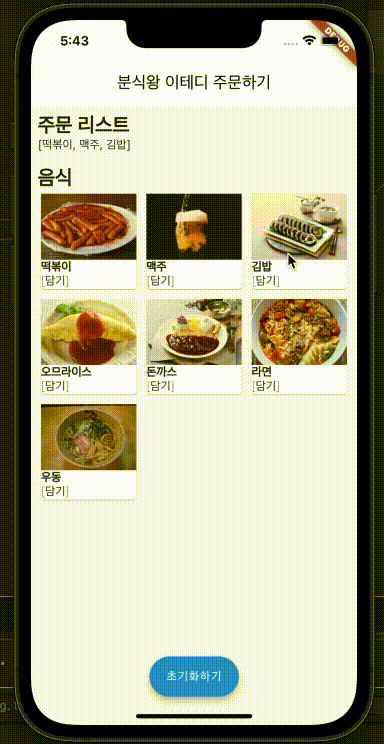
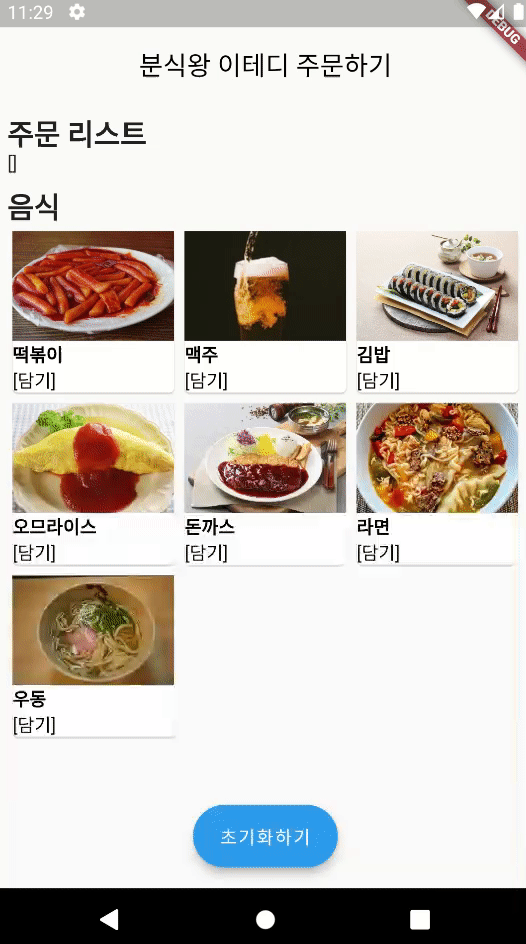
- 음식을 누르면 주문 리스트에 담기는 키오스크앱을 만들어봅니다.
- 음식이미지는 자유입니다.
- 하단에 떠있는 버튼을 누르면 지금까지 주문된 주문 리스트를 초기화합니다.
- 하단에 떠있는 버튼은 정중앙의 하단, 넓게 펴진 형태로 [ 초기화하기 ] 텍스트를 포함합니다.
- 음식이 보여지는 것은 [갤러리] 형태로 보여지게 합니다.
- 그 외 UI 디자인은 자유입니다.
2. 키오스크 앱 기반 작성
- 코드
import 'package:flutter/material.dart';
void main() {
runApp(const MyApp());
}
class MyApp extends StatelessWidget {
const MyApp({super.key});
// root Widget
Widget build(BuildContext context) {
return MaterialApp(
home: MyHomePage(title: '분식왕 이테디 주문하기'), // 홈 페이지 호출(title 매개변수로 전달)
);
}
}
class MyHomePage extends StatefulWidget {
MyHomePage({super.key, required this.title});
final String title; //앱 제목
State<MyHomePage> createState() => _MyHomePageState();
}
class _MyHomePageState extends State<MyHomePage> {
List<String> order = []; //주문 리스트
//음식 리스트
final List<Map> foodList = [
{'imgUrl': 'assets/images/option_bokki.png', 'name': '떡볶이'},
{'imgUrl': 'assets/images/option_beer.png', 'name': '맥주'},
{'imgUrl': 'assets/images/option_kimbap.png', 'name': '김밥'},
{'imgUrl': 'assets/images/option_omurice.png', 'name': '오므라이스'},
{'imgUrl': 'assets/images/option_pork_cutlets.png', 'name': '돈까스'},
{'imgUrl': 'assets/images/option_ramen.png', 'name': '라면'},
{'imgUrl': 'assets/images/option_udon.png', 'name': '우동'}
];
Widget build(BuildContext context) {
return Scaffold(
//앱바
appBar: AppBar(
title: Text(widget.title),
centerTitle: true, //타이틀 글씨 가운데 정렬
backgroundColor: Colors.transparent,
foregroundColor: Colors.black,
elevation: 0,
),
body: Padding(
padding: const EdgeInsets.all(8.0),
child: Column(
crossAxisAlignment: CrossAxisAlignment.start,
children: [
Text(
style: TextStyle(
fontSize: 22,
fontWeight: FontWeight.bold,
),
'주문 리스트',
),
Text(order.toString()),
SizedBox(height: 8),
Text(
style: TextStyle(
fontSize: 22,
fontWeight: FontWeight.bold,
),
'음식',
),
Expanded(
// 음식 리스트 그리드 뷰
child: GridView.count(
crossAxisCount: 3,
children: List.generate(foodList.length, (index) {
return GestureDetector(
onTap: () => setState(() {
order.add(foodList[index]['name']);
}),
// 하나의 음식 요소
child: Card(
child: Column(
crossAxisAlignment: CrossAxisAlignment.start,
children: [
Expanded(
child: Image(
image: AssetImage(
foodList[index]['imgUrl'],
),
height: MediaQuery.of(context).size.height,
width: MediaQuery.of(context).size.width,
fit: BoxFit.cover,
),
),
Text(
style: TextStyle(
color: Colors.black,
fontWeight: FontWeight.bold,
),
foodList[index]['name'].toString(),
),
Text(
style: TextStyle(
color: Colors.black,
),
'[담기]',
),
],
),
),
);
}),
),
),
],
),
),
// 하단 버튼
floatingActionButton: FloatingActionButton.extended(
onPressed: () => setState(() {
order.clear();
}),
label: Text('초기화하기'),
),
// 하단 버튼 위치
floatingActionButtonLocation: FloatingActionButtonLocation.centerFloat,
);
}
}- 결과
StatelessWidget으로 MaterialApp을 만들고 home으로 MyHomePage를 불러왔다. 앱 제목인 title은 매개변수로 전달한다.
MyHomePage는 StatefulWidget으로 생성했다. 변수로 주문 리스트를 담을 order와 음식들의 정보를 담고있는 foodList를 생성했다.
build에서는 Scaffold 위젯을 생성하고 우선 앱바를 작성했다. title은 전달받은 widget.title로 설정했다.
본문의 내용은 우선 Paddind으로 Column을 감싸서 생성했다. Column의 안에는 주문 리스트 텍스트와 order 배열을 출력할 위젯을 생성하고, 아래에 음식 텍스트와 그리드 뷰를 작성했다.
음식들을 나열하는 GridView는 GridView.count를 사용해 만들었으며 crossAxisCount: 3을 설정해 3개의 아이템이 한 줄에 나열되도록 했다. children으로 List.generate를 사용해 반복적으로 음식들을 출력했다.
음식의 요소들은 클릭했을 때 이벤트를 핸들링할 수 있도록 GestureDetector를 사용해 만들었으며 아래에 Card와 Column으로 요소를 감싸주었다. Column의 내부에서 음식 사진, 음식 이름, '[담기]' 텍스트를 순서대로 출력해주었다.
마지막으로 하단의 버튼은 확장된 모양을 가지도록FloatingActionButton.extend를 사용했으며 FloatingActionButtonLocation.centerFloat로 위치를 가운데로 설정했다.
위와 같이 GridView의 요소를 직접 Column으로 구성할 수도 있지만 GridTile을 사용할 수도 있다. 아래는 GridTile을 사용해 만들어본 키오스크 앱의 코드이다.
- GridTile 사용 코드
// ignore_for_file: prefer_const_constructors, must_be_immutable
import 'package:flutter/material.dart';
void main() {
runApp(const MyApp());
}
class MyApp extends StatelessWidget {
const MyApp({super.key});
// root Widget
Widget build(BuildContext context) {
return MaterialApp(
home: MyHomePage(title: '분식왕 이테디 주문하기'), // 홈 페이지 호출(title 매개변수로 전달)
);
}
}
class MyHomePage extends StatefulWidget {
MyHomePage({super.key, required this.title});
final String title; //앱 제목
State<MyHomePage> createState() => _MyHomePageState();
}
class _MyHomePageState extends State<MyHomePage> {
List<String> order = []; //주문 리스트
//음식 리스트
final List<Map> foodList = [
{'imgUrl': 'assets/images/option_bokki.png', 'name': '떡볶이'},
{'imgUrl': 'assets/images/option_beer.png', 'name': '맥주'},
{'imgUrl': 'assets/images/option_kimbap.png', 'name': '김밥'},
{'imgUrl': 'assets/images/option_omurice.png', 'name': '오므라이스'},
{'imgUrl': 'assets/images/option_pork_cutlets.png', 'name': '돈까스'},
{'imgUrl': 'assets/images/option_ramen.png', 'name': '라면'},
{'imgUrl': 'assets/images/option_udon.png', 'name': '우동'}
];
Widget build(BuildContext context) {
return Scaffold(
//앱바
appBar: AppBar(
title: Text(widget.title),
centerTitle: true, //타이틀 글씨 가운데 정렬
backgroundColor: Colors.transparent,
foregroundColor: Colors.black,
elevation: 0,
),
body: Padding(
padding: const EdgeInsets.all(8.0),
child: Column(
crossAxisAlignment: CrossAxisAlignment.start,
children: [
Text(
style: TextStyle(
fontSize: 22,
fontWeight: FontWeight.bold,
),
'주문 리스트',
),
Text(order.toString()),
SizedBox(height: 8),
Text(
style: TextStyle(
fontSize: 22,
fontWeight: FontWeight.bold,
),
'음식',
),
Expanded(
// 음식 리스트 그리드 뷰
child: GridView.count(
crossAxisCount: 3,
children: List.generate(foodList.length, (index) {
return GestureDetector(
onTap: () => setState(() {
order.add(foodList[index]['name']);
}),
// 하나의 음식 요소
child: Card(
child: GridTile(
footer: SizedBox(
height: 50,
child: GridTileBar(
backgroundColor: Colors.white,
title: Text(
style: TextStyle(
color: Colors.black,
fontWeight: FontWeight.bold,
),
foodList[index]['name'].toString(),
),
subtitle: Text(
style: TextStyle(
color: Colors.black,
),
'[담기]',
),
),
),
child: Image.asset(
fit: BoxFit.fill,
foodList[index]['imgUrl'].toString(),
),
),
),
);
}),
),
),
],
),
),
// 하단 버튼
floatingActionButton: FloatingActionButton.extended(
onPressed: () => setState(() {
order.clear();
}),
label: Text('초기화하기'),
),
// 하단 버튼 위치
floatingActionButtonLocation: FloatingActionButtonLocation.centerFloat,
);
}
}- GridTile 사용 결과

GridTile을 음식 요소로 사용하면 footer속성을 사용할 수 있다. footer에서는 GridTileBar 위젯을 사용할 수 있다.
위의 코드에서는 GridTile의 child로 이미지를 넣고, footer에 GridTileBar를 사용해 보았다. GridTileBar에서는 ListTile처럼 title subtitle 등을 설정할 수 있다.
하지만 GridTile을 사용하게되면 이미지의 부분인 child가 Card의 전체를 차지하여 아래 부분이 GridTileBar에 의해 잘리게 되어 Column을 사용하여 직접 구성하는 것이 해당 어플에서는 더 좋아 보인다.
추가 내용 정리
MediaQuery.of()
첫 번째 코드에서 이미지를 Card에 맞게 확장하기 위해 width와 heigth에 MediaQuery.of(context).size.width와 MediaQuery.of(context).size.height를 사용했다. 이에 대해 알아보고자 한다.
MediaQuery는 반응형 앱 내의 패키지이다. 보통 디바이스마다 가로 세로 길이가 다르기 때문에 이를 사용해 앱의 사이즈에 맞는 가로나 세로의 값을 가져오는 것이 일반적이다.
of() 함수는 현재 위젯에서 부모 위젯으로 거슬러 올라가고 싶을 때 사용한다. 이를 사용하면 현재context에서 부터 가장 가까운 부모 위젯을 찾는 것이 가능하다. 예를 들어 아래와 같은 코드는 부모 위젯의 너비와 높이를 의미한다.
MediaQuery.of(context).size.width // 부모 위젯의 너비
MediaQuery.of(context).size.height// 부모 위젯의 높이
GridView
GridView는 화면에 그리드 형태로 위젯들을 배치할 수 있도록 하고, 스크롤 기능을 제공하는데 이를 생성하는 방법에는 아래와 같이 5가지의 방법이 있다.
- GridView
- GridView.builder
- GridView.count
- GridView.extent
- GridView.custom
가장 중요한 속성은 girdDelegate이다. 이 속성은 children의 사이즈와 포지션을 컨트롤하는데 설정 방법은 아래와 같다.
1. SliverGridDelegateWithFixedCrossAxisCount
몇 개를 배치할지 결정한다.
crossAxisCount: CrossAxis 방향으로 몇개의 grid를 배치할지 결정
crossAxisSpacing: 그리드의 사이의 좌우 간격
mainAxisSpacing: 그리드 사이의 수직 간격
childAspectRatio: child의 가로 세로 비율2. SliverGridDelegateWithMaxCrossAxisExtent
반응형을 구현하고 싶을 때 사용할 수 있다. maxCrossAxisExtent와 기기의 width를 사용해 crossAxis로 그리드가 몇개가 들어갈지 지정한다.
maxCrossAxisExtent: child에게 부여할 최대 width 설정
crossAxisSpacing: 그리드의 사이의 좌우 간격
mainAxisSpacing: 그리드 사이의 수직 간격
childAspectRatio: child의 가로 세로 비율
GridView 위젯의 생성자 파라미터는 ListView의 생성자와 거의 유사하다.
GridView.count는 delegate를 넘기지 않고 파라미터에 직접 crossAxisCount crossAxisSpacing mainAxisSpacing childAspectRatio를 넘길 수 있다. 아래와 같은 코드처럼 사용할 수 있다.
GridView.builder(
     itemCount: ,   //item 개수
     gridDelegate: SliverGridDelegateWithFixedCrossAxisCount(
         crossAxisCount: ,   //1 개의 행에 보여줄 item 개수
         childAspectRatio: 1 / 2,   //item 의 가로 1, 세로 2 의 비율
     ),
     itemBuilder: (BuildContext context, int index) { ... },   //item 의 반목문 항목 형성
)GridView.builder는 위에서 gridDelegate 속성을 설명한 것처럼GridView.count와 같이 아이템을 몇 개를 배치할지 설정할 수도 있고, 반응형으로 개수를 설정할 수도 있다. 아래와 같은 코드처럼 사용할 수 있다.
GridView.count(
     crossAxisCount: ,   //1 개의 행에 보여줄 item 개수
     childAspectRatio: 1 / 2,   //item 의 가로 1, 세로 2 의 비율
     children: List.generate(length, (index) { ... }   //item 의 반목문 항목 형성
     ),
),
GridTile
GridTile은 그리드 안에 넣을 수 있는 위젯이다. 하지만 그리드 안에 꼭 이 위젯을 넣어야 하는 것은 아니다.
child header footer의 속성을 가지고 있는데 child는 필수 요소로 메인 content를 넣고, header와 footer는 각각 상단과 하단 부분을 차지한다.
GridTileBar
GridTileBar는 GridTile에 넣을 수 있는 특수한 위젯으로 ListTile과 비슷하게 leading trailing title subtitle을 가지고 있다.
GridTile의 header와 footer로 삽입될 수 있다.
익명함수와 람다식
다트 공식 문서에서는 익명 함수를 람다 또는 클로저(closure)라고 부른다고 설명되어 있다.
익명 함수의 기본 형태는 아래와 같은데 위젯을 사용하며 이벤트를 핸들링할 때 onTap 등에서 주로 사용했다.
// (매개 변수명) {표현식;};
(a, b) {a + b};
람다식의 기본 형태는 아래와 같은데 이번 주간 평가를 할 때 onPressed에서 사용한 화살표 함수와 같다.
// (매개변수명) => 표현식;
(a, b) => a + b;
즉, =>는 Dart 언어에서 사용하고, 표현식을 오른쪼긍로 실행하며 값을 반환하는 함수를 정의하는 방법이다. 함수를 정의할 때 생기는 중괄호는 없애고 사용한다.
또한 화살표가 붙으면 return 키워드를 생략할 수 있다. 하지만 코드 블럭이 두 줄 이상이라면 화살표 함수를 사용할 수 없다.
이러한 함수들의 예시를 정리하면 아래와 같다.
//기본 메소드
int sum(int a, int b) {
	return a+b;
}

//익명 함수를 저장하는 sum2 변수
Function sum2 = (a, b){
	return a+b;
}

//화살표 함수(람다식)
int sum3(a, b) => a+b;

//화살표 함수를 저장하는 sum4 변수
var sum4 = (a, b) => a+b;
그리드 뷰와 StatefulWidget의 사용
처음에 시작했을 때 그리드 뷰를 사용해야 하고, 화면이 변화하기 때문에 StatefulWidget으로 구성해야 한다는 것을 파악하고 시작해서 어렵지는 않았다. 하지만 그리드 뷰에서 그리드 타일과 그리드 타일 바를 사용 하려고 하다보니 예시 결과와 완전히 같은 UI가 만들어지지 않았고, 특히 이미지가 가운데에 잘리는 부분이 적게 배치되지 않았다. 여러 방법을 찾아보며 그리드 타일을 계속 사용해 보려 했지만 해결이 되지 않았다.ㅠㅠ 그래서 결국 그리드 타일은 버리고 컬럼으로 카드를 직접 구성했더니 같은 화면을 만들 수 있었다. 그리드 타일을 그리드 안에 꼭 넣어야 하는 것은 아니라고 하던데 직접 해보니까 확실히 원하는 UI에 사용할 상황이 아니면 다른 위젯을 사용하는 것이 좋은 것 같다.ㅋㅋㅋㅋ 어쨌든 전체 내용중에 그리드에 이미지 배치하는 부분이 가장 오래 걸린 듯...? 그럼 이만 도전 하기 과제도 하러 가보겠습니다!!
📄 Reference