스나이퍼팩토리 플러터 16일차
15일차에서 FutureBuilder를 사용해 봤지만 16일차에서 자세한 내용을 학습했고, NullSafety와 예외처리를 학습했다.
학습한 내용
- Null Safety
- 예외 처리 (try-catch)
- FutureBuilder
추가 내용 정리
Null Safety
Null Safety에 대해서는 [Flutter] 스나이퍼팩토리 2주차 도전하기 에서 한 번 정리한 적이 있지만 이번에 다시 학습하게 되어 정리하고자 한다.
Flutter 2.0 부터 Null Safety(널 안정성)가 적용되었다. 이는 null로 인해 의도하지 않거나 예상치 않은 동작에 대비하는 것에 목적이 있다.
Null Safety 이후에 기본적으로 모든 데이터타입은 null을 허용하지 않는 Non-nullable type이다. 데이터를 Nullable type으로 선언하고 싶다면 데이터 타입 뒤에 ?를 사용하면 된다.
void main() {
	int? a // nullable type
    a = null
}
Nullable type의 변수를 선언하면 null check를 해야 하는데 아래와 같이 세 가지 방법 정도가 있다.
- if-else 문 사용
void main() {
	String? str;
    str = null;

    if (str == null) {
    	print("empty");
    } else {
    	print(str);
    }
}
- 삼항연산자 사용
void main() {
	String? str;
    str = null;

    print(str == null ? "empty" : str);
}
- ?? 연산자 사용: 변수가 null이면 ?? 뒤의 값으로 대체
void main() {
	String? str;
    str = null;

    print(str ?? "empty");
}
null check를 해서 오류를 막아야 하지만 nullable type의 변수를 선언하고 이 변수에는 절대 null이 대입되지 않는다고 100% 확신이 들 수 있다. 이 경우에는 null assertion 연산자를 사용할 수 있다. 사용 방법은 변수 뒤에 !를 붙이면 된다.
아래와 같은 코드는 a가 nullable type 이지만 3이라는 값이 대입되어 절대 null이 아니기 때문에 c에 대입할 때 뒤에 !를 붙여 오류를 막을 수 있다.
void main() {
	int? a = 3;
    int c = a!;
}
Non-nullable type의 매개변수가 포함된 함수를 선언하려면 매개변수의 값을 초기화 해주거나 required 키워드를 사용하면 된다.
class Person {
	String name;
    int? birthYear;
    int money;

    Person({required this.name,
    		this.birthYear,
            this.money = 0});
}

void main() {
	Person p1 = Person(name: "Kim");
    print(p1.name);
    print(p1.birthYear ?? "알 수 없음");
    print(p1.money);
}
또 다른 방법으로 변수를 당장 초기화 하고 싶지 않은데 nullable type으로 선언하고 싶지도 않다면 late 키워드를 사용하면 된다.
class Meal {
	late String description;

    void setDescription(String str) {
    	description = str;
    }
}

void main() {
	final myMeal = Meal();
    myMeal.setDescription('pizza');
    print(myMeal.description);
}
예외 처리 (try-catch)
Java와 마찬가지로 Dart에서도 try-catch문을 사용하여 예외를 처리할 수 있다.
- try
블록 안에 에러가 발생할 수 있는 코드를 작성한다.
try{
    // code
}- on Exception
예외 클래스(Exception) 타입을 지정해야 할 때 사용
try{
    // 예외 발생할 수 도 있는 코드
    // code that might throw an exception
}on 예외클래스{
    // 예외처리를 위한 코드
    // code for handling exception
}- catch(e)
e(exception object) 객체가 필요할 때 사용한다.
try{
   // 예외 발생할 수 도 있는 코드
   // code that might throw an exception
}catch(e){
   // 예외처리를 위한 코드
   // code for handling exception
}- on Excetpion catch(e)
두 가지를 같이 사용할 수도 있다.
try{
   // 예외 발생할 수 도 있는 코드
   // code that might throw an exception
}on 예외클래스 catch(e){
   // 예외처리를 위한 코드
   // code for handling exception
}- finally
에러에 상관없이 무조건 실행할 코드를 작성한다.
try{
   // 예외 발생할 수 도 있는 코드
   // code that might throw an exception
}catch(e){
   // 예외처리를 위한 코드
   // code for handling exception
}finally{
  // 무조건 실행되는 코드
}
on Exception 은 약간 생소한데 특정 exception만 지정해서 예외 처리를 하고 싶은 경우에 사용하면 된다.
FutureBuilder
FutureBuilder는 비동기 결과를 처리하는 객체로 snapshot 정보를 통해 비동기 처리 결과를 얻을 수 있다.
아래는 FutureBuilder의 생성자 구조이다.
  const FutureBuilder({
    Key? key,
    this.future,
    this.initialData,
    required this.builder,
  }) : assert(builder != null),
super(key: key);builder는 AsyncSnapshot 객체를 제공한다. 이 스냅샷은 Future 객체에 대한 처리 과정, 결과를 제공한다.
스냅샷으로부터
connectionStatehasData등을 확인할 수 있다.
future에 FutuerBuilder가 처리할 Future 객체를 바인딩한다.
FutureBuilder의 사용 예시는 아래의 링크를 참고
Flutter - FutureBuilder 사용법 + API 서버 http 연동
네트워크 데이터를 initState()에서 받아오는 이유
학습을 진행하다 보면 FutuerBuilder에 사용할 Future 객체를 initState()에서 초기화하고 future에 바인딩하는 것을 알 수 있다.
왜 데이터를 가져오는 함수를 직접 연결하지 않고 이러한 방식을 사용할까? 그 이유는 Flutter 공식 문서에서 찾아 볼 수 있다.
API 요청 코드를 build()메소드 안에 위치시키면 편리하겠지만 좋은 코드가 아니다. 그 이유는 Flutter는 변경 사항이 생길 때마다 build()함수가 자주 호출된다. 하지만 네트워크 요청 코드를 build()함수 내에 위치시키면 불필요한 API 요청이 반복되어 앱이 느려질 수 있기 때문이다.
해당 내용은 아래의 공식문서를 참고했으며 http 패키지를 사용해 네트워크에서 데이터를 가져오는 예시를 아래의 링크를 통해 자세히 확인할 수 있다.
인터넷에서 데이터 가져오기 - Flutter
오늘도 유용한 패키지 정리
- connectivity_plus
- 인터넷 연결을 확인할 수 있는 패키지
- pull_to_refresh
- 아래로 내려서 새로고침이나 무산 스크롤 등을 구현할 수 있는 패키지
- shimmer
- 위젯에 shimmer 효과를 줄 수 있는 패키지
- 로딩중이나 위젯에 빛나는 효과를 줄 수 있다.
- (Shimmer 사용법은 아래의 사용 예시를 참고하면 좋음)
- Explore Shimmer Animation Effect In Flutter
- flutter_spinkit
- 다양한 Progress Indicator를 사용 가능
16일차 과제
- 주어진 화면 구현하기
1. 주어진 화면 구현하기
아래와 같은 결과물의 화면을 구현하고자 한다.
결과물 예시
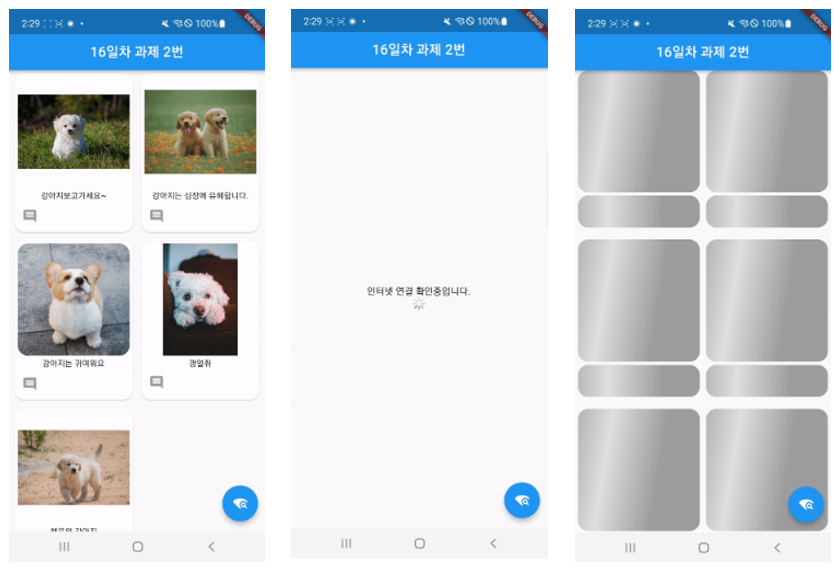
요구사항
- 다음의 URL에 데이터를 요청하여 문제를 해결합니다.
- 디바이스가 인터넷에 연결돼있는지 확인하는 패키지를 사용합니다.
- 패키지명 : connectivity_plus
- FAB을 누르면 인터넷이 연결되어있는지 확인합니다.
- 인터넷 연결을 확인중일 때 “인터넷 확인중입니다”와 로딩 위젯을 보여줍니다.
- 이 때, 로딩 위젯은 어떠한 것이든 상관없습니다.
- 이 때, 로딩 위젯은 어떠한 것이든 상관없습니다.
- 화면을 아래로 당기면 데이터를 새로 요청할 수 있도록 패키지를 사용합니다.
- 패키지명 : pull_to_refresh
- 패키지명 : pull_to_refresh
- 데이터를 가져올 때 사용자에게 데이터가 로딩중이라는 것을 알려줄 수 있도록 패키지를 활용합니다.
- 패키지명 : Shimmer
- 패키지명 : Shimmer
- 위 기능을 우선적으로 구현하며, 최대한 자연스러운 UX를 구현할 수 있도록 합니다.
그 외 과제를 위한 기능 및 디자인은 자유입니다.
코드 작성
- pubspec.yaml
dependencies:
  dio: ^5.0.0
  pull_to_refresh: ^2.0.0
  connectivity_plus: ^3.0.3
  shimmer: ^2.0.0
flutter_spinkit: ^5.1.0dependencies에 dio pull_to_refresh connectivity_plus shimmer를 넣어 패키지를 설치했다. 추가로 로딩 위젯을 사용하기 위해 flutter_spinkit도 같이 설치해 주었다.
- main.dart
import 'package:first_app/page/home_page.dart';
import 'package:flutter/material.dart';
void main() {
runApp(const MyApp());
}
class MyApp extends StatelessWidget {
const MyApp({super.key});
// root Widget
Widget build(BuildContext context) {
return MaterialApp(
home: HomePage(), // 홈 페이지 호출
);
}
}main.dart에서는 HomePage 위젯을 호출한다.
- home_page.dart
import 'package:first_app/widget/ShimmerBox.dart';
import 'package:flutter/material.dart';
import 'package:dio/dio.dart';
import 'package:pull_to_refresh/pull_to_refresh.dart';
import 'package:connectivity_plus/connectivity_plus.dart';
import 'package:flutter_spinkit/flutter_spinkit.dart';
class HomePage extends StatefulWidget {
const HomePage({super.key});
State<HomePage> createState() => _HomePageState();
}
class _HomePageState extends State<HomePage> {
late Future result; // 데이터 가져오기 결과
Dio dio = Dio(); //Dio 객체
bool isNetworkConnect = true; //네트워크 연결 상태
bool isCheckingNetwork = false; //네트워크 연결 확인 중
bool isLoading = true; //데이터 로딩 중
RefreshController refreshController = RefreshController(); //리프레시 컨트롤러
//데이터 가져오기
Future getData() async {
isLoading = true; //로딩 중
var url =
'https://sfacassignment-default-rtdb.firebaseio.com/.json'; //요청 url
try {
var res = await dio.get(url); //데이터 요청
isLoading = false; //로딩 종료
return res.data['body']; //결과 리턴
} catch (e) {
print(e);
}
}
//새로고침(데이터를 다시 불러옴)
void onRefresh() async {
result = getData(); //데이터 가져오기
setState(() {}); //화면 그리기
refreshController.refreshCompleted(); //새로고침 완료
}
// 네트워크 연결 확인
void checkConnectivityNetwork() async {
isCheckingNetwork = true; //네트워크 연결 확인 중
setState(() {}); //네트워크 연결 확인 중 화면으로 그리기
final connectivityResult =
await (Connectivity().checkConnectivity()); //네트워크 연결 확인
await Future.delayed(
Duration(milliseconds: 1500)); // 연결 확인 중 화면을 출력하기 위한 딜레이
//네트워크가 연결된 경우
if (connectivityResult == ConnectivityResult.mobile ||
connectivityResult == ConnectivityResult.wifi) {
isNetworkConnect = true; //네트워크 연결 됨
result = getData(); //데이터 가져오기
} else {
//네트워크가 연결 되지 않은 경우
isNetworkConnect = false; //네트워크 연결 안됨
}
isCheckingNetwork = false; //네트워크 연결 확인 종료
setState(() {}); //결과에 맞는 화면 그리기
}
void initState() {
super.initState();
result = getData(); //데이터 가져오기
}
void dispose() {
refreshController.dispose(); //컨트롤러 해제
super.dispose();
}
Widget build(BuildContext context) {
return Scaffold(
// 앱바
appBar: AppBar(
centerTitle: true,
title: Text('16일차 과제'),
),
body: !isCheckingNetwork &&
isNetworkConnect //네트워크 연결 확인 중이 아니고, 네트워크가 연결된 경우(그리드 뷰 출력)
? FutureBuilder(
future: result,
builder: (context, snapshot) {
return SmartRefresher(
controller: refreshController, //새로고침 컨트롤러 연결
onRefresh: onRefresh, //새로고침 핸들러
enablePullDown: true, //내려서 새로고침 활성화
child: GridView.builder(
physics: BouncingScrollPhysics(),
gridDelegate: SliverGridDelegateWithFixedCrossAxisCount(
crossAxisCount: 2, // 그리드뷰 한 줄의 아이템 개수
mainAxisSpacing: 8,
crossAxisSpacing: 8,
childAspectRatio: 0.73,
),
itemCount: snapshot.hasData ? snapshot.data.length : 6,
itemBuilder: (context, index) {
return !isLoading //데이터가 로딩 중이 아닌 경우(불러온 데이터를 카드에 출력)
? Card(
clipBehavior: Clip.antiAlias,
shape: RoundedRectangleBorder(
borderRadius: BorderRadius.circular(16.0),
),
child: Column(
children: [
//모서리가 둥근 이미지
Expanded(
child: Container(
width: double.infinity,
margin: EdgeInsets.all(8.0),
decoration: BoxDecoration(
borderRadius:
BorderRadius.circular(16.0),
),
clipBehavior: Clip.antiAlias,
child: Image.network(
snapshot.data[index]['url'].toString(),
),
),
),
// 메세지
Text(
snapshot.data[index]['msg'].toString(),
),
// 코멘트 아이콘
Container(
alignment: Alignment.centerLeft,
margin: EdgeInsets.all(16.0),
child:
Icon(color: Colors.grey, Icons.comment),
),
],
),
)
// 데이터가 로딩 중인 경우(Shimmer 카드 출력)
: Card(
shape: RoundedRectangleBorder(
borderRadius: BorderRadius.circular(16.0),
),
child: Column(
children: [
Expanded(child: ShimmerBox()),
SizedBox(height: 8),
ShimmerBox(height: 40),
],
),
);
},
),
);
},
)
//네트워크 연결 확인 중이거나 네트워크가 연결되지 않은 경우
: Center(
child: Column(
mainAxisAlignment: MainAxisAlignment.center,
children: [
if (isCheckingNetwork) Text('인터넷이 연결 확인중입니다'), // 연결 확인 중 메세지
if (!isCheckingNetwork)
Text('인터넷이 연결되지 않았습니다!'), // 연결되지 않음 메세지
SizedBox(height: 16),
// 연결 확인중 progress
if (isCheckingNetwork)
SpinKitWave(
color: Colors.blue,
size: 32.0,
),
],
),
),
floatingActionButton: FloatingActionButton(
onPressed: () {
checkConnectivityNetwork(); // 네트워크 연결 확인
},
child: Icon(Icons.wifi_find),
),
);
}
}변수는 총 5가지를 생성했는데 우선 불러온 데이터의 결과를 저장할 result, Dio 객체를 저장한 dio, 네트워크 연결 상태를 나타내는 isNetworkConnect, 네트워크 연결을 확인 중인지를 판단할 isCheckingNetwork, 마지막으로 데이터를 불러오는 중인지를 확인할 isLoading 이다.
데이터를 가져오는 함수인 getData()는 우선 isLoading을 true로 바꿨다. 데이터 요청은 dio의 get 메소드를 사용했고, try-catch문을 사용했다. 데이터를 불러온 후에는 isLoading을 false로 바꾼다.
새로고침을 수행하는 함수인 onRefresh()은 데이터를 getData()로 가져와 result에 저장한 뒤 setState()를 호출한다.
네트워크 연결 확인은 checkConnectivityNetwork() 함수로 작성했는데 우선 네트워크 연결 확인 중을 나타내는 isCheckingNetwork를 true로 바꾸고, 로딩 중 화면을 출력하기 위해 setState()를 호출한다. 그리고 네트워크 연결 상태를 확인하고, 로딩 중 화면을 사용자에게 보여주기 위해 딜레이를 1.5초 정도 설정했다. 네트워크가 연결된 경우 isNetworkConnect를 true로 하고 getData()를 사용해 데이터를 불러온다. 네트워크가 연결되지 않은 경우 isNetworkConnect를 false로 설정한다. 연결 확인이 끝난 후 isCheckingNetwork를 false로 설정하고, setState()로 화면을 다시 그려준다.
initState()에서는 getData()를 사용해 result를 초기화 했고, dispose()에서는 리프레시 컨트롤러를 해제했다.
본문에서는 네트워크가 연결 확인 중이 아니고, 네트워크가 연결되어 있는 경우 FutureBuilder를 사용해 result의 내용을 출력했다. 화면은 그리드 뷰로 구성했는데 GridView.builder를 사용했고, 내려서 새로고침을 위해 SmartRefresher로 감싸 주었다.
그리드 뷰의 itemCount는 데이터를 불러온 후에는 snapshot.data.length로 설정하고, 불러오기 전에는 6정도로 설정했다.
그리드 뷰의 아이템은 Card로 만들었는데 데이터가 로딩 중이 아닐 때 그려주었다. 내부의 요소는 Column으로 구성해 모서리가 둥근 이미지와 가져온 메세지, 코멘트 아이콘을 출력했다.
데이터가 로딩 중일 때는 Shimmer를 통해 로딩 중인 화면을 출력했는데 사용한 ShimmerBox는 커스텀 위젯으로 아래에서 작성한 코드를 설명할 것이다.
앞에서 FutuerBuilder를 그릴 때 확인한 것과 반대로 네트워크가 연결 확인 중이거나 네트워크가 연결되지 않은 경우에는 "연결 확인 중" 메세지 또는 "연결되지 않음" 메세지를 isChekingNetwork의 값에 따라 출력했다. 로딩 위젯은 SpinKitWave를 사용했고, 역시 연결 확인 중에만 출력해 주었다.
FAB에서는 onPressed 이벤트에 앞에서 작성한 checkConnectivityNetwork()를 연결해 주었다.
- ShimmerBox.dart
import 'package:flutter/material.dart';
import 'package:shimmer/shimmer.dart';
//Shimmer를 보여주는 위젯
class ShimmerBox extends StatelessWidget {
const ShimmerBox({super.key, this.width = double.infinity, this.height = 0});
final double width; // 너비
final double height; // 높이
Widget build(BuildContext context) => Shimmer.fromColors(
baseColor: Colors.grey, // 기본 색상
highlightColor: Colors.white, // 하이라이트 색상
child: Container(
width: width, // 너비 설정
height: height, // 높이 설정
decoration: BoxDecoration(
color: Colors.grey,
borderRadius: BorderRadius.circular(16.0), // 둥근 모서리
),
),
);
}ShimmerBox는 Shimmer를 보여주는 컨테이너를 반환해 준다. 컨테이너는 둥근 모서리를 설정했고, baseColor는 회색 highlightColor는 흰색으로 설정했다. 해당 위젯은 호출할 때 width와 height를 전달해 크기를 설정할 수 있다.
결과
코드가 뭔가 맘에 들지 않는다...ㅠ
오늘 과제는 한 개였는데 과제 노션페이지에 2번이라고 써있는걸 보니 어제 과제가 많이 어려워서 좀 조절해주신게 아닌가 싶다 ㅋㅋㅋㅋ 그건 그렇고 네트워크 통신에 들어가면서 상호작용도 많아지고 코드도 길어지고 있는데 오늘 과제는 완성된 코드가 크게 마음에 들지는 않는다.(결과가 잘 나오긴 했지만 뭔가 복잡하고 깔끔하지 않은 느낌...?) 좀 더 위젯을 파일로 나누고 간결하게 하면 좋아질꺼 같긴 한데 나중에 시간이 날 때 수정해 봐야겠다.
📄 Reference
- https://cafepurple.tistory.com/72
- https://velog.io/@adbr/Dart-%EC%98%88%EC%99%B8%EC%B2%98%EB%A6%AC-try-on-vs-try-catch
- https://youngwonhan-family.tistory.com/entry/FlutterDart-FutureBuilder-%EC%82%AC%EC%9A%A9%EB%B2%95jsonplaceholder-api-%EC%97%B0%EA%B3%84
- https://flutter-ko.dev/docs/cookbook/networking/fetch-data
- https://medium.flutterdevs.com/explore-shimmer-animation-effect-in-flutter-7b0e46a9c722