스나이퍼팩토리 플러터 1주차 도전하기
Flutter로 UI 그리기 연습
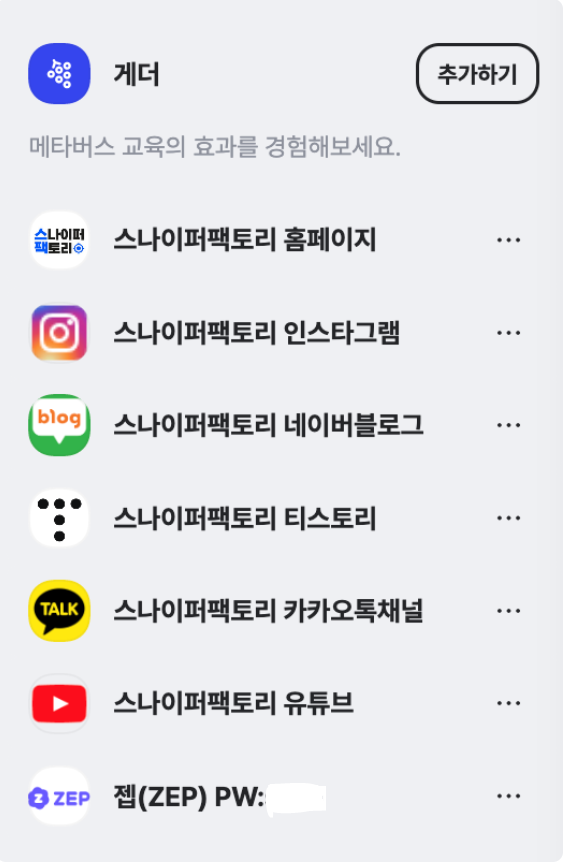
1. UI 설명
- 플러터를 사용해 아래와 같은 이미지의 결과가 나오게 UI를 그린다.
- (크게 상관은 없을 것 같긴 한데 ZEP의 PW 부분은 지움)
UI 그리기
- 코드
import 'package:flutter/material.dart';
void main() {
runApp(const MyApp());
}
class MyApp extends StatelessWidget {
const MyApp({super.key});
Widget build(BuildContext context) {
return MaterialApp(
home: Scaffold(
body: SafeArea(
child: Column(
mainAxisAlignment: MainAxisAlignment.spaceBetween,
crossAxisAlignment: CrossAxisAlignment.start,
children: [
Padding(
padding: EdgeInsets.fromLTRB(16.0, 16.0, 16.0, 0.0),
child: Row( // 이미지, 게더, 추가하기 버튼 Row
mainAxisAlignment: MainAxisAlignment.spaceBetween,
children: [
Row( // 이미지와 게더 텍스트 Row
children: [
ClipRRect( // 테두리가 둥근 이미지
borderRadius: BorderRadius.circular(18.0),
child: Image.network(
width:48,
height:48,
fit: BoxFit.cover,
'https://is5-ssl.mzstatic.com/image/thumb/Purple124/v4/b2/9a/d1/b29ad152-5a1b-aa8b-8809-815734d59eff/AppIcon-0-0-1x_U007emarketing-0-0-0-7-0-0-sRGB-0-0-0-GLES2_U002c0-512MB-85-220-0-0.png/246x0w.webp',
),
),
SizedBox(width: 16),
Text( // 게더 텍스트
style:TextStyle(
fontWeight: FontWeight.bold,
fontSize: 20,
),
'게더',
),
],
),
OutlinedButton( // 추가하기버튼
onPressed: () => print('버튼 예시'),
child: Text(
style: TextStyle(
color: Colors.black,
fontWeight: FontWeight.bold,
fontSize: 20,
),
'추가하기'
),
style: OutlinedButton.styleFrom(
fixedSize: Size(110, 54),
side: BorderSide(width: 3.0, color: Colors.black),
shape: const RoundedRectangleBorder(
borderRadius: BorderRadius.all(Radius.circular(20)),
),
),
),
],
),
),
Padding(
padding: EdgeInsets.only(left:16.0, bottom: 16.0),
child: Text( // 설명 텍스트
style: TextStyle(
color:Colors.grey,
fontSize: 18,
),
'메타버스 교육의 효과를 경험해 보세요.'
),
),
ListTile( // 홈페이지
title: Text( // 타이틀 텍스트
style: TextStyle(
fontWeight: FontWeight.bold,
fontSize: 20,
),
'스나이퍼팩토리 홈페이지'
),
leading: ClipRRect( // 테두리가 둥근 이미지
borderRadius: BorderRadius.circular(18.0),
child: Image.network(
width:48,
height:48,
fit: BoxFit.cover,
'https://www.co-worker.co.kr/application/resources/upload/logo_img/1672387281996864.jpeg',
),
),
trailing: Icon(Icons.more_horiz_outlined), // 더보기 아이콘
),
ListTile( //인스타그램
title: Text(
style: TextStyle(
fontWeight: FontWeight.bold,
fontSize: 20,
),
'스나이퍼팩토리 인스타그램'
),
leading: ClipRRect(
borderRadius: BorderRadius.circular(18.0),
child: Image.network(
width:48,
height:48,
fit: BoxFit.cover,
'https://www.busan.com/nas/wcms/wcms_data/photos/2019/06/26/2019062622520951927_l.jpg',
),
),
trailing: Icon(Icons.more_horiz_outlined),
),
ListTile( // 네이버 블로그
title: Text(
style: TextStyle(
fontWeight: FontWeight.bold,
fontSize: 20,
),
'스나이퍼팩토리 네이버블로그'
),
leading: ClipRRect(
borderRadius: BorderRadius.circular(18.0),
child: Image.network(
width:48,
height:48,
fit: BoxFit.cover,
'https://cdn.smehost.net/sonymusiccokr-45pressprod/wp-content/uploads/2017/03/Blog_96-300x300.png',
),
),
trailing: Icon(Icons.more_horiz_outlined),
),
ListTile( // 티스토리
title: Text(
style: TextStyle(
fontWeight: FontWeight.bold,
fontSize: 20,
),
'스나이퍼팩토리 티스토리'
),
leading: ClipRRect(
borderRadius: BorderRadius.circular(18.0),
child: Image.network(
width:48,
height:48,
fit: BoxFit.cover,
'https://t1.kakaocdn.net/kakaocorp/kakaocorp/admin/5a539919017800001.png',
),
),
trailing: Icon(Icons.more_horiz_outlined),
),
ListTile( // 카카오톡 채널
title: Text(
style: TextStyle(
fontWeight: FontWeight.bold,
fontSize: 20,
),
'스나이퍼팩토리 카카오톡채널'
),
leading: ClipRRect(
borderRadius: BorderRadius.circular(18.0),
child: Image.network(
width:48,
height:48,
fit: BoxFit.cover,
'https://upload.wikimedia.org/wikipedia/commons/f/f2/Kakao_logo.jpg?20171226171735',
),
),
trailing: Icon(Icons.more_horiz_outlined),
),
ListTile( // 유튜브
title: Text(
style: TextStyle(
fontWeight: FontWeight.bold,
fontSize: 20,
),
'스나이퍼팩토리 유튜브'
),
leading: ClipRRect(
borderRadius: BorderRadius.circular(18.0),
child: Image.network(
width:48,
height:48,
fit: BoxFit.cover,
'https://cdn.gametoc.co.kr/news/photo/201806/48184_91857_3214.JPG',
),
),
trailing: Icon(Icons.more_horiz_outlined),
),
ListTile( // 젭(ZEP)
title: Text(
style: TextStyle(
fontWeight: FontWeight.bold,
fontSize: 20,
),
'젭(ZEP) PW:****'
),
leading: ClipRRect(
borderRadius: BorderRadius.circular(18.0),
child: Image.network(
width:48,
height:48,
fit: BoxFit.cover,
'https://cdn.getnews.co.kr/news/photo/202202/574402_265375_2311.png',
),
),
trailing: Icon(Icons.more_horiz_outlined),
),
SizedBox(height: 16,),
],
),
),
),
);
}
}- 결과
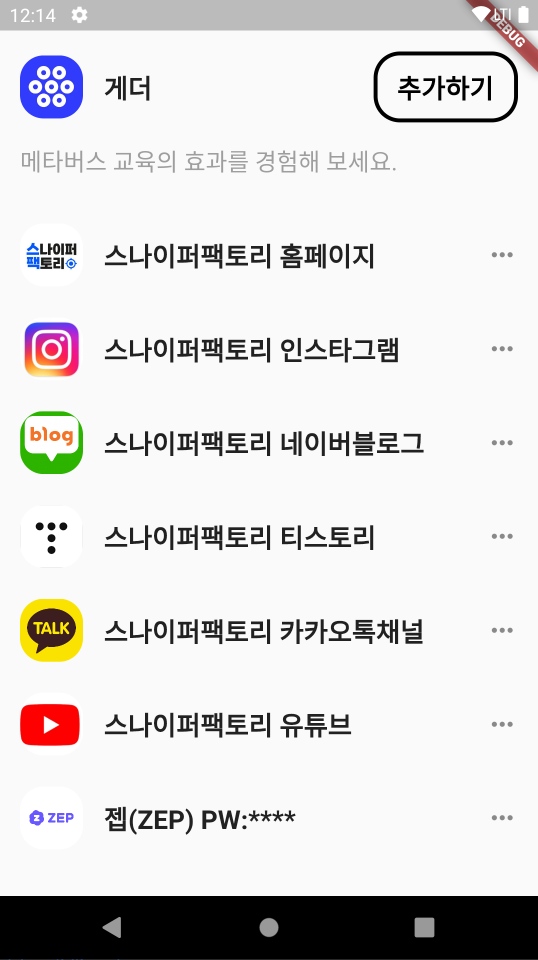
전체 모든 요소들은 Column 위젯을 사용해 묶어 주었다.
가장 윗 줄은 하나의 Row를 사용했고 양 끝에 위치하도록 정렬한 뒤 이미지와 텍스트는 또 하나의 Row로 묶어 주었다.
이미지는 둥근 모서리를 가지도록 ClipRRect 위젯을 사용했다.
추가하기는 특별한 기능을 넣지는 않았지만 OutlinedButton 위젯을 사용하여 버튼으로 만들었다.
아래의 회색 설명 텍스트는 따로 Padding 위젯으로 묶어 Text 위젯을 생성했다.
마지막으로 아래의 각 사이트들의 정보는 ListTile을 사용했고, 이미지는 앞서 게더의 이미지를 둥글게 만든것과 같은 방식을 썼다.
추가 내용 정리
플러터의 버튼
이번 도전하기에서 버튼의 기능까지 자세히 구현하지는 않았지만 OutlinedButton을 사용해서 간단히 플러터의 버튼들에 대해 정리해 보려 한다.
플러터에서 주로 사용하는 버튼은 FlatButton, RaisedButton, OutlinButton이 있는데 이 세가지 버튼은 아래와 같이 변경되었다.
- FlatButton -> TextButton
- RaisedButton -> ElevatedButton
- OutlineButton -> OutlinedButton
이에 마찬가지로 theme 또한 TextButtonTheme, ElevatedButtonTheme, OutlinedButtonTheme로 변경되었다.
플러터의 버튼들은 아래와 같은 기능으로 사용된다.
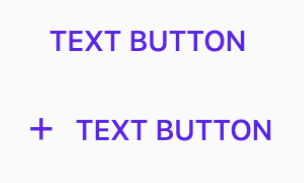
- TextButton : 텍스트를 포함한 기본 버튼
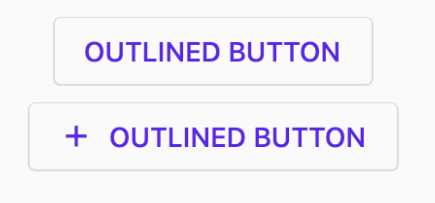
- OutlinedButton : 테두리 선을 가지고 있는 버튼
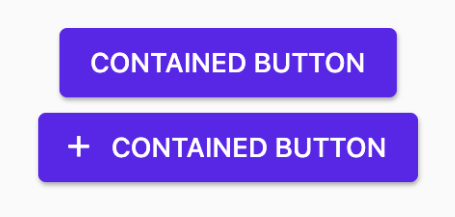
- ElevatedButton : 버튼을 강조할 때 사용
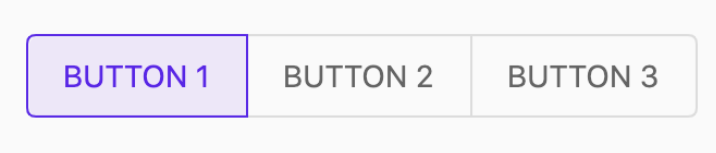
- ToggleButtons : 그룹 중 하나만 선택할 때 사용
- IconButton : 아이콘으로 이루어진 버튼, 단일 항목을 선택하거나 해제할 때 주로 사용
플러터는 이렇게 다양한 버튼을 가지고 있다. 여기서는 종류만 정리하고 자세한 사용법은 나중에 다시 글로 작성 해야겠다.
지금까지 진행한 것 중 가장 긴 코드!!
1주차에 기본적인 위젯들을 공부하고 사용했다. 도전과제로는 배웠던 코드들을 거의 모두 활용했고, 처음 사용해 본 위젯들도 찾아서 코드를 작성했다. 다 만들고 보니 코드가 215줄? 정도 되네... 지금까지 했던 과제들과 연습 중에 가장 긴 코드가 되었다. ㅋㅋㅋㅋ 처음에 게더 옆의 이미지가 예시와 같은 것을 찾을 수가 없어서 고민했는데 그냥 비슷해 보이는 걸로 넣었다. 상관 없겠지 ㅠㅠ 그리고 굳이 바꿀 필요가 없을거 같긴 한데 패스워드도 ****로 바꿔 보았다. ㅎㅎ 어쨌든 1주차 진짜 끝!!
📄 Reference