스나이퍼팩토리 플러터 25일차 part2
25일차에서는 데이터 Serialization을 연습하기 위해 두 가지 앱을 만들 것이다. 두 가지 앱을 각각 다른 포스팅으로 작성해서 part1과 part2로 나누었다. part2에서는 Todo 앱을 만들었다.
학습한 내용
- part1: 블로그 앱 만들기
- part2: Todo 앱 만들기
추가 내용 정리
Dismissible Widget
Dismissible 위젯은 사용자가 화면에서 스와이프하여 리스트에서 아이템을 사라지도록 할 수 있다.
주요 속성을 몇 가지를 살펴보면 아래와 같다.
Dismissible 주요 속성
- key
- Dismissible은 반드시 유니크한 key 값을 가져야 한다.
- 한 위젯이 트리의 다른 위젯을 대체하는 방법을 제어한다.
- background
- child 위젯을 드래그 했을 때 아래에 보이는 위젯
- direction
- child 위젯이 사라지는 방향
- default는 DismissDirection.horizontal
- onDismissed
- child 위젯이 화면에서 사라지고 난 뒤에 호출되는 이벤트
- confrimDismiss
- dismiss가 동작하기 전에 사용자에게 확인할 기회를 제공
Dismissible 위젯은 이외에도 더 많은 속성을 가지고 있지만 key와 child는 필수 속성이다.
아래는 Dismissible 클래스의 공식문서이다.
Dismissible class - widgets library - Dart API - Flutter API
Dart enum
enum 타입은 열거형으로 보통 그룹화를 하여 사용할 수 있는 상수 값들을 하나의 묶음으로 만들기 위해 사용한다.
아래는 열거형의 예시인데 열거형의 명칭은 첫 문자를 대문자로 쓰고, 앞에 enum 키워드를 사용한다. 그리고, 중괄호 블로겡 필드로 상수값들을 나열한다.
enum Color { red, black, yellow }이렇게 선언한 열거형의 전체 상수 목록은 아래와 같은 형태로 읽을 수 있다.
void main() {
	print(Color.value); //[Color.red, Color.black, Color.yellow]
}
코드를 작성할 때의 예시를 한 가지 살펴보자. 만약 승인, 반려, 대기 세 가지의 상태를 가지는 프로그램이 있다면 아래와 같이 if문을 작성하여 각 상태에 맞는 코드를 실행할 수 있을 것이다.
void main() {
	String status = 'approved';

    if(status == 'approved') {
    	print('승인되었습니다.');
    } else {
    	print('반려 또는 대기중 입니다.');
    }
}
하지만 위와 같은 경우 할당한 값이 잘못된 문자열이거나 외부에서 넘겨 받은 값이 한 글자라도 틀리면 잘못된 결과가 도출될 수 있다.
따라서 아래와 같이 enum 타입 상수를 사용하여 코드를 수정할 수 있다.
enum Status {
	approved,
    rejected,
    pending
}

void main() {
	Status status = Status.approved;

    if(status == Status.approved) {
    	print('승인되었습니다.');
    } else {
    	print('반려 또는 대기중 입니다.');
    }
}
추가로 dart.2.17 부터 enum에서도 일반 클래스처럼 속성이나 메서드, static 메서드를 추가할 수 있다. 아래는 이렇게 일반 클래스처럼 작성한 enum의 예시이다.
enum Status {
  approved('approved', '승인'),
  rejected('rejected', '반려'),
  pending('pending', '대기');
  undefined('undefined', '');

  const BoardType(this.code, this.displayName);
  final String code;
  final String displayName;

  factory Status.getByCode(String code){
    return Status.values.firstWhere((value) => value.code == code,
                                        orElse: () => Status.undefined);
  }
}
블러 효과
BackdropFilter와 ImageFilter.blur를 사용하면 특정 위젯에 블러 처리를 할 수 있다.
ClipRect(
    child: BackdropFilter(
      filter: ImageFilter.blur(sigmaX: 10, sigmaY: 10),
      child: Container(
        color: Colors.black.withOpacity(0),
      )
    ),
  )
위와 같은 코드를 아래의 예시처럼 앱바의 flexibleSpace 속성에 적용하면 앱바에 블러처리를 하여 앱바 뒤에 body의 내용을 보이게 할 수 있다.
return Scaffold(
      extendBodyBehindAppBar: true,
      appBar: AppBar(
        foregroundColor: Colors.black,
        backgroundColor: Colors.transparent,
        elevation: 0,
        //앱바 블러 처리
        flexibleSpace: ClipRRect(
            child: BackdropFilter(
                filter: ImageFilter.blur(sigmaX: 10, sigmaY: 10),
                child: Container(color: Colors.transparent))),
...
추가로 Stack에 예시 코드를 Positioned위젯으로 감싸주면 특정 위치만 블러처리를 하는 것도 가능하다.
Stack(
  children: [
    Image.asset("lib/flutter_img.png", fit: BoxFit.fill,),
    Positioned(
  		width: 200, height: 200, top: 100,
  		child: ClipRect(
    		child: BackdropFilter(
      			filter: ImageFilter.blur(sigmaX: 10, sigmaY: 10),
      			child: Container(
        			color: Colors.black.withOpacity(0),
      			),
    		),
  		),
	),
  ],
)
25일차 과제 part2
- Todo 앱 만들기
- 추가 사항
1. Todo 앱 만들기
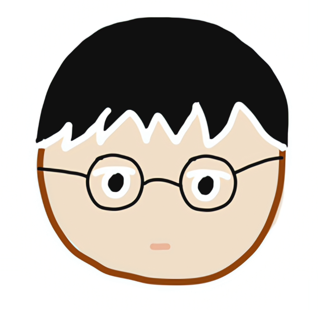
공개된 API를 분석하고, 클래스를 활용하여 적용 후 해야할 일을 보여주는 Todo 앱을 만들고자 한다.
요구사항
- 아래의 공개된 API에서 데이터를 받아온다.
- 반드시 Todo 클래스를 만들고 Serialization을 진행한다.
- AppBar는 다음의 조건에 따라 만든다.
- Blur 효과를 넣어 body 내용이 흐릿하게 보여질 수 있도록 한다.
- Actions에는 다음의 기능이 포함된 아이콘을 제작한다.
- Filter 아이콘:
- 클릭 시 아래서 필터를 설정할 수 있도록 시트 위젯이 켜진다.
- 필터가 적용되면 화면에 보이는 데이터의 종류가 바뀐다.
- 필터 선택 시 아래에서 스낵바를 보여준다.
- Refresh 아이콘:
- 클릭 시 네트워크에 데이터를 한 번 더 요청하여 리스트에 재적용한다.- 각 Todo를 보여주는 위젯은 다음의 조건에 따라 만든다.
- 완료된 상태의 Todo라면, 초록색 배경에 체크 버튼의 아이콘이 보여지도록 한다.
- Dismissible 위젯을 활용하여 옆으로 슬라이드 했을 때, 리스트에서 사라지도록 한다.
활용할 소스코드
아래의 제공되는 소스코드를 활용한다.
- widget/filter_bottom_sheet.dart
import 'package:flutter/material.dart';
enum TodoFilter { all, completed, incompleted }
class FilterBottomSheet extends StatefulWidget {
const FilterBottomSheet(
{Key? key, required this.filter, required this.onApply})
: super(key: key);
final TodoFilter filter;
final Function(TodoFilter) onApply;
State<FilterBottomSheet> createState() => _FilterBottomSheetState();
}
class _FilterBottomSheetState extends State<FilterBottomSheet> {
onApply(TodoFilter filter) {
ScaffoldMessenger.of(context).showSnackBar(
SnackBar(
content: Text('Filter applied: $filter'),
),
);
widget.onApply(filter);
Navigator.pop(context);
}
Widget build(BuildContext context) {
return Container(
padding: const EdgeInsets.all(16),
child: Column(
mainAxisSize: MainAxisSize.min,
children: [
ListTile(
title: const Text('All'),
trailing: Checkbox(
value: widget.filter == TodoFilter.all,
onChanged: (value) {
if (value == true) onApply(TodoFilter.all);
},
),
),
ListTile(
title: const Text('Completed'),
trailing: Checkbox(
value: widget.filter == TodoFilter.completed,
onChanged: (value) {
if (value == true) onApply(TodoFilter.completed);
},
),
),
ListTile(
title: const Text('InCompleted'),
trailing: Checkbox(
value: widget.filter == TodoFilter.incompleted,
onChanged: (value) {
if (value == true) onApply(TodoFilter.incompleted);
},
),
),
],
),
);
}
}- widget/todo_card.dart
import 'package:flutter/material.dart';
import '../model/todo.dart';
class TodoCard extends StatelessWidget {
const TodoCard({super.key, required this.todo});
final Todo todo;
Widget build(BuildContext context) {
return Dismissible(
key: Key(todo.id.toString()),
child: Container(
margin: const EdgeInsets.all(8),
decoration: BoxDecoration(
color: todo.completed ? Colors.green.shade100 : null,
border: todo.completed
? Border.all(
color: Colors.green,
)
: null,
borderRadius: BorderRadius.circular(8),
),
child: ListTile(
title: Text(
todo.title,
style: TextStyle(
color: todo.completed ? Colors.green : null,
fontWeight: FontWeight.bold,
),
),
trailing: todo.completed
? const Icon(
Icons.check_circle,
color: Colors.green,
)
: null,
),
),
);
}
}결과물 예시
코드 작성
- lib/main.dart
import 'package:flutter/material.dart';
import 'package:my_app/page/main_page.dart';
void main() {
runApp(const MyApp());
}
class MyApp extends StatelessWidget {
const MyApp({super.key});
// root Widget
Widget build(BuildContext context) {
return MaterialApp(
home: MainPage(), // 메인 페이지 호출
);
}
}main.dart에서는 MainPage를 호출한다.
- lib/model/todo.dart
class Todo {
  int userId; //유저 아이디
  int id; //todo 아이디
  String title; //할 일
  bool completed; //완료 여부

  //생성자
  Todo({
    required this.userId,
    required this.id,
    required this.title,
    required this.completed,
  });

  //json을 받아 Todo 객체를 생성
  factory Todo.fromJson(Map<String, dynamic> json) {
    return Todo(
        userId: json['userId'],
        id: json['id'],
        title: json['title'],
        completed: json['completed']);
  }
}
Todo 클래스는 해야할 일을 담고 있으며 userId, id, title, completed를 멤버 변수로 가진다. 데이터를 Serialization 할 수 있도록 json 데이터를 받아 Todo 객체를 생성하는 생성자를 작성했다.
- lib/page/main_page.dart
import 'dart:ui';
import 'package:flutter/material.dart';
import 'package:dio/dio.dart';
import 'package:my_app/model/todo.dart';
import 'package:my_app/widget/filter_bottom_sheet.dart';
import 'package:my_app/widget/todo_card.dart';
class MainPage extends StatefulWidget {
const MainPage({super.key});
State<MainPage> createState() => _MainPageState();
}
class _MainPageState extends State<MainPage> {
final Dio _dio = Dio(); //dio 객체
final String _url = 'https://jsonplaceholder.typicode.com/todos'; //데이터 요청 url
TodoFilter _filter = TodoFilter.all; //필터 상태
Future<List<Todo>>? _result; //데이터 불러오기 결과
//데이터 불러오기
Future<List<Todo>> _readData() async {
var response = await _dio.get(_url); //데이터 요청
//데이터를 성공적으로 받아온 경우
if (response.statusCode == 200) {
var data = List<Map<String, dynamic>>.from(response.data); //결과 형변환
return data.map((e) => Todo.fromJson(e)).toList(); //데이터 직렬화 후 반환
}
return []; //빈 리스트 반환
}
void initState() {
super.initState();
_result = _readData(); //네트워크 데이터 초기화
}
Widget build(BuildContext context) {
return Scaffold(
extendBodyBehindAppBar: true,
appBar: AppBar(
foregroundColor: Colors.black,
backgroundColor: Colors.transparent,
elevation: 0,
//앱바 블러 처리
flexibleSpace: ClipRRect(
child: BackdropFilter(
filter: ImageFilter.blur(sigmaX: 7, sigmaY: 7),
child: Container(color: Colors.transparent))),
title: const Text('Todo App'),
actions: [
//필터 버튼
IconButton(
icon: const Icon(Icons.filter_list),
//하단 시트 실행
onPressed: () => showModalBottomSheet(
context: context,
builder: (context) => FilterBottomSheet(
filter: _filter,
onApply: (filter) => setState(() {
_filter = filter; //선택한 필터 값으로 적용
}),
),
),
),
//데이터 다시 읽기
IconButton(
icon: const Icon(Icons.refresh),
onPressed: () => setState(() {
_result = _readData();
}),
),
],
),
body: FutureBuilder(
future: _result, //데이터 읽기 바인딩
builder: (context, snapshot) {
if (snapshot.hasData) {
return ListView.builder(
itemCount: snapshot.data!.length,
itemBuilder: (context, index) {
var todo = snapshot.data![index];
//필터가 완료된 할 일만 출력하도록 설정된 경우
if (_filter == TodoFilter.completed) {
return todo.completed
? TodoCard(todo: snapshot.data![index])
: const SizedBox();
}
//필터가 완료되지 않은 할 일만 출력하도록 설정된 경우
if (_filter == TodoFilter.incompleted) {
return !todo.completed
? TodoCard(todo: snapshot.data![index])
: const SizedBox();
}
//모든 할 일들을 출력
return TodoCard(todo: snapshot.data![index]);
},
);
}
return const Center(child: CircularProgressIndicator()); //로딩
},
),
);
}
}MainPage에서는 출력할 할 일의 상태를 설정할 _filter 변수를 enum 타입의 TodoFilter로 선언했다.
데이터를 불러와 Serialization을 수행하는 메서드를 _readData()로 작성하고 이를 initState()에서 _result 변수에 초기화 했다.
본문에서는 앱바의 flexivleSpace 속성에서 BackdropFilter를 사용해 앱바에 블러처리를 했다.
actions의 필터 버튼에서는 FilterBottomSheet를 호출해 하단 시트를 띄워주는데 현재 _filter 값을 넘겨주고, 적용되었을 때 onApply 이벤트로 현재 필터의 값을 수정했다.
리프레시 버튼은 _result에 _readData()의 결과를 저장해 다시 데이터를 읽어주었다.
본문은 FutureBuilder를 사용했고, ListView.builder를 사용해 데이터를 출력했는데 필터의 값에 따라 상태에 맞는 할 일들을 출력했다.
- lib/widget/todo_card.dart
import 'package:flutter/material.dart';
import '../model/todo.dart';
class TodoCard extends StatelessWidget {
const TodoCard({super.key, required this.todo});
final Todo todo;
Widget build(BuildContext context) {
return Dismissible(
key: UniqueKey(),
child: Container(
margin: const EdgeInsets.all(8),
decoration: BoxDecoration(
color: todo.completed ? Colors.green.shade100 : null,
border: todo.completed
? Border.all(
color: Colors.green,
)
: null,
borderRadius: BorderRadius.circular(8),
),
child: ListTile(
title: Text(
todo.title,
style: TextStyle(
color: todo.completed ? Colors.green : null,
fontWeight: FontWeight.bold,
),
),
trailing: todo.completed
? const Icon(
Icons.check_circle,
color: Colors.green,
)
: null,
),
),
);
}
}TodoCard는 주어진 코드를 그대로 사용했다.
여기서 Dismissible의 키값을 Key(todo.id.toString())으로 설정하면 화면을 새로고침 할 때 A dismissed Dismissible widget is still part of the tree라는 오류가 발생하기 때문에 UniqueKey()로 수정했다.
아마 고유한 키값이 들어가야 하는데 새로고침을 수행하면 지워졌던 위젯의 Key(todo.id.toString()) 키 값이 이미 트리에 있어서 발생하는 오류로 예상된다.
Dismissble 위젯의 key 값에 대한 내용은 앞의 추가 내용 설명에서 정리했다.
- lib/widget/filter_bottom_sheet.dart
import 'package:flutter/material.dart';
enum TodoFilter { all, completed, incompleted }
class FilterBottomSheet extends StatefulWidget {
const FilterBottomSheet(
{Key? key, required this.filter, required this.onApply})
: super(key: key);
final TodoFilter filter;
final Function(TodoFilter) onApply;
State<FilterBottomSheet> createState() => _FilterBottomSheetState();
}
class _FilterBottomSheetState extends State<FilterBottomSheet> {
onApply(TodoFilter filter) {
ScaffoldMessenger.of(context).showSnackBar(
SnackBar(
content: Text('Filter applied: $filter'),
),
);
widget.onApply(filter);
Navigator.pop(context);
}
Widget build(BuildContext context) {
return Container(
padding: const EdgeInsets.all(16),
child: Column(
mainAxisSize: MainAxisSize.min,
children: [
ListTile(
title: const Text('All'),
trailing: Checkbox(
value: widget.filter == TodoFilter.all,
onChanged: (value) {
if (value == true) onApply(TodoFilter.all);
},
),
),
ListTile(
title: const Text('Completed'),
trailing: Checkbox(
value: widget.filter == TodoFilter.completed,
onChanged: (value) {
if (value == true) onApply(TodoFilter.completed);
},
),
),
ListTile(
title: const Text('InCompleted'),
trailing: Checkbox(
value: widget.filter == TodoFilter.incompleted,
onChanged: (value) {
if (value == true) onApply(TodoFilter.incompleted);
},
),
),
],
),
);
}
}TodoFilter도 주어진 코드를 그대로 사용했다.
해당 위젯은 하단 시트로 전달 받은 filter 값을 현재 필터 값으로 하여 체크 박스를 띄워주고, 체크 박스를 선택하여 필터 값을 변경할 수 있다.
onApply 메소드는 선택한 필터 값을 스낵바로 보여주고 호출될 때 전달받은 onApply 핸들러를 실행하고 하단 시트를 닫는다.
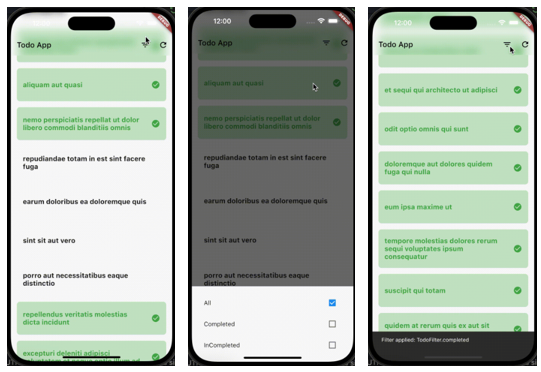
결과
2. 추가 사항
과제를 수행하고 난 뒤 강의를 듣고 아쉬웠던 점을 정리했다.
Filter에 적용된 값에 따라 리스트 변경
기존 코드에서는 네트워크에서 불러온 데이터를 모두 담은 리스트에서 filter의 값에 따라 TodoCard를 그리거나 그리지 않는 방식을 사용했다. 하지만 함수로 리스트에서 where()을 사용해 현재 filter에 맞는 데이터만 리스트로 만들어 화면을 출력하면 더 깔끔한 코드가 될 것 같다.
우선 아래와 같이 현재 filter 값에 맞는 데이터만 리스트로 반환하는 함수를 작성한다.
List<Todo> filterMaker(List<Todo> value) {
	switch (_filter) {
    	case TodoFilter.all:
        	return value;
        case TodoFilter.completed:
        	return value.where((element) => element.completed == true).toList();
        case TodoFilter.incompleted:
        	return value.where((element) => element.completed == false).toList();
    }
}
이 메서드를 사용해 리스트 뷰를 그리기 전 받아온 데이터에서 리스트를 필터링하면 더욱 간결하게 코드를 작성할 수 있다.
part2도 끝
오늘 과제를 다 했다.ㅎㅎ todo 앱도 part1에서 만든 블로그 앱과 비슷한 과제라서 크게 어렵진 않았다. 그리고 기본적으로 하단 시트와 todoCard 코드가 제공되어서 더 간단하게 끝낼 수 있었다. 과제를 하면서 한 가지 이해가 잘 되지 않은 것이 있다. Dismissible 위젯에서 key 값에 대한 설명이 공식 문서에서 "한 위젯이 트리의 다른 위젯을 대체하는 방법을 제어한다."라고 하는데 무슨 의미인지 잘 모르겠다...ㅠㅠ 일단 각자 고유한 키 값을 가지고 있어야 하고, 드래그하여 삭제하는 방식은 알겠는데 다른 위젯을 대체 한다니...조금 더 자세히 내용을 찾아봐야겠다. (내일은 3.1절로 쉬어갑니다. ㅎㅎ)
📄Reference
- https://velog.io/@kjha2142/Flutter-Dismissible-Widget
- https://api.flutter.dev/flutter/widgets/Dismissible-class.html
- https://dajoonee.tistory.com/30
- https://masswhale.tistory.com/22
- https://stcodelab.com/entry/Flutter-%EC%9D%B4%EB%AF%B8%EC%A7%80-%ED%9D%90%EB%A6%BC-%ED%9A%A8%EA%B3%BC-%EB%84%A3%EA%B8%B0-ImageFiltered-BackdropFilter