
스나이퍼팩토리 플러터 29일차
29일차에서는 상태관리기법과 GetX의 기본적인 사용 방법에 대해 학습했다.
학습한 내용
- 상태관리기법
- GetX
- Get.to(), Get.snackBar(), Get.width, Get.height
- GetxController
추가 내용 정리
상태관리기법
앱의 규모가 커지면 위젯안에 위젯이 많이 생기기 때문에 부모와 자식 관계만으로 데이터 전달이 어려워질 수 있다.
상태관리기법을 사용하면 프로그램에서 필요한 데이터를 따로 저장하고, 관리할 수 있다. 아래는 Flutter에서 주로 사용되는 상태관리기법의 패키지들이다.
Flutter 상태관리
- MobX
- bloc
- https://pub.dev/packages/bloc
- 주로 대규모 프로젝트에서 사용
- Provider
- https://pub.dev/packages/provider
- 최근에는 업데이트 주기가 느리다.
- RiverPod
- https://pub.dev/packages/riverpod
- Provider 제작자가 만든 더 나은 버전의 Provider
- GetX
- https://pub.dev/packages/get
- 쉽고, 간단한 상태관리
- 코드가 매우 짧아진다.
- GetX를 사용하면 자동으로 dispose가 이루어진다.
- 쉬운만큼 에러도 자주 발생할 수 있다.
- 깊게 사용할 수록 잔버그가 있지만 업데이트 속도가 느리다.
Get.to
많은 상태관리 기법 중에서 이번주에는 GetX에 대해 학습을 할 예정이다. 우선 GetX는 여러가지 편리한 메서드를 제공하는데 그 중 하나가 Get.to이다.
먼저 GetX를 사용하기 위해서는 pubspec.yaml에 get패키지를 설치한 뒤 최상위 위젯으로 GetMaterialApp을 사용해야 한다.
Get.to는 Navigator를 사용하여 수행했던 페이지 이동을 짧고, 간결하게 수행할 수 있다.
- Navigator.push() 사용 코드
Navigator.push(context, MaterialPageRoute((context) => NewPage())- Get.to 사용 코드
Get.to(() => NewPage())Get.snackbar는 아래 과제 1번의 내용에 작성
Get.width, Get.height
디바이스의 화면크기도 기존의 코드보다 간결한 코드로 쉽게 가져올 수 있다.
- MediaQuery 사용 코드
MediaQuery.of(context).size.width //디바이스 너비
MediaQuery.of(context).size.height //디바이스 높이- Get.width, Get.height 사용 코드
Get.width //디바이스 너비
Get.height //디바이스 높이
GetxController
GetxController는 상태를 관리할 수 있는 컨트롤러로 앱에서 따로 데이터를 관리하는 공간이다. 이러한 컨트롤러는 생성하고, 언제든지 불러와 사용 가능하다.
-
컨트롤러 정의
이러한 상태관리를 사용하기 위해서는 우선 컨트롤러를 미리 정의해야 한다.
class 컨트롤러명 extends GetxController {
	//멤버 변수
    String name;

    //생성자
    컨트롤러명({required this.name});
}-
Get.put
정의된 컨트롤러를 생성해서 전역으로 사용할 수 있도록 하기 위해
Get.put을 사용한다. 이렇게 하면 앱 내에서 언제든지 컨트롤러를 호출하여 데이터에 접근할 수 있다.
var controller = Get.put(컨트롤러명());-
Get.find
Get.find를 사용하여 한 번 put했던 컨트롤러를 찾아 사용할 수 있다.
var controller = Get.find<컨트롤러명>();
var controllerName = Get.find<컨트롤러명>().name;
29일차 과제
- GetX 패키지의 Get 메서드(dialog, bottomSheet snackbar)
- GetX 패키지에서 i18n을 구현하는 방법
- GetxController를 활용하여 전역 컨트롤러 생성
1. GetX 패키지의 Get 메서드(dialog, bottomSheet snackbar)
GetX 패키지는 다양한 Get 메서드를 제공한다. 그 중에서 Get.dialog와 Get.bottomSheet, Get.snackbar에 대해 알아보고자 한다.
작성한 코드는 모두 아래와 같은 main.dart 코드를 사용하며 MainPage를 호출한다.
import 'package:flutter/material.dart';
import 'package:get/get.dart';
import 'package:new_app/page/main_page.dart';
void main() {
runApp(const MyApp());
}
class MyApp extends StatelessWidget {
const MyApp({super.key});
Widget build(BuildContext context) {
return const GetMaterialApp(
home: MainPage(),
);
}
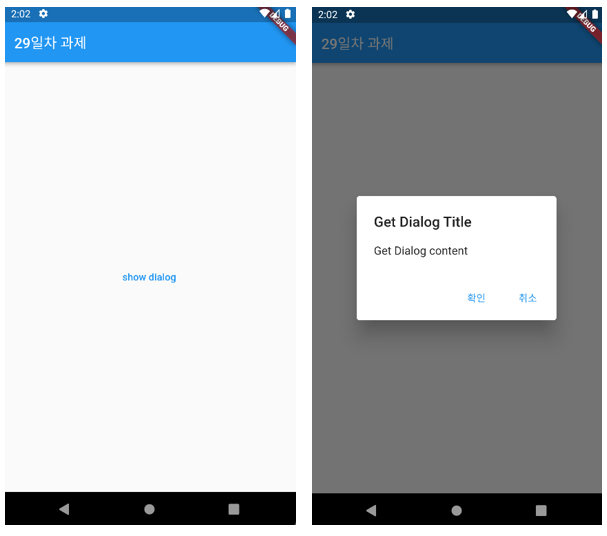
}1) Get.dialog
Get.dialog는 다이얼로그를 띄워주는 기능을 수행하며, showDialog와 같은 역할을 한다.
내부 위젯을 넣어 다이얼로그를 생성할 수 있고, 속성들을 사용해 다이얼로그 외부 색상, 애니메이션 등을 설정할 수 있다.
- 활용 예시 코드
import 'package:flutter/material.dart';
import 'package:get/get.dart';
class MainPage extends StatelessWidget {
const MainPage({super.key});
Widget build(BuildContext context) {
return Scaffold(
appBar: AppBar(
title: const Text('29일차 과제'),
),
body: Center(
child: TextButton(
onPressed: () {
Get.dialog(
AlertDialog(
title: const Text('Get Dialog Title'),
content: const Text('Get Dialog content'),
actions: [
TextButton(
onPressed: Get.back,
child: const Text('확인'),
),
TextButton(
onPressed: Get.back,
child: const Text('취소'),
)
],
),
);
},
child: const Text('show dialog'),
),
),
);
}
}
Get.defaultDialog
GetX에서 기본적으로 제공되는 다이얼로그로Get.dialog와 다르게 내부 다이얼로그 위젯 없이 사용 가능하다.Get.defaultDialog( title: 'Get DefaultDialog Title', content: const Text('Get DefaultDialog content'), onConfirm: Get.back, onCancel: Get.back, );
onConfirm대신confirm을 사용하여 버튼을 커스텀 할 수도 있으며confirm을 사용 시onConfirm은 무시된다. (onCancel과cancel도 동일)

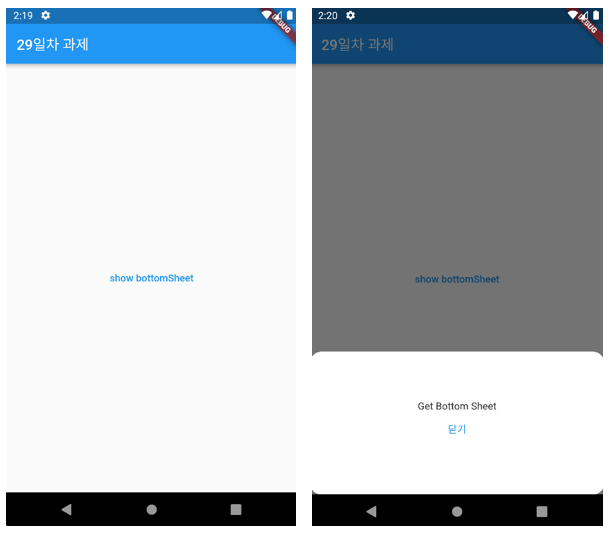
2) Get.bottomSheet
Get.bottomSheet는 showModalBottomSheet와 같이 하단 시트를 띄워주는 기능을 수행한다.
내부 위젯을 넣어 하단 시트를 띄울 수 있고, 하단 시트의 배경색, 테두리, 열고 닫을 때의 속도 등을 설정할 수 있다.
- 활용 예시 코드
import 'package:flutter/material.dart';
import 'package:get/get.dart';
class MainPage extends StatelessWidget {
const MainPage({super.key});
Widget build(BuildContext context) {
return Scaffold(
appBar: AppBar(
title: const Text('29일차 과제'),
),
body: Center(
child: TextButton(
onPressed: () {
Get.bottomSheet(
backgroundColor: Colors.white,
shape: RoundedRectangleBorder(
borderRadius: BorderRadius.circular(16),
),
SizedBox(
height: 200,
child: Column(
mainAxisAlignment: MainAxisAlignment.center,
children: [
const Text('Get Bottom Sheet'),
TextButton(
onPressed: Get.back,
child: const Text('닫기'),
),
],
),
),
);
},
child: const Text('show bottomSheet'),
),
),
);
}
}
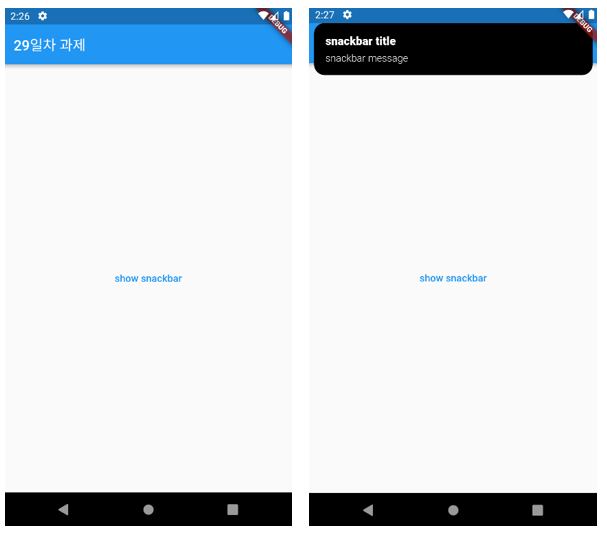
3) Get.snakbar
Get.snackbar는 스낵바를 띄워주는 기능을 수행한다. ScaffoldMessenger.of(context).showSnackBar() 보다 간단하게 스낵바를 출력할 수 있다.
title message를 설정하여 출력할 텍스트를 입력한다. 만약 titleText와 messageText를 사용하면 위젯으로 내용을 생성할 수도 있다.
이외에도 스낵바의 위치, 애니메이션, 등의 다양한 설정이 가능하다.
- 활용 예시 코드
import 'package:flutter/material.dart';
import 'package:get/get.dart';
class MainPage extends StatelessWidget {
const MainPage({super.key});
Widget build(BuildContext context) {
return Scaffold(
appBar: AppBar(
title: const Text('29일차 과제'),
),
body: Center(
child: TextButton(
onPressed: () {
Get.snackbar(
'snackbar title',
'snackbar message',
colorText: Colors.white,
backgroundColor: Colors.black,
snackPosition: SnackPosition.TOP,
);
},
child: const Text('show snackbar'),
),
),
);
}
}
2. GetX 패키지에서 i18n을 구현하는 방법
i18n
i18n이란 internationalization(국제화)라는 단어를 축약한 것으로 i부터 n까지 18개의 문자수가 있기 때문에 i18n이라고 한다.
국제화는 다양한 언어 및 지역에 적용할 수 있도록 프로그램을 설계하는 프로세스이다.
(참고) l10n
localization(현지화)라는 단어를 축약한 것으로 특정 대상 시장의 언어나 문화 및 기타 요구사항을 충족하기 위해 제품을 조정하는 것을 의미
가장 기본적으로 구현을 하는 방식은 문자열을 하드 코딩하지 않고, 참조키를 사용한다.
GetX로 i18n 구현
GetX에서 i18n을 구현하려면 먼저 최상위 수준 위젯이 GetMaterialApp이어야 한다.
GetMaterialApp은 아래 코드처럼 Translations 클래스 유형을 translations 속성에 사용할 수 있다.
return GetMaterialApp(
      .....
      translations: AppTranslations(),
      .....
);
위와 같이 설정하고 Translations를 상속받는 AppTranslations 클래스를 구현하면 된다.
Translations는 GetX에서 제공하는 추상 클래스이고, 반드시 keys 메서드를 구현해야한다. keys 메서드는 다양한 언어의 맵을 반환한다.
import 'package:get/get.dart';
class AppTranslations extends Translations {
Map<String, Map<String, String>> get keys => {
'en_US': {
'hello': 'Hello World',
},
'de_DE': {
'hello': 'Hallo welt',
}
};
}Locale
위의 코드에서en_US와de_DE는Locales를 호출한다. 두 개의 locale은languageCode와contryCode로 구성되어 있다.더 많은 Locale의 내용은 아래 링크르 참고
Dart - Locale class
이제 Text등의 위젯에서 문자열을 사용할 때 하드 코딩 대신 맵의 참조 키를 사용하여 코드를 작성할 수 있다.
Text(
  'hello'.tr,
),
locale 변경은 우선 아래와 같이 GetMaterialApp에 초기 locale을 설정해야 한다.
return GetMaterialApp(
....
locale: const Locale('en', 'US'),
....
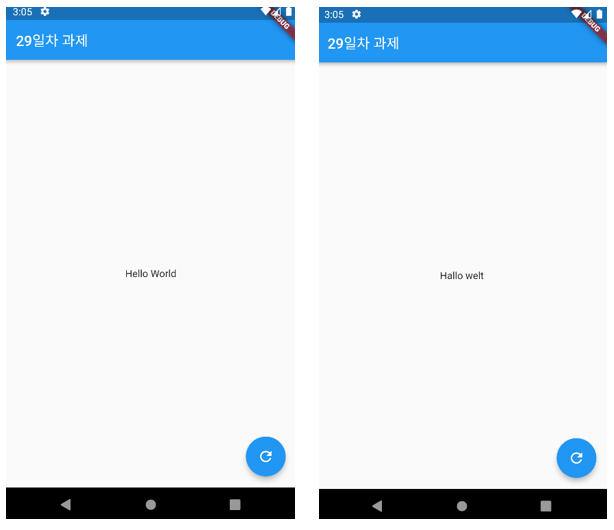
);그 후 FAB을 눌렀을 때 독일어로 변경하려면 아래와 같이 Get.updateLocale을 사용하면 된다.
floatingActionButton: FloatingActionButton(
    onPressed: () {
        Get.updateLocale(const Locale('de', 'DE'));
    },
    child: const Icon(Icons.refresh),
),
이렇게 코드를 작성하고 앱을 실행하면 아래 왼쪽 화면이 출력되며 FAB을 누르면 아래 오른쪽 화면처럼 언어가 변경된다.(locale을 변경하면 레이아웃도 현재 locale에 맞게 변경됨)
추가 내용
1) 매개변수와 함께 시용도 가능import 'package:get/get.dart'; Map<String, Map<String, String>> get keys => { 'en_US': { 'logged_in': 'logged in as @name with email @email', }, 'es_ES': { 'logged_in': 'iniciado sesión como @name con e-mail @email', } }; Text('logged_in'.trParams({ 'name': 'Jhon', 'email': 'jhon@example.com' }));2) 시스템의 locale을 가져오기
return GetMaterialApp(
    locale: Get.deviceLocale,
);
더 많은 내용은 아래의 공식 문서의 Internationalization을 참고
GetX - Internationalization
3. GetxController를 활용하여 전역 컨트롤러 생성
GetxController를 사용하여 주어진 요구사항에 맞는 전역 컨트롤러를 만들고자 한다.
요구사항
- 컨트롤러명은
AppSettingController로 한다.- 포함되는 멤버 변수는 다음과 같다.
data type variable bool isSoundOn bool isNotificationOn String appVersion String appName String appAuthor String appPackageName DateTime? lastUpdated
- 위 데이터를 메인 페이지에서
Get.put하여 전역에서 사용할 수 있도록 등록하고, 최소 두 페이지 이상에서Get.find하여 해당 데이터를 불러온다.- 페이지 명, 페이지 수는 상관 없으며, 임의로 존재하는 페이지로 한다.
- 이 때 페이지들은 서로 네비게이션을 다음과 같이 한다.
Get.to(()=>페이지명());
코드 작성
- pubspec.yaml
dependencies:
  cupertino_icons: ^1.0.2
  flutter:
    sdk: flutter
get: ^4.6.5pubspec.yaml에 get을 설치한다.
- lib/main.dart
import 'package:flutter/material.dart';
import 'package:get/get.dart';
import 'package:new_app/page/main_page.dart';
void main() {
runApp(const MyApp());
}
class MyApp extends StatelessWidget {
const MyApp({super.key});
Widget build(BuildContext context) {
return GetMaterialApp(
theme: ThemeData.dark(),
home: const MainPage(), //MainPage 호출
);
}
}main.dart에서는 최상위 위젯으로 GetMaterialApp을 사용하고, MainPage를 호출한다.
- lib/controller/app_setting_controller.dart
import 'package:get/get.dart';

class AppSettingController extends GetxController {
  bool isSoundOn; //사운드 켜기 여부
  bool isNotificationOn; //공지 켜기 여부
  String appVersion; //버전
  String appName; //이름
  String appAuthor; //작성자
  String appPackageName; //패키지이름
  DateTime? lastUpdated; //마지막 업데이트 날짜

  AppSettingController({
    required this.isSoundOn,
    required this.isNotificationOn,
    required this.appVersion,
    required this.appName,
    required this.appAuthor,
    required this.appPackageName,
    required this.lastUpdated,
  });
}
요구사항에 주어진 멤버 변수를 포함한 AppSettingController를 작성했다.
이 컨트롤러는 GetxController를 상속받는다.
- lib/page/main_page.dart
import 'package:flutter/material.dart';
import 'package:get/get.dart';
import 'package:new_app/controller/app_setting_controller.dart';
import 'package:new_app/page/infromation_page.dart';
import 'package:new_app/page/setting_page.dart';
class MainPage extends StatelessWidget {
const MainPage({super.key});
Widget build(BuildContext context) {
//컨트롤러 등록
Get.put(
AppSettingController(
isSoundOn: true,
isNotificationOn: true,
appVersion: '1.0.0',
appName: '29일차 앱',
appAuthor: 'Kim',
appPackageName: 'new_app',
lastUpdated: DateTime.now(),
),
);
return Scaffold(
appBar: AppBar(
title: const Text('29일차 과제'),
),
body: Column(
mainAxisAlignment: MainAxisAlignment.center,
crossAxisAlignment: CrossAxisAlignment.stretch,
children: [
TextButton(
//설정 페이지 호출
onPressed: () => Get.to(const SettingPage()),
child: const Text('Settings'),
),
TextButton(
//앱 정보 페이지 호출
onPressed: () => Get.to(const InformationPage()),
child: const Text('Informations'),
),
],
),
);
}
}MainPage에서는 Get.put을 사용해 만들었던 컨트롤러를 등록한다.
두 개의 TextButton을 생성해 각각 앱 설정 페이지와 앱 정보 페이지로 이동하도록 했다. 이 때 페이지 이동은 Get.to를 사용했다.
- lib/page/setting_page.dart
import 'package:flutter/material.dart';
import 'package:get/get.dart';
import 'package:new_app/controller/app_setting_controller.dart';
class SettingPage extends StatefulWidget {
const SettingPage({super.key});
State<SettingPage> createState() => _SettingPageState();
}
class _SettingPageState extends State<SettingPage> {
Widget build(BuildContext context) {
return Scaffold(
appBar: AppBar(
title: const Text('29일차 과제'),
),
body: Padding(
padding: const EdgeInsets.all(40.0),
child: Column(
crossAxisAlignment: CrossAxisAlignment.start,
children: [
const Text(
style: TextStyle(
fontSize: 24,
fontWeight: FontWeight.bold,
),
'Settings',
),
const SizedBox(height: 16),
Row(
children: [
//사운드 설정
const Text('Sound'),
Checkbox(
value: Get.find<AppSettingController>().isSoundOn,
onChanged: (value) {
Get.find<AppSettingController>().isSoundOn = value!;
setState(() {});
},
),
const SizedBox(width: 24),
//공지 설정
const Text('Notification'),
Checkbox(
value: Get.find<AppSettingController>().isNotificationOn,
onChanged: (value) {
Get.find<AppSettingController>().isNotificationOn = value!;
setState(() {});
},
),
],
),
],
),
),
);
}
}SettingPage는 앱의 사운드와 공지를 설정하는 페이지로 CheckBox위젯에서 Get.find로 컨트롤러의 값을 가져와 사용한다.
체크박스를 눌러 값을 변경한 후에는 컨트롤러의 해당 변수의 값을 바꾸고, setState로 화면을 다시 그려주었다.
- lib/page/information_page.dart
import 'package:flutter/material.dart';
import 'package:get/get.dart';
import 'package:new_app/controller/app_setting_controller.dart';
class InformationPage extends StatelessWidget {
const InformationPage({super.key});
Widget build(BuildContext context) {
//컨트롤러 가져오기
AppSettingController controller = Get.find<AppSettingController>();
return Scaffold(
appBar: AppBar(
title: const Text('29일차 과제'),
),
body: Padding(
padding: const EdgeInsets.all(40.0),
child: Column(
crossAxisAlignment: CrossAxisAlignment.start,
children: [
const Text(
style: TextStyle(
fontSize: 24,
fontWeight: FontWeight.bold,
),
'Informations',
),
const SizedBox(height: 16),
//앱 정보들 출력
Column(
crossAxisAlignment: CrossAxisAlignment.start,
children: [
Text('name: ${controller.appName}'),
Text('author: ${controller.appAuthor}'),
Text('version: ${controller.appVersion}'),
Text('pakage name: ${controller.appPackageName}'),
if (controller.lastUpdated != null)
Text('last updated: ${controller.lastUpdated.toString()}')
],
),
],
),
),
);
}
}InformationPage는 앱의 기본 정보를 보여주는 페이지로 Get.find로 컨트롤러를 가져오고, 저장된 값들을 Text 위젯으로 출력한다.
nullable인 lastUpdated는 null이 아닐 경우에만 출력한다.
결과
7주차 시작!
지난주에 한 주 동안 했던 데이터 Serialization을 끝내고 이번주는 상태관리 기법중 GetX를 학습한다. 예전에 대학교 3학년 때(그게 언제더라...2020년도 쯤?) 플러터 쓰면서 Provider를 간단하게 사용했었는데 그 때 당시에 Provider에서 어려움을 느꼈던 것 같다. ㅋㅋㅋㅋ GetX는 스나이퍼 팩토리를 시작하고 플러터를 공부하면서 구글링을 할 때 자주 보였던 용어인데 가장 궁금했던 내용이었다. 이번주부터 공부하게 되었는데 Provider를 썼을 때 보다 확실히 쉬운것 같다. (사실 Provider는 쓰긴 했는데 쓰는 법 같은건 기억 안나고 어려웠던 기억만 남 ㅠㅠ) 어쨌든 오늘은 간단하게 학습한 내용 위주로만 정리하고 과제를 진행했다.
📄Reference