
객체 배열
객체 기반의 배열은 다음의 형태로 선언한다(SoSimple이 클래스 이름이다).
SoSimple arr[10];이를 동적으로 할당하는 경우에는 다음의 형태로 선언한다.
SoSimple * ptrArr = new SoSimple[10];이러한 형태로 배열을 선언하면, 열 개의 SoSimple 객체가 모여서 배열을 구성하는 형태가 된다. 이렇듯 구조체 배열의 선언과 차이가 없다. 하지만 배열을 선언하는 경우에도 생성자는 호출이 된다. 단, 배열의 선언과정에서는 호출할 생성자를 별도로 명시하지 못한다(생성자에 인자를 전달하지 못한다). 즉, 위의 형태로 배열이 생성되려면 다음 형태의 생성자가 반드시 정의되어 있어야 한다.
SoSimple() { . . . . }그리고 배열선언 이후에 각각의 요소를 여러분이 원하는 값으로 초기화시키길 원한다면, 일일이 초기화의 과정을 별도로 거쳐야 한다. 그럼 이전 예제에서 정의한 Person 클래스 기반의 예제를 통해서 객체 배열을 조금 더 살펴보겠다.
ObjArr.cpp
#include <iostream>
#include <cstring>
using namespace std;

class Person
{
private:
	char * name;
	int age;
public:
	Person(char * myname, int myage)
	{
		int len=strlen(myname)+1;
		name=new char[len];
		strcpy(name, myname);
		age=myage;
	}
	Person()
	{
		name=NULL;
		age=0;
		cout<<"called Person()"<<endl;
	}
	void SetPersonInfo(char * myname, int myage)
	{
		name=myname;
		age=myage;
	}
	void ShowPersonInfo() const
	{
		cout<<"이름: "<<name<<", ";
		cout<<"나이: "<<age<<endl;
	}
	~Person()
	{
		delete []name;
		cout<<"called destructor!"<<endl;
	}
};

int main(void)
{
	Person parr[3];

	char namestr[100];
	char * strptr;
	int age;
	int len;

	for(int i=0; i<3; i++)
	{
		cout<<"이름: ";
		cin>>namestr;
		cout<<"나이: ";
		cin>>age;

		len=strlen(namestr)+1;
		strptr=new char[len];
		strcpy(strptr, namestr);
		parr[i].SetPersonInfo(strptr, age);
	}

	parr[0].ShowPersonInfo();
	parr[1].ShowPersonInfo();
	parr[2].ShowPersonInfo();
	return 0;
}
called Person()
called Person()
called Person()
이름: 한지수
나이: 21
이름: 양은정
나이: 21
이름: 이한영
나이: 34
이름: 한지수, 나이: 21
이름: 양은정, 나이: 21
이름: 이한영, 나이: 34
called destructor!
called destructor!
called destructor!위의 실행결과를 통해 객체 배열 생성시 void형 생성자가 호출됨을 확인할 수 있다. 그리고 배열 소멸시에도 그 배열을 구성하는 객체의 소멸자가 호출됨을 확인할 수 있다.
객체 포인터 배열
객체 포인터 배열은 객체의 주소 값 저장이 가능한 포인터 변수로 이뤄진 배열이다.
ObjPtrArr.cpp
#include <iostream>
#include <cstring>
using namespace std;

class Person
{
private:
	char * name;
	int age;
public:
	Person(char * myname, int myage)
	{
		int len=strlen(myname)+1;
		name=new char[len];
		strcpy(name, myname);
		age=myage;
	}
	Person()
	{
		name=NULL;
		age=0;
		cout<<"called Person()"<<endl;
	}
	void SetPersonInfo(char * myname, int myage)
	{
		name=myname;
		age=myage;
	}
	void ShowPersonInfo() const
	{
		cout<<"이름: "<<name<<", ";
		cout<<"나이: "<<age<<endl;
	}
	~Person()
	{
		delete []name;
		cout<<"called destructor!"<<endl;
	}
};

int main(void)
{
	Person * parr[3];

	char namestr[100];
	char * strptr;
	int age;
	int len;

	for(int i=0; i<3; i++)
	{
		cout<<"이름: ";
		cin>>namestr;
		cout<<"나이: ";
		cin>>age;

		parr[i]=new Person(namestr, age);
	}

	parr[0]->ShowPersonInfo();
	parr[1]->ShowPersonInfo();
	parr[2]->ShowPersonInfo();

	delete parr[0];
	delete parr[1];
	delete parr[2];
	return 0;
}
이름: 안수희
나이: 31
이름: 이한오
나이: 39
이름: 강인환
나이: 19
이름: 안수희, 나이: 31
이름: 이한오, 나이: 39
이름: 강인환, 나이: 19
called destructor!
called destructor!
called destructor!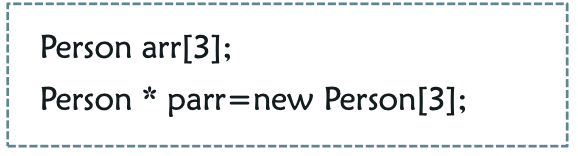
객체 배열! 객체로 이뤄진 배열, 따라서 배열 생성시 객체가 함께 생성된다.
이 경우 호출되는 생성자는 void 생성자이다.
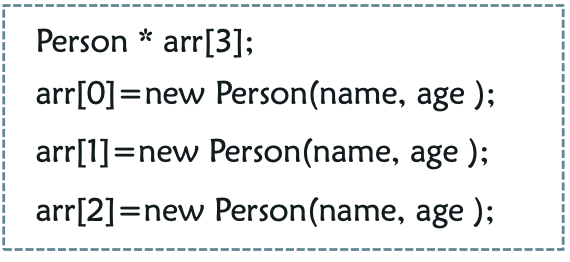
객체 포인터 배열! 객체를 저장할 수 있는 포 인터 변수로 이뤄진 배열! 따라서 별도의 객체 생성 과정을 거쳐야 한다.
객체 관련 배열을 선언할 때에는 객체 배열을 선언할지, 아니면 객체 포인터 배열 을 선언할지를 먼저 결정해야 한다.
this 포인터의 이해
멤버함수 내에서는 this라는 이름의 포인터를 사용할 수 있는데, 이는 객체 자신을 가리키는 용도로 사용되는 포인터이다.
그럼 간단한 예제를 통해 this 포인터에 대해 이해해보자.
PointerThis.cpp
#include <iostream>
#include <cstring>
using namespace std;

class SoSimple
{
	int num;
public:
	SoSimple(int n) : num(n)
	{
		cout<<"num="<<num<<", ";
		cout<<"address="<<this<<endl;
	}

	void ShowSimpleData()
	{
		cout<<num<<endl;
	}

	SoSimple * GetThisPointer()
	{
		return this;
	}
};

int main(void)
{
	SoSimple sim1(100);
	SoSimple * ptr1=sim1.GetThisPointer();
	cout<<ptr1<<", ";
	ptr1->ShowSimpleData();

	SoSimple sim2(200);
	SoSimple * ptr2=sim2.GetThisPointer();
	cout<<ptr2<<", ";
	ptr2->ShowSimpleData();
	return 0;
}
num=100, address=0x16cedb448
0x16cedb448, 100
num=200, address=0x16cedb43c
0x16cedb43c, 200this 포인터는 그 값이 결정되어 있지 않은 포인터이다. 왜냐하면 this 포인터는 this가 사용된 객체 자신의 주소값을 정보로 담고 있는 포인터이기 때문이다.
this 포인터의 활용
UsefulThisPtr.cpp
#include <iostream>
using namespace std;

class TwoNumber
{
private:
	int num1;
	int num2;
public:
	TwoNumber(int num1, int num2)
	{
		this->num1=num1;
		this->num2=num2;
	}

	/*
	TwoNumber(int num1, int num2)
		: num1(num1), num2(num2)
	{
		// empty
	}
	*/

	void ShowTwoNumber()
	{
		cout<<this->num1<<endl;
		cout<<this->num2<<endl;
	}
};

int main(void)
{
	TwoNumber two(2, 4);
	two.ShowTwoNumber();
	return 0;
}
2
4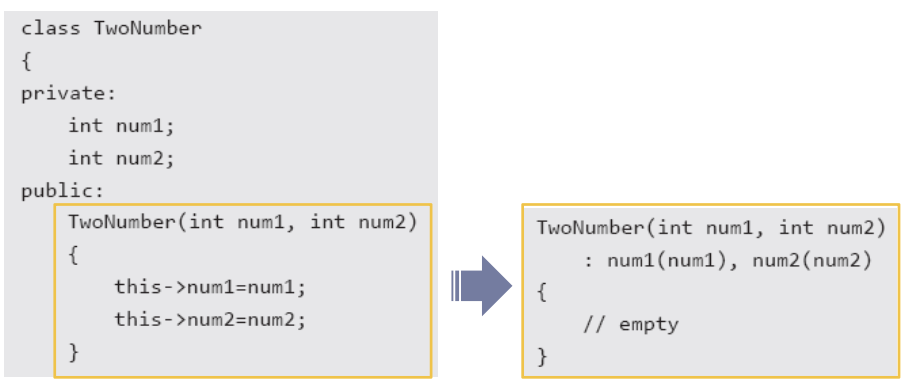
this->num1은 멤버변수 num1을 의미한다. 객체의 주소 값으로 접근할 수 있는 대상은 멤버변수이지 지역변수가 아니기 때문이다! 그럼 매개변수 num1을 통해 전달된 값이 멤버변수 num1에 저장된다.
멤버 이니셜라이저에서는 this포인터를 사용할 수 없다 대신에 저장하는 변수는 멤버변수로, 저장되는 값은(소괄호 안의 변수 및 상수는) 매개변수로 인식한다.
Self-reference의 반환
this 포인터를 이용해서, 객체가 자신의 참조에 사용할 수 있는 참조자의 반환문을 구성할 수 있다.
SelfRef.cpp
#include <iostream>
using namespace std;

class SelfRef
{
private:
	int num;
public:
	SelfRef(int n) : num(n)
	{
		cout<<"객체생성"<<endl;
	}
	SelfRef& Adder(int n)
	{
		num+=n;
		return *this;
	}
	SelfRef& ShowTwoNumber()
	{
		cout<<num<<endl;
		return *this;
	}
};

int main(void)
{
	SelfRef obj(3);
	SelfRef &ref=obj.Adder(2);

	obj.ShowTwoNumber();
	ref.ShowTwoNumber();

	ref.Adder(1).ShowTwoNumber().Adder(2).ShowTwoNumber();
	return 0;
}
객체생성
5
5
6
8아래의 부분을 보면,
SelfRef& Adder(int n)
	{
		num+=n;
		return *this;
	}
이는 객체 자신의 포인터가 아닌, 객체 자신을 반환하겠다는 의미가 된다. 반환형이 참조형 SelfRef&로 선언되었는데, 따라서 객체 자신을 참조할 수 있는 '참조의 정보(참조값)'가 반환된다.
ref.Adder(1).ShowTwoNumber()
.Adder(2).ShowTwoNumber();
먼저 객체 ref의 Adder 함수가 호출된다. 그런데 Adder 함수는 참조 값을 반환하므로, 반환된 참조 값을 이용해서 다시 ShowTwoNumber 함수를 호출하게 된다. 그리고 마찬가지로 반환되는 참조 값을 이용해서 다시 Adder 함수를 호출하고, 또 이어서 ShowTwoNumber 함수를 호출한다. 이는 두 함수 Adder와 ShowTwoNumber가 객체의 참조 값을 반환하기 때문에 구성이 가능한 문장이다.