
🎯 목적
- 다양한 환경에서의 안정적인 서비스 제공이 필수적
- 서비스 품질의 일관성 및 신뢰성 확보
- 이미 테스트된 프로그램의 테스트 반복
- 버그 수정 후 새롭게 만들어지는 잠재적 버그 신속 탐지
🚩 목표
- 기능적
- 주문, 송금, 인증, 실시간시세, 거래내역 확인 등의 핵심 기능 테스트
- 성능적
- 응답 속도 및 부하 테스트
- 다양한 기기, 환경에서의 성능 검증
🤖 Appium?

- 네이티브, 하이브리드 및 웹 앱 자동화 테스트 오픈 소스 도구
- 모바일 기기 및 에뮬레이터 테스트 지원
- 터치 제스처, 화면 회전, 하드웨어 버튼 제어 등 다양한 모바일 테스트 기능을 제공, 모바일 디바이스의 센서(위치, 카메라 등)를 제어하여 테스트 수행
- 서버-클라이언트 구조
- 클라이언트측 테스트 스크립트로 Java, Python, Ruby, JavaScript 등 다양한 프로그래밍 언어 지원
- Node.js 사용한 HTTP 서버
- Appium 서버는 각 플랫폼에 특화된 드라이버를 사용
- UI 테스트 자동화 분야에서 오랫동안 선구자였던 기술인 Selenium W3C 표준 WebDriver 프로토콜을 사용
- JSON Wire 프로토콜은 Selenium 3.8 버전 이전에 사용되었음. Selenium 4에서는 완전히 제거되고, W3C 표준 프로토콜 사용
- appium/webdriver.py 소스 일부
from selenium import webdriver from selenium.common.exceptions import ( InvalidArgumentException, SessionNotCreatedException, UnknownMethodException, WebDriverException, ) from selenium.webdriver.common.by import By from selenium.webdriver.remote.command import Command as RemoteCommand from selenium.webdriver.remote.remote_connection import RemoteConnection from appium.common.logger import logger from appium.options.common.base import AppiumOptions from appium.webdriver.common.appiumby import AppiumBy - 모바일 화면에 보이는 위젯 하나하나가 WebElement. appium/webdriver.py 소스 일부
def find_element(self, by: str = AppiumBy.ID, value: Union[str, Dict, None] = None) -> MobileWebElement:from .webelement import WebElement as MobileWebElement - Appium의 초기 목표는 모바일 앱(iOS 및 Android)에 대한 자동화 표준을 개발하는 것이었음. 새로운 것을 만들 수도 있었지만 표준을 유지한다는 정신으로 Selenium WebDriver를 Appium의 API로 채택
- 웹과 모바일 앱에서의 유저 상호 작용이 완전히 동일하지는 않지만, 사실 대부분의 소프트웨어 UI는 거의 동일. 이는 WebDriver 사양이 어느 플랫폼에나 어느 정도 매핑되는 자동화 API 기본 엘리먼트(엘리먼트 찾기, 엘리먼트와의 상호 작용, 페이지 로드 등)를 제공한다는 것을 의미
- appium/webdriver.py 소스 일부
- 동작 순서
- 클라이언트는 Appium 서버에 연결하고, 테스트를 시작
- 서버는 앱을 초기화하고 디바이스나 에뮬레이터를 설정
- 클라이언트는 앱의 UI 엘리먼트를 식별, 액션을 수행하도록 Appium 서버에 요청
- Appium 서버는 해당 플랫폼의 드라이버를 통해 앱을 제어하고, 결과를 클라이언트에게 반환
- 테스트가 완료되면, 클라이언트는 Appium 서버와의 연결을 종료
💻 테스트
기본 동작 살펴보기
-
Web
-
네이버 경제 뉴스 탭 눌러보고, 애플 검색도 해보자 (test_selenium.py)
-
터미널로 크롬 개발자 도구 켜서 차근차근 해보자
from selenium import webdriver
from selenium.webdriver.common.by import By
import time
from selenium.webdriver.common.keys import Keys

driver = webdriver.Chrome()

# 네이버 열기
driver.get("https://www.naver.com/")

time.sleep(3)

# "경제" 찾아보기
el = driver.find_element(By.LINK_TEXT, "경제")

# "경제" 속성 살펴보기
el.get_attribute("class")

# "경제" 클릭
el.click()

time.sleep(3)

# 애플 검색하기
el = driver.find_element(By.CLASS_NAME, "search_input")
el.send_keys("AAPL")
el.send_keys(Keys.ENTER)

time.sleep(3)
-
-
App
-
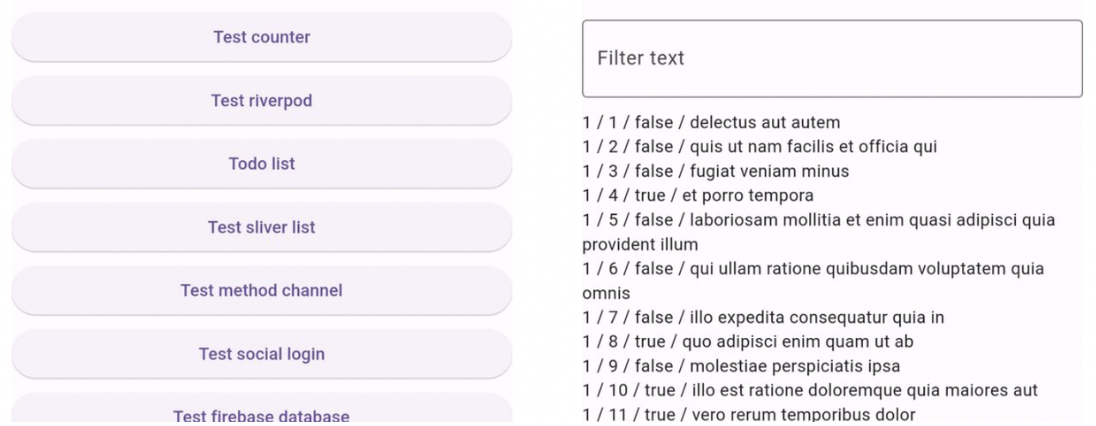
“TestFlutter” 앱에서 Todo list 터치 후 스크롤해보자 (test_appium.py)
from appium import webdriver
from appium.webdriver.common.appiumby import AppiumBy
import time
from appium.options.android import UiAutomator2Options

# 테스트 앱 열기
capabilities = UiAutomator2Options().load_capabilities({
 "platformName": "Android",
 "appium:deviceName": "aos_galaxy_note_10_plus",
 "appium:udid": "R3CMA0F73PL",
 "appium:automationName": "UiAutomator2",
 "appium:appPackage": "com.example.test_flutter",
 "appium:appActivity": ".MainActivity",
 "appium:autoGrantPermissions": "true",
 "appium:noReset": "true",
 "appium:newCommandTimeout": "3000"
})
driver = webdriver.Remote(command_executor="http://localhost:4723", options=capabilities)

time.sleep(3)

# "Todo list" 클릭
el = driver.find_element(by=AppiumBy.ACCESSIBILITY_ID, value="Todo list")
el.click()

time.sleep(2)

# 스크롤
driver.swipe(700, 800, 0, 0, 1000)
driver.swipe(200, 500, 900, 1800, 1000)

time.sleep(3)
-
녹화 테스트
-
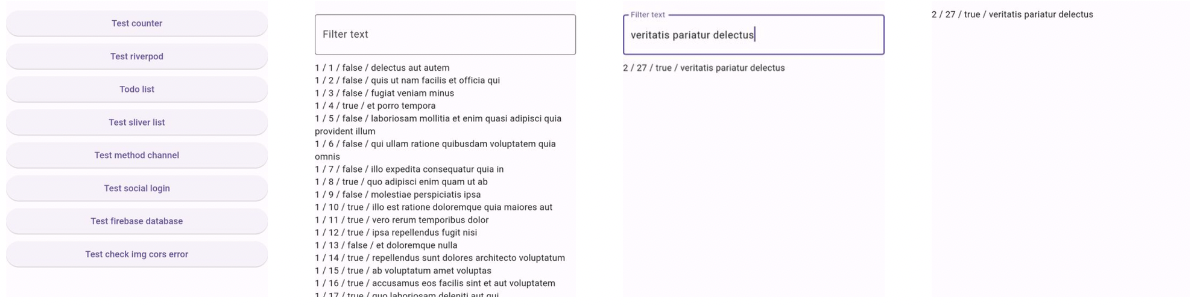
테스트 전에 “TestFlutter” 앱 테스트 스크립트 잠깐 살펴보자 (test_todo_list_for_pt.py)
-
Appium inspector 사용해서 “TestFlutter” 앱 테스트 녹화해보자 (test_todo_list_for_pt.py)
- 녹화된 코드 바로 사용하기 애매함
- 변수명 안예쁨
- find_element 사용해서 엘리먼트 찾을 때 화면에 없으면 오류남 → 기다리는 것 필요
- 미리 작성해둔 패턴 이용해서 AI한테 변경해달라고 시키자 (ai.py)
- 녹화된 코드 바로 사용하기 애매함
POM(Page Object Model) 적용
-
POM?
- 페이지 단위로 모듈화
- 각 페이지 객체는 해당 페이지의 엘리먼트 및 기능들을 캡슐화
- 테스트 코드가 더 읽기 쉽고, 유지 보수 용이
-
POM 적용해보자 (test_todo_list_for_pt.py)
class TodoListTest(BaseTest):

    def test_todo_list(self) -> None:
        main_page = MainPage(self.driver)
        main_page.click_todo_list()

        todo_list_page = TodoListPage(self.driver)
        time.sleep(2)
        todo_list_page.scroll_down()
        todo_list_page.scroll_up()
        todo_list_page.send_keys_filter_text()
        todo_list_page.check_todo_item()
        todo_list_page.click_todo_item()

        time.sleep(0.5)
테스트 코드 추가 개선
-
반복되는 코드 줄이기
-
init, setUp, tearDown → BaseTest
class BaseTest(unittest.TestCase):
    def __init__(self, methodName='runTest', device=None):
        print(f"__init__")
        super().__init__(methodName)
        self.device = device

    def setUp(self) -> None:
        # 디바이스 셋팅
        if self.device:
            config.device = self.device

        # 드라이버 셋팅
        appium_server_url = f"{config.appium_server_host}:{util.get_port()}"
        capabilities_options = util.get_capabilities_options()
        print(f"setUp / device : {config.device} / appium_server_url : {appium_server_url}")
        self.driver = webdriver.Remote(command_executor=appium_server_url, options=capabilities_options)

    def tearDown(self) -> None:
        print("tearDown")
        if self.driver:
            print("tearDown / quit")
            # noReset true 하면 테스트 끝나도 앱 종료안되서 강제 종료
            self.driver.terminate_app(util.get_app_package())
            self.driver.quit()
class Temp01Test(BaseTest): def test_temp_01(self) -> None: time.sleep(0.5) def test_error(self): raise ValueError("에러 테스트 :)") @unittest.skip("스킵 테스트 :)") def test_skip(self): pass def test_fail(self): self.assertEqual(1, 2)class TodoListTest(BaseTest): def test_todo_list(self) -> None: main_page = MainPage(self.driver) main_page.click_todo_list() todo_list_page = TodoListPage(self.driver) time.sleep(2) todo_list_page.scroll_down() todo_list_page.scroll_up() todo_list_page.send_keys_filter_text() todo_list_page.check_todo_item() todo_list_page.click_todo_item() time.sleep(0.5) -
테스트 코드 최초 실행되는 로직 (if name == 'main' 부분)
# 스크립트 파라미터 파싱
def get_args(argv) -> argparse.Namespace:
    # help
    parser = argparse.ArgumentParser(description="Test Appium", add_help=True) # python3 test.py -h

    # 파싱
    devices = " / ".join(config.capabilities.keys())
    parser.add_argument("--device", "-d", dest="device", help=f"Available devices >>>>>>> {devices}")

    # 1번째는 스크립트 이름. 실제 파라미터는 2번째부터
    args = parser.parse_args(argv[1:])
    return args

# 테스트 슈트 로드
def load_tests(args: argparse.Namespace, test_class) -> unittest.TestSuite:

    # 파라미터 전달
    suite = unittest.TestLoader().loadTestsFromTestCase(test_class)
    for test_case in suite:
        test_case.device = args.device

    return suite
args = util.get_args(sys.argv) suite = util.load_tests(args, TodoListTest) suite2 = util.load_tests(args, Temp01Test) suites = unittest.TestSuite([suite, suite2])
-
Report 생성
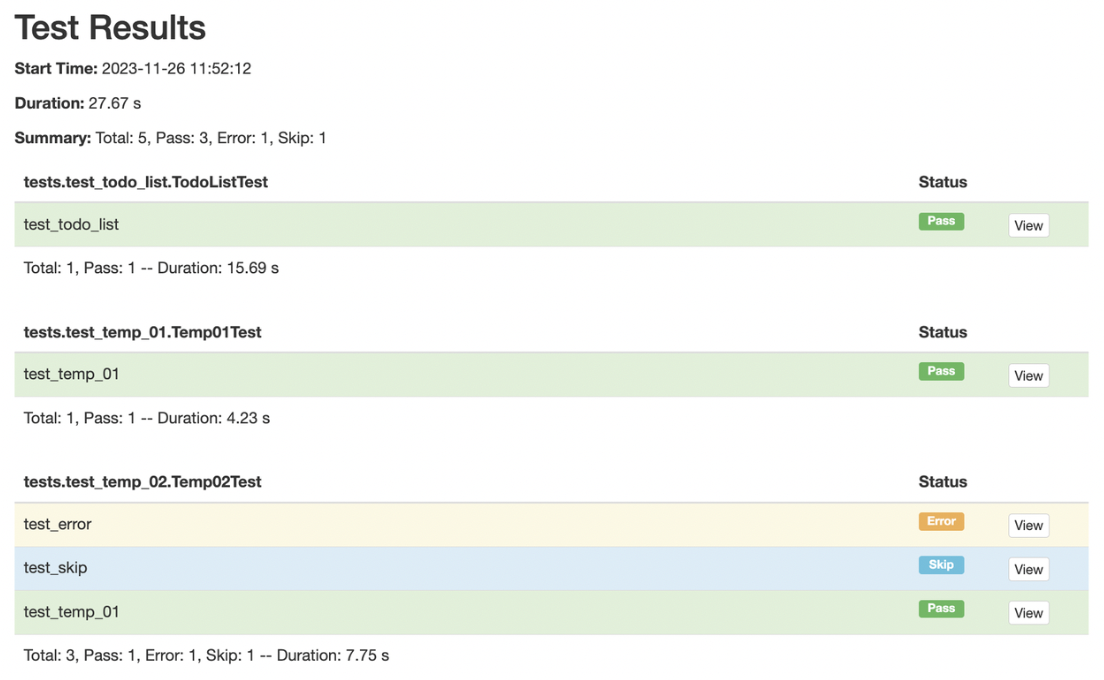
- HTMLTestRunner 사용해보자
- 설치
pip3 install html-testRunner - 실행
# 테스트 실행 및 report 생성 HtmlTestRunner.HTMLTestRunner( output = "reports", # report 넣을 폴더명 report_name = f"report_{args.device}", # report html 파일명 report_title = "Test Results", # report 제목 combine_reports = True # report 합치기 ).run(suites) - 결과

- 설치
병렬 테스트
- 직접 보자
- AOS = MyData (repeat_test_aos.sh)
-
capabilities MyData 셋팅 필요
// SmartM MyData
"appium:appPackage": "kr.co.koreastock.mts.android",
"appium:appActivity": ".mydata.MyDataActivity",

// SmartM Intro
"appium:appPackage": "kr.co.koreastock.mts.android",
"appium:appActivity": ".AppIntro",

// STEPS Intro
"appium:appPackage": "plus.steps.sapp.dev",
"appium:appActivity": "plus.steps.sapp.intro.IntroActivity",

// STEPS Apk
"appium:app": "/Users/kwon0koang/Downloads/steps.apk",
-
- iOS = TestFlutter (repeat_test_ios.sh)
- AOS = MyData (repeat_test_aos.sh)
- 관련 옵션
- appium:systemPort
- UiAutomator2 ↔ Android
- Default : 8200 (8200~8299)
- appium:wdaLocalPort
- XCUITest ↔ iOS
- Default : 8100 (8100~8199)
- appium:chromedriverPort
- Chromium ↔ Chrome
- Default : 9515
- appium:systemPort
- 미러링
- AOS : LetsView 혹은 scrcpy -s R3CMA0F73PL
- iOS : QuickTime Player
❤️🔥 더 시도해 볼 만한 것
-
Jenkins 연동
-
ELK 연동
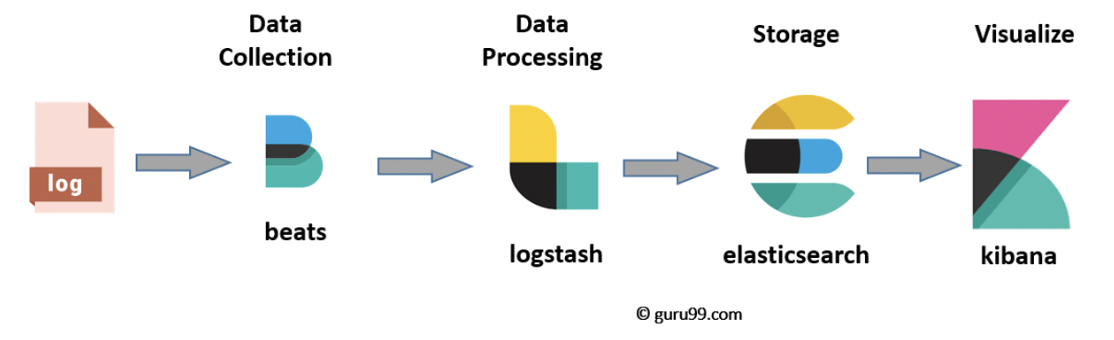
- Filebeat : 데이터를 Logstash로 전송. Logstash 경량화 버전
- Logstash : 데이터 수집 & 필터링 후 저장소에 전송
- 저장소 : File, ElasticSearch, Redis, RDB, Kafka 등
- ElasticSearch : 검색 엔진. 데이터 저장소 역할
- Kibana : 데이터 시각화
- 추가
- Kafka : 로그가 손실되는 일이 없도록 하는 이벤트 브로커
-
Telegram 혹은 Slack 연동
❗️ 결론 및 생각
- 개발서버에서 주요 기능(매매, 송금 등) 회귀 테스트 가능할 듯
- 이행 전후 테스트는 운영서버에서 테스트해야 하기 때문에 테스트폰에 개인 계정으로 로그인하지 않는 이상 테스트 어려움
- 운영서버 테스트 계정은 법적으로 안됨
- 갑자기 뜨는 팝업들(실시간 공지, 종목 업데이트 등) 같은 경우는 테스트에 아주 큰 방해 요소. 갑자기 뜨면 테스트 실패
- 때에 따라 달라지는 상황(매매 불가능 시간에 매매, 동일 금액 송금 등)은 어떻게 할 것인지 고민 필요
🖋 Note & Trouble shooting
- AOS
- Manifest에 테스트 시작 액티비티 exported true 필요
- 스크린 캡쳐 막아놓은 경우 inspector에서도 캡쳐안됨
- 액티비티 캡쳐 방지 소스
- `window.setFlags(WindowManager.LayoutParams.FLAG_SECURE, WindowManager.LayoutParams.FLAG_SECURE)`
- 액티비티 캡쳐 방지 소스
- 앱 패키지 확인
adb shell dumpsys window windows | grep "popupcalculator”
- Failed to create session. An unknown server-side error occurred while processing the command. Original error: Could not proxy command to the remote server. Original error: socket hang up
adb uninstall io.appium.uiautomator2.server.test
터미널 입력한 다음에 재실행하면 정상 동작함
- iOS
- 플러터 앱 빌드해서 넣었는데 앱이 계속 꺼지는 현상
- 플러터 앱 release로 빌드해야 함
- WebDriverAgent.xcodeproj 파일 Xcode로 열어서 Product>Test 실행해서 WDA 켜진 다음에 테스트 진행해야 하더라. WebDriverAgent는 Github에서 가져옴
- Could not launch “WebDriverAgentRunner”
- Store 배포 버전이 아니기 때문에 발생. 테스트 기기에서 신뢰할 수 있는 인증서 등록 필요
- It appears that there was a problem signing your application prior to installation on the device.
Verify that the Bundle Identifier in your project is your signing id in Xcode
open ios/Runner.xcworkspace
Also try selecting 'Product > Build' to fix the problem.
- 플러터 앱 빌드해서 넣었는데 앱이 계속 꺼지는 현상
- Server
- Appium & 드라이버 설치
npm install -g appiumappium driver install uiautomator2
- npm install permission error
sudo chown -R $(whoami) $(npm config get prefix)/{lib/node_modules,bin,share}
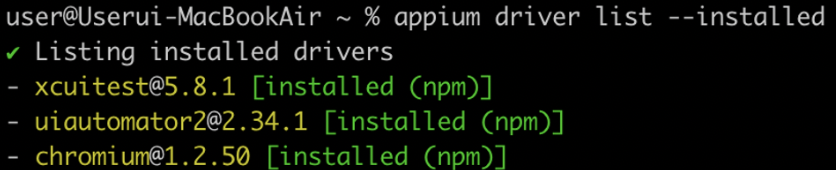
- 설치된 드라이버 확인
appium driver list --installed
- 주요 옵션
--log-timestamp: Show timestamps in console output--log: Also send log output to this file
- selenium.common.exceptions.WebDriverException: Message: The requested resource could not be found, or a request was received using an HTTP method that is not supported by the mapped resource
- 서버 기본 경로 설정
appium --base-path /wd/hub --port 4723
- 서버 기본 경로 설정
- Appium & 드라이버 설치
- Client
- Python Selenium Client 설치
pip3 install selenium
- Python Appium Client 설치
pip3 install appium-python-client
- UiAutomator2 매우 느린 현상. DOM이 유휴 상태가 되기를 기다리는 것 때문에 느림
self.driver.update_settings({"waitForIdleTimeout": 0})
- AttributeError: 'HtmlTestResult' object has no attribute '_count_relevant_tb_levels'
- 최신 버전에서는 "_count_related_tb_levels"를 사용할 수 없으므로 HtmlTestRunner 패키지의 runner.py 일부 수정 필요.
# 수정 전
if exctype is test.failureException:
    # Skip assert*() traceback levels
    length = self._count_relevant_tb_levels(tb)
    msg_lines = traceback.format_exception(exctype, value, tb, length)
else:
    msg_lines = traceback.format_exception(exctype, value, tb)

# 수정 후
msg_lines = traceback.format_exception(exctype, value, tb)
- 최신 버전에서는 "_count_related_tb_levels"를 사용할 수 없으므로 HtmlTestRunner 패키지의 runner.py 일부 수정 필요.
- Python Selenium Client 설치
📚 참조
Appium Documentation - Appium Documentation
Chapter 4.8 - Run First Test on iOS Real Device
Parallel execution in Appium 1.7
Docker 기반의 Elasticsearch 설치 및 실행
ELK Stack Tutorial: What is Kibana, Logstash & Elasticsearch?
[ELK] ELK(Elasticsearch, Logstash, Kibana)에 대한 간단한 소개 및 구성 예시

서비스 핵심 가치를 이해하고, 지속적인 개선을 이끄는 엔지니어(를 지향함)